Working with Billing
The Billing section is designed to assist in the setup and daily activities of staff/employees who use the Integrated Billing solution. Note: This this section is not intended for those using the legacy CQI integration.
Before getting started with Integrated Billing please review Things you will need to verify with your Accountant , a list of commonly asked questions that your accountant should answer.
Contents
- 1 Initial Billing Setup
- 2 Billing - Day to Day Activities
- 2.1 Create a Single One-Time Invoice
- 2.2 Process Payments
- 2.3 Processing Sales Receipts
- 2.4 Process Credits
- 2.5 Process Deposits
- 2.6 Process a Write-off
- 2.7 Process a Refund
- 2.8 Process Discounts
- 2.9 Statements and Reports
- 2.10 Print Collection Letters, Thank you’s, and Notifications
- 2.11 Group Billing
- 2.12 Event Billing
- 3 Processing Recurring Member Invoices
- 4 Credit Card Processing
- 5 Billing Reports
- 6 Export Journal Entries
- 7 Billing FAQ's
- 8 Accounting Basics Tutorials
- 9 QuickBooks Troubleshooting
Initial Billing Setup
Initial Billing Setup 
![]() View this video to learn how to setup your Chart of Accounts, Fee items, and Sales Tax. Setup custom customer messages, payment terms, payment methods, and set system-wide defaults. (NOTE: this training is not intended for those using the legacy CQI integration) Length: ~15 minutes.
View this video to learn how to setup your Chart of Accounts, Fee items, and Sales Tax. Setup custom customer messages, payment terms, payment methods, and set system-wide defaults. (NOTE: this training is not intended for those using the legacy CQI integration) Length: ~15 minutes.
Imported Data: If you are new to this application's Billing module, information may have been imported from your previous billing solution. If so, you may want to check your beginning balances, chart of accounts and other pertinent information for each member to ensure that your data is correct.
No Imported Data: If no billing information has been imported, each member will have a starting balance of $0 and will begin when you create your first transaction. Your first step should be to create the chart of accounts.
All Users: Setup Membership Fees, Payment Terms, Payment Methods, Customer Messages, and Sales Tax options.
Billing Options & Settings
The Billing Options & Settings allow you to establish defaults for such things as number of days ahead of renewal month you wish the task list to notify you that invoices need to be created, default invoice & statement templates you wish to use, credit card processing/manual e-payment settings, etc.
- Click Setup in the navigation panel.
- Click Billing Options & Settings in the Billing Section
- Billing Solution: Configure the following as applicable:
- Default member record where non-member invoices/receipts will be assigned for purchases: Select the member record to which invoices for non-members will be attached.
- # of months to look ahead for task list invoice count: Enter the number of months in advance that you prepare your membership renewal invoices. This setting will then trigger the task list to display the invoices pending for that period.
- Sales Tax Rate: Select the default sales tax rate to be used.
- Payment Deposit Account: Select the default deposit account to be used when receiving payments or processing sales receipts.
- Bank Deposit Account: Select the default deposit account to be used when depositing funds.
- Quick Books On-line: If you are using QuickBooks on-line, click on the QuickBooks Online Connection button. Enter your QuickBooks online login information and say yes to the connections.
- Appearance: Configure the following as applicable:
- A/R Account: Select the A/R account to be used by default. NOTE: If you are using multiple A/R Accounts be sure to select the A/R Account

that is used for event invoicing. This way, any auto-generated invoices will report to the proper A/R Account. You may edit (or add new accounts) by clicking the Edit Account button.
- Payment Terms: Select the payment terms that you wish to use by default. You will be able to over-ride these terms as needed when creating an invoice, best practice is to select the terms that you use the most frequently. You can add or edit terms by clicking the Edit Payment Terms button.
- Customer Message: Select or create a customer message that will be included on your invoices by default. When you are creating invoices, you will be able to select the message you wish to apply from a drop-down list.
- Delivery Method: Select your preferred delivery method for invoices. You will have the ability to over-ride this option when delivering invoices. Best practice is to select the method that you use the majority of the time.
- Display the Invoice Discount Memo as the line item description for Invoice Discounts on member Bill Pay screens and invoices/statements: If this setting is enabled, the Memo field (your custom message) will be displayed to members when they view a Discount line item on their invoices, statements, on their Bill Pay screen or in their Transaction History. When this setting is off, Discount line items will display the word "Discount" in member-facing locations. NOTE: The Memo field is available when creating/editing an Invoice Discount. For instance, when editing an Invoice that has a remaining balance, click Add a Discount. The next window has a Memo field where you can make comments or notes about the purpose and reason for a discount.
- Default Template: Select the template you want the system to use by default. You will have the ability to override the template when creating invoices as needed. Best practice is to select the template that you use most frequently.
- Email Cover Letter: Create or edit the email cover letter that you wish to use, by default, in delivering your invoices (email). You will have the ability to override the cover letter when delivering invoices. Best Practice is to select the cover letter that you use the most frequently.
- Credit Cards: Configure the following as applicable (NOTE: GrowthZone will assist you with setup of the credit card processing parameters):
- Allow members and reps to make payments with a Credit Card through their Member Login account: Select this option to allow your reps to make payments on open invoices or make additional payments from their MIC.
- Add link to bottom of email to pay bills online" selected by default when emailing invoices: Select this option to make it easy for your members to access their bills and pay on-line.
- Send an automatic notification email to the Chamber: Enter the name of the staff person that should receive an email message when a credit card payment is made on line. At this time only one email address can be selected.
- Select the credit cards that you will accept: Visa, MasterCard, American Express, Discover.
- Add Credit Card Billing Address as required field: Enable this check-box if you require billing address for credit card transactions.
- Add Credit Card Security Code as required field: Enable this check-box to require the credit card security code.
- Automatically create a paid invoice for credit card payments: Select this option if you want an invoice created for each credit card transaction. If selected, you will have both an invoice and a payment record for the sale.
- Automatically create a receipt for credit card payments: Select this options if you want only a receipt to be created for each credit card transaction.
- Display Terms and Conditions agreement in checkout cart: If selected, your terms & agreements will appear in all locations where the new checkout cart is in place which includes member payments from the Member Information Center, purchases of jobs and deals and the updated beta event registration.
- Merchant or Store Name [Optional]: If you choose to enter this information, it will be used to generate an additional message on Credit Card Purchase Receipts that will read: Important: This charge will appear as [Your Merchant or Store Name] on your Credit Card statement.
Working with Invoice Templates
To edit an existing invoice template, the Template Manager must be available in your database. If the Template Manager has been enabled in your database, you will see the selection Template Manager under the Setup module. If the Template Manager is not enabled in your database, contact customer support to receive instruction about enabling this feature.
View/Edit Default Templates
- Select Setup in the Navigation Panel.
- Click Template Manager in the Billing section.
- Select the template you wish to view/edit, from the Loaded Template drop-down list.
- To edit the template:
- Type any desired static text in the desired location in the Page Layout area of your template. All the standard word processing functions are available, such as bold, italics, and so on.
- Insert database fields clicking Add Database Field. Open the Billing Template Fields, scroll to and click the desired field.
- Type a new name for this edited template in the Template Name field
- Click Save As (so not to modify the original in case you need to return to the old template).

| Note: The database field titled [invoice_compact_lineitems] generates a unique output when used and is not commonly included on templates except in rare occasions. This database field will take all individual line items billed to the customer and compact them into a single item on the invoice that is displayed to the customer. The line item total will include the total of all individual line items. The line item description for the first item on the invoice is the only item that will display to the customer. In your software, you will still see all individual line items but the customer is kept from getting bogged down with all the items that make up that single item that you’d like to bill them. |
Setting your Default Invoice Template
- Click Setup in the left-hand menu.
- Click Billing Options and Settings.
- Open the Appearance area.
- Select the desired template from the Invoice Default Template drop-down list.

Note: There is also a default Statement template that may be selected here.
Setup/Modify Chart of Accounts
The Chart of Accounts ensures that your financial data is aligned to any existing accounting records and processes. On installation of the software, a sample chart of accounts is provided as a starting point. Edit and add to this list to ensure your database chart of accounts matches your current structure.
- Click Setup in the left-hand menu.
- Click Chart of Accounts in the "Billing" area. The current Chart of Accounts will display.

Create a new Account
- Click Setup in the left-hand menu.
- Click Chart of Accounts in the "Billing" area. The current Chart of Accounts will display.
- Click Add Account.
- Enter the Account Name. Note: Chart of Accounts names created by users who intend to export transactions to PeachTree should name their accounts here with the Peachtree Account ID (numeric value) instead of the Account name. For QuickBooks users that have the option enabled to use account numbers, EITHER the account number or the account name may be used. If using the account name, sub-accounts must be added with all heading accounts included (ex. Renewal Dues is set up as a sub-account of Membership Dues - account name would be entered as Membership Dues:Renewal Dues - a colon needs to separate the two account names)
- Select the Account Type from the drop-down list. The account type should be the account type defined by your accounting software.
- (Optional) Select an Account Code from the drop-down list. Account Codes are used when deferring income. If necessary, click the add/edit button to add or edit your account codes.
- Select the Account Status from the drop-down list. Only Active accounts will be available for selection when setting up fee items.
- (Optional) Enter a description of the account. This is informational only.
- Click Save.

De-activate an account from the Chart of Accounts
- Click Setup in the left-hand menu.
- Click Chart of Accounts in the "Billing" area. The current Chart of Accounts will display.
- Click the title of the Account you wish to remove in the Account Name column.
- Select Inactive from the Account Status drop-down list.
- NOTE: Best practice is to inactivate accounts as opposed to deleting.
- Click Save.
Modify an account in the Chart of Accounts
- Click Setup in the left-hand menu.
- Click Chart of Accounts in the "Billing" area. The current Chart of Accounts will display.
- Click the title of the Account you wish to modify in the Account Name column.
- Make desired modifications.
- Click Save.
Selecting Undeposited Payments Account
You may designate an account from your chart of accounts to hold undeposited payments and sales receipts. You may also choose the default placeholder account Undeposited Funds instead of choosing a specific account. QuickBooks users should leave this set to Undeposited Funds.
- Click Setup in the left-hand menu.
- Click Chart of Accounts in the "Billing" area.
- Select the appropriate Undeposited Payment Account.

Setting Up Transaction Classes
Transaction classes give you a way to classify your transactions. You can use classes to classify your income and expenses by department, location, event, or any other meaningful breakdown of the business you do. For example, if you charge for multiple events, you might create a Business Expo, an Annual Dinner, and a Golf Classic class for tracking income and expenses by event. At the end of an accounting period, you could view separate information for each event in the appropriate report download.
Administrators create desired transaction classes by selecting Setup > Transaction Classes. The classes you create are available to assign to your transaction when creating invoices, sales receipts, credits, write-offs and invoice discounts.
Select Integrated Billing reports will include break-out by transaction class in the .CSV download file including
Receivable reports (Accounts Receivable Aging Detail, Open Invoices, Collections Report) Sales report (Sales By Item detail), and Transaction reports (Member Transaction Summary, Invoice Summary, Sales Receipt Summary, Credit Memo Summary, Write-off Summary) These classes are also compatible with QuickBooks classes if choosing to export Integrated Billing and then import into QuickBooks.
Working with Fee Items
Adding a Regular Fee Item
- Click Setup in the left-hand menu.
- Click Fee Items List in the Billing section. The current list of Fee Items display under the List Options filter.
- Click Add Fee Item.
- Select the Regular Fee radio button.
- Configure the following:
- Fee Item Name: Title for the fee item; will be used by default to identify the fee item on a member’s account
- Description: Further description of the fee item that displays on the invoice by default (may be modified on each member account)
- Account: Select the desired account from your list of Chart of Accounts.
- Sales Tax: Select whether this item should be taxed or not; if proper tax amounts are not displayed, modify this item by selecting Sales Tax from the Setup module.
- Price: Type the desired fee item amount – the annual amount or one-time price.
- Member Fees and Dues
- Event Fees – available in the Events module (not available when creating a Bundled Fee)
- Group Fees – available in the Groups module for billing an entire group a single price all at once.
- eCommerce Fees - used with the eCommerce add-on module
- Pledges Fees - alternate fee item type to separate pledges. Works similar to non-dues fees
- Non-Dues Fees - used for tracking other fees that don't fit into a type above.
- Status: Select Active or Inactive (only Active items may be billed). Fee Items, when set to inactive, will present options to either remove the fee from the member or remain on the member account. Inactive fees on a member account will not be billed.
- Frequency: Select desired default frequency (available only if Member Fees and Dues item type is selected). Annual, Semi-annual, Quarterly, Monthly, One-Time. This selection may be changed on each members’ account as desired.
- Collection Basis: Select Cash or Accrual (Not available when creating a Bundled Fee.)
- Voluntary: If desired, click “Treat this fee as voluntary”. (Not available when creating a Bundled Fee.) Note: Unpaid voluntary fees do not count against a member's account balance and are not automatically included on billing statements.
- Batch Group: If you would like to batch this fee item separately from other batches when creating invoices, select a group from the drop-down list. If needed, click Add group from the drop-down list to add a new group.
- Click Save.


Adding a Bundled Fee Item
Bundled Fees are typically used for those offering a tiered dues membership. Bundled fees allow the ability to include a single line item on an invoice but report to multiple income accounts for internal bookkeeping. NOTE: Before creating bundled fees, you must first create Regular Fee Items.
Click Here to view a video on creating Bundled Fees
- Click Setup in the left-hand menu.
- Click Fee Items List in the Billing area. The current list of Fee Items display under the List Options filter.
- Click Add Fee Item.
- Select the Bundled Fee radio button.
- Configure the following:
- Fee Item Name: Title for the fee item; will be used by default to identify the fee item in a member's transaction history.
- Description: Further description of the fee item that displays on the invoice by default (may be modified on each member account)
- Item Type: The item type dictates where the fee item is used in the software.
- Member Fees and Dues
- Group Fees – available in the Groups module for billing an entire group a single price all at once.
- Pledges Fees - alternate fee item type to separate pledges. Works similar to non-dues fees
- Non-Dues Fees - used for tracking other fees that don't fit into a type above.
- Status: Select Active or Inactive (only Active items may be billed). Fee Items, when set to inactive, will present options to either remove the fee from the member or remain on the member account. Inactive fees on a member account will not be billed.
- Frequency: Select desired default frequency (available only if Member Fees and Dues item type is selected). Annual, Semi-annual, Quarterly, Monthly, One-Time. This selection may be changed on each members’ account as desired.
- Add Fee Items to your bundle (NOTE: The Account, Sales Tax assignment, and Collection Basis designation originally selected for each item is used when this Bundled Fee is invoiced.):
- Select an Item from the drop-down list.
- (Optional) Select Class from drop-down list.
- Edit Price if needed. NOTE As items are added, the Price of the bundle is totaled.
- Click the Add Item button to continue adding items to the bundle as needed.
- Click Save & Exit.

Update existing fee items associated with a record
Use the following procedure if you wish to update a fee item that is currently associated to a record in your database. For Example: If you wish to update membership pricing, you may do this from the Fee Items screens, and updates will be applied to all future billing of the item.
- Click Setup.
- Click Fee Item List in the Billing section.
- To the right of the fee item name click Edit Pricing.
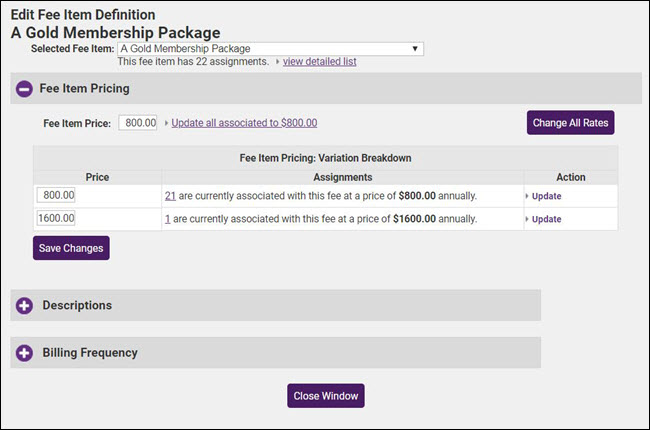
- The view detailed list link will allow you to generate a list of the members associated to this fee item. This list can be used to change the price of a fee item for individual members.
- Fee Item Pricing: In this section you will have several different ways to update pricing.
- Update all members to a specific price: Enter a new price in the Fee Item Pricing box and click the Update all associated to link. You will be presented with a dialog box informing you of the number of associations that will be affected. Click OK to proceed or Cancel if you do not wish to update all.
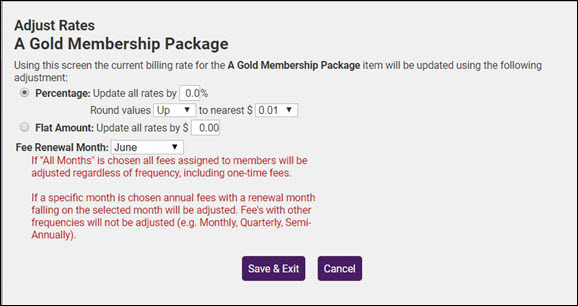
- Change rates by a percentage or flat rate: Click the Change All Rates button to increase all of the members tied to this fee item by a percentage or a flat rate.
- NOTE: Click the Save Changes button after making any changes in the Fee Item Pricing area.
- In the Fee Item Pricing: Variation Breakdown section a list of variations in the price of this fee item is displayed. You may change the price for one, more or all then click Update to update the pricing.
- Description: In this section you may update the description of this fee item. NOTE: Click the Save Changes button after making any changes in the Description area.
- Billing Frequency: This area allows you to see what frequency each member is set as and what members are assigned to each frequency. All members tied to this frequency will be updated if any changes are made.


Setting Up Sales Tax
Click Here to view a video on setting up your tax items.
Setting up your taxes is a two step process, you must first create your tax items, then create your tax item sets.
Create Tax Items
- Click Setup in the left-hand navigation panel.
- Click Define Sales Tax Rates in the Billing Section
- To setup your tax items, click Manage Tax Items.
- Click New Tax Item.
- On the New Sales Tax Item screen, configure the following fields:
- Tax Rate: Enter the tax rate for this tax item.
- Sales Tax Name: Enter a name for this tax item. The name is required, and visible in the back-office when creating tax sets.
- Tax Agency: (Optional) Enter the tax agency.
- Tax Account: Select the account to be used for tax revenue. This account must have been created within your Chart of Accounts.
- Description: (Optional) Enter a description of the account.
- Status: Select the status of the account. When status is set to Active it is available for selection in the back-office. When set to Inactive it is not available for selection when applying taxes in the back-office. Best practice is to de-activate tax items that you are no longer using.
- Display Order: Select the order in which you want to list the tax items on the tax list.
- Click Save & Exit.
Create Tax Item Sets
Billing - Day to Day Activities
Billing Day to Day Activities ![]() View this video for an overview of the daily activity as it relates to billing: creating invoices, posting payments, issuing credits, running reports, etc. Includes information on what the difference is between a payment and a receipt as well as when to use credits, discounts and write-offs. (NOTE: this training is not intended for those using the legacy CQI integration) Length: ~15 minutes.
View this video for an overview of the daily activity as it relates to billing: creating invoices, posting payments, issuing credits, running reports, etc. Includes information on what the difference is between a payment and a receipt as well as when to use credits, discounts and write-offs. (NOTE: this training is not intended for those using the legacy CQI integration) Length: ~15 minutes.
Create a Single One-Time Invoice
Creating a single invoice may be done within the Billing Center or on a member's billing tab.
- Click Billing in the left-hand menu.
- Click the Billing Center tab.
- Click the desired member in the member list.
- Click the New Invoice button. The
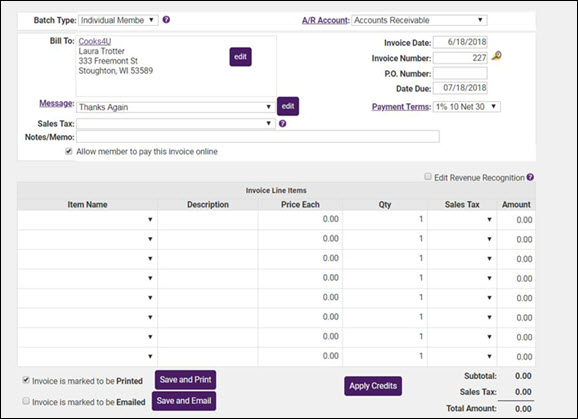
- Configure the following as necessary:
- A/R Account: Select the A/R account your wish to use for this invoice. The default you selected under Billing Options & Settings will be displayed, but you may change this as needed.
- Invoice Date: The invoice date will default to the current date, but you may change this as needed.
- Invoice Number: The system will automatically generate the next invoice number for you.
- P.O. Number: If you have a PO Number you may enter it here. If you receive the PO Number after you have sent the invoice, this field may be updated.
- Date Due: The date due is calculated by the Payment Terms described below. If you wish to specify a date due, you may enter it in this field and it will override the payment terms.
- Payment Terms: Select the payment terms for this invoice. The payments terms you set as default under Billing Options & Settings will be displayed, but you may change this as needed. Click the Payment Terms hyper-link to add or edit payment terms.
- Message: Select a message to display on your invoice. The message you set as default under Billing Options & Settings will be displayed, but you may change this as needed. The drop-down list will contain all messages you created in the Billing Options & Settings. Click the Edit button if you wish to make changes to a message.
- Sales Tax: If the items on this invoice are taxable, select Tax from the drop-down list. Modify the *Sales Tax sets under Setup->Define Sales Tax Rates.
- Notes/Memo: Enter any notes/memos you wish for this invoice.
- Item Name: Select the fee items that you wish to include on this invoice. The Description and Price Each will be populated with the defaults you configured when the fee item was created. You may change these if needed.
- Qty: Enter the quantity of the fee item to be included on the invoice.
- Sales Tax: If the fee items is taxable, select Tax from the drop-down list. The tax will be automatically calculated.
- Amount: The system will automatically calculate the total amount for the sale.
- If you wish to defer recognition of the revenue for this invoice, click the Edit Revenue Recognition, the # of Months Recg. column will be displayed. Enter the number of months over which you wish to recognize the revenue.
- If you wish to deliver the invoice immediately, click the delivery method: Save and Print or Save and Email
- OR
- If you simply wish to ready this invoice for delivery, select the appropriate delivery method Invoice is marked to be printed or Invoice is marked to be emailed.
- (Optional): If the member has available credits, click the Apply Credits button.
- Click Save.
- Click Close.


Process Payments
When payment is received, you can enter a payment in one of three locations: the Billing Center tab or Payments tab in the Billing module, or the Account tab in the Members module.
Receive Payments
- Click Billing in the left-hand menu.
- Click the Billing Center tab.
- Click the desired member in the member list.
- Click New Payment.
- Select the deposit account to which funds should be deposited from the Deposit To drop-down list. Click Here for more information on deposits.
- Complete the payment information fields including: Payment Amount, Payment Date, and Payment Method.
- Optional: Fill in the Reference number of Notes/Memo field as desired. Reference number may contain the check number or last 4 digits of credit card or other identifying information. Notes/Memo is available for miscellaneous notes displayed on the payment. If selecting Credit Card and then capturing the credit card payment right away, then the Reference number and Notes/Memo will automatically be filled in.
- If selecting Credit Card as the Payment Method, the Capture Payment button will appear. Click Capture Payment and complete the credit card information screen. The credit card will be processed with the amount specified in the Payment Amount field. NOTE: The Capture Payment button is only available for Plus users that have Authorize.net, Beanstream, IPP, or PayPal Website Payment Pro processing.
- To apply the payment to a particular invoice(s), click to select the checkbox in front of the invoice that this payment applies to. Deselect any invoices that do not apply, by default, the oldest invoice will be selected.
- Click Save.
- If desired, click Print or Email to print/email a payment receipt.


NOTE: If you wish to print a Paid Invoice, you can do this by reprinting the invoice to which this payment has been applied. The appropriate fields must be included in your invoice template.
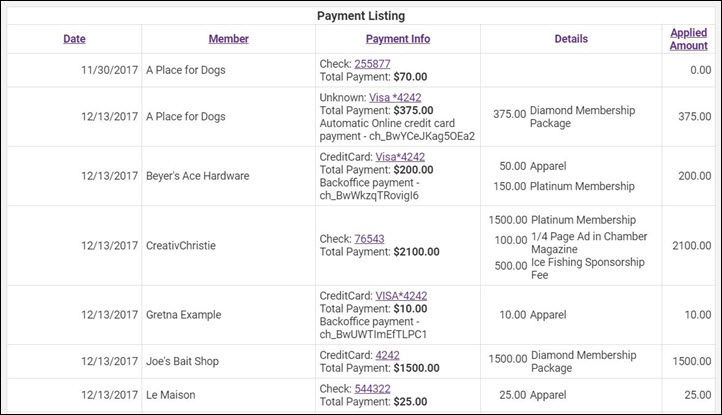
Payment Summary Report
The Payment Summary Report allows you to generate a list of all payments received in a selected date range, for a specific batch, payment method, item type, item basis, or class.
- Click Billing in the left-hand menu.
- Click the Reports tab.
- Click Payment Summary in the Transactions section.
- Enter the desired date range in the Date From and Through text boxes. Click the more... link to choose a pre-defined date range.
- (Optional) Select additional filtering criteria:
- Show Active/Courtesy members only. - If you wish to see all payments, de-select this option.
- Specific Batch - If you wish to view payment history for a specific batch, click Choose Batch.
- Payment Method - If you wish to see a specific payment method, select an option from the list.
- Item Type - If you wish to generate the report for a specific fee item type, for example Membership Dues, select an option from the list. NOTE: You may also select a Specific Fee Item. For Example: if you wish to see payments on specific event fee items, click Use Specific Fee Item and select the desired fee items.
- Item Basis - If you wish to generate the report for a specific accounting basis (accrual vs. cash), select an option from the drop-down list.
- Click Refresh Report to generate the report.


Processing Sales Receipts
A receipt is created when accepting money on a Cash Basis. If you are receiving money to pay off an invoice, make sure to receive a payment instead of creating a receipt so the invoice can be marked as paid. The Sales Receipt Summary report will display sales receipts transactions.
How to Create a Sales Receipt
- Click the Billing Center tab.
- Click the desired member in the member list.
- Click New Sales Receipt.
- Complete the sales receipt information fields as needed:
- Sale Date defaults to the current date.
- The Sale Number automatically displays the next available Sales Receipt Number.
- (Optional) Enter a Payment Reference # that displays on this transaction, often the check number or some other unique identifier. If capturing a credit card payment, this will be filled in automatically after processing the card.
- (Optiona) Select a Message if desired.
- (Optional)Sales Tax: Choose the desired Tax Set if necessary.
- (Optional)Notes/Memo: is available for miscellaneous notes displayed on the credit. If capturing a credit card payment, this will be filled in automatically after processing the card.
- Note: If Transaction Classes have been created, a Receipt Class drop-down selection will appear on the screen. Select the desired Class for this transaction. If needed, select a different Class assignment on each line item.
- Ensure that the Deposit To: drop-down selection is the desired account for funds to initially be deposited. Note: See “Selecting Payment and Receipt “Deposit To” Account” for more information.
- If selecting the “Credit Card” Payment Method, then you may actually process the card right now if you have credit card information. Click Capture Payment and complete the credit card information screen. The credit card will be processed with the total of the line items.
- Note: Capture Payment button is only available for Plus users that have Authorize.net, Beanstream, IPP or PayPal Website Payment Pro processing.
- Select the desired items from the Item Name list. The system will populate the price you have initially configure for the fee item, you may over-ride this if necessary. The Quantity field will automatically default to 1, update as needed. Continue adding items as needed.
- Click Save and then click Close.

NOTE: If desired, click Print Now and follow prompt on-screen to print the sales receipt.
Sales Receipt Summary Report
- From the Reports tab in the Billing module, click Sales Receipt Summary in the Transactions section.
- Enter the desired date range in the Date From and Through text boxes. Click the more... link to choose a pre-defined date range.
- (Optional) Select additional filtering criteria:
- Show Active/Courtesy members only. - If you wish to see all payments, de-select this option.
- Item Type - If you wish to generate the report for a specific fee item type, for example Membership Dues, select an option from the list. NOTE: You may also select a Specific Fee Item. For Example: if you wish to see payments on specific event fee items, click Use Specific Fee Item and select the desired fee items.
- Item Basis - If you wish to generate the report for a specific accounting basis (accrual vs. cash), select an option from the drop-down list.
- Click Refresh Report to generate the report.


Process Credits
A credit may be created for a member ahead of time or created when receiving the payment. Credits do not have to be associated with a particular invoice when created. In contrast, discounts must be associated with a particular invoice. The Credit Memo Summary report will display credit transactions. Credits can be done using any fee item that exists on your items list. Keep in mind that whichever fee is selected will decrease the income account that is assigned to that item. In some instances, you could select the item that is the reason for the credit needing to be created (i.e. A credit is being issued for a cancellation to the annual dinner. Create the credit and select the annual dinner fee item. This will decrease the amount of income reporting on the financial statements for that event). If you are unsure as to which item should be selected you will want to check with your accountant, as this will affect your financial statements.
Create a Credit
- Click Billing in the left-hand menu.
- On the Billing Center tab, select the member to which you want to issue a credit.
- Click the New Credit button.
- Type the credit amount in the Credit Amount field. If there are outstanding invoices displayed, the credit amount will automatically be applied to an open invoice. If you do not wish to apply the credit to an open invoice, deselect the check-box next to the open invoice. NOTE: If there are no open invoices, you may simply create the credit, and it will be available for future use
- Complete the credit information fields if needed. Credit Date defaults to the current date and the Credit Number automatically displays the next available credit number. Optional: Enter a P.O. Number if applicable. Select a Message if desired. Notes: is available for miscellaneous notes displayed on the credit.
- Note: If Transaction Classes have been created, a Class drop-down selection will appear on the screen. Select the desired Class for this transaction.
- Select the Assigned Item for this credit. NOTE: The account associated to the fee item will be debited the amount of the credit immediately, not at the time that the credit is used.
- Click Save Credit.

Apply a credit before payment is received
If a member has an open invoice, you may apply a credit to that invoice prior to receipt of payment.
- Click Billing in the left-hand menu.
- Click the Invoices tab.
- Click the invoice to which the credit should be applied.
- Click the New Transaction drop-down arrow.
- Click Apply Credit.
- If multiple credits are available, select the desired credit from the Credit # drop down list.
- Click Apply Credit.


Apply a Credit When Payment is Received
- Click Billing in the left-hand menu.
- On the Billing Center tab, click the member from which you wish to receive payment and apply discount.
- Click the invoice number to be paid.
- On the invoice screen, click add/view payments.
- If credits are available, the Apply existing credits to this invoice radio button will be enabled and the amount of available credit will be displayed.
- Click Continue.
- In the list of Open Invoices, ensure the correct Invoice Number is selected the list.
- Type the amount of credit to be applied in the Amount to Use field. The full amount of the credit will be populated if applicable.
- Click Apply Credit.
- On the Payment History screen, if a balance remains on the invoice, the Make a payment toward this invoice balance. radio button will be enabled. To make the payment click continue. Complete the Payment screen as desired and click Save Payment.


Process Deposits
Deposits are only available when payments and receipts have been deposited into the Undeposited Funds account. for more information on the undeposited funds account.
Make a Deposit
- Click Billing in the left-hand menu.
- Click the Deposits tab.
- Select the desired Deposit Account (typically your bank account)
- (Optional) Click Apply Filters to narrow the list by payment method.
- Select the payments to be deposited from the Select Payments to Deposit list. By default all payments will be selected, but you may deselect those that you do not wish to include in this deposit.
- (Optional) If Cash Back is desired:
- Select a Cash Back Account from the drop-down list. If you wish to add a new account, click the Cash Back Account hyper-link.
- (Optional) Enter a Cash Back Memo.
- Enter the Cash Back Amount.
- (Optional) Click Print Listing, Download Listing, or Print Deposit to create desired output.
- Click Save Deposit. The payments you have selected will be included in this deposit.

Note: If planning to export your transactions to QuickBooks or other 3rd party billing software, making a deposit using Integrated Billing deposit options does not take away your option of being able to create a deposit in QuickBooks. The Integrated Billing deposit transaction can be excluded from your export, allowing you to also make the deposit in QuickBooks.
Deposit Summary Report
The Deposit Summary report will display deposit transactions.
- Click Billing in the left had navigation panel.
- On the Reports tab, click Deposit Summary in the Banking section. The report will generate for the default date range and all deposit accounts.
- To generate the report for a different date range, enter the desired date range in the Date From and Through text boxes. Click the more... link to choose a pre-defined date range.
- (Optional) If you wish to view a specific deposit account, select an Account from the drop-down list.
- Click Refresh Report

Process a Write-off
If a member does not pay, it is possible to write-off a balance. You may wish to have an account in your Chart of Accounts where these amounts will be recorded. Write-offs can also be done [[Mass Write-Offs|in mass when dropping members with the Mass Drop feature.
Entering a Single Write-off Transaction
- Click Billing in the left-hand menu.
- On the Billing Center tab, select the appropriate member.
- Click the invoice to be written off.
- Click the New Transaction drop-down arrow.
- Click Write-off balance. The Invoice Write-off screen will display.
- Complete the fields as desired:
- The Writeoff Date will automatically be populated with the current date.
- The Writeoff Amount will be populated with the full amount of the invoice, you may change this if you wish to do only a partial write-off.
- Select the account you wish to use for this write off from the Expense Account drop-down list. If you wish to add a new account, click the Expense Account hyper-link.
- (Optional) Enter Notes / Memo for internal use.
- Click Finish.


Note: If Transaction Classes have been created, a Billing Class drop-down selection will appear on the screen. Select the desired Billing Class for this transaction.
Recording mass write-off while performing a mass drop
Watch a video on the mass drop/mass write-off feature ![]()
- Click Billing in the left-hand menu.
- Click the Reports tab.
- Click Past Due Members / Mass Drop in the executive section.
- Click Generate Report to see a list of all members with over-due member fees and dues.
- Select the members you’d like to drop by checking the box in front of their name.
- Ensure the correct drop date is listed above along with the desired Drop Reason and Drop Comments.
- If you’d like to write-off all the open invoices to their original accounts, check the Write-off member balance(s) check mark and enter the desired write-off date.
- Recommend: Select Disable rep(s) in group(s) so that reps will no longer be included in communication to the group.
- Click Drop Selected Members.

Mass Write-off Tips
Column Contents
- Member Since = Join Date
- Last Renewal = last paid invoice with Dues fees on it
- Lifetime Membership Value = total of all payments and receipts
- Last Payment Received = date of last payment of any fee type
- Aging of Member Dues Owed = how many days overdue for the outstanding Member Fees and Dues
- Total Amount Owed = Invoices total - payment total - credit total - writeoff total
- Member Dues Owed = total of line items with a dues fee (does not include credits)
If Write-off Member Balance is Selected
- a write-off date will be asked for to use on this transaction and may be back-dated if needed
- all member invoices will be written off back to the original account that was billed.
- the write-offs will appear in the Journal Entry Export
- Members that have unapplied payments are marked with an * and will not be able to be included in the write-off. You should check out this member manually and see if these payments could be applied prior to dropping.
If Disable Rep in Group is Selected
- all reps will be marked as Disabled in their groups which means that they will no longer receive communication to that group but staff can see them as "greyed out" when viewing that group which lets you know that they did belong to that group at one time.
- if not selecting this checkmark, reps will remain in the groups unchanged but will display as inactive (red) due to dropping the member. They would still receive communication to any groups they belong to.
- Regardless of this checkmark, these reps are marked as Inactive reps on the Members->Reps tab.
Voluntary fees will be written off back to their original account if you are currently set to export all voluntary fees (paid and unpaid). Contact customer support if you'd like to get to a point where you only export paid voluntary fees.
Process a Refund
Processing a refund may be performed through the Billing module (on the Payments page) or on an individual member's Account tab. Follow the instructions below to process a refund from the member's account tab.
- On the member's Account Tab, click the hyper-link for the payment you wish to refund.
- On the payment screen, click the Refund Payment button.
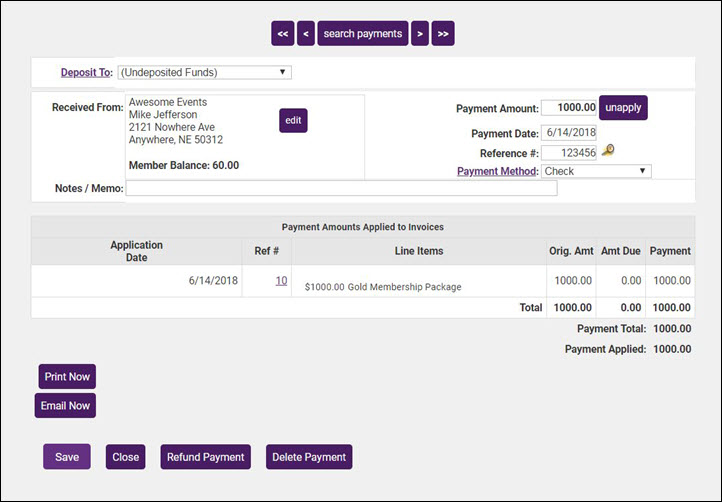
- The information displayed at the top of the screen, shown below, was captured when the payment was made and should not be edited.
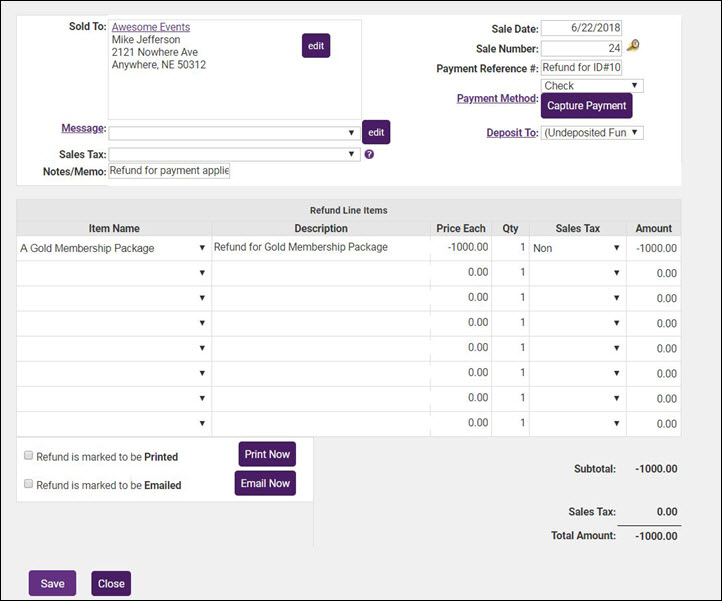
- To give a full refund for the payment, click Save
- OR
- To give a partial refund for the payment, change the Price Each field to the amount you wish to refund.
- If you wish to email or deliver a record of this refund to the member, you may select Print Now or Email Now
- Click Save.
- Click Close.


If you wish to email or deliver a record of this refund to the member, you may select Print Now or Email Now
| Note: The Members' Account tab will list this transaction as a Receipt but will show the description as "Refund". |
|
|
NOTE: If you are using GrowthZone Pay, a partial refund will appear on the person's statement a little differently than a full refund if the original charge has not yet fully processed. The credit won't appear as a separate line item on the bank statement. Instead, the original charge should post for a lower amount on the customer's statement. This will especially be an issue when a partial refund is issued shortly after the original charge was made. For example, a charge is made for $830.00. A partial refund is issued for $35.00 while the original charge was still listed as pending so the charge was updated to $795.00. There will not be a separate transaction for the refund issued. If the customer has questions on how this shows on their statement, they should contact their bank directly. |
Process Discounts
A discount may be applied to a particular invoice at the time of payment or prior to payment received. A discount is associated with a specific invoice and may only be removed by accessing the assigned invoice. In contrast, Credits do not have to be assigned to a particular invoice. There are two types of discounts within the ChamberMaster/GrowthZone database. Event discounts and Invoice Discounts. This page contains information about Invoice Discounts. See Event Discount Options page for event discount information.
Apply Discount Before Payment is Received
- Click Billing in the left-hand menu.
- On the Billing Center tab, select the member from the member list.
- Click the invoice to which the discount is to be applied.
- Click the New Transaction drop-down arrow.
- Click Add Discount.
- Type the Discount Amount, Notes/Memo (if desired), and double-check the Discounted Item and Discount Account.
- Click Save Discount.


NOTE: If Transaction Classes have been created, a Class drop-down selection will appear on the screen. Select the desired Class for this transaction.
Assign a Discount when Payment is Received
- Click Billing in the left-hand menu.
- On the Billing Center tab, locate the member from whom you have received payment.
- Click the invoice number to which you want to add the discount.
- From the New Transaction drop-down list, select Add Discount. The Invoice Discount screen will display.
- Type the Discount Amount, Notes/Memo (if desired), and double-check the Discounted Item and Discount Account.
- Note: The Discount Account must be identified as an Income account in Setup->Chart of Accounts. In Figure 3-19 above, a special Income account titled “Membership Dues Discounts” has been created that will maintain a list of discounted membership dues specifically for keeping track of early payment discounts.
- If Transaction Classes have been created, a Class drop-down selection will appear on the screen. Select the desired Class for this transaction.
- Click Save Discount

Delete a discount
Discounts are associated with a particular invoice and thus must be removed from the assigned invoice.
- Click Billing in the left-hand menu.
- Click the Invoices tab.
- Locate the desired invoice where a discount should be removed.
- Click Show Balance Summary (if not already selected).
- Click the Discount ID #.
- Click Delete Discount.


Statements and Reports
Collections Report
The Collections Report provides you a way to identify all past due invoices. The report can be generated based on a specific transaction date, specific item type, batch, etc. From the report it is easy to contact members with overdue invoices.
- In the Billing module, click the Reports tab.
- Click Collections Report in the Receivables section.
- Enter the desired filtering criteria.
- Click Refresh Listing.


From the report you will be able to:
- Resend invoices: Scroll to the bottom of the report, and click the Resend Invoices button.
- View individual invoices: Click the link for an invoice to view the details.
Print Collection Letters, Thank you’s, and Notifications
- Explains options for printing pre-defined or self-defined letters to specific members based on your own set of criteria.
Group Billing
Fees may be assigned to a group or to certain individuals within the group. Groups may be created by you as desired to accommodate your billing needs or you may use groups that are already created.
Fees are created by selecting Group Fees as the Item Type. In the Groups module, fees are assigned to an entire group and then the amount may be modified per individual if desired. However, all group members will be billed using the same frequency.
To create invoices for a group that has been assigned a fee item with a One-Time Billing Cycle, Bill Group Now must be selected on the Group Fees tab.
Creating invoices for a group that has been assigned a fee item with a Billing Cycle of Annual, Semi-Annual, Quarterly, or Monthly, allows you to invoice from the Billing module by selecting the Group Batch Type and the appropriate Billing Month. These fees are treated as recurring fees and will be included automatically in Group billing batch.
If your group(s) should be billed on a regular basis, setting the Billing Cycle to Annual, Semi-Annual, Quarterly, or Monthly would be recommended, especially if billing multiple groups each month. To create the invoices only requires only a few simple selections in the Billing module each month.
Event Billing
- Contains steps for setting up Event fees and creating event invoices.
Processing Recurring Member Invoices
Create a Batch of Recurring Invoices
Creating batches of your recurring invoices (For Example: Membership Dues) can be done through the Billing Module on the Invoices tab or from the task list. The instructions below will show you how to create your batch from the Task List.
- Click Invoices in the left-hand menu. If there is not a number next to invoices in the task list, then you have now invoices to batch.
- Note the Assigned fees for drop down. The month selected by default is driven by the Months to look ahead setting in your Billing Options & Settings. Invoices displayed as Recurring Fees Batches and Group are identified by this setting. One Time Fees, such as Setup Fees, and Event fees will simply display on your list regardless of the Assigned Fees For setting.
- To generate invoices for your recurring fees, click the create invoices hyper-link next to the desired Batch Group in the Recurring Fees section.
- If this is the first time you have run a batch for the selected renewal month, New Batch will be displayed. If you have previously created a batch of invoices for this renewal month, but additional invoices need to be created, Match Found will be displayed. When Match Found appears, scroll down and click New Batch.
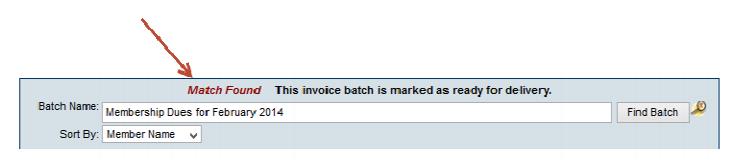
- If a match was found it means you’ve already invoiced this particular set of invoices. If there are some additional invoices that need “added to this batch”, you would want to create a new batch. If you proceed without creating a new batch, previous invoices batched would be updated to any changes made to terms, dates and payment options. Selecting New Batch is typically a better, safer idea.
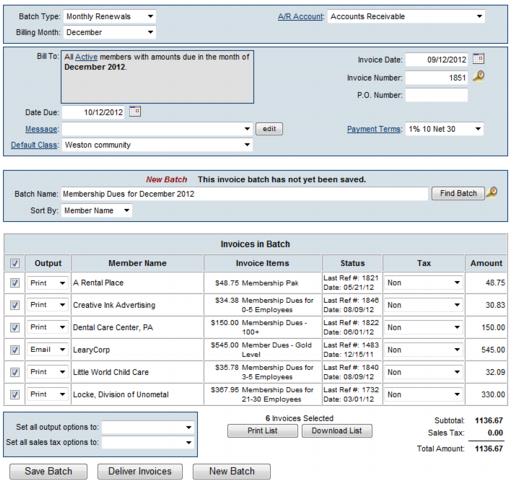
- Configure the following as necessary:
- Configure the following as necessary:
- A/R Account: Select the A/R account your wish to use for this invoice. The default you selected under Billing Options & Settings will be displayed, but you may change this as needed.
- Invoice Date: The invoice date will default to the current date, but you may change this as needed.
- Invoice Number: The system will automatically generate the next invoice number for you.
- P.O. Number: If you have a PO Number you may enter it here. If you receive the PO Number after you have sent the invoice, this field may be updated.
- Date Due: The date due is calculated by the Payment Terms described below. If you wish to specify a date due, you may enter it in this field and it will override the payment terms.
- Payment Terms: Select the payment terms for this invoice. The payments terms you set as default under Billing Options & Settings will be displayed, but you may change this as needed. Click the Payment Terms hyper-link to add or edit payment terms.
- Message: Select a message to display on your invoice. The message you set as default under Billing Options & Settings will be displayed, but you may change this as needed. The drop-down list will contain all messages you created in the Billing Options & Settings. Click the Edit button if you wish to make changes to a message.
- Sales Tax: If the items on this invoice are taxable, select Tax from the drop-down list. Modify the *Sales Tax sets under Setup->Define Sales Tax Rates.
- Notes/Memo: Enter any notes/memos you wish for this invoice.
- Configure the following as necessary:
- Complete the rest of the fields including Invoice Date, Date Due, and Payment Terms. If Transaction Classes have been created, an Invoice Class drop-down selection will appear on the screen. Select the desired Invoice Class for this batch of invoices.
- NOTE: If only viewing the invoices when, clicking Deliver Invoices, the invoices will be created. If you clicked Deliver Invoices and do not want this batch created, close the Deliver window and click Delete Batch.
- Uncheck any invoices that should be excluded from this Batch. Note: Excluded invoices may be added to this batch or placed in a new batch later.
- Click Save Batch or Deliver Invoices. If clicking Save Batch, you can return to a batch of invoices at any time to deliver them (email or print them). If clicking Deliver Invoices, continue to the next step. Either choice, Save Batch or Deliver Invoices, will create the batch of invoices. Deliver Invoices will create the invoices and immediately open a window with options to print and/or email the invoices.
- If you have selected Deliver Invoices the Deliver Customer Invoices window will appear. The Delivery Method of Print Invoices is already selected. Those invoices with an Output selection (from the previous window) of Print or Both will be selected. Those invoices with an Output selection of Email or None will not be selected. Also, any invoice that does not have complete mailing address information will not be selected.
- NOTE: Changes made to the Contact Name or address on the Deliver Customer Invoices window does not modify the Member’s Account information. Permanent Billing Rep or address changes must be made in the Members module.
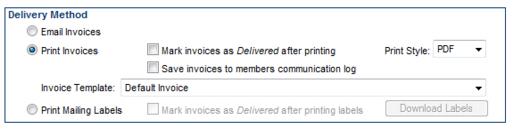
- Complete the Delivery Method selections as desired.
Note: A default Invoice Template may be selected as desired by clicking '''Setup''' > '''Billing Options''' and '''Settings'''. Open the '''Appearance''' area and select a new '''Default Template'''. The templates may also be edited at this location. See “Invoice Templates” for more information.
- When ready, click Preview Invoices or Print Invoices.
- Suggestion: Click Mark invoices as Delivered after printing when printing the labels. (if not printing labels, click Mark invoices as Delivered after printing when printing the invoices). This will make it easier to determine later if the invoices in that batch have been printed or not. Later, the selection Print/Email Invoices on the Reports tab will easily identify any outstanding invoices that have not been “delivered”, regardless of which batch they belong to. See “Print/Email All Undelivered Invoices”
- If mailing labels are desired, click Print Mailing Labels in the Delivery Method section.
Note: When viewing the Member's Account tab after billing: The Next Billed column in the Membership Fees and Dues area reflects the name of the monthly batch that this fee/due will be included in or already has been included in. This column will automatically display the next billing month when the current date passes that month. For instance, if the current date is February 2015 and a fee/due is set to be billed in February 2015, the Next Billed column will display February 2015 until March 1, 2015; then it will automatically switch and display February 2016. To see if a particular fee/due has been billed, refer to the transactions displayed in the Transaction History area.
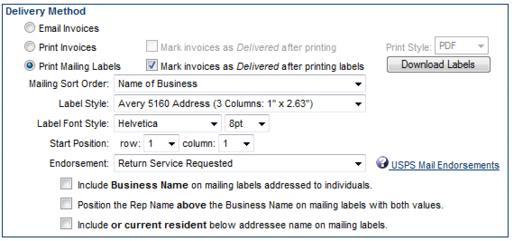
- Make the desired selections.
- Click Print Labels.
- If any invoices need to be emailed, click Email Invoices in the Delivery Method section.
- Make the desired selections.
- Click Send Emails.


Create Batch of Recurring Epayment Transactions
Credit Card Processing
- Explains steps to implement credit card payment into event registrations, online membership applications, and member bill pay.
Billing Reports
Recognized Income by Invoice Date
When this option is selected the recognition of the line items will start based on the ‘INVOICE DATE’. If an invoice is dated 1/14/16, for example, in the amount of $120.00, and the recognition period is set for 12 months then the monthly recognition will be $10/month starting with the January report.
Recognized Income by Invoice Due Date
When this option is selected the recognition of the line items will start based on the ‘DUE DATE’ on the invoice. If an invoice is dated 1/14/16 but the due date is set for 2/14/16, for example, in the amount of $120.00, and the recognition period is set for 12 months then the monthly recognition will be $10/month starting with the February report.
Recognized Income by Payment Date
When this option is selected the recognition of the line items will start based on when the PAYMENT is applied to the invoice. If an invoice is dated 1/14/16, for example, in the amount of $120.00, and the recognition period is set for 12 months then the monthly recognition will be $10/month with the first recognition being whenever the payment is applied. If the payment is applied in January then the recognition would start with the January report in the amount of $10.00, and then $10.00 each month thereafter. If the payment is applied in February then the recognition would start with the February report in the amount of $20.00, and then $10.00 each month thereafter. If the payment is recognized in August then the recognition would start with the August report in the amount of $80.00, and then $10.00 each month thereafter. In the case of a partial payment, the recognition would follow the same process as stated above with the exception that it would only be recognized UP TO the amount of the payment and then would start again when additional payments are applied. The full recognition would only happen in the event that the invoice is paid in full.
Export Journal Entries
Billing FAQ's
- How to I create and send invoices for monthly membership dues?
- How do I create statements?
- How to I export my transactions to QuickBooks or Peachtree?
- How do I set up credit card processing?
- How do I set up voluntary fees?
- What reports can I use to reconcile to my financial software?
- Which reports display cash vs. accrual based information?
- How do I track Trades?
- How do I make sure that the member name in CM/GZ matches what I have in Quickbooks?
Accounting Basics Tutorials
- Accounting Basics

- Accounting Best Practices
QuickBooks Troubleshooting
- Desktop Version
- Online Version
- Desktop Version