Difference between revisions of "Create and Send Fax Output"
Jump to navigation
Jump to search

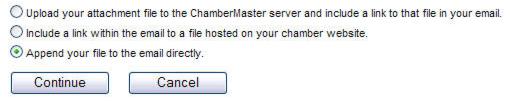 Figure 10-3a

(Created page with "<div xmlns="http://www.w3.org/1999/xhtml"> <div style="text-align: left;">Table of Contents | Emails_Letters_and_Mail...") |
|||
| Line 1: | Line 1: | ||
| − | + | <div style="color: #5F497A; font-family: Cambria; font-size: 11pt; font-weight: bold; margin-left: 0pt;"><span id="wwpID0E0MCB0HA">Send fax output using your fax machine or to download fax output</span></div> | |
| − | |||
| − | |||
| − | |||
| − | |||
| − | |||
| − | |||
<div style="margin-left: 18pt;"> | <div style="margin-left: 18pt;"> | ||
<table border="0" cellspacing="0" cellpadding="0" width="99%" summary=""> | <table border="0" cellspacing="0" cellpadding="0" width="99%" summary=""> | ||
| Line 184: | Line 178: | ||
<div style="font-family: Calibri; font-size: 10pt; margin-bottom: 12pt; margin-left: 54pt; text-align: justify;"><span id="wwpID0E0OBB0HA">Figure 10-3c - Sample of the Send Faxes button when using eFax</span></div> | <div style="font-family: Calibri; font-size: 10pt; margin-bottom: 12pt; margin-left: 54pt; text-align: justify;"><span id="wwpID0E0OBB0HA">Figure 10-3c - Sample of the Send Faxes button when using eFax</span></div> | ||
<div style="color: #5F497A; font-family: Calibri; font-size: 9pt; margin-bottom: 12pt; margin-left: 36pt;"><span id="wwpID0E0NBB0HA">Some email fax services may accept the cover page or the main content of the fax in the editor area instead of attaching the content and cover page as an attachment. Check with your email fax service or contact ChamberMaster for more information.</span></div> | <div style="color: #5F497A; font-family: Calibri; font-size: 9pt; margin-bottom: 12pt; margin-left: 36pt;"><span id="wwpID0E0NBB0HA">Some email fax services may accept the cover page or the main content of the fax in the editor area instead of attaching the content and cover page as an attachment. Check with your email fax service or contact ChamberMaster for more information.</span></div> | ||
| − | |||
Revision as of 21:10, 5 September 2016
Send fax output using your fax machine or to download fax output
1. |
Click Communication in the left-hand menu. |
2. |
Click Form Letters. |
3. |
Select desired recipients. |
4. |
Select Fax Only as the way to Distribute By: |
5. |
If applicable, click remove next to those identified under Fax Only as having no contact info, duplicate fax #, or invalid fax #. |
6. |
Click Edit with ChamberMaster. |
7. |
Create the fax output. |
8. |
Click Print Fax Content and/or Download Fax List. Read more information on fax output options. |
Send fax output to an Internet Fax service
This requires a separate subscription with one of many well-known internet fax service. See “Internet Fax Service” in the “Administrator Tasks” section of online help for more information.
1. |
Click Communication in the left-hand menu. |
2. |
Click Form Letters. |
3. |
Select desired recipients. |
4. |
Select Fax Only as the way to Distribute By: |
Preferred Communication Type may be selected instead to select to send faxes only to those that have Fax selected as their preference.
5. |
If applicable, click remove next to those identified under Fax Only as having no contact info, duplicate fax #, or invalid fax #. |
6. |
Click Edit with ChamberMaster. |
7. |
click Add/Remove Attachment. |
8. |
Select Append your file to the email directly. |
 Figure 10-3a
9. |
Click Continue. |
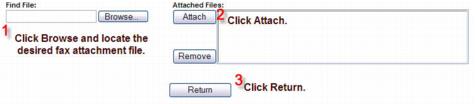
10. |
Click Browse… to locate the desired fax attachment file. |
11. |
Click Attach. |
12. |
Click Return. |

Figure 10-3b – Selecting the desired fax attachment
13. |
Click Send Faxes via . . . |
Figure 10-3c - Sample of the Send Faxes button when using eFax
Some email fax services may accept the cover page or the main content of the fax in the editor area instead of attaching the content and cover page as an attachment. Check with your email fax service or contact ChamberMaster for more information.