Edit Member Public Photos and Images
Jump to navigation
Jump to search
Contents
Overview
Enhanced Package participants are able to add an image in the online directory search results, a company logo, photo gallery, video, and map. Images must be .jpg, .png or .gif.
Note: Members may also modify this information in the Member Information Center.
Note: Only those who have purchased the Marketing Package add-on or those with Premier or Pro edition will have the option to select the Enhanced package. See more on the “Software editions”.

- Figure: Web Photos & Images
- Note: the YouTube Video and eBrochure Photo Gallery option displays only if your website is integrated using the SEO module integration, version 2 or greater.
Add a logo or Member Information page image
- On the Web tab, click Add Image in the Action column of the Image Type that you wish to add in the Web Photos & Images area.
- Note: Enhanced members may add photos and images. Non-member and Basic package participants do not have this feature.
- Type the path and file name of the desired graphic file or click Browse to locate and click Open when desired graphic is located.
- Click Upload Image.
- Click Close Window.
Add an icon to the search results
- On the Web tab, click Enable in the Action column of the Search Results Icon in the Web Photos & Images area.
- Click Add Image.
- Type the path and file name of the desired graphic file or click Browse to locate and click Open when desired graphic is located.
- Click Upload Image.
- Click Close Window.
- Note: Search Results logo will only display if enabled for your members under Setup > Member Login Area Options and Settings. Make sure Search Results Icon is set to Enabled under Menu Items & Permissions.
Add a map image
- On the Web tab, click the desired option button in the Image Type column in the Web Photos & Images area.
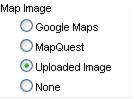
- Figure: Map Image types
- If selecting Uploaded Image, then click Add Image in the Action column. Type the path and file name of the desired graphic file or click Browse to locate and click Open when desired graphic is located. Click Upload Image. Click Close Window.

Remove a logo, photo, search results icon, or an uploaded map image
- On the Web tab, click Remove Image in the Action column of the Image Type that you wish to remove in the Web Photos & Images area.
Change an existing logo, photo, search results icon, or an uploaded map image
- On the Web tab, click Change Image in the Action column of the Image Type that you wish to change in the Web Photos & Images area.
- Type the path and filename of the desired graphic file or click Browse to locate and click Open when desired graphic is located.
- Click Upload Image.
- Click Close Window.
Disable the search results icon
- On the Web tab, click Disable in the Action column of the Search Results Icon image type. Note: if an image was already uploaded for this Search Results Icon image Type, it will not be removed, only disabled.