Difference between revisions of "Getting Started-Integration Settings Control Panel"
Jump to navigation
Jump to search
(Created page with "<div xmlns="http://www.w3.org/1999/xhtml"> <div style="text-align: left;">Table of Contents | Getting_Started-Search_Engine_Optimized_...") |
|||
| Line 1: | Line 1: | ||
| − | + | <div style="font-family: "Times New Roman"; font-size: 11pt; margin-bottom: 12pt; margin-left: 18pt;"><span id="wwpID0E0UT0HA">When your website is integrated with your software using </span><span style="font-family: Calibri; font-size: 11pt;">version 2 or version 3</span> of our <span style="font-family: Calibri; font-size: 11pt;">SEO public website modules</span>, your web designer uses the <span style="font-weight: bold;">Integration Settings Control Panel</span> to modify specific settings related to how your website displays and where website templates are located.</div> | |
| − | |||
| − | |||
| − | |||
| − | |||
| − | |||
<div style="font-family: "Times New Roman"; font-size: 11pt; margin-bottom: 12pt; margin-left: 18pt;"><span id="wwpID0E0TT0HA">Your Integration Settings Control Panel is located by using a browser software and accessed one of several ways but the simplest way to describe it if unfamiliar with your website domain names is this way:</span></div> | <div style="font-family: "Times New Roman"; font-size: 11pt; margin-bottom: 12pt; margin-left: 18pt;"><span id="wwpID0E0TT0HA">Your Integration Settings Control Panel is located by using a browser software and accessed one of several ways but the simplest way to describe it if unfamiliar with your website domain names is this way:</span></div> | ||
<div style="color: #5F497A; font-family: Cambria; font-size: 11pt; font-weight: bold; margin-left: 18pt;"><span id="wwpID0E0ST0HA">Access your Integration Settings Control Panel</span></div> | <div style="color: #5F497A; font-family: Cambria; font-size: 11pt; font-weight: bold; margin-left: 18pt;"><span id="wwpID0E0ST0HA">Access your Integration Settings Control Panel</span></div> | ||
| Line 57: | Line 52: | ||
</tr> | </tr> | ||
</table> | </table> | ||
| − | |||
| − | |||
Revision as of 20:02, 4 September 2016
When your website is integrated with your software using version 2 or version 3 of our SEO public website modules, your web designer uses the Integration Settings Control Panel to modify specific settings related to how your website displays and where website templates are located.
Your Integration Settings Control Panel is located by using a browser software and accessed one of several ways but the simplest way to describe it if unfamiliar with your website domain names is this way:
Access your Integration Settings Control Panel
1. |
Login to your software with Admin permissions. |
2. |
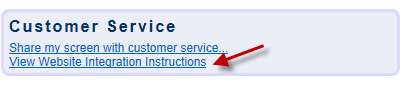
From the Dashboard, find the Customer Service section. |

3. |
Click View Website Integration Instructions. |
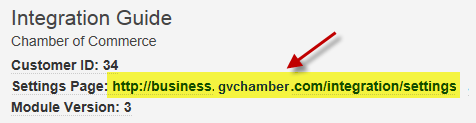
4. |
Click the URL displayed for the Settings Page. |

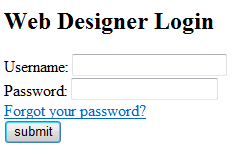
5. |
Enter your software Administrator Login credentials. |

6. |
You are now logged into the Integration Settings Control Panel. Changes here will affect your live website. |