Difference between revisions of "Invoice Discounts"
Jump to navigation
Jump to search
(Created page with "<div xmlns="http://www.w3.org/1999/xhtml"> <div style="text-align: left;">Table of Contents | ChamberMaster_Billing-Refunds|Prev...") |
|||
| (16 intermediate revisions by one other user not shown) | |||
| Line 1: | Line 1: | ||
| − | + | There are two types of discounts within the ChamberMaster/GrowthZone database. Event discounts and Invoice Discounts. This page contains information about Invoice Discounts. See [[Event Discount Options]] page for event discount information. | |
| − | + | ==Invoice Discounts== | |
| − | + | A discount may be applied to a particular invoice at the time of payment or prior to payment received. A discount is associated with a specific invoice and may only be removed by accessing the assigned invoice. In contrast, Credits do not have to be assigned to a particular invoice. | |
| − | + | ==Assign a discount before payment is received== | |
| − | + | #Click '''Billing''' in the left-hand menu. | |
| − | + | #Click the '''Invoices''' tab. | |
| − | + | #Locate the desired invoice where a discount should be applied. | |
| − | + | #Click the '''New Transaction''' drop-down arrow. | |
| − | + | #:[[File:New_Transaction_-_Add_Discount.jpg|framed|none|Assign Discount before payment is received]] | |
| − | + | #Click '''Add Discount'''. | |
| − | + | #Type the Discount Amount, Notes/Memo (if desired), and double-check the Discounted Item and Discount Account. | |
| − | + | #:[[File:Invoice Discount Screen.jpg|framed|none|Input discount amount]] | |
| − | + | #:If Transaction Classes have been created, a Class drop-down selection will appear on the screen. Select the desired Class for this transaction. | |
| − | + | #Click '''Save Discount'''. | |
| − | + | #Click '''Show Balance Summary''' to view the assignment of this discount. | |
| − | + | #:[[File:Show_Balance_Summary.jpg|framed|none|Show Balance Summary]] | |
| − | + | #:[[File:Discount Balance Summary.jpg|framed|none|Balance Summary displayed]] | |
| − | + | #This invoice will display the new amount when payment is received. At that time you may view the discount by clicking '''View Credits & Discounts'''. | |
| − | + | #:[[File:View Credits & Discounts.jpg|framed|none|View Credits & Discounts on the Payments tab]] | |
| − | + | ||
| − | + | ==Assign a discount when payment is received== | |
| − | + | #Click '''Billing''' in the left-hand menu. | |
| − | + | #Click the '''Payments''' tab. | |
| − | + | #Locate the desired member from which to receive payment. | |
| − | + | #Click '''View Credits & Discounts'''. | |
| − | + | #Click '''Add Discount'''. | |
| − | + | #The '''Invoice Discount screen''' will display. | |
| − | + | #:[[File:Invoice Discount Screen.jpg|framed|none|Invoice Discount Screen]] | |
| − | + | #Type the Discount Amount, Notes/Memo (if desired), and double-check the Discounted Item and Discount Account. | |
| − | + | #:'''Note:''' The Discount Account must be identified as an Income account in Setup->Chart of Accounts. In Figure 3-19 above, a special Income account titled “Membership Dues Discounts” has been created that will maintain a list of discounted membership dues specifically for keeping track of early payment discounts. | |
| − | + | #:If Transaction Classes have been created, a Class drop-down selection will appear on the screen. Select the desired Class for this transaction. | |
| − | + | #Click '''Save Discount''' | |
| + | |||
| + | ==Delete a discount== | ||
| + | Discounts are associated with a particular invoice and thus must be removed from the assigned invoice. | ||
| + | #Click '''Billing''' in the left-hand menu. | ||
| + | #Click the '''Invoices''' tab. | ||
| + | #Locate the desired invoice where a discount should be removed. | ||
| + | #Click '''Show Balance Summary''' (if not already selected). | ||
| + | #Click the '''Discount ID #'''. | ||
| + | #:[[File:Selecting_the_Discount_ID.jpg|framed|none|Selecting the Discount ID #]] | ||
| + | #Click '''Delete Discount'''. | ||
| + | #:[[File:Clicking Delete Discount.jpg|framed|none|Clicking Delete Discount]] | ||
| + | |||
| + | '''Related Topics''' [[Write-off an Invoice]] | ||
| + | [[Category:Billing]] | ||
Latest revision as of 20:44, 27 April 2017
There are two types of discounts within the ChamberMaster/GrowthZone database. Event discounts and Invoice Discounts. This page contains information about Invoice Discounts. See Event Discount Options page for event discount information.
Contents
Invoice Discounts
A discount may be applied to a particular invoice at the time of payment or prior to payment received. A discount is associated with a specific invoice and may only be removed by accessing the assigned invoice. In contrast, Credits do not have to be assigned to a particular invoice.
Assign a discount before payment is received
- Click Billing in the left-hand menu.
- Click the Invoices tab.
- Locate the desired invoice where a discount should be applied.
- Click the New Transaction drop-down arrow.
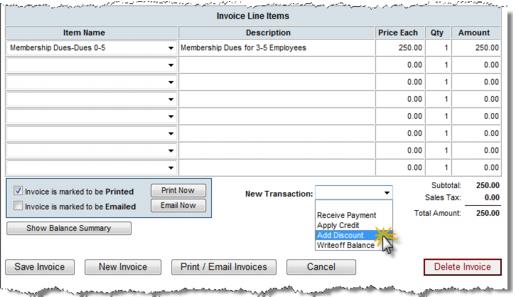 Assign Discount before payment is received
- Click Add Discount.
- Type the Discount Amount, Notes/Memo (if desired), and double-check the Discounted Item and Discount Account.
 Input discount amount
- If Transaction Classes have been created, a Class drop-down selection will appear on the screen. Select the desired Class for this transaction.
- Click Save Discount.
- Click Show Balance Summary to view the assignment of this discount.
 Show Balance Summary
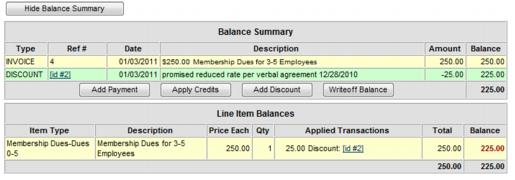 Balance Summary displayed
- This invoice will display the new amount when payment is received. At that time you may view the discount by clicking View Credits & Discounts.
 View Credits & Discounts on the Payments tab


Assign a discount when payment is received
- Click Billing in the left-hand menu.
- Click the Payments tab.
- Locate the desired member from which to receive payment.
- Click View Credits & Discounts.
- Click Add Discount.
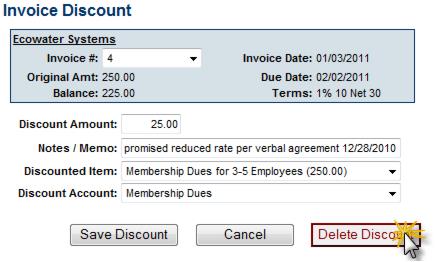
- The Invoice Discount screen will display.
- Invoice Discount Screen
- Type the Discount Amount, Notes/Memo (if desired), and double-check the Discounted Item and Discount Account.
- Note: The Discount Account must be identified as an Income account in Setup->Chart of Accounts. In Figure 3-19 above, a special Income account titled “Membership Dues Discounts” has been created that will maintain a list of discounted membership dues specifically for keeping track of early payment discounts.
- If Transaction Classes have been created, a Class drop-down selection will appear on the screen. Select the desired Class for this transaction.
- Click Save Discount
Delete a discount
Discounts are associated with a particular invoice and thus must be removed from the assigned invoice.
- Click Billing in the left-hand menu.
- Click the Invoices tab.
- Locate the desired invoice where a discount should be removed.
- Click Show Balance Summary (if not already selected).
- Click the Discount ID #.
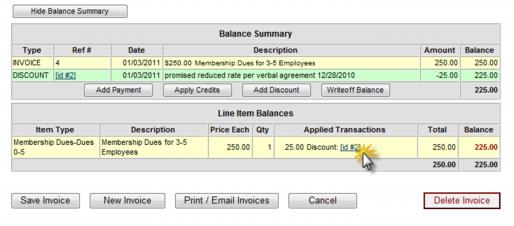 Selecting the Discount ID #
- Click Delete Discount.
 Clicking Delete Discount


Related Topics Write-off an Invoice