Member Management-Send an Email
Jump to navigation
Jump to search
 Send an Email Fields – Table 4-2
Sending an email may be done multiple places throughout the software, any of which will automatically create an entry in the communication history. However, if sending to a single member, choosing Send an Email on the Communication tab streamlines the process by automatically selecting the current member’s address.
Send an email
1. |
On the Communication tab, click New Communication and click Email with GrowthZone/ChamberMaster or Email with Outlook. |
2. |
If selecting Email with GrowthZone/ChamberMaster, edit the Send an Email fields. See Figure 4-3 and Table 4-2. If selecting Email with Outlook, complete your own email screen and send using your own familiar steps. See “Email Sending Options” for more information. |
3. |
Click Send Email. |
Selecting to include a carbon copy to sender allows a staff person the ability to store and file emails in their own email program and also the ability to view the email as it will be seen by the recipient.
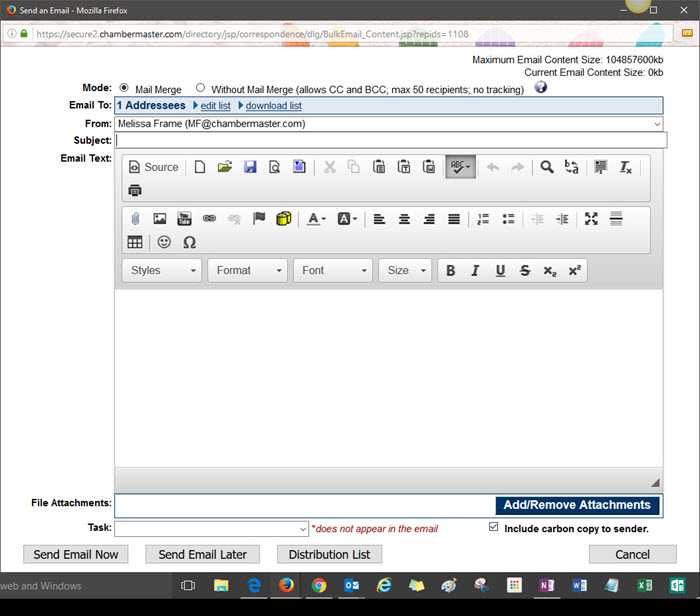

Figure 4-3 Send an Email
To: Select the email address for the one who should receive this email. Names and email addresses displayed here are pulled from the Contact Information area on the General tab and the individual rep’s email addresses on the Rep tab. Edit these locations to change the email addresses displayed here. The email address from the General tab is the default address displayed.
From: Select the email address for the one who should be displayed as the sender. Names and email addresses displayed here are pulled from the current list of staff names. Edit the names and email addresses displayed under Employees/ Reps in the Setup menu to change the email addresses displayed here. The email address of the logged-in staff person is the default address displayed.
Subject: Type a subject for this call. The Subject is used as a title for this entry. Leaving this field blank results in a title of [not specified], which cannot be changed later. (Maximum characters = 100)
Email Text: Type your email message here. Use standard formatting selections to customize your message.
Attachments: To add an attachment click Add/Remove Attachments and follow the directions on the screen.
Include carbon copy to sender: Click to select the Include carbon copy to sender check box to receive a copy of this message at the From address listed above.
Task: Select a task item that indicates the nature of this communication. If the desired task item is not listed, create your own under Setup->Correspondence Categories. These task items are then available as a Task item across all member records. The ability to add new task items is only available to staff with Administrator level permissions.