Working with Events
Contents
- 1 Configure Global Event Settings
- 1.1 Allow the Public to Submit Events
- 1.2 Configure Event RSS Feed Appearance for Your Public Web-site
- 1.3 Import Events from an iCal Feed
- 1.4 Change your Calendar Title
- 1.5 Configure Search/Filter Options for Public Calendar
- 1.6 Configure Default Event Registration Preferences
- 1.7 Define the Terminology used on Your Event Registration Page
- 1.8 Define Default Event Billing Preferences
- 1.9 Configure Default Sponsorship Levels
- 1.10 Configure Event Categories
Configure Global Event Settings
Allow the Public to Submit Events
You can provide the opportunity for the general public to submit events. You will be able to review the events and approve prior to them being displayed on your calendar.
- Click Setup in the left-hand menu.
- Click Event Options & Settings, in the Association Options section.
- Expand the General Settings section if needed.
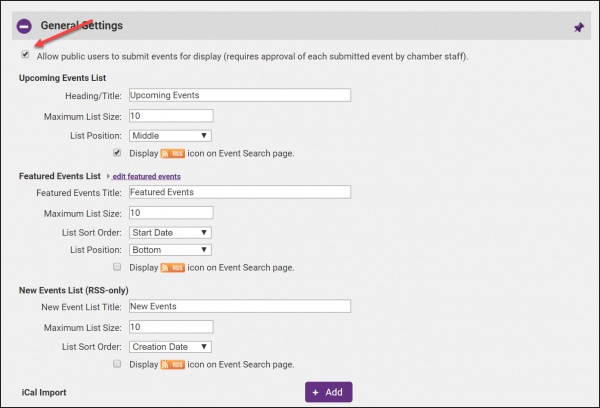
- Tick Allow public users to submit events for display (requires approval of each submitted event by chamber staff).
- Click Save.
Configure Event RSS Feed Appearance for Your Public Web-site
Three RSS Feeds are available for your events: Upcoming Events, Featured Events, and New Events. You can configure the appearance of these feeds under Setup > Event Options & Settings.
| NOTE: These settings simply allow you to configure the appearance of the RSS feeds. You will need to add the module to your web-site. If we have created a SmartCMS site, this is done by adding a module feed to your site. If we have created a GZCMS site for you or you are using a third party web-site, you will need to generate a widget for your site. |
- Click Setup in the left-hand menu.
- Click Event Options & Settings, in the Association Options section.
- If needed, expand the General Settings section.
- Configure the following for the *Upcoming Events List feed:
- Heading/Title: You may customize the title displayed at the top of your RSS Feed. The default is Upcoming Events.
- Maximum List Size: Configure the maximum number of upcoming events to include in your RSS Feed.
- List Position: N/A.
- Display rss icon on Event Search page: Select this option if you wish to include the RSS icon on your event search page.
- Configure the following for the *Featured Events List feed:
- Featured Events Title: You can customize the header displayed on your website for the Featured Events RSS feed. The default is Featured Events.
- Maximum List Size: Configure the maximum number of featured events to be included in your RSS Feed.
- List Sort Order: Select the order in which you wish to display your featured events in the RSS Feed. They may be displayed either by Start Date of the event, Event Title or Custom Order. If Custom Orderis selected, when editing your featured events, you will be able to drag and drop the events in the order that you wish.
- Display rss icon on Event Search page: Select this option if you wish to include the RSS icon on your event search page.
- Configure the following for the *New Events List (RSS Only) feed:
- New Event List Title: You can customize the header displayed on your website for the New Events RSS feed. The default is New Events.
- Maximum List Size: Configure the maximum number of new events to be included in your RSS Feed.
- List Sort Order: Select the order in which you wish to display your new events. The may be displayed by either Creation Date, Event Start date or Event Title.
- Display rss icon on Event Search page: Select this option if you wish to include the RSS icon on your event search page.
- Click Save.
Import Events from an iCal Feed
iCalendar (iCal) is an open standard for exchanging calendar and scheduling information. iCal feed enables an application to fetch, push or syncronize date and time based data to an another calendar application. The ChamberMaster/MemberZone iCal feed import provides an ability for you to upload your iCal list (from the Cloud drive or other http url used with iPhones, iPads etc and other similar calendars) and import directly into the event calendar. A URL is specified to the location of this iCal and then each night the events are synchronized. NOTE: Refer to the documentation provided by your calendar software for instructions on creating the required URL.
- Click Setup in the left-hand menu.
- Click Event Options & Settings, in the Association Options section.
- If needed, expand the General Settings section.
- In the iCal Import area, click the Add button.
- Enter the URL for your iCal feed.
- Click Save.
| NOTE: Once an iCal has been added, the events on that calendar may take up to 24 hours to display on your event calendar. |
Change your Calendar Title
- Click Setup in the left-hand menu.
- Click Event Options & Settings, in the Association Options section.
- If needed, expand the Calendar Search Options section.
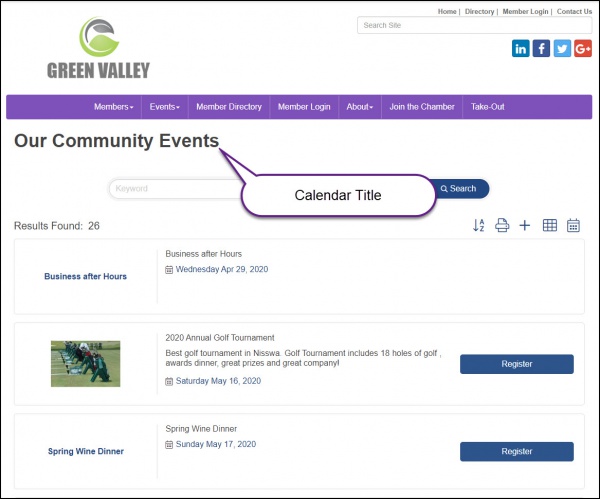
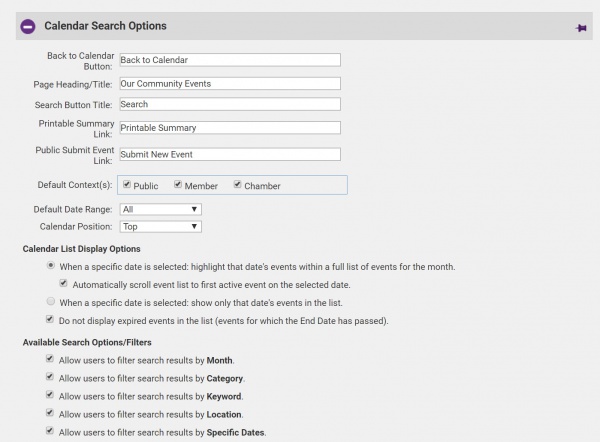
- Enter the Page Heading/Title you wish to appear for your calendar.
- Click Save.
Configure Search/Filter Options for Public Calendar
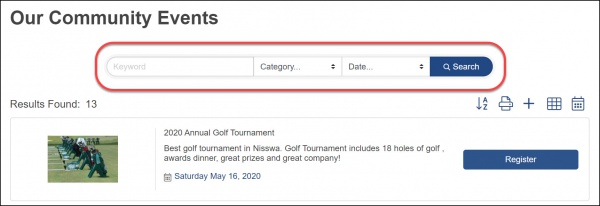
To make it easy for visitors to your web-site to find events, you can enable various filtering options. These include searching by keyword, category, date and location (if applicable).
- Click Setup in the left-hand menu.
- Click Event Options & Settings, in the Association Options section.
- If needed, expand the Calendar Search Options section.
- Choose the desired search options from Available Search Options/Filters:
- Allow users to filter search results by Month.
- Allow users to filter search results by Category.
- Allow users to filter search results by Keyword.
- Allow users to filter search results by Location.
- Allow users to filter search results by Specific Dates.
- Click Save.
Configure Default Event Registration Preferences
The Registration and Billing Preferences settings allow you to configure such things as what fields you wish to require on your event registration forms, how members will be authenticated when registering for events, registration form terminology, and so on. If many of these settings are consistent across all of your events, setting up defaults will make it more efficient when creating those events. Some, but not all, of the default settings may be over-ridden at the individual event level.
Configure How Members are Authenticated during Event Registration
The Registration Member Authentication Method settings are used to determine how the system will authenticate members. If you offer events with member only pricing, this setting allows the system to determine whether the registrant is an active member and will display member only prices if the registrant is.
- Click Setup in the left-hand menu.
- Click Event Options & Settings, in the Association Options section.
- If needed, expand the Registration and Billing Preferences section.
- Select the authentication method that you wish to use Registration Member Authentication Method section:
- Email Address Only (No Password Required): When this option is selected, a member registrant would simply need to enter in an email address to be authenticated. If the email address is found to be associated to an active member, member pricing will be made available. Security on this option is low, but it is easy for your members. NOTE: If using this method, your members would not be able to use a stored credit card or bank account to pay for their registration.
- Login Name and Password: When this option is selected, members will be authenticated by enter the user name/password for the Member Information Center. This option provides higher security than email address only, and your members would be able to use stored credit cards/bank accounts (if applicable). To use this method, you will need to ensure that all of your representatives have log-in credentials to the MIC.
- Login Name and Password / Email Address Only (Dual Option): When this option is selected, members may use either their email address or MIC login credentials. Most members will opt for the easy option of using their email address only uses the less secure method of registration. However the option of fully authenticating with a complete login and password is available too. If customers are constantly frustrated having to enter their contact information or can't use their stored credit card to check out, you may wish to switch to the Login Name and Password option.
- Member Names List and Password: When this option is selected, a list of members is displayed, and after picking the member name, a password is required. This will expose your entire list of members to the general public.
- Click Save.
| NOTE: If you wish to always have member contact information auto-populate for them and provide an option to save and use stored credit card and bank accounts, you should select Login Name and Password. |
Define the Contact Information Required for Event Registrants
Under Setup > Events Options & Settings, you can set the contact fields (address, phone, etc.) that will be required on your event registration pages. NOTE: These settings are global. You will not be able to over-ride them at the event level.
- Click Setup in the left-hand menu.
- Click Event Options & Settings, in the Association Options section.
- Expand the Registration and Billing Preferences section if needed.
- In the Registration Preferences section, enable the desired options (keeping in mind that these are global settings that you will not be able to over-ride at the event level):
- Require registrants to provide a company name.
- Require registrants to provide an email address.
- Require registrants to provide first name.
- Require registrants to provide a phone number.
- Require registrants to provide an address.
- Click Save.
Require Staff to Complete Required Fields
When a staff member registers someone from the back-office, you can choose to enforce that staff complete required fields.
- Click Setup in the left-hand menu.
- Click Event Options & Settings, in the Association Options section.
- Expand the Registration and Billing Preferences section if needed.
- Tick Enforce required fields for staff.
- Click Save.
Include the Event Reminder Option on Your Event Page
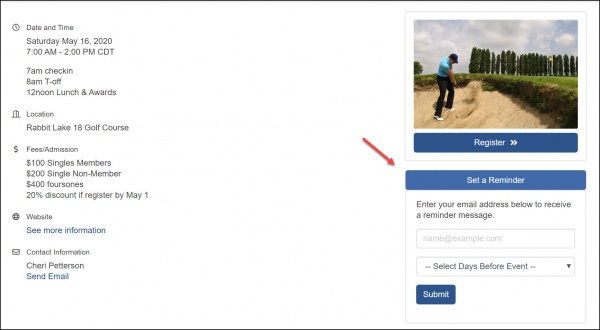
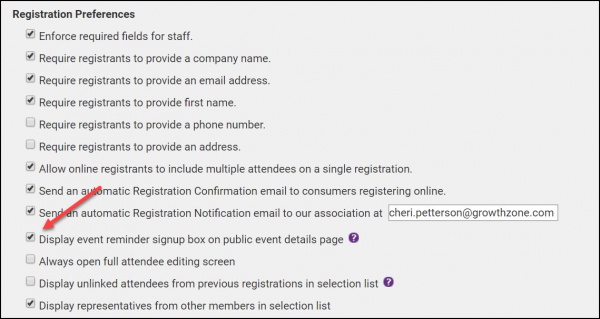
The Reminder option on your event page allows visitors to your web-site to sign up for an email reminder. This reminder is not a reminder that they have registered for the event, but a reminder that the event is scheduled. This will enable the Set a Reminder button on the main event page.
- Click Setup in the left-hand navigation panel.
- Click Event Options & Settings.
- Expand the Registration and Billing Preferences section if needed.
- Tick the check-box for Display event reminder signup box on public event details page.
- Click Save.
Define the Terminology used on Your Event Registration Page
Various options can be configured to suit your needs on the registration page. For example, you can change the statement that appears the member login option or change the message displayed when registration is closed.
| IMPORTANT: Terminology settings are global and you will NOT be able to over-ride these at the event level. |
Define Registration Closed Message for Events
- Click Setup in the left-hand navigation panel.
- Click Event Options & Settings.
- Expand the Registration and Billing Preferences section if needed.
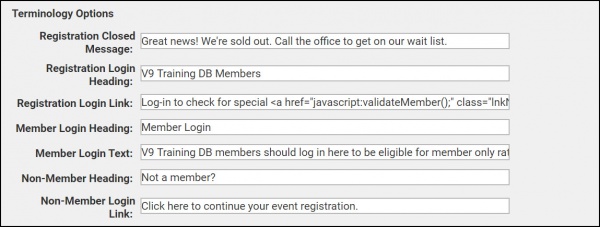
- Define the following messages (Note: this is a global setting that you will not be able to over-ride at the event level):
- Registration Closed Message: If you have set a cut-off day for online registrations, this message will be displayed after that date.
- Click Save.
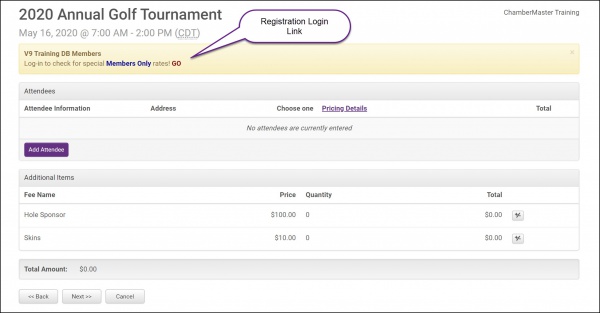
Define Member Log-in Messaging for Events
When registering for events, registrants are presented with the option to log-in as members OR continue as a guest. The terminology displayed for member log-in can be customized.
| IMPORTANT: These are global settings, you will not be able to over-ride at the event level |
- Click Setup in the left-hand navigation panel.
- Click Event Options & Settings.
- Expand the Registration and Billing Preferences section if needed.
- Configure the following messages (IMPORTANT: These are global settings, you will not be able to over-ride at the event level):
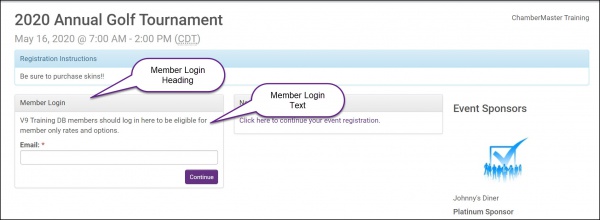
- Member Login Heading
- Member Login Text
- Registration Login Link: This message appears when the non-member registration link is selected, prompting members, once again to login to get member rates.
- Click Save.
Define Non-member Log-in Messaging for Events
When registering for events, registrants are presented with the option to log-in as members OR continue as a guest. The terminology displayed for non-members can be customized.
| IMPORTANT: These are global settings, you will not be able to over-ride at the event level |
- Click Setup in the left-hand navigation panel.
- Click Event Options & Settings.
- Expand the Registration and Billing Preferences section if needed.
- Configure the following messages (IMPORTANT: These are global settings, you will NOT be able to over-ride at the event level):
- Non-Member Heading
- Non-Member Login Link
- Click Save.
Define Chamber/Association Message included on Event Confirmation Emails
Under Events Options & Settings you can configure a message to be included on ALL of your event confirmations. IMPORTANT: This is a global setting, and can NOT be changed at the event level. At the event level you will be able to add a message to the confirmation, however, if you have also configured a global message, both would be included in the confirmation.
- Click Setup in the left-hand navigation panel.
- Click Event Options & Settings.
- Expand the Registration and Billing Preferences section if needed.
- In the Registration Email Confirmation Billing Message Options' section, click the edit link to configure the Chamber Message. Click
- Click Save.
Define Default Event Billing Preferences
Define Where Invoice/Receipts are Logged for Non-members
If your event is setup to allow for credit cards or invoicing, the system will log invoices and payments. You must define where you would like these to be logged. You can log all invoices/payments under one record in the database OR you can create a new member record for each. Best Practice is to assign all to a non-member record as creating a new member record could result in a large number of contacts in your database. NOTE: This setting can be over-ridden at the individual event level.
- Click Setup in the left-hand navigation panel.
- Click Event Options & Settings.
- Expand the Registration and Billing Preferences section if needed.
- In the Invoice/Receipt Options section, choose from the following:
- Assign only non-member invoices/receipts to a single Member: > Non-Member Transactions: If this option is selected, all transactions will be logged on the Account tab for the Non-Member Transactions contact in your database. This contact is setup by default, but, if you wish, you can choose a different contact.
- Create a new Member for each non-member participant that pays by credit card to assign the invoice/receipt to: Choose this option if you would like a new member created in your database. The member status will be set to Prospect. Caution: Selecting this option may result in the creation of many new Customer records and would also impact your accounting software records.
- Click Save.
Define Transactions created for Event Credit Card Payments
This option allows you to define whether an invoice and a payment record should be created OR whether just a receipt is created when registration is paid by Credit Card. Your accounting practices will drive the choice. NOTE: This setting can be over-ridden at the individual event level.
- Click Setup in the left-hand navigation panel.
- Click Event Options & Settings.
- Expand the Registration and Billing Preferences section if needed.
- In the Credit Card Payment Tracking Options section, choose one of the following:
- Create a new Invoice and Payment for each Credit Card Payment
- Create a new Sales Receipt for each Credit Card Payment
- Do not create Credit Card Payment records (NOT recommended)
- Click Save.
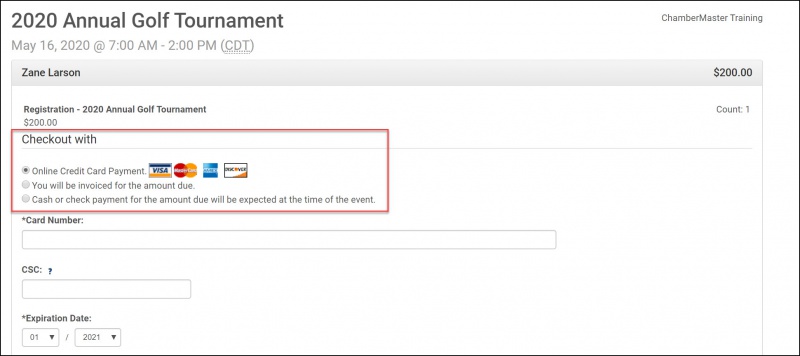
Define Event Payment Check-out Messages
This option allows you to define the message included on the event check-out page. IMPORTANT: These settings are global and can NOT be over-ridden at the event level.
- Click Setup in the left-hand navigation panel.
- Click Event Options & Settings.
- Expand the Registration and Billing Preferences section if needed.
- In the Registration Email Confirmation Billing Message Options section, configure the following messages:
- Credit Card
- Invoice
- Cash/Check
- No Charge - this message/option would only display for internal staff.
- Click Save.
Define Event Invoicing Options
Define Default Line Item Description for Event Invoices
Under Event Options & Settings you can set the default line item description for event invoices. NOTE: You will be able to over-ride this at the individual event level.
- Click Setup in the left-hand navigation panel.
- Click Event Options & Settings.
- Expand the Registration and Billing Preferences section if needed.
- From the Default Line Item Description list, choose the desired description. NOTE: You will be able to over-ride this when generating your event invoices.
- Click Save.
Define Default Bill To Contact for Event Invoices
Under Event Options & Settings you can define the Bill To contact for event invoices. By default invoices will be billed to the registrant, however, you can alternately choose to bill to the registrants company billing representative, if available. NOTE: The Bill To contact can be over-ridden before delivering invoices.
- Click Setup in the left-hand navigation panel.
- Click Event Options & Settings.
- Expand the Registration and Billing Preferences section if needed.
- From the Default Bill/Sold To Contact Type list select Registrant or Member Billing Rep (if available). If the registrant is NOT a member, the system will default back to registrant as the bill to contact.
- Click Save.
Configure Default Sponsorship Levels
If the Sponsorship Levels you use are consistent from one event to another, setting up defaults make it efficient for you when you setup individual event. When setting up the event, you will have the option to use the defaults (and save time) or add new sponsorship levels.
- Click Setup in the left-hand menu.
- Click Event Options & Settings, in the Association Options section.
- If needed, expand the Sponsors section.
- Click Edit Default Levels.
- Click Add New Level.
- Select the desired Sort Order. This option allows you to organize the order in which the sponsorship levels will be displayed on your event page.
- Enter the name of the sponsorship level in the Name text-box.
- Select the desired Appearance options. If you wish to include the name of the sponsorship level on your event page, select Display Header.
- Repeat steps 5 - 7 to add additional sponsorship levels.
- Click Save Changes.
- Click Close.
- Click Save.
Configure Event Categories
Event Categories are a great way to allow your members and the public to search for events on your event calendar. Examples of categories include sporting events, arts & culture, educational opportunities, and so. You may configure as many categories as meet your business needs. When creating events, you will associate the event to one or more categories.
Add New Event Categories
- Click Setup in the left-hand menu.
- Click Events Calendar: View/Edit Event Types in the Information Request section.
- Enter a name for the event category in the New Event Type Name text box. This is the name of the category that will be display for searching purposes on your public web-site and within the MIC.
- Click Add Event Type to save the new category.
- Repeat steps 3 - 4 above to add additional categories.
| NOTE: Event Categories can also be created "on the fly" on an event's General tab. |
Edit an Existing Event Category
- Click Setup in the left-hand menu.
- Click Events Calendar: View/Edit Event Types in the Information Request section.
- Select the category you wish to edit from the Edit Existing Event Type drop-down list.
- Make the edits that you wish to the event category name in the Change Event Type Name To text box.
- Click Update Event Type.
Using Event Categories to Display Separate Calendar on Web-site
Multiple "calendars" may be included on you website by using your event categories. For example, if you wish to include a calendar for your chamber events, vs. community event, this is achieved by adding an event category to your event calendar url.
To find the event category id:
- For any event, click the General tab.
- Click the edit categories link in the Placement Options section.
The ids are the numbers to the left of each category in the window that pops up.
Add this category id to your standard event calendar link. For example, in the category list shown above, community events are category id 3. If you wish to display a calendar of just these events: the standard event calendar url is of the following http://v9training.smartcms.site/events/calendar/, you will add the category id http://v9training.smartcms.site/events/calendar/calendarcatgid/3. This URL can then be used to add a page to your website, displaying your event calendar filtered to just community events.
