Working with GrowthZone Pay
Contents
- 1 GrowthZone Pay Processing Overview
- 2 Initial Set Up
- 3 Member Options for Storing Payment Profiles
- 4 Setup Recurring Charges to be billed to a Stored Payment Profile
- 5 Process ePayment Batches
- 6 Manage and View GrowthZone Pay Transactions
- 7 ePayment Reporting
- 8 Running a Single Direct Transaction
- 9 GrowthZone Pay - Point of Sales
- 10 Using the Mobile Card Reader with GrowthZone Pay
- 11 FAQs
GrowthZone Pay Processing Overview
Accept payments using GrowthZone Pay. Members can securely store their account information to conveniently pay for events or futures invoices. In addition, recurring charges may be setup to make sure membership dues are automatically collected when your invoice batch is run.
Due to the tight integration with your database, there is no need to log into a separate portal to view successes or failures, perform refunds or view statements from your processor. It’s all included within your Integrated Billing screens – even providing a virtual terminal for running single direct charges.
Features include:
- Automatic recurring credit/debit card charges so you are sure to get your payments
- Safe storage of payment card info for convenient event registration and member payments
- Automatic matching of credit card payments with invoices, saving hours of labor
- Payment of invoices using bank account (US customers only)
- Automatic bank draft (ACH) option available and included with setup (US customers only)
- Online, real-time statements and bank deposit/transfer reports
- Virtual terminal included for running single direct charges
- Convenience – one management location, integrated with billing, simple
- Inclusive pricing – all features, integrated, single point of support – one simple rate!
- Mobile card reader use with the premium staff app to allow smooth, efficient checkout at events
- Point of Sale feature - sell one-off items like raffle tickets, silent auction items
Click here for more information.
Initial Set Up
![]() This video walks you through the step-by-step process (outlined below) of getting set up with GrowthZone Pay.
This video walks you through the step-by-step process (outlined below) of getting set up with GrowthZone Pay.
Entering Your Bank Account Information
After your account has been enabled by customer support, you will need to complete the configuration of GrowthZone Pay by signing up and entering necessary bank account information.
- Click Setup in the left-hand navigation panel.
- Click Billing Options & Settings.
- If needed, expand the Credit Cards section.
- Click the Account Setup button.
- Select your country from the drop-down list. Note: GrowthZone and Stripe's terms and conditions can be viewed on this page. These terms and conditions can also be viewed on the Billing Setup page at any time. Additionally, you can access information about your fee structure, PCI Compliance, features and FAQ's.
- Click Sign up.
- The name of your organization will be automatically populated.
- Statement Descriptor: This is the name that will be displayed on statements. To avoid dispute, best practice is to ensure that the descriptor provides sufficient information so the purchasers recognizes your organization. Max length: 22 characters. The following characters are not allowed: greater than, less than, single quote, double-quote or symbols (>, <, ', ").
- Product Description: Optional - provide a general description of what you are selling; what purchases will be made on this account: i.e.memberships, event registrations, sponsorships etc.
- Public Contact Info: Enter a phone number, email, and public website url for your organization.
- Settings
- Country: Country will default to the country previously selected.
- Decline Charge On: Select when credit card charges should be declined. CVC Failure and/or AVS Failure.
- Bank Accounts: Click the Add Bank Account button to enter the bank account where your payments will be transferred. If setting up a Canadian bank, please enter the Transit # XXXXX and Institution # YYY in the Transit/Routing Number field as follows: XXXXX-YYY.
- Click Save.
- Fill in required Account Holder information.
- Click Save'. Once submitted, this information is reviewed by Stripe, the company we partner with to bring you GrowthZone Pay. #While still in the Credit Card section of the Billing Options & Settings page, verify the Credit Card settings are configured as needed. See ' for further instruction.
- Click Save.


NOTE: If the Canadian user is setting up GrowthZone Pay, but they don't have a properly formatted routing number they likely have a canadian MICR Number in the format of BBBBB-AAA. To use this MICR Number it needs to be converted to a routing number format which would be Routing Number - 0AAABBBBB
Reference: https://www.canadaroutingnumber.com/
NOTE: Once you have completed GrowthZone Pay setup, be sure to setup an email for dispute notification. See Setup Dispute Notification.
GrowthZone Pay Status Verification
An email will be sent to the email address entered when you filled out your Account Setup information when your account has been verified. NOTE: If no email address was entered, then the email address listed under Billing ➝ Reports ➝ Payment Processing Reports ➝ Other Reports, Features and Settings will be used or lastly the email address under Setup ➝ Association Information.
To verify the status of your account:
- Click Setup in the left-hand navigation panel.
- Click Billing Options & Settings.
- If needed, expand the Credit Cards section.

- Verification Complete: This will indicate (yes/no) if the required verification by Stripe & GrowthZone have been completed.
- Charges Enabled: This will indicate (yes/no) whether charges may be processed through the gateway.
- Transfers Enabled: This will indicate (yes/no) whether transfers to your bank account have been enabled.
- Bank Account: This will indicate (yes/no) whether your bank account information has been successfully verified.
NOTE: If more information is required for verification, you will be notified by email. The status will automatically change to Verification Complete = true when your account has been marked verified by Stripe, Inc. They may simply be processing your information or waiting until you have a greater amount of charges before requesting more verification information.
Setup Dispute Notification Email
After completing your GrowthZone pay setup, you will configure the email to which notifications of disputes should be sent:
- Click Billing in the left-hand navigation panel.
- Click the Reports tab.
- Click Payment Processing Reports / Management Tools in the Banking section.
- Click Features & Settings.
- Enter a valid email address in the Email address for dispute transactions section.
- Click Save.

Running a Test
- Click Billing in the left-hand navigation panel.
- Click the Reports tab.
- Click Payment Processing Reports / Management Tools in the Banking section.
- Click Features & Settings.
- Enter an amount in the amount text box (minimum $0.50).
- Enter a description to help you identify this transaction on your bank account.
- Click Continue.
- Enter your email address.
- Enter Credit Card information.
- Click Pay.

The transaction will be displayed in the Payment Card Transactions report at the bottom of the screen, as well as on the Monthly Statement. You will also see this transaction in the Bank Account Deposits/Transfer report after two business days.
Your account is live and ready to process transactions!
Member Options for Storing Payment Profiles
With GrowthZone Pay, you members may easily store credit card or bank account information to be used for future purchases, and for recurring fee items, such as their membership dues.
Invite your members to sign up for Automatic Monthly Payments
The email template “Automatic Monthly Payment Invitation” may be used to encourage your members to store their credit card or bank account information via the MIC.

The template includes a link into the MIC where they can easily enter their payment profile. Open the email template “Automatic Monthly Payment Invitation”, modify with any desired changes and send to your members. It also includes suggested authorization verbiage that you should modify to fit your needs, noticing especially the use of the mail merge field [Annual Fees and Dues Amount] which displays a total value of all recurring Membership Fees and Dues assigned to their account. See Working with Email Templates for information on customizing and sending the email.
Members have an option to notify you once they’ve entered their Payment Profile and would like to setup automatic payments. This will send an email to the address listed under Setup ➝ Billing Options and Settings under Credit Cards section. If no email is selected here, the email under Setup ➝ Association Information will be notified.

Storing a Credit Card in the MIC
With GrowthZone Pay, your members will be able to store credit cards in the MIC. They can then notify you that they wish to use the stored payment profile for recurring fees. NOTE: The member must have permissions to manage the company billing to store a credit card.
- In the MIC, click Account Settings in the upper right.
- Click Billing.
- In the left-hand navigation panel, click Payment Profiles.
- Click Add a New Payment Profile.
- The Credit Card radio button is enabled by default. Enter all required credit card information.
- (Optional) - Click the Notify [Your Organization Name] that I am interested in setting up automatic payments and select to use this profile for the recurring charges. Note: Once automatic payments are setup with [Your Organization Name], keep this checkbox selected so that you can easily identify which profile is being charged. check-box if the member wishes to setup automatic payments.
- Click Add Profile.


Storing a Bank Account in the MIC
Members who would like to pay for one-time or recurring transactions with a bank account (U.S. banks only) must first set the account up as a Payment Profile in the MIC and then have it be verified.
![]() This video shows how members store a bank account, verify and then use later.
This video shows how members store a bank account, verify and then use later.
- In the MIC, click Account Settings in the upper right.
- Click Billing.
- In the left-hand navigation panel, click Payment Profiles.
- Click Add a New Payment Profile.
- Click the Bank Account radio button.
- Under Payment Information, select the Bank Account option.
- Complete the form with all the required fields.
- Click the Add Profile button.

The new bank account will be listed as Un-verified on the payment profiles screen.

To verify the account, the member must look for two small deposits in the account. Once these deposits have been made, your member can return to complete the verification of the account.
- In the MIC, click Account Settings in the upper right.
- Click Billing.
- In the left-hand navigation panel, click Payment Profiles.
- Click the un-verified bank account, to expand the details.
- Enter the dollar value of the two deposits in the *Deposit Ammount text boxes.
- Click Update Profile.

The bank account will now be available for use. NOTE: The ePayment Profile Report may be used to generate a list of your members who have stored bank account information, and whether the accounts are verified or un-verified. See ePayment Profile Report.
Paying with a Credit Card
![]() This video shows how members can pay for an event using a stored credit card.
This video shows how members can pay for an event using a stored credit card.
During the checkout process, when paying for an event or invoice, members will have the option to save a credit card for future transactions by clicking the Securely Save this Card checkbox. If a member would like to add a card as a payment profile without making a payment, they simply need to add a payment profile in the MIC by going to Account Settings ➝ Billing ➝ Payment Profile. Note: Storing and using payment profiles is only available to fully authenticated users, (ie, the user must enter their login and password).
NOTE: There are no batches with our GrowthZone Payment Processing as all transactions are captured immediately. So any dependence would be on the banks and credit card companies themselves.
Setup Recurring Charges to be billed to a Stored Payment Profile
With GrowthZone pay, you can request authorization from your members to implement automatic payments to a stored credit card or bank account (US Banks only).
Assign a Stored Payment Profile to Recurring Fees
If your member has added a stored profile via the MIC, and the member has authorized you to charge recurring fees to the profile:
- Select the desired member's Account tab.
- In the Membership Fees & Dues section, click the hyper-link for the recurring fee you wish to assign to e-payment.
- Click the Charge to ACH, debit or credit card check-box.
- In the Choose drop-down list select the desired stored profile.
- Click Save & Exit.


The recurring schedule will now display epayment in the Frequency column.

Once the stored payment profile has been assigned, best practice is to send the member a follow-up email. The default template Automatic Payment Confirmation may be used as a starting point. See Working with Email Templates for further instructions.
NOTE: If you are selecting a bank account, you will be notified if the account has not yet been verified. The bank account owner must look for 2 small deposits in their bank account. These amounts must be entered into the profile by the owner when logged into the Member Info Center, or on their behalf by a staff person when editing this profile. You will still be able to assign the bank account, however, if the account is still un-verified when you run the batch, a warning notification will be displayed.

Store a Credit Card Payment Profile when Paying an Invoice (Back Office)
In cases where your member contacts you directly to make a payment, by credit card, towards an invoice, you will have the opportunity to ask if they would like to store their credit card for future use. You may do this from the member's Account tab, or from the Billing Center. NOTE: This procedure is only for storing credit cards, and is not available for storing bank accounts.
- Select the desired member from the member list in the Billing Center.
- Click the New Payment button.
- Enter the Payment Amount.
- Select Credit Card from the Payment Method drop-down list.
- Click Capture Payment.
- Enter required credit card information and select Securely Save this Card.
- Click Checkout.


The invoice(s) is now paid, and the credit card information is saved to be used for recurring charges.
Process ePayment Batches
Processing batches of invoices for members that have been setup on ePayment is similar to processing batches for non-ePayment members. The task list will notify of invoices that need to be generated, and by clicking into the invoices, you will be able to process ePayments for recurring dues.
- In the left-hand navigation panel, click Invoices in the Task List.

- The epayment column will display Yes for invoices that need to be created for ePayment.
- Click on Create Invoices.
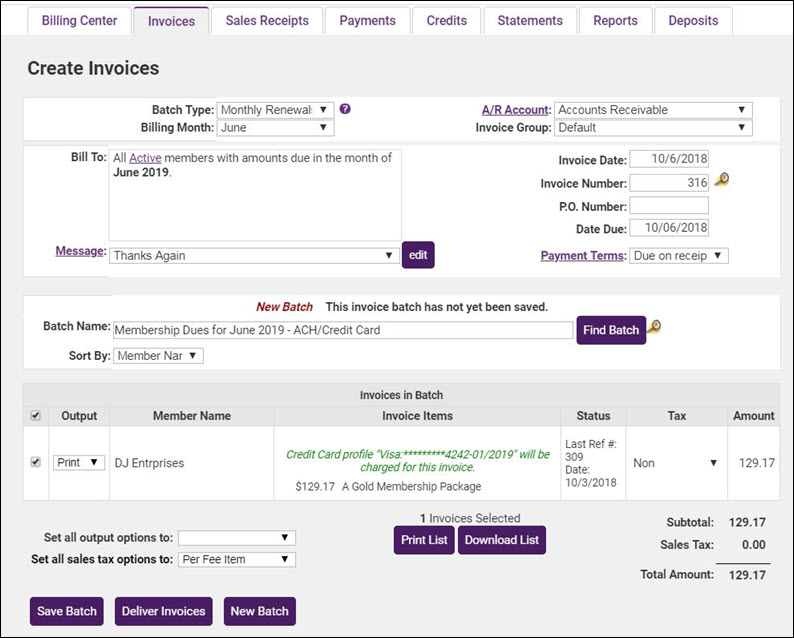
- Note: If you have already created this batch and you see the message that says “Match Found”, you must scroll down and click New Batch. If a match was found it means you’ve already invoiced this particular set of invoices. If there are additional invoices that need to be “added to this batch”, scroll down and click New Batch.
- In the Item Description field, you will see a notification that the ePayment profile will be charged the amount of the invoice. This will display the last four digits of a credit card, along with the expiration date of the card. If the card is expired, best practice is to remove the invoice from the batch, and contact the member to update the card. Additionally, if the ePayment profile is a bank account, Un-verified will be displayed if the member has not verified the account. You should removed these invoices from the batch until the account has been verified by the account holder (or by a staff member impersonating the member). See Storing a Bank Account in the MIC for further information.
- Click Save Batch to save the batch. OR, click Deliver Invoices. If Deliver Invoice is selected, you will be able to send a paid invoice to the member, for their records. for further details on delivering invoices.


CAUTION: A batch with automatic epayments should NOT be deleted and recreated as this would charge their accounts automatically all over again. Exclude previously created transactions if it is necessary to create an additional batch of invoices. If a batch has previously been created Match Found will be displayed.
Notification of ePayment Failures
If an ePayment fails to process, a notification will be sent to the member. The email will indicate which type of charge failed (Credit Card or Bank Account) and provide the member with instructions on logging into the MIC to update their profile. Both types will show the last 4 digits of the account number. For credit cards it will display the expiration date in the message.
- Bank Account Failure Notification - to Member

- Bank Account Failure Notification - to Staff

Notes:
- Manual epayment members will be included in the batch, but do not have any bank transaction created, only the desired bookkeeping transaction(s) is created. Contact your bank to setup the transaction details for these members.
- Note to legacy ‘ACH’ users: In order to integrate the recurring automatic ACH selection with the option that we've called "ACH" for many years, we renamed the old "ACH" selections to "Manual epayment" (Oct 2014). It still works the way it used to but now the new automated selections are integrated into these same choices. Watch this video to see where your old 'ACH" choices went. (NOTE: Reference is made to Auth.net in video, but Integrated Payment Processing also applies)

Manage and View GrowthZone Pay Transactions
Payment Processing Report
The Payment Processing Report will allow you to view the date of transactions, the success/failure of those transactions, and provide the opportunity to refund a transaction.
![]() This video shows where to view and manage your transactions.
This video shows where to view and manage your transactions.
- Select Billing in the left-hand navigation panel.
- Click the Reports tab.
- Click Payment Processing Reports/Management Tools in the Banking section.
- Enter desired filtering criteria:
- Member: If you wish to filter the report to a single member, click the Select a Member hyper-link, and choose the desired member.
- From/To: To filter the report on a specific date range, enter the From date and the To date. Alternately, click the more... link and select a range, or click Do Not Filter to run the report for all transactions.
- Unresolved disputed transactions regardless of date: Click the radio button if you want to include un-resolved disputes regardless of the date range selected.
- Only show successful transactions: Click the radio button if you wish to see only successful transactions.
- Show item details: Click this radio button if you wish to see the fee items and bill to contact in the report.
- Show unresolved disputes: Click this radio button if you wish to show unresolved disputes in the report.
- Click Refresh Report.


Bank Account Deposits/Transfers
The Bank Account Deposits/Transfers report provides a list of all transfers. This report will give you all of the payments that match up with a specific transfers to your bank account and the initial transaction date. This report should be used to find the fees associated with credit card transactions so that you can make the appropriate journal entries into your accounting software. This report will also display any adjustments and/or refunds made.
|
|
NOTE: Your very first deposit (transfer) may take up to 7 days to be deposited. After that, deposits (transfers) are made daily and are typically composed of the payments that were processed two days prior for most US and Australia customers; seven days for other countries. For example, August 1st charges are deposited by August 3rd for most US and Australia customers; August 8th for other countries. August 2nd charges are deposited by August 4th for most US and Australia customers; August 9th for other countries. On occasion, banks may take 2-3 additional days to post funds. Also keep in mind that transfers that are scheduled on weekends or holidays won’t be accepted by your bank until the next business day. Also some US and Australia customers may initially be set for a seven day transfer while business activity is evaluated. |
- Select Billing in the left-hand navigation panel.
- Click the Reports tab.
- Click Payment Processing Reports/Management Tools in the Banking section.
- Click the Bank Account Deposits/Transfers button.
- The current month will be displayed by default. Select the desired Month to view a previous month, and click Refresh.
- A list of all transfers will be displayed. These transfers should be shown as deposits to your bank account.
- Click the Details button to view further information about a transfer.


Record GrowthZone Pay Transaction Fees with Quickbooks
Note: These instructions are for the desktop version of QuickBooks. The process is similar in QuickBooks Online, Peachtree or other accounting software. When recording credit card fees, they will need to be added as a negative line item in your software.
- Export and import your detailed IIF file as described in Exporting Journal Entries for Quickbooks Desktop. NOTE: When creating the Journal Entry Export file, select Exclude Deposit Transactions for the Deposit choice.
- Record your deposit in QuickBooks: go to Banking, Make Deposits (or click Record Deposits on the Home screen).
- Click the Payments button to view all payments which will include those brought over through your journal entries.
- Select the payments that are included in the deposit and click OK. Note: Find the list of payments to include in your deposit by viewing the Bank Account Deposits/Transfers report under Billing ➝ Reports ➝ Payment Processing Reports / Management Tools in your ChamberMaster or MemberZone database.
- On the QuickBooks Deposit screen add a new line item to record the transactions fee. Note: A typical account to select is a Bank Service Charge expense account. Enter the total transaction fee amount for that deposit with a negative value.
- Verify that the bank deposit total matches the deposit total on the Bank Account Deposits/Transfers report.


In this example, the Journal entry for the deposit appears like this in QuickBooks.

ePayment Reporting
ePayment Fee Assignment report
The ePayment Fee Assignment report will display which members have manual or automatic epayments assigned, for how much, how often, and the start or end dates assigned. You can also report on a specific month and year to view a scheduled total of epayment fees that would be billed that month. NOTE: This report may be used for GrowthZone Pay and Authorize.NET CIM enabled processors. Additionally, the report may be generated for manual ePayments (where you are using a 3rd party or other outside financial institute to actually charge the member.)
- Click Reports in the left-hand navigation panel.
- Type ePayment in the keyword search box.
- Select ePayment Fee Assignment [Beta].
- Entered desired filtering options for report results:
- OPTIONAL - Filter to a specific month & year by picking a date: If you wish to filter the report results to a specific date/month, clear the None check-box, and select desired date.
- Member Status: To view all member status, select All/Any from the drop-down list or select the desired status.
- Fee Item Types: To view the recurring ePayments for all fee item types, select (All) or select the individual fee items types you wish to include in your report from the drop-down list.
- ePayment Type: Select Stored Profile or Manual ePayment. NOTE: Manual ePayment is for customers using the integrated billing but are using a 3rd party or other outside financial institute to actually charge the member.
- Sort: Select how you would like the report sorted from the following options:
- Company
- Fee Start Date
- Fee Expiration Date
- Fee Frequency
- Renewal Month
- Amount Billed in Report Month
- Click View Report.


ePayment Profile Report
The ePayment Profile Report provides information on stored profiles (credit card and bank accounts). The report can be useful in identifying for you cards that have expired, ensuring you can notify your members prior to attempting to bill the expired card.
Additionally, for members who have stored bank account information, you can check to ensure the bank accounts have been verified, prior to attempting to bill the account.
This report may be used for GrowthZone Pay or Authorize.Net with CIM (Customer Information Manager) enabled.
- Click Reports in the left-hand navigation panel.
- Type ePayment in the keyword search box.
- Select ePayment Profile Report.
- Select the desired filtering options for the report:
- Profile Type: You may select All, or select either Credit/Debit Card or Bank/ACH.
- Status: You may select all statuses, or filter the report on Valid, Expired, Unverified, Unknown.
- NOTE: Bank account status of unverified only applies to GrowthZone Pay customers, if displaying a bank account of Authorize.net customers, the Valid column will say N/A, as your ChamberMaster/MemberZone software does not track this for Authorize.net bank accounts.
- Sort: Select how you would like the report results sorted from:
- Company Name
- Rep First, Last
- Rep Last, First
- Modified Date
- Autopay Selected
- Click View Report


Running a Single Direct Transaction
If there are situations where you need to run a transaction for a one-time charge without an invoice or sales receipt. These transactions will not show up in your Integrated Billing reports. It only appears on the Payment Processing Report.
- Click Billing in the left-hand navigation panel
- Click the Reports tab.
- Click Payment Processing Reports / Management Tools.
- Click the plus sign next to Features and Settings.
- In the Process a single direct transaction section, enter an Amount, a Description (optional)
- Click Continue.
- Enter the customer's email address and credit card information.
- Click Pay.


NOTE: No invoice or receipt will be created; this is a single one-off transaction direct to the processor. The transaction will still appear in the Transactions below listed as "Single direct transaction".
GrowthZone Pay - Point of Sales
When using GrowthZone Pay, you have the ability to setup and run point of sale functionality using the staff app from the App Store (iOS) or the Google Play Store (Android). See Working with Point of Sale for complete details.
Using the Mobile Card Reader with GrowthZone Pay
Save time and receive additional convenience by connecting the mobile card reader to your Android or iOS device, login to the staff app and receive event registration payment at the door by swiping the attendees' credit/debit card; automatic invoice and payment (or sales receipt) transaction is immediately created in your database. In addition to taking payment for event registration, the included Point of Sale feature will allow you to receive payment on one-off items like raffle tickets, silent auction items and mulligans.
Benefits
- Event registration payment using the mobile card reader immediately updates the back office with the billing transaction – no manual matching of payments later
- Payment receipt emailed immediately after submitting payment info
- No surcharge for mobile payment processing; same single, simple rate no matter where/how you process the card
- Using the staff app also gives easy access to the attendee check-in feature.
- Point of Sale module allows smooth, efficient sale of single items such as Raffle tickets, silent auction items or Mulligans

Requirements
- Use GrowthZone Pay as your credit card solution
- Download or update to the newest version of the Staff app
- Upgrade the Staff app to the Premium edition
- Ensure your Android or iOS device is supported by the card reader.
- Supported Android list
- Note: All Apple iOS devices are supported.
- Purchase the Shuttle mobile card reader from our recommended distributor.
How to Use to Take Event Registration Payment
- Plug in the card reader into the audio jack on your device.
- Open the app and navigate to an event where payment should be taken.
- Click to View Attendees.
- Tap the Money symbol next to the name of the attendee who is paying.
- Tap the Pay with Card button. The screen will say Ready for Swipe.
- Swipe the card. The screen will say Card Read Successfully.
- Click Submit Payment Now.
How to Use with Point of Sale Module
- Plug in the card reader into the audio jack on your device.
- Open the app and choose Point of Sale in the menu.
- Select the desired POS item(s) and tap Continue.
- Continue with the default guest checkout or select from your database list of members or reps.
- The screen will say Ready for Swipe.
- Swipe the card. The screen will say Card Read Successfully.
- Click Submit Payment Now.
| Note: Items you want to sell using Point of Sale must use a Point of Sale Fees Fee Item type: |

Tips:
View more tips in the FAQ section - Mobile Card Reader - Connecting or Mobile Card Reader - Using |
FAQs
General
Q: What software edition do I need to have?
A: Standard, Plus, Premier or Pro edition of the ChamberMaster/Memberzone software is required at this time. Other editions may eventually be supported.
Q: Can I use GrowthZone Pay if I have the legacy QuickBooks CQI integration?A: No, not at this time.
Q: What country can I be from (my legal entity) in order to set this up?A: United States, Canada, Ireland, United Kingdom and Australia.
Q: Do I need to be using the updated event registration?A: Yes. GrowthZone Pay is only available with the updated shopping cart, which is only part of the updated event registration. This updated event version is available at no charge to all customers and provides lots of great new features. Check whether you are on the newer version by going under Setup->Event Options and Settings and under Registration and Billing Preferences. Ensure the check mark is enabled in front of Enable updated event registration and Guest List.
Q: If using the ACH and bank account storage feature, what countries are supported for where the bank account can be located?
A: United States banks only.
Q: What currency types are supported for the amounts that will be charged to their cards?A: US dollar, Canadian dollar, Euro, English pound, and Australian dollar. You will select your default currency type that will be used on all transactions on the Account Setup screen.
Q: What international support is available for bank locations and supported currency.A: International customers may choose their desired currency: US dollar, Canadian dollar, Euro, British pound or Australian dollar (only one supported per database). Your bank account where automatic deposits/transfers are made may be located in the US, Canada, Ireland, United Kingdom or Australia. The same transaction rates and fees apply as above with no additional charges.
Q: What payment card types are accepted?A: Both debit and credit cards are accepted. U.S. businesses can accept Visa, MasterCard, American Express, JCB, Discover, and Diners Club. Canadian, Australian and European customers can accept Visa, MasterCard, and American Express. You can also accept gift and prepaid cards that are one of the above types.
Setup Questions
Q: What are the steps involved to enable GrowthZone Pay, after my database is enabled?
A: Three easy steps are required to start accepting payments Watch this video for a 3 min demo
http://www.screencast.com/t/PujiGx9Z
- 1. Login to your database and complete the Account Setup screen.
- 2. Modify any credit card settings if needed.
- 3. Run a quick test.
Q: How long does it take to get setup? Can I process credit card transactions immediately?A: Yes. You can receive charges into your bank account immediately for up to ~$2,000 after simply submitting the form with the minimum required fields completed. However, if Stripe needs more information to complete verification process, transfers of money beyond ~$2K into your bank account will be suspended until after your account has been fully verified.
Q: Will I be notified when my account is verified?A: Yes, an email will come to the email address entered when you filled out your Account Setup information. If no email address was entered there, then the email address listed under Billing ➝ Reports ➝ Payment Processing Reports ➝ Other Reports, Features and Settings will be used or lastly the email address under Setup ➝ Association Information. You can also check your status under Setup ➝ Billing Options and Setting in the Credit Card section. Details Verified will change to "True" once you've been verified.
Q: Where do I enter my verification information?A: Under Setup ➝ Billing Options and Setting in the Credit Card section. Click Account Setup.
Q: Are there any businesses, business activities or business practices that I may not accept payment from?A: Yes. As part of your agreement with Stripe and GrowthZone, you agreed to never accept payments in connection with the businesses, business activities or business practices listed here.
Q: What types of card holder verification is supported?A: CVV and address verification.
Q: Can I have more than one bank account where the transfers are deposited?A: Although you can have more than one bank account listed in the Account Setup, only one of those can be active at a time. Indicate which bank account is active by selecting the default account for your currency type when editing the bank account information under Setup ➝ Billing Options and Settings in the Credit Card section.
Q: Does this solution replace both my merchant account and gateway?A: Our solution replaces the need for any other merchant account or gateway for receiving payments into your database by doing all the tasks necessary for a complete transaction - accepting the payment data and depositing the funds into your bank account. All transactions that are performed in the database are handled by our one single solution.
Q: Why do I need to agree to Stripe's terms of agreement when signing up?A: GrowthZone has implemented GrowthZone Pay using an API provided by Stripe. As part of our agreement with Stripe in using their API, our customers (you) need to agree to both our terms of agreement for GrowthZone Pay and Stripes agreement. In the agreement you are considered the Connected Account and GrowthZone is the Connect Platform.
Q: Who is Stripe?A: Stripe started in 2009 and is now considered an elite startup company after striking a deal with Apple and Twitter in Sept 2014.* Stripe stands out from rivals for the amount and ease of code it offers, which lets software programmers quickly incorporate the payment features into their apps. They are based in San Francisco with worldwide offices. It is currently implemented in checkout carts of Twitter, Kickstarter, Shopify, Salesforce, Lyft and others.
Q: Is Stripe PCI compliant?A: Yes. See their information listed here.
Q: What type of security do you have in place?
A: Security is of supreme importance in our implementation and in who we partner with, which is one of the reasons we partnered with Stripe, Inc.
GrowthZone does not store, process and/or transmit cardholder data. GrowthZone has implemented GrowthZone Pay using an API provided by Stripe which provides a method for securely sending sensitive information to Stripe directly from the customer’s browser. Collection, storage and processing of all cardholder data is all handled by Stripe, Inc.
Security measures provided by both GrowthZone and by Stripe meet and maintain the high standards required by PCI-DSS security compliance. GrowthZone conducts and passes monthly PCI compliance scans to ensure we remain in compliance on areas that apply to us. Stripe has been audited by a PCI certified auditor, and is certified to PCI Service Provider Level 1 https://support.stripe.com/questions/is-stripe-pci-compliant, the most stringent level of certification available. Stripe is also a participant in the PCI Security Standards Council. See Stripe’s website for their answer to their security compliance. https://support.stripe.com/questions/what-kind-of-security-does-stripe-have-in-place
Q: Do I need to create my own cybersecurity policy?
A: Your organization’s risk and responsibility in regards to the implementation within GrowthZone’s software is minimal due to the security methods in place by both GrowthZone and Stripe however, the source of security breaches are varied and if it came down to an investigation, might be part of your responsibility as well. So we never discourage an organization from creating and maintaining their own information and cybersecurity policy for managing risk or obtaining their own cybersecurity liability policy. With vulnerabilities and threats constantly evolving and the future unknown, of course, being prepared is always the best practice. Legally speaking, however, nothing is required on your end. Read more on cybersecurity policies here http://www.naic.org/cipr_topics/topic_cyber_risk.htm and view Stripe’s legal conditions here - https://stripe.com/us/legal#section_e
Switching from Another Processor
Q: Do you have a video I can watch to explain the things I need to consider before switching?
A: Yes.
This video shows how to determine if you have anything special to consider before switching and explains the FAQs in this section.
Q: What if I want to switch to GrowthZone Pay but I have automatic billing setup with a 3rd party processor and have manual epayments assigned to my members which automatically create my transactions for me each month when I run my monthly epayment batch?A: No problem. There are two ways to approach the transition to GrowthZone Pay for automatic recurring billing that is currently done outside of the database with a 3rd party processor.
- 1) Gradual: Continue using your 3rd party processor for the recurring billing. Whenever a member successfully enters their account info as a new payment profile in the Member Information Center (MIC), change their fee assignment from Manual epayment to the Automatic epayment associated with their newly entered profile. When running your monthly epayments batch, it will include both the manual epayments and automatic epayments in the same batch. Remember to disable the automatic billing in your 3rd party processor whenever you assign the member to the new automatic epayments.
- 2) Immediately: After the last 3rd party batch has been processed, stop using it for the recurring billing and do not use it for your next batch. Next, remove the manual epayment assignment from your member fees. (This means they would temporarily be included in the regular Monthly Renewals batch and would receive an invoice.) Once the member has successfully entered their account info as a new payment profile in the Member Information Center (MIC), you can enable the automatic epayment on the member fee. When at least one member is setup with an automatic epayment assignment, then you will need to begin running the monthly epayment batch.
Q: What if I want to switch to IGrowthZone Pay but I have automatic billing setup with Authorize.net and CIM with automatic epayments assigned to my members which automatically create my transactions and bill the customers each month when I run my monthly epayment batch?A: No problem but there are a few steps to do prior to switching over.
Switching over to GrowthZone Pay means that all transactions within the database will be processed with this new processor. Consequently, the Authorize.net epayment profiles will no longer work if those profiles are processed with GrowthZone Pay. And due to PCI compliance rules and other security concerns, these profiles may not be transferred from one processor to another – they must be re-entered. Here would be the steps we would recommend:
- (Optional) Let your members know that changes are coming and in the meantime they temporarily will not be able to pay invoices with stored cards/bank accounts while you clear out the old profiles and switch to the new GrowthZone Pay.
- Run and keep a copy of the “ePayment Profile Report”, to view a list of members that have epayment profiles stored with Authorize.net.
- Run and keep a copy of the “ePayment Fee Assignment“ report to see those that are assigned for automatic payment with Authorize.net during your epayment batch.
- Remove the automatic epayment assignment from your member fees. (This means they would temporarily be included in the regular Monthly Renewals batch and would receive an invoice.) Note: Contact customer support to have this done globally for you.
- Delete the Authorize.net epayment profiles by impersonating the rep and deleting the profile. Note: contact customer support to have this done globally for you.
- Contact customer support or call 800-825-9171 option 4 (the fastest option) and switch to GrowthZone Pay and complete the quick setup steps.
- Follow the steps for setting up recurring billing.
Q: My members have credit card and bank account stored with my 3rd party processor and I use their recurring billing with no transaction automatically created in the database (not using Manual epayments). Can I have these accounts transferred to GrowthZone Pay or will my members have to re-enter them?A: They need to be re-entered. Due to PCI compliance rules and other security concerns, these profiles may not be transferred from one processor to another – they must be re-entered.
Q: If I switch to the GrowthZone Pay, does GrowthZone contact my previous processor?A: No. Your account with your previous processor is your responsibility to close out or maintain. However you want to handle it.
Day to Day Operations
Q: What types of features are available to me?
A: GrowthZone Pay allows you to start accepting payment cards as payment for event registrations, in the Point of Sale module on the staff app, on your membership application and for invoices in the Member Information Center. You can also setup features such as recurring payment card and bank account billing (US banks only). And your members now have the convenient option of storing their payment cards and/or bank account (US banks only) for convenience when paying online.
Q: Does GrowthZone Pay allow us to attach a swipe device?A: Yes. See the info on Mobile Card Reader.
Q: Is there a minimum purchase that can be made?A: Yes - 50 cents
Q: What is the maximum size for my Statement Descriptor?A: Yes, 22 characters. This is the phrase that will appear on your customers' credit/debit/bank statements.
Q: Will I know which staff person processed the single, direct transactions that do not create a billing transactions?A: Yes. Entries are recorded in the Setup ➝ System Event Log when any transaction is made to GrowthZone Pay. The single, direct transactions specifically mention the name of the staff person who ran the transaction.
Q: Will I receive any emails when purchases are made?A: Yes. An email from the database will come to the email address listed under Setup ➝ Billing Options and Settings in the Credit Card section.
Q: The person who signed up for this account is no longer with the organization. How do I make sure to update this account with an updated contact name?A: Contact GrowthZone support via email with the name of the contact that you’d like to have listed as the contact. An email verification will be sent back to you stating that this change has been made.
Q: How do I deactivate/close my account with Stripe and GrowthZone?A: Contact GrowthZone Customer Service who will deactivate your Stripe account.
Q: How do I issue a refund?A: Click the Refund link on the Payment Processing Report or on a fully applied payment. Then follow the steps for creating the appropriate bookkeeping entry.
Q: How soon will my customer see the refund in their account?A: The customer will receive the funds from a refund in their account approximately 5–10 business days after the date on which the refund was initiated.
Q: Are the fees returned to me when doing a full refund?A: Yes. When you refund a charge, the fees you paid to process the charge are returned to you. That is, after charging and then completely refunding a payment, the net cost is zero. If you partially refund a charge, the pro-rated portion of the percentage cost is returned but the fixed fee of .35 is not.
Q: How soon is money deposited (transferred) into my account?A: Your very first deposit may take up to 7 days to be deposited. After that, deposits (transfers) are made daily and are typically composed of the payments that were processed two days prior for most US and Australia customers; seven days for other countries. For example, August 1st charges are deposited by August 3rd for most US and Australia customers; August 8th for other countries. August 2nd charges are deposited by August 4th for most US and Australia customers; August 9th for other countries. On occasion, banks may take 2-3 additional days to post funds. Also keep in mind that transfers that are scheduled on weekends or holidays won’t be accepted by your bank until the next business day. Also some US and Australia customers may initially be set for a seven day transfer while business activity is evaluated.
Q: Why does the date listed on the Deposit/Transfer report not match the date of the actual deposit into my bank?A: The Date identified as the Deposit/Transfer date is the intended/scheduled deposit date indicated by Stripe. The actual deposit date could possibly be delayed most commonly because most banks do not process transfers on weekends
Q: Do all credit card transactions carry over to the Journal Entry Export report?A: No. Payments, Receipts and Refunds (negative Sales Receipts) that are automatically created by the software will be included in the JEE. However, you will need to make a manual adjustment in your accounting software to record processing fees, dispute fees, or charge backs, as those will not be deducted from the journal entries. Use your Bank Account Deposits/Transfers report to find the totals of each deposit for what will need to be adjusted.
For QuickBooks users using the detail journal entry export option, it is recommended that deposits are handled within QuickBooks. Be sure to select the ‘Exclude Deposits’ option at the time of export. When the deposit is recorded in QuickBooks a line item can be added to account for the total amount of the fees that were withheld from each transaction resulting in a net deposit that will match bank statement activity. View detailed steps.
Q: How do you recommend I record my transaction fees so that my deposits match what is actually being deposited?A: Include the transaction fee amount, which is shown on the Bank Account Deposits/Transfers report, as part of your deposit in your accounting software. View detailed steps for those using the detail Journal Entry Export with QuickBooks desktop.
Q: We want our members to pay off their annual dues by paying 3 equal payments in 3 consecutive months. Can we automatically charge a card consecutive months in a row and then stop charges for the remainder of that year?A: Yes this can be setup to accommodate any number of consecutive equal payments. How? Assign a monthly epayment fee item to this member and set the Status to Active in Date Range. http://screencast.com/t/j99nKmunRk The Start Date should be the 1st month that you want payment to be charged and the Expiration to the month of the last payment (inclusive). The amount charged per month will be the Fee Amount / 12 so you will need to inflate the Fee Amount assigned so that when it divides by 12 it will be what you want to charge monthly. The example shown here would charge $400 in April, May and June totaling a $1200 annual fee but requires putting $4800 in the Fee field. (Note: the Fee field is not visible to members or in your accounting totals)
Q: Can we set our epayments to charge on a particular day of the month?A: No, not exactly. ePayment charges happen on whatever day you login to the software and click to Save the batch.
Q: Can I charge certain members on the 1st and others on the 15th?A: Yes if setup properly. Create another duplicate fee item(s) for the 15th of the month. When creating the fee you would create/assign a new Batch Invoice Group e.g. ePayment 15th Batch as shown in this example. http://screencast.com/t/fiBqqk5TqLqS Any members that must be charged on the 15th should be assigned this new fee item. By specifying that this fee belongs to an invoice group other than the default, you now will be able to bill these members in a separate batch. When you need to create your invoices on the 15th, make sure to select the ePayment 15th Batch as your Invoice Group when clicking Invoices from the Task List. http://screencast.com/t/0gekwey6MXh You can also select the correct Invoice Group when on the Invoices tab. http://screencast.com/t/SCA6o6gxm
Q: Why are so many of my members' cards being declined?A: One reason, besides the normal variety of reasons that charges are typically declined, would be if you are trying to use the stored cards from your previous solution with Authorize.Net. Previously stored cards from another processor will not work with any other credit card processor. See the steps in Switching from Another Processor. http://supportwiki.micronetonline.com/Integrated_Payment_Processing#Switching_from_Another_Processor
Q: What if I already have automatic credit card processing with a 3rd party company but want to get setup GrowthZone Pay recurring charges?A: No problem. Follow the steps for Setup Recurring Charges but modify the initial message to indicate that you are changing your processor and need your member's help. In addition, follow these steps:
- If members were assigned a manual epayment fee when setup with your 3rd party company, switch it to the appropriate epayment selection once the member has entered the new epayment profile into the MIC. You can continue to run your epayment batch with a mix of manual and automatic epayment in the batch.
- If members were assigned an epayment fee with Authorize.net, those epayment profiles will no longer work and must be deleted prior to notifying the customers to add their new payment profile.
- If members were not assigned either a manual or epayment fee when setup with your 3rd party company, no additional steps are needed - - just assign the epayment fee once the member enters it into the MIC.
Q: I did a refund today. Does the refund display on my Payment Processing report?A: The Payment Processing report is just that - it shows the payments that have been processed or attempted to be processed (failures). It does not itemize refunds in a line of it’s own.
Refunds are visible in the Monthly statement and then they are detailed out in the Bank Account Deposits/Transfers report as a Payment Refund and an Adjustment.
When balancing for the month, check the Monthly Statement for refund quantity and total, and then find the adjustment in the Deposits/Transfer report and use the Txn ID (starts with ch_) that is being refunded if you need to locate the original payment.
- Note: if you go back to the original payment on the Payment Processing Report, it will display (Refunded: $amount) and the Refund link will no longer be available if fully refunded.
Member Use
Q: My member stored a bank account as one of their payment profiles in the Member Information Center but it says "Unverified" next to it. What does that mean?
A: The member’s bank account needs to be verified as being a valid bank account. To do that, the member needs to check their bank account for two small deposits that will have been made. Then they enter those amounts into their payment profile where indicated. The deposit items, labeled "MemberZone TRANSFER VERIFICATION", will typically show on the next business day after the account was created.
Q: My member has entered a payment profile for their bank account in the Member Information Center. Why doesn't it show as an option under "Charge to ACH, debit or credit card" when I go to assign and setup their recurring charges?A: The bank account will not show in the "Charge to ACH, debit or credit card" selection drop-down list until the account has been verified.
Q: Why was a member’s charge declined?A: Declines can happen for a variety of reasons. When we submit a charge to your customer’s bank, they have automated systems that determine whether or not to accept the charge. These systems take various signals into account, such as your customer’s spending habits, account balance, and card information like the expiration date and CVC.
Since these signals are constantly changing, a previously successful card might be declined in the future. Even if all of the card information is correct, and your customer previously had a successful payment, a future charge can still be declined by a bank’s overzealous fraud systems.
Q: How do I find out more information about a specific decline?A: If all of the card information seems correct, it is best to have your customer contact his or her bank, inquire for more information, and ask for future charges to be accepted.
Q: How do I decrease the likelihood of declines?A: The correctness of the card number, the expiration data, and the CVC are the primary factors used by the customer’s bank when deciding whether or not to accept a transaction. Collecting the CVC can significantly decrease your decline rates. If you’re not collecting CVCs and you’re having issues with declines, requiring the value can be a quick fix.
The influence of other data that you collect, like the address or name, varies by card brand. For example, only American Express consider the customer’s name. If you are still seeing troubles with declines after collecting the more influential fields, it might be worthwhile to collect this additional data.
Disputed Charges
Q: What happens if a charge is disputed?
A: An email notification is sent to the address listed in the Payment Processing Reports / Management Tools that indicates the details of the dispute and gives direction on what to resolve the dispute.
Q: What information does a sample dispute email notification include?
A:
Q: Where do I enter dispute information?A: Follow these steps:
- 1. Access the Payment Processing Report under Billing ➝ Reports tab.
- 2. Select the filter “Unresolved disputed transactions regardless of date”.
- 3. Click Refresh Report.
- 4. Click the link next to the disputed charge.
- 5. Follow the instructions on the next screen. Entering as much evidence as possible prior to the date listed on this screen.
- 6. Once evidence is submitted, the link next to the charge will change to “under_review” while it is being reviewed. During this time, you may re-submit evidence up to 4 times before the indicated deadline. Allow 60-75 days for the review to be completed.
- 7. When the review is completed, the status will change to “won” or “lost”.
Q: How long does the dispute process take?A: Dispute resolution can take a long time, and we know that’s frustrating. During a dispute, banking entities engage in a series of formal communications that are a rigid part of the process, and we really can’t affect the timeline set in place by the banks and card networks. You can expect a dispute to be finalized approximately 60 days from the date evidence was due (not the date you provided evidence). If it has been more than 60 days since the bank’s evidence deadline, feel free to reach out to us and we’ll be happy to take a closer look!
Q: What evidence do you suggest that I provide?A: The evidence you’ll want to submit will vary depending on the specific case. Web logs, customer service emails, shipment tracking numbers and delivery confirmation, proof of prior refunds or replacement shipments, and so on, can all be helpful. You’ll want to provide evidence appropriate to the type of dispute—we offer suggestions here. Stripe will submit any information you can provide to your customer’s credit card company, and keep you posted afterwards.
Note that it is safe to assume that requests to call a contact number, click through to further information, and so on, will not be fulfilled by the institution that is evaluating the dispute. Banks will not follow external links to view your website or files you’ve uploaded elsewhere, so it’s important to include all evidence at your disposal in your initial evidence submission.
It is extremely important to provide evidence for every dispute you hope to win, even if the cardholder/customer has told you they will withdraw the dispute.
Q: What happens when a charge is reported as a “Fraudulent Charge”?A: The disputed amount and the fee is deducted from your account the day after a dispute is received. The disputed amount and fee is refunded to your bank account if the dispute is resolved in your favor. This is referred to as a chargeback. https://support.stripe.com/questions/what-is-the-difference-between-a-chargeback-and-an-inquiry-or-retrieval
Q: What happens when a charge is reported as an ‘Unrecognized Charge?”A: Basically, an “Unrecognized Charge” is an inquiry or retrieval request that asks for information about a transaction. These usually occur after a cardholder calls their issuing bank about a charge they don’t recognize or other discrepancy on their bill.
The disputed amount is not deducted from your account and no fee is charged.
If you choose to Refund the full amount, the dispute will automatically be resolved. However, if the charge is valid and you do not wish to refund, it is always recommended that you reach out to your customer first to get more information about the reason for the dispute.
If you reach an agreement with your customer, and they agree to withdraw the dispute, it’s still important to provide evidence (even if it’s simple text evidence indicating that you’ve communicated with them and they’ve agreed to withdraw).
Once you produce sufficient evidence to defend the transaction, this type of dispute can usually be settled in your favor. Many disputes are the result of the cardholder not recognizing the transaction, and providing basic info about your business and what was purchased is usually sufficient to close the case.
However, if the customer refutes your evidence, or the bank considers it insufficient, the bank might escalate the inquiry into a chargeback and begins the process of returning the customer’s funds—it’s important to resolve the case while it is still in this stage.
Q: What is the difference between an “Unrecognized Charge” and a “Fraudulent Charge”?A: Sometimes, a cardholder’s bank may initiate an investigation into a complaint before a formal chargeback. These investigations are displayed as “Unrecognized” charges, but they differ from those marked as “Fraudulent” or full chargebacks in two ways: No funds are moved during an inquiry/retrieval investigation (you retain the funds), and charges are refundable during the inquiry or retrieval investigation.
Q: The customer indicates that the dispute was a mistake. How do I get the dispute reversed?A: If you’ve talked to your customer and they’ve agreed to drop the dispute, there are a couple next steps. First, have your customer call their bank and let them know. This is critical, since the bank won’t know your customer has dropped it unless your customer tells them.
Secondly, even though the customer has already agreed to withdraw the dispute through their bank, you must still submit evidence for the dispute. Your evidence should indicate to the bank that your customer wishes to drop the dispute, and must include any email evidence you have where the customer may say that. If your customer had specific complaints that led to the dispute, be sure to address those in the evidence. Failing to provide evidence even though the customer agreed to drop the dispute could still result in you losing the dispute.
Once you’ve done those two things, we need to wait for the bank to let us know that the dispute has been closed in your favor. As soon as they do that, we will return the full amount of the charge and the associated fee to you. Do note that this process can take quite a while—it’s not unusual for us to not hear from the bank for 60-70 days after the dispute. As soon as we know that the dispute is closed in your favor we will send you an email.
Q: My customer withdrew their dispute so I could provide a refund but the Refund button is crossed-out and unavailable. What should I do?A: Often, customers don’t realize that the dispute process is not simply an “easy refund” - it penalizes merchants. Most merchants are more than happy to provide a regular refund if the customer asks them to. When a charge is disputed, and the customer is willing to withdraw the dispute so you can provide a normal refund, things can get rather complicated because the dispute process generally involves more than one banking entity handling the dispute.
Without intervention, the resolution process still takes approximately 60 days from the date evidence is due - and that’s a long wait for your customer, because you can’t process a refund until the dispute is resolved in your favor! There is a way to expedite the process, but it requires very specific evidence. When a cardholder withdraws a dispute, their bank will generally do two things: re-bill their card account for the disputed amount, and provide them with a formal letter/communication (it might be a paper letter, an email, or a document in their online account) indicating that the dispute case has been closed. If you are able to obtain a copy of this letter, or clear evidence of re-billing, you may reach out to us with this information and we may be able to close the dispute before the 60 day period ends.
Even in cases where your customer withdraws, submitting evidence is vitally important. You should respond just as you would if the customer was not intending to withdraw, but certainly mention their intention to do so and include any correspondence you have had with your customer that indicates they will withdraw the dispute with their bank. But do respond! Evidence submission is extremely important to the dispute process and a successful resolution in your favor.
Q: I lost a dispute, is there anything I can do?A: We know how frustrating it is to lose a dispute, and we’re sorry to say that once a dispute has been lost, that outcome is final.
Disputes are decided by the cardholder’s bank, according to the bank’s process. The steps Stripe follows to help you respond to the dispute and submit evidence are rigidly defined, but the decision made by the bank can be affected by a number of factors, such as the cardholder’s specific complaint, the strength of your evidence, and the specific details of the charge. Often the decision on who wins a dispute comes down to a judgement call by the bank. Stripe has no way to affect this judgement call beyond submitting evidence on your behalf.
For this reason, it’s always best to take measures to avoid disputes. And when facing a dispute, it often helps to work with the cardholder (where possible) to withdraw the dispute.


Mobile Card Reader - Connecting
Q: Is there a specific mobile card reader that I need to use?
A: Yes. Our software must use a specific mobile card reader called the Shuttle, by ID TECH. The UniMagPro may also be used but we’ve determined that the Shuttle has a design that keeps the reader steady while swiping. The Shuttle also supports a larger numbers of Android devices.
Q: Does it matter where I purchase the Shuttle?A: Not exactly. But we have a relationship with a distributor that will provide our customers a special 5% discount and free shipping (Free shipping promo ends 3/31/2017) in the US if ordering using a special promo code. Contact customer support for the current promo code. Order the Shuttle online with IDScan.Net and enter the currently provided promo code.
Q: Once ordered, how long does it take for the Shuttle to arrive?A: If ordered from our partnering distributor, IDScan.net, US order will arrive between 5-7 business days. Orders placed before 3:00 p.m. CT should be shipped that same day. International orders would be a few days longer.
Q: What tips do you have on using the Shuttle mobile card reader?A: You may need to remove the protective case on your Android or iOS device in order to make a good connection with the Shuttle. Check the Card Reader Status entry under Settings on the staff app to see if your card reader is being recognized.
Remember that your Android or iOS device can be placed in auto-rotation mode or have auto-screen rotation mode turned off. Choose the selection that works best for you and how you are using your device.
Also, make sure that the magnetic strip on the card is aligned with the arrow on the card reader. http://screencast.com/t/T9fczlMK7cjZ
On Apple devices, make sure that the settings for the staff app has the Microphone slider enabled. Tap Settings, General and scroll down to ChamberMaster / GrowthZone. Then slide the Microphone to on. https://www.screencast.com/t/rJea7MkHrEC
Q: I'm getting the message that the Card Reader can't be found when going to Pay with Card. Any suggestions?A: Make sure that your device has the microphone enabled and available to use with the staff app. On Apple devices, make sure that the settings for the staff app has the Microphone slider enabled. Tap Settings, General and scroll down to ChamberMaster / GrowthZone. Then slide the Microphone to on. https://www.screencast.com/t/rJea7MkHrEC
Q: What Android or iOS devices are supported with the mobile card reader?
A: All iOS devices are supported.
The supported Android devices are listed here and updated several times a year. The supported device list is quite specific and we have found it to be correct down to the Carrier specified and Operating System. Also note that you can still process credit cards manually in the app even with no device present.
Q: Does the Shuttle card reader work with the iPhone7?A: Yes. You can use the included Lightening adapter to connect your Shuttle card reader. Make sure to load the staff app first; turn the volume all the way up on your iPhone7; then plug in the included Lightening adapter and the Shuttle card reader device. Check your devices status under Settings. It should say Card Reader Status: Connected
Q: My Android device is not on the list of supported devices, can I still process credit cards from the app?A: Yes. The manual entry selection will work to process the transactions regardless of whether the mobile card reader is connected.
Q: What if the credit card is damaged and a successful swipe can’t be made?A: No problem. There is always an option to enter the card manually – typing in the customer name, credit card number and expiration date. This option is available regardless of whether the card reader is connected.
Q: Will my phone still work when I have the card reader plugged in?A: Yes – your phone will still work and an incoming call can be received, but because the card reader is plugged into the audio port, you will need to unplug the reader in order to successfully hear and speak to the incoming caller.
Q: How long can I expect a single transaction to take to process the credit card?A: On a Wifi network that was tested at approximately 5 Mbps for download and 2.5 Mbps upload speeds (speeds often at the low end of 4G LTE networks), we found the transaction completed in less than 10 seconds from the moment that Submit Payment is clicked until the attendee list refreshes with the attendee marked as paid.
On the contrary, with a download speed closer to .50 Mbps download and upload speed (more typical of slower 3G networks) the complete transaction back to a refreshed attendee list will typically take approximately 30 seconds. No manual interaction is needed for those 30 seconds as the screen will move from one stage to the next about every 5-10 seconds, providing on-screen messages that processing or refreshing is taking place.Feel free to download a free app titled “Speedtest.net” to test your device prior to your event to determine what speed you might expect.
Q: Can you explain the differences between 3g and 4G, and 4G LTE?A: There is not an exact definition because various providers have their own version of what these networks speeds mean but we found this article helpful to get the big picture. In the end, the speed of your network is what is important, not what it is called.
Feel free to download a free app titled “Speedtest.net” to test your device to see where your devices fits in the speed spectrum.
Q: Does your device support EMV (Chip cards) or Apple Pay?A: Our initial entry into the card reader solution is a simple swipe device and does not yet support the EMV chip reading or Apple Pay. This gets us into the arena with a path to change to different devices as we continue moving into mobile card reading. We definitely have that on our radar, but the certification required to work with the EMV devices is very time-intensive and quite involved which has been part of the reason for the slower adoption rate in the US.
We are looking at solutions to move us to the chip reader but didn't want to slow down our entrance into the market. Based on available stats, a swipe device will still line up with others that are in transition as well. In the meantime, you'll be able to accept credit card payments at your events now.
Q: Can I use the mobile card reader if I use another credit card solution like Authorize.Net, Beanstream/Bambora, Heartland or PayPal?A: No, at this time only GrowthZone Pay is supported. But using GrowthZone Pay may save you time and money with all the benefits and integrated features that we offer. View more information on what our solution can provide: MemberZone / ChamberMaster
Mobile Card Reader - Using
Q: Do you have a Point of Sale (POS) feature available?
A: Yes. The Point of Sale feature is available. Download the latest version of the ChamberMaster or GrowthZone Staff app from the App Store(iOS) or Play Store (Android). The included Point of Sale feature will allow you to receive payment on one-off items like raffle tickets, silent auction items and mulligans. Here's how it works. https://www.screencast.com/t/z82XP8dHq
Q: What is the best way to be prepared at my event for processing attendees the quickest?
A: When possible, attendees should register and pay ahead of time using your online registration.
Second best is if the attendee can be registered with the correct total listed as due. You can invoice them ahead of time if you like or leave them set on the Invoice or Cash selection for payment method (either is fine) if you don't wish to create the transaction ahead of time.
At the event these unpaid attendees will display with a Payment icon next to their name. Tap the icon and you will automatically be presented with an option to swipe the card or enter manually. After the payment has been submitted, an automatic invoice and payment or sales receipt will be created according to your settings under Events->Fees tab in the Registration and Billing Preferences section. If an invoice was already created for their registration, the card swipe will automatically charge the balance due on the invoice to their card.
Q: If pre-registration and pre-payment is not possible, can I add a walk-up attendee?
A: See the next FAQ.
Q: How do I add a walk-up attendee that is not on my Guest List?
A: While viewing the Attendee List In the app, click the + button in the upper right corner of the screen which will open event registration in your mobile browser. Complete the event registration which will use the auto-fill options when selecting a member and automatically have their information completed within the registration. If they are not a member, you will just need to complete required fields to get them added to the guest list in order to process their payment. Then select Invoice (or Cash) for the payment method on the registration if you want to use the card reader for credit card payment. Switch back to the App window. Refresh your guest list if needed. Then click the payment icon next to your newly registered attendee.
Q: Is there a receipt that is emailed to the registrant that pays by credit card?
A: Yes. The email address from the Primary Contact on the registration will default as the email address to receive the payment confirmation email but may be changed to any email that you enter immediately before clicking Submit Payment Now in the app. They receive the same Payment Confirmation email that comes when other credit card payments are made.
Q: Can I pay a partial amount on a registration?
A: No. On the app, you must pay for the whole registration amount. There is not an option to enter a different amount when accepting the payment. You can, however, enter comments in the Comment fields as to any changes that would viewed by the staff in the back office later. You would need to login to the back office and make any modifications to the event registration and then refresh the app screen.
Q: If two or more are registered together on one registration, can I pay for just one attendee?
A: No. On the app, you must pay for the whole registration amount. There is not an option to enter a different amount when accepting the payment You can, however, enter comments in the Comment fields as to any changes that would viewed by the staff in the back office later. You would need to login to the back office and make any modifications to the event registration and then refresh the app screen.
Q: How is the Reference # field used on the App?
A: If you enter something in the Ref # field, prior to the swipe, it will be appended to the successful Ref # that is added automatically. This appears on the payment in the back office in the Ref # field.