|
|
| (54 intermediate revisions by 4 users not shown) |
| Line 1: |
Line 1: |
| − | ==Overview of your GrowthZone CMS== | + | =='''Overview of your GrowthZone CMS'''== |
| | | | |
| − | GrowthZone has designed and built hundreds of engaging and compelling association websites, to help enhance your brand and drive increased traffic, engagement, and usage of your most important public-facing asset. A wide variety of themes are available for you to choose from. '''[https://www.growthzone.com/solutions/website-design/website-gallery/ Click Here]''' to view our website gallery. | + | GrowthZone has designed and built hundreds of engaging and compelling association websites, to help enhance your brand and drive increased traffic, engagement, and usage of your most important public-facing asset. A wide variety of themes are available for you to choose from. '''[https://www.growthzone.com/solutions/website-design/website-gallery/ View our website gallery]'''. |
| | | | |
| − | GrowthZone Content Management System (CMS) puts you in control of your new website 24/7. Your site is built on the WordPress Platform which provides intuitive content editing tools to make it easy to add and manage web pages, as well as incorporate your GrowthZone content into your site in seconds, all from any web browser. | + | GrowthZone Content Management System (CMS) puts you in control of your new website 24/7. Your site is based on the WordPress Platform with an added front-end page editor which provides intuitive content editing tools to make it easy to add and manage web pages, as well as incorporate your Chambermaster/MemberZone content into your site in seconds, all from any web browser. |
| − |
| |
| − | ==GrowthZone CMS Training Videos - Getting Started==
| |
| | | | |
| − | ==='''[https://www.screencast.com/t/O737dAXalsT GrowthZone CMS Dashboard Overview]'''=== | + | {| class="wikitable" |
| − | ==='''[https://www.screencast.com/t/Re65obivE GrowthZone CMS Page Editor Overview]'''=== | + | |- |
| − | ==='''[https://www.screencast.com/t/EEAMBXgN How to Create and Edit a Menu Page]'''===
| + | | |
| − | ==='''[https://www.screencast.com/t/Ta4mrEtte Add Content, Rows and Saved Rows]'''===
| + | [[File:One Row.png|25px]] |
| − | ==='''[https://www.screencast.com/t/15mp0Hmz How to use Beaver Theme Layouts & edit header/footer]'''===
| + | | style="width: 100%"| Are you managing your own website instead of using a GrowthZone CMS website and looking for ChamberMaster/MemberZone integration resources? '''[http://integration.growthzone.com/ Visit our website integration Knowledge Base]''' |
| | + | |} |
| | | | |
| − | ==Add GrowthZone Modules to your GrowthZone CMS Website== | + | =='''GrowthZone CMS Training Videos - Getting Started'''== |
| | | | |
| − | Several modules from your GrowthZone Database can easily be added to your website. You can add the following:
| |
| | | | |
| − | *Directories
| + | ===[https://www.screencast.com/t/Re65obivE GrowthZone CMS Page Editor Overview]=== |
| − | *Event Calendars
| + | ===[https://www.screencast.com/t/omDqm9rTDTaM How to Create a New Page and Add to the Menu]=== |
| − | *Web Content (Blogs, News Releases, Job Postings, Deals)
| |
| − | *Forms
| |
| − | *Membership Application Form
| |
| − | *Lists/Committees
| |
| − | *Store
| |
| | | | |
| − | '''[https://www.screencast.com/t/CAVa6Tscf Click Here]''' to view a video.
| + | ===[https://www.screencast.com/t/27QHW1rM6 Working With the Menus, Dropdowns, and Links]=== |
| | + | ===[https://www.screencast.com/t/O737dAXalsT GrowthZone CMS Dashboard Overview]=== |
| | + | ===[https://www.screencast.com/t/Ta4mrEtte Add Content, Rows and Saved Rows]=== |
| | + | ===[https://www.screencast.com/t/15mp0Hmz How to use Beaver Theme Layouts and edit header/footer]=== |
| | + | ===[https://www.screencast.com/t/ywfcejbAtOC How to Adjust the Colors and Appearance]=== |
| | + | ===[https://www.screencast.com/t/L1ICO9gHh How to Link a Button or Image to a PDF ]=== |
| | + | ===[https://www.screencast.com/t/5JkXWrMqzo How to Create a Saved Module or Row]=== |
| | + | ===[https://www.screencast.com/t/KgsmusN3 How to Add a ChamberMaster/MemberZone Widget to Your GZCMS Website ]=== |
| | + | ===[https://www.screencast.com/t/OQoVAMh2oczb How to Create Banner Ads & Add Them to Module Pages and Content Pages (Requires ChamberMaster Pro Subscription or Marketing Package) ]=== |
| | + | ===[https://www.screencast.com/t/M8kKCuQDuW How to Create and Display a GZCMS Blog Post ]=== |
| | + | ===[https://www.screencast.com/t/cvrqN2k8c How to Use Accordions and Tabs]=== |
| | | | |
| − | The first step to add a GrowthZone module to your website is to generate a URL from the back-office:
| + | =='''Adding ChamberMaster/MemberZone Content to Your Website'''== |
| | + | Are you managing your own website instead of using a GrowthZone CMS website and looking for ChamberMaster/MemberZone integration resources? '''[http://integration.growthzone.com/ Visit our website integration Knowledge Base]''' |
| | | | |
| − | #Click '''Setup''' in the left-hand navigation panel.
| + | ===Accessing Links to the Modules for your GrowthZone CMS Website=== |
| − | #Click '''GrowthZone Pages''' in the '''Website''' section.
| |
| − | #:[[File:CP Module Page Settings.jpg|center]]
| |
| − | #Click the numbered hyper-link in the '''Pages''' column. The '''Manage Site Modules''' dialog box will open, displaying any of the modules you have currently configured for use in your website.
| |
| − | #:[[File:CP Manage Site Modules.jpg|center]]
| |
| − | #Click the '''Add Module''' button.
| |
| − | #:[[File:CP Add Site Module.jpg|center]]
| |
| − | #Select the desired module from the '''Site Module Type''' drop-down.
| |
| − | #If there are multiple instances of the site module type (for example, if you have multiple calendars multiple directories, forms, etc.), select the desired module from the drop down presented. In the example below, the '''Site Module Type''' selected is events, and a selection of the calendar to include is presented.
| |
| − | #:[[File:CP Site Module with Event Calendar.jpg|center]]
| |
| − | #Enter a '''Title'''. This is the default title that will be used on your website.
| |
| − | #Enter a '''Relative Path'''. This will be used to populate the URL that is system generated.
| |
| − | #Select the '''Template''' to be used for this module. The templates used in your website design will be populated in the drop-down list.
| |
| − | #The '''Entire Url''' will automatically be populated after you save the new module. This is the URL that you will use on your website.
| |
| − | #If you are using the Sponsors/Ads module, configure the '''Top of the page''' and the '''Bottom of the Page''' advertising types. See '''[[Sponsors/Ads#Working_with_Banner_Ads|Working with Banner Ads]]''' for further details.
| |
| − | #Click '''Done'''.
| |
| | | | |
| − | The URL needed to add the module to your website will automatically be generated. You can use this link within the content modules on your website, or you can use the link to add a menu item to you website.
| + | Several modules from your Chambermaster/MemberZone database can easily be added to your website. You can add the following: |
| | | | |
| − | ===Add a GrowthZone Module as a Menu Item to your GrowthZone CMS website===
| + | *Contact Us |
| | + | *Communication |
| | + | *Events (List View or Calendar View) |
| | + | *Groups |
| | + | *Hot Deals |
| | + | *Job Postings |
| | + | *Member Directory |
| | + | *Member Login |
| | + | *New Member Application |
| | | | |
| − | To add a GrowthZone Module as a Menu Item on your GrowthZone CMS website, first you must generate the URL for the module as described above.
| + | The links have been generated for you and may be accessed through the Message Center in the Customer Service section on the Dashboard of your system. |
| | + | [[File:MZ GZ CMS message center.JPG|600px|left]] [[File:MZ Module Links.JPG|600px|center]] |
| | | | |
| − | #From the database, click '''Setup''' in the left-hand navigation panel.
| + | ===Integration Settings Control Panel (ISCP)=== |
| − | #Click '''GrowthZone Pages''' in the '''Website''' section.
| + | The Integration Settings Control Panel (or "ISCP") is used as a means to setup and configure your public facing modules, including setting up a base URL for the website (so our server can tell the browser where to load any relatively linked resources from), setting up template locations, and changing the appearance of the CM/MZ-provided pages through the use of color, font, and size fields. |
| − | #:[[File:CP Module Page Settings.jpg|center]]
| |
| − | #Click the numbered hyper-link in the '''Pages''' column. The '''Manage Site Modules''' dialog box will open, displaying any of the modules you have currently configured for use in your website.
| |
| − | #:[[File:CP Manage Site Modules.jpg|center]]
| |
| − | #Click the hyperlink for the module you wish to add to your website. In the example below, the Upcoming Events module hyper-link was selected.
| |
| − | #:[[File:CP Event Module.jpg|center]]
| |
| − | #Copy the '''Entire Url''' link.
| |
| − | #Access your website in edit mode by clicking the [[File:CP Globe Icon.jpg]] in the header bar (back office).
| |
| − | #Hover over the name of your organization in the header bar.
| |
| − | #:[[File:CP Menu.jpg|center]]
| |
| − | #Click '''Menu'''.
| |
| − | #:[[File:CP Add Menu URL.jpg|center]]
| |
| − | #:Click the down arrow in the '''Customize Links''' section.
| |
| − | #Paste the previously copied '''Entire Url''' in the '''URL''' box.
| |
| − | #Enter the text you would like to appear on the menu for this item in the '''Link Text''' box.
| |
| − | #Click '''Add Menu'''.
| |
| | | | |
| − | The menu item for your GrowthZone module has now been added to your main menu structure.
| + | '''[[http://integration.growthzone.com/iscp-overview/ ISCP Overview]]''' |
| | | | |
| − | =='''<span style="color:#800080">Generate GrowthZone Widgets'''</span>==
| + | '''[[http://integration.growthzone.com/iscp-basics/ ISCP Basics]]''' |
| − | ---- | |
| − | GrowthZone provides a variety of widgets that may be included on your webpages including: Business Directory Search, Info Hub Login, Database Feed, Fundraising Donate, Sponsorships, Subscription, and Ads.
| |
| − | ==='''<span style="color:#800080">Generate a Business Directory Search Widget'''</span>===
| |
| − | ----
| |
| | | | |
| − | #Click '''Setup''' in the left-hand navigation panel. | + | ===Add a Chambermaster/MemberZone Module as a Menu Item to your GrowthZone CMS website=== |
| − | #Click '''GrowthZone Pages''' in the '''Website''' section. | + | #Copy the url(s) from the Module Links you would like to add to your website. |
| − | #:[[File:Widgets.jpg|800px|center]]
| + | #From the database, click [[File:Pencil for website.JPG|45px|edit pencil]] icon in the upper right menu of the database. This will provide an edit mode access to your website. |
| − | #Select '''Business Directory Search''' from the drop-down list. | + | #Hover over the name of your organization in the header bar and click '''Menus'''. |
| − | #:[[File:Generate Website Widget.jpg|800px|center]] | + | #:[[File:MZ menu.JPG|400px]] |
| − | #Configure the following fields: | + | #Click the arrow in the '''Custom Links''' section. |
| − | #:[[File:Generate Directory.jpg|800px|center]] | + | #:[[File:Custom links.JPG|200px]] |
| − | #*'''Target Domain''': This will default to the domain of your website. If you have multiple websites, select the appropriate domain. | + | #Paste the previously copied '''Entire Url''' in the '''URL''' box. |
| − | #*'''Directory''': Select the directory for which you wish to generate the widget.
| + | #Enter the text you would like to appear on the menu for this item in the '''Link Text''' box. |
| − | #*'''Maximum Results''': Enter the maximum number of results to be returned. The default is 10. | + | #Click '''Add to Menu'''. |
| − | #*'''Button Text''': You may customize the text on the search button. The default text is '''Search'''.
| + | #Repeat steps to add as many Menu items as needed. |
| − | #*'''Keyword Placeholder''': You may customized the text shown in the keyword search box. The default is '''Enter name, category or keyword'''. | + | #:*Notice that the Menu Structure will build as you add the items in Custom Links. You are able to click and drag the added items into the order you would like it to be on your website. You are also able to add sub items and create dropdown menus on the header. |
| − | #*'''Appearance''': This option allows you to style the page. If ''''Default''' is selected, the widget will use the defaults used in your website. If custom is selected, you may customize the font and font colors. | + | #:[[File:Menu structure.jpg|800px|center]] |
| − | #The widget code is automatically update with your customizations. Copy and paste this code into your website's html editor. | + | #Click [[File:Save menu.JPG|100px|save menu]] to save all the changes to your website. |
| − | #Click '''Close'''. | |
| | | | |
| | + | The menu item(s) for your Chambermaster/MemberZone module have now been added to your main menu structure and viewable on the website. |
| | | | |
| − | ==='''<span style="color:#800080">Generate an Info Hub Login Widget'''</span>===
| + | :[[File:Headers added.JPG|1000px|center]] |
| − | ----
| |
| | | | |
| − | #Click '''Setup''' in the left-hand navigation panel.
| + | ===Chambermaster/MemberZone Widgets=== |
| − | #Click '''GrowthZone Pages''' in the '''Website''' section.
| + | [[File:Module_Feed_Widgets.jpg|600px|right]] '''[https://www.screencast.com/t/KgsmusN3 Watch a video on how to add a ChamberMaster/MemberZone Widget to your GrowthZone CMS Website]''' |
| − | #:[[File:Widgets.jpg|800px|center]]
| |
| − | #Click the '''Actions''' button and select '''Generate Widget'''.
| |
| − | #Select '''Login''' from the drop-down list.
| |
| − | #:[[File:Widget Login.jpg|800px|center]]
| |
| − | #Configure the following:
| |
| − | #:[[File:Login Widget.jpg|800px|center]]
| |
| − | #*'''Target Domain''': If you have multiple websites, select the desired website.
| |
| − | #*'''Header Text (Logged In)''': Enter the text to be displayed when the member is logged in to the Info Hub. The default is '''Logged in As'''.
| |
| − | #*'''Header Text (Logged Out)''': Enter the text to be displayed when the member wishes to log in. The default is '''Member Login'''.
| |
| − | #*'''Display Remember Password''': Enable this check-box if you wish to display a remember password check-box on the login screen.
| |
| − | #*'''Forgot Password Text''': Enter the text to be displayed for forgotten password. The default is '''Forgot your username/password?'''.
| |
| − | #*'''Login Button Text''': Enter the text to be displayed on the log-in button. The default is '''Log in'''.
| |
| − | #*'''Display Logout Button''': Enable this check-box if you wish to include a log-out button.
| |
| − | #*'''Member Area Name''': Enter the name of your Info Hub. The default is '''Member Information Center'''.
| |
| − | #*'''Appearance''': This option allows you to style the page. If ''''Default''' is selected, the widget will use the defaults used in your website. If custom is selected, you may customize the font and font colors.
| |
| − | #The widget code is automatically update with your customizations. Copy and paste this code into your website's html editor.
| |
| − | #Click '''Close'''.
| |
| | | | |
| − | ==='''<span style="color:#800080">Generate a Database Feed Widget - New Members'''</span>===
| + | Below are examples of widgets that will auto-populate on the website using ChamberMaster/MemberZone database content. Please note that the availability of these widgets may differ based on your software subscription package. Some of the database features needed to populate the widgets below are only available with the Pro software. |
| − | ----
| |
| | | | |
| − | #Click '''Setup''' in the left-hand navigation panel.
| + | '''Basic Module Feed Widgets''' |
| − | #Click '''GrowthZone Pages''' in the '''Website''' section.
| |
| − | #:[[File:Widgets.jpg|1000px|center]]
| |
| − | #Click the '''Actions''' button and select '''Generate Widget'''.
| |
| − | #Select '''Database Feed''' from the '''Select a Widget Type''' drop-down list.
| |
| − | #:[[File:Generate Widget New Member.jpg|800px|center]]
| |
| − | #Select your website domain from the '''Target Domain'''drop-down list.
| |
| − | #Select '''Members-New''' from the '''Data Feed Type''' drop-down list.
| |
| − | #Configure the following (as selections are made, the results area of the dialog box will be updated)*:
| |
| − | #*Select the desired '''Directory''' from the drop-down list. This is the directory that will be used to locate new members.
| |
| − | #*Enter the number of '''Days Back''' that you wish to use to identify new members.
| |
| − | #*Select the desired '''Animation''' for your new member list.
| |
| − | #*Enter the '''Scroll Frequency'''. The default is 35.
| |
| − | #*Enter the '''Maximum Results'''. This setting allows you to define the maximum number of new members to be displayed in the new members list.
| |
| − | #*'''No Results Message''': Enter the message you would like displayed when there are no members that match your '''Days Back''' criteria.
| |
| − | #*'''Create Links''': Enable this option if you wish links to the members directory page to be created in the list.
| |
| − | #*'''Open in New Window''': If you have enabled '''Create Links''', select this option if you wish the member's directory page to open in a new window when the link is clicked.
| |
| − | #*'''Appearance''': Select the desired styling from the drop-down list. When an option is selected, you will see the results preview. Styling includes changing default colors and fonts.
| |
| − | #Copy and paste the displayed code into your website's html editor.
| |
| − | #Click '''Close'''.
| |
| | | | |
| − | ==='''<span style="color:#800080">Generate a Database Feed Widget - Upcoming Events'''</span>===
| + | Can be populated using the following feeds: |
| − | ----
| + | #New Members (automated by join date) |
| | + | #Featured Members (manually designated) |
| | + | #Upcoming Events |
| | + | #Featured Events (manually designated) |
| | + | #News Releases |
| | | | |
| − | #Click '''Setup''' in the left-hand navigation panel.
| + | Results can be limited to show a certain maximum number of results and/or a certain number of days back/forward. |
| − | #Click '''GrowthZone Pages''' in the '''Website''' section.
| + | Event and News Release feeds can display all or filter to show only a single category. |
| − | #:[[File:Widgets.jpg|1000px|center]]
| + | Event feeds can also display the location and/or a snippet of the event description with each item. |
| − | #Click the '''Actions''' button and select '''Generate Widget'''.
| + | '''[https://www.screencast.com/t/oi2tHoHBg Watch a 10 second video of the scrolling animation]''' |
| − | #Select '''Database Feed''' from the '''Select a Widget Type''' drop-down list.
| + | The Simple List and Box Style versions require a bit of added code that is not included when generated from the ISCP. Contact our support team for assistance adding this styling to your GZCMS website. |
| − | #:[[File:Generate Widget Upcoming Events.jpg|800px|center]]
| |
| − | #Select your website domain from the '''Target Domain''' drop-down list.
| |
| − | #Select '''Events Upcoming''' from the '''Data Feed Type''' drop-down list.
| |
| − | #Configure the following (Note: as configuration selections are made, results will display in the right hand corner of the dialog box):
| |
| − | #*'''Calendar''': Select the calendar to be searched for upcoming events.
| |
| − | #*'''Category''': Select the desired event category to be search for upcoming events '''OR''' select '''Any Category''' to include all categories.
| |
| − | #*'''Display Location''': Enable this option if you wish to display the location details in the upcoming events list.'''
| |
| − | #*'''Display Search Description (Teaser)''': Enable this option if you wish to include the search description in the upcoming events list. If this option is enabled, you can also configure the '''Teaser Length (Maximum)''' to indicate the number of characters to be included.
| |
| − | #*'''Days Forward''': Enter the number of days forward you would like to be used to identify upcoming events.
| |
| − | #*'''Date Format''': Select the desired date format from the drop-down list.
| |
| − | #*'''Animation''': Select the desired animation from the drop-down list. None, Scroll Vertically, Automatic.
| |
| − | #*'''Maximum Results''': Enter the maximum number of events to be included in the list.
| |
| − | #*'''No Results Message''': Enter the message you would like displayed if no events are found in the '''Days Forward'''.
| |
| − | #:'''Create Links''': Enable this option if you wish to include the links to events in your list. If this option is enabled, you may also choose to enable '''Open in New Window''', which would open the event in a new window so the user does not navigate away from the page.
| |
| − | #*'''Appearance''': Select the desired '''Styling'''.
| |
| − | #Copy the code and paste into your website.
| |
| − | #Click '''Close'''.
| |
| | | | |
| − | ==='''<span style="color:#800080">Generate a Database Feed Widget - Web Content - Jobs'''</span>=== | + | ====Generate a Widget for a Module Feed'''==== |
| − | ----
| + | Various module feeds can be included on your website, for example New Members, Featured Members, Featured Events, etc. |
| | + | To generate the widget code: |
| | + | #From the Dashboard, click '''View Website Integration Settings'''. |
| | + | #:[[File:Integration settins cm 2021.jpg|600px|center]] |
| | + | #Click the hyperlink for your '''Integration Settings'''. |
| | + | #Enter you login credentials. These are the same credentials used when you login into ChamberMaster/MemberZone. |
| | + | #Click the '''Widgets''' tab. |
| | + | #:[[File:Create widget 2021.jpg|400px|center]] |
| | + | #Select '''Module Feed''' from the '''Widget Type''' list. |
| | + | #Select the desired '''Data Feed Type'''. |
| | + | #Configure desired features: |
| | + | #*Data Type: Do you wish to display text or image |
| | + | #*Maximum Results: How many items do you wish to display in your list? |
| | + | #*No Results Message: If no results are returned what message do you wish to display |
| | + | #*Animation: Select the desired automation. |
| | + | #*Create Links: Do you wish visitors of your website to be able to click into the item and view further details. |
| | + | #*Link Opening Location: Select where you wish the link to be opened. |
| | + | #*Styling Option: Select the desired styling option. If Custom is selected, enter desired styling options. |
| | + | #Click the '''Generate''' button. The widget code will be generated for you. This code can then be copied and pasted to be added to your website. |
| | | | |
| − | #Click '''Setup''' in the left-hand navigation panel.
| + | '''Quick Access Module Widgets''' |
| − | #Click '''GrowthZone Pages''' in the '''Website''' section.
| |
| − | #:[[File:Widgets.jpg|1000px|center]]
| |
| − | #Click the '''Actions''' button and select '''Generate Widget'''.
| |
| − | #Select '''Database Feed''' from the '''Select a Widget Type''' drop-down list.
| |
| − | #Select your website domain from the '''Target Domain''' drop-down list.
| |
| − | #Select '''Web Content''' from the '''Data Feed Type''' drop-down list.
| |
| − | #Select '''(Jobs)/jobs''' from the '''Content Type''' drop-down list.
| |
| − | #:[[File:Generate Widget Jobs.jpg|800px|center]]
| |
| − | #Configure the following:
| |
| − | #*'''Category''': Select the job category to include in your list '''OR''' select '''Any Category'''.
| |
| − | #*'''Display Sub-Title''': Enable this option if you wish to include the sub-title of the jobs in your list.
| |
| − | #*'''Display Contact''': Enable this option if you wish to include the job contact in your list. If enabled, you may choose to '''Link Contact''':
| |
| − | #:* '''Do Not Link''': A link to the contact will not be included in the list
| |
| − | #:*'''Link in New Window''': If this option is selected, when the link is clicked, the contact will be opened in a new browser window.
| |
| − | #:*'''Link Same Window''': If this option is selected, when the link is clicked, the contact page will be opened in the same browser window.
| |
| − | #*'''Display Content Date''': Enable this option if you wish to include the job content date in your list.
| |
| − | #*'''Display Published Dates''': Enable this option if you wish to include the published dates of the job in your list.
| |
| − | #*'''Display Search Description (Teaser)''': Enable this option if you wish to include the job search description in your list. If this option is enabled, you can also configure the '''Teaser Length (Maximum)''' to indicate the number of characters to be included.
| |
| − | #*'''Date Format''': Select the desired date format from the drop-down list.
| |
| − | #*'''Animation''': Select the desired animation from the drop-down list. None, Scroll Vertically, Automatic.
| |
| − | #*'''Maximum Results''': Enter the maximum number of jobs to be included in the list.
| |
| − | #*'''No Results Message''': Enter the message you would like displayed if no jobs are found.
| |
| − | #:'''Create Links''': Enable this option if you wish to include the links to the jobs in your list. If this option is enabled, you may also choose to enable '''Open in New Window''', which would open the job in a new window so the user does not navigate away from the page.
| |
| − | #*'''Appearance''': Select the desired '''Styling'''.
| |
| − | #Copy the code and paste into your website.
| |
| − | #Click '''Close'''.
| |
| | | | |
| − | ==='''<span style="color:#800080">Generate a Database Feed Widget - Web Content - Coupons'''</span>===
| + | These simple widgets do not have any alternative style versions, but the placeholder text and colors can usually be set when generating the widget code. |
| − | ----
| + | #Directory Search Bar |
| | + | #Member Login Block |
| | + | #Event Mini Calendar |
| | | | |
| − | #Click '''Setup''' in the left-hand navigation panel.
| + | [[File:Quick Access widgets.jpg|600px|center]] |
| − | #Click '''GrowthZone Pages''' in the '''Website''' section.
| |
| − | #:[[File:Widgets.jpg|1000px|center]]
| |
| − | #Click the '''Actions''' button and select '''Generate Widget'''.
| |
| − | #Select '''Database Feed''' from the '''Select a Widget Type''' drop-down list.
| |
| − | #Select your website domain from the '''Target Domain''' drop-down list.
| |
| − | #Select '''Web Content''' from the '''Data Feed Type''' drop-down list.
| |
| − | #Select '''Coupon''' from the '''Content Type''' drop-down list.
| |
| − | #:[[File:Generate Widget Coupon.jpg|800px|center]]
| |
| − | #Configure the following:
| |
| − | #*'''Category''': Select the coupon category to include in your list '''OR''' select '''Any Category'''.
| |
| − | #*'''Display Sub-Title''': Enable this option if you wish to include the sub-title of the coupon in your list.
| |
| − | #*'''Display Contact''': Enable this option if you wish to include the coupon contact in your list. If enabled, you may choose to '''Link Contact''':
| |
| − | #:* '''Do Not Link''': A link to the contact will not be included in the list
| |
| − | #:*'''Link in New Window''': If this option is selected, when the link is clicked, the contact will be opened in a new browser window.
| |
| − | #:*'''Link Same Window''': If this option is selected, when the link is clicked, the contact page will be opened in the same browser window.
| |
| − | #*'''Display Content Date''': Enable this option if you wish to include the coupon content date in your list.
| |
| − | #*'''Display Published Dates''': Enable this option if you wish to include the published dates of the coupon in your list.
| |
| − | #*'''Display Search Description (Teaser)''': Enable this option if you wish to include the coupon search description in your list. If this option is enabled, you can also configure the '''Teaser Length (Maximum)''' to indicate the number of characters to be included.
| |
| − | #*'''Date Format''': Select the desired date format from the drop-down list.
| |
| − | #*'''Animation''': Select the desired animation from the drop-down list. None, Scroll Vertically, Automatic.
| |
| − | #*'''Maximum Results''': Enter the maximum number of coupons to be included in the list.
| |
| − | #*'''No Results Message''': Enter the message you would like displayed if no coupons are found.
| |
| − | #:'''Create Links''': Enable this option if you wish to include the links to the coupons in your list. If this option is enabled, you may also choose to enable '''Open in New Window''', which would open the coupon in a new window so the user does not navigate away from the page.
| |
| − | #*'''Appearance''': Select the desired '''Styling'''.
| |
| − | #Copy the code and paste into your website.
| |
| − | #Click '''Close'''.
| |
| | | | |
| − | ==='''<span style="color:#800080">Generate a Database Feed Widget - Web Content - News'''</span>===
| + | '''Pro or Add-On Module Widgets''' |
| − | ---- | + | [[File:Form_widget.jpg|300px|left]] The widgets below may require the Pro version of the database software or add-on features. |
| | + | #Embedded Form |
| | + | #Shopping Cart |
| | + | #Banner Ads |
| | | | |
| − | #Click '''Setup''' in the left-hand navigation panel.
| + | Banner ads will automatically display at the top of any module page selected within ChamberMaster, but you can also create a widget to feed in a particular set of ads to a non-module website page by assigning a context ID to indicate placement. Ads will rotate in a randomized order, but the maximum results per page load and rotation delay can be adjusted when generating the widget code. |
| − | #Click '''GrowthZone Pages''' in the '''Website''' section.
| |
| − | #:[[File:Widgets.jpg|1000px|center]]
| |
| − | #Click the '''Actions''' button and select '''Generate Widget'''.
| |
| − | #Select '''Database Feed''' from the '''Select a Widget Type''' drop-down list.
| |
| − | #Select your website domain from the '''Target Domain''' drop-down list.
| |
| − | #Select '''Web Content''' from the '''Data Feed Type''' drop-down list.
| |
| − | #Select '''(News)/news''' from the '''Content Type''' drop-down list.
| |
| − | #:[[File:Widget News.jpg|800px|center]]
| |
| − | #Configure the following:
| |
| − | #*'''Category''': Select the news category to include in your list '''OR''' select '''Any Category'''.
| |
| − | #*'''Display Sub-Title''': Enable this option if you wish to include the news sub-title in your list.
| |
| − | #*'''Display Contact''': Enable this option if you wish to include the news contact in your list. If enabled, you may choose to '''Link Contact''':
| |
| − | #:* '''Do Not Link''': A link to the contact will not be included in the list
| |
| − | #:*'''Link in New Window''': If this option is selected, when the link is clicked, the contact will be opened in a new browser window.
| |
| − | #:*'''Link Same Window''': If this option is selected, when the link is clicked, the contact page will be opened in the same browser window.
| |
| − | #*'''Display Content Date''': Enable this option if you wish to include the news item content date in your list.
| |
| − | #*'''Display Published Dates''': Enable this option if you wish to include the published dates of the news item in your list.
| |
| − | #*'''Display Search Description (Teaser)''': Enable this option if you wish to include the news search description in your list. If this option is enabled, you can also configure the '''Teaser Length (Maximum)''' to indicate the number of characters to be included.
| |
| − | #*'''Date Format''': Select the desired date format from the drop-down list.
| |
| − | #*'''Animation''': Select the desired animation from the drop-down list. None, Scroll Vertically, Automatic.
| |
| − | #*'''Maximum Results''': Enter the maximum number of coupons to be included in the list.
| |
| − | #*'''No Results Message''': Enter the message you would like displayed if no news items are found.
| |
| − | #:'''Create Links''': Enable this option if you wish to include the links to the news items in your list. If this option is enabled, you may also choose to enable '''Open in New Window''', which would open the news item in a new window so the user does not navigate away from the page.
| |
| − | #*'''Appearance''': Select the desired '''Styling'''.
| |
| − | #Copy the code and paste into your website.
| |
| − | #Click '''Close'''.
| |
| | | | |
| − | ==='''<span style="color:#800080">Generate a Database Feed Widget - Web Content - Blog'''</span>===
| + | '''[https://www.screencast.com/t/OQoVAMh2oczb Watch a video on how to Create Banner Ads & Add Them to Module Pages and Content Pages ]''' |
| − | ----
| |
| | | | |
| − | #Click '''Setup''' in the left-hand navigation panel.
| + | [[File:Ads_and_shopping_cart_widgets.jpg|400px|center]] |
| − | #Click '''GrowthZone Pages''' in the '''Website''' section.
| |
| − | #:[[File:Widgets.jpg|1000px|center]]
| |
| − | #Click the '''Actions''' button and select '''Generate Widget'''.
| |
| − | #Select '''Database Feed''' from the '''Select a Widget Type''' drop-down list.
| |
| − | #Select your website domain from the '''Target Domain''' drop-down list.
| |
| − | #Select '''Web Content''' from the '''Data Feed Type''' drop-down list.
| |
| − | #Select '''Blog''' from the '''Content Type''' drop-down list.
| |
| − | #:[[File:Widget Blog.jpg|800px|center]]
| |
| − | #Configure the following:
| |
| − | #*'''Category''': Select the Blog category to include in your list '''OR''' select '''Any Category'''.
| |
| − | #*'''Display Sub-Title''': Enable this option if you wish to include the blog sub-title in your list.
| |
| − | #*'''Display Contact''': Enable this option if you wish to include the blog contact in your list. If enabled, you may choose to '''Link Contact''':
| |
| − | #:* '''Do Not Link''': A link to the contact will not be included in the list
| |
| − | #:*'''Link in New Window''': If this option is selected, when the link is clicked, the contact will be opened in a new browser window.
| |
| − | #:*'''Link Same Window''': If this option is selected, when the link is clicked, the contact page will be opened in the same browser window.
| |
| − | #*'''Display Content Date''': Enable this option if you wish to include the blog content date in your list.
| |
| − | #*'''Display Published Dates''': Enable this option if you wish to include the published dates of the blog in your list.
| |
| − | #*'''Display Search Description (Teaser)''': Enable this option if you wish to include the news search description in your list. If this option is enabled, you can also configure the '''Teaser Length (Maximum)''' to indicate the number of characters to be included.
| |
| − | #*'''Date Format''': Select the desired date format from the drop-down list.
| |
| − | #*'''Animation''': Select the desired animation from the drop-down list. None, Scroll Vertically, Automatic.
| |
| − | #*'''Maximum Results''': Enter the maximum number of blogs to be included in the list.
| |
| − | #*'''No Results Message''': Enter the message you would like displayed if no blogs are found.
| |
| − | #:'''Create Links''': Enable this option if you wish to include the links to the blogs in your list. If this option is enabled, you may also choose to enable '''Open in New Window''', which would open the blog in a new window so the user does not navigate away from the page.
| |
| − | #*'''Appearance''': Select the desired '''Styling'''.
| |
| − | #Copy the code and paste into your website.
| |
| − | #Click '''Close'''.
| |
| | | | |
| − | ==='''<span style="color:#800080">Generate a Database Feed Widget - Web Content - Testimonial'''</span>===
| + | =='''Working with Word Press Modules'''== |
| − | ----
| |
| | | | |
| − | #Click '''Setup''' in the left-hand navigation panel.
| + | ===Working with Buttons=== |
| − | #Click '''GrowthZone Pages''' in the '''Website''' section.
| |
| − | #:[[File:Widgets.jpg|1000px|center]]
| |
| − | #Click the '''Actions''' button and select '''Generate Widget'''.
| |
| − | #Select '''Database Feed''' from the '''Select a Widget Type''' drop-down list.
| |
| − | #Select your website domain from the '''Target Domain''' drop-down list.
| |
| − | #Select '''Web Content''' from the '''Data Feed Type''' drop-down list.
| |
| − | #Select '''Testimonial''' from the '''Content Type''' drop-down list.
| |
| − | #:[[File:Widget Testimonial.jpg|800px|center]]
| |
| − | #Configure the following:
| |
| − | #*'''Category''': Select the Testimonial category to include in your list '''OR''' select '''Any Category'''.
| |
| − | #*'''Display Sub-Title''': Enable this option if you wish to include the testimonial sub-title in your list.
| |
| − | #*'''Display Contact''': Enable this option if you wish to include the testimonial contact in your list. If enabled, you may choose to '''Link Contact''':
| |
| − | #:* '''Do Not Link''': A link to the contact will not be included in the list
| |
| − | #:*'''Link in New Window''': If this option is selected, when the link is clicked, the contact will be opened in a new browser window.
| |
| − | #:*'''Link Same Window''': If this option is selected, when the link is clicked, the contact page will be opened in the same browser window.
| |
| − | #*'''Display Content Date''': Enable this option if you wish to include the testimonial content date in your list. This is the '''Viewable Published Date''' configured when the testimonial was created.
| |
| − | #*'''Display Published Dates''': Enable this option if you wish to include the published dates of the testimonial in your list.
| |
| − | #*'''Display Search Description (Teaser)''': Enable this option if you wish to include the testimonial search description in your list. If this option is enabled, you can also configure the '''Teaser Length (Maximum)''' to indicate the number of characters to be included.
| |
| − | #*'''Date Format''': Select the desired date format from the drop-down list.
| |
| − | #*'''Animation''': Select the desired animation from the drop-down list. None, Scroll Vertically, Automatic.
| |
| − | #*'''Maximum Results''': Enter the maximum number of testimonials to be included in the list.
| |
| − | #*'''No Results Message''': Enter the message you would like displayed if no testimonials are found.
| |
| − | #:'''Create Links''': Enable this option if you wish to include the links to the testimonials in your list. If this option is enabled, you may also choose to enable '''Open in New Window''', which would open the blog in a new window so the user does not navigate away from the page.
| |
| − | #*'''Appearance''': Select the desired '''Styling'''.
| |
| − | #Copy the code and paste into your website.
| |
| − | #Click '''Close'''.
| |
| | | | |
| − | ==Configuring DNS for GrowthZone CMS Sites==
| + | Buttons may be added to your GrowthZone CMS site to take the visitor to a different page, a saved document, etc. |
| | | | |
| − | ===Overview===
| + | To add a button, open the Page Editor from the black bar across the top of your site. Click the plus (+) symbol in the top right corner, next to the Done button, to start adding content to your page. Click and hold the "Button" item to drag a button to the desired location and drop into place. |
| | | | |
| − | '''What is DNS?'''
| + | [[File:Button-Module-GZCMS.jpg|350px|left|button module]] [[File:Word Press Button 2020.jpg|600px|center]] |
| | | | |
| − | Simply put, DNS records act as the phonebook for the internet. They connect easy to read and remember domain names (mostly letters) to the IP addresses where websites are hosted. For your website to pull up correctly when a member/customer types in your website URL, the DNS configuration must be set correctly to connect your customer to the website host. In our case, we’ll have you use a cName alias which works very much like an IP address to connect visitors to your site.
| + | #Enter the '''Text''' you would like to appear on the button. |
| | + | #(Optional) Choose an icon to be displayed before or after the button text. You may also choose the visibility of the icon, either constant or fade when hover. |
| | + | #Select the '''Click Action''': |
| | + | #*'''Link''': enter the desired link. You may select to open the link in a new window or |
| | + | #*'''Light Box''': A lightbox is an overlay or a popup window that goes over the website page. This option allows you to enter html content, or a video. |
| | | | |
| − | It is crucial that this process is done securely as an insecure setup may work for a while but leaves your site open to malicious attacks such as domain hijacking where an attacker can automatically redirect all your visitors to another site.
| + | '''[https://www.screencast.com/t/L1ICO9gHh Watch a Video on How to Link to a PDF Document ]''' |
| | | | |
| − | '''Why do I have to do this?'''
| |
| | | | |
| − | One common confusion point is the assumption that this process is just automatically taken care of when you set up a new website. However, purchasing your domain name (and setting where that name points to) is a separate set of tasks and can be with a completely different company than your website host (in this case, GrowthZone). Therefore, we do not automatically have access to this information when setting up your new GrowthZone CMS site.
| |
| | | | |
| − | '''What is cName vs. IP Address'''
| + | ===Create an Anchor to a section on a Page=== |
| | | | |
| − | If you’re wondering why we’re using a cName(alias) rather than an IP address, it is because the IP may change and using a cName frees all our customers from needing to go back in and change these records every time that happens (i.e. Set it and forget it). We may change IP addresses for maintenance, upgrades, performance or security reasons but you’ll be covered with a cName as all the changes will be automatic. Unfortunately, not as many providers currently offer pointing to a cName rather than an IP address which plays a large role in the providers we’re recommending below.
| + | An anchor link is a type of link on the page that brings your visitors to a specific place on that same page. It allows them to jump to the section they’re most interested in. Creating an anchor will be a two step process: |
| | + | #Add an id to the section you wish to anchor to |
| | + | #Create a hyperlink to the text or section you wish to anchor from |
| | | | |
| − | ==='''<span style="color:#800080">Process'''</span>===
| + | '''Add an ID to a section you wish to anchor to''': |
| − | ---- | + | #In editor mode, click the edit icon for the section you wish to anchor to. |
| | + | #Locate the '''HTML Element''' section. This is generally on the the '''Advanced''' tab, but may vary dependent on the type of element you are working with. |
| | + | #:[[File:Anchor to image 2020.jpg|600px|center]] |
| | + | #In the '''id''' section, enter the id to be assigned to this section. This can be anything, but must be all numbers or letters with '''no spaces'''. In the example above, the id is '''be-part-of-solution'''. |
| | + | #Click '''Save'''. |
| | + | '''Create the hyperlink to the anchored section''' |
| | + | If you are working with text, and wish to create a link within the text: |
| | + | #Create your text element, or edit an existing element. |
| | + | #Highlight the text where you wish to place the hyperlink. |
| | + | #Click the hyperlink (chain) icon. |
| | + | #Enter a # followed by the anchor id with '''no spaces'''. For example, above we created an anchor id called be-part-of-solution. For the link in the URL field you will enter #be-part-of-solution. |
| | + | #Click '''Save'''. |
| | | | |
| − | Use the following steps to configure your DNS to point to the GrowthZone hosting1 cName for your GrowthZone CMS site. This task will take approximately 30 minutes.
| + | Publish your page, and you now have a link anchored to a specific section on your page. |
| | | | |
| − | Before you get started, you will need to know/have:
| + | =='''Website Accessibility'''== |
| | | | |
| − | #Where your domain settings (i.e. your website name www.example.com) are hosted/stored and how to access them (login info)
| + | ===A Practical Guide to Implementing ADA Compliance=== |
| − | #An GrowthZone CMS site with GrowthZone
| |
| | | | |
| − | {| class="wikitable"
| + | The Practical Guide has been created to outline some of the most critical areas of focus for WCAG/ADA compliance, along with practical steps to take to ensure greater compliance so you can provide all of your visitors with the best experience possible. Click [https://growthzone.growthzoneapp.com/ap/CloudFile/Download/mP7oxqjP HERE] to download the guide for review. |
| − | |-
| |
| − | |
| |
| − | [[File:Smallest.png|25px]]
| |
| − | | style="width: 100%"| '''NOTE:''' If your organization has opted to subscribe to a combined GrowthZone software and GrowthZone CMS package where we’re also purchasing the domain for you, this information can be disregarded as we’ll take care of all of it during the setup process. (Not common)
| |
| − | |}
| |
| | | | |
| | + | ===Website Accessibility FAQs=== |
| | | | |
| − | To make this process easier, GrowthZone strongly recommends using one of the two providers below:
| + | Below is a listen of Frequently Asked Questions regarding website accessibility and ADA Compliance. |
| | | | |
| − | *'''GoDaddy''' - GoDaddy is a well-known leader in domains and hosting, so there’s a good chance you might have purchased your domain through them. If so, you’ll need your GoDaddy login information. If your domain needs to be renewed soon, it may be a good opportunity to consider transferring it from your current provider to GoDaddy. Information regarding domain transfers can be found here.
| + | '''''What is Website Accessibility?''''' |
| − | *'''CloudFlare''' - If you have your domain with another provider, you can also use CloudFlare as a secure tool to manage the DNS configuration. You will only need a free CloudFlare account for this process.
| |
| | | | |
| − | If you do not want to use either of the two options above, please call our support team so we can walk you through options. It is possible that your current provider may work. Yet, due to each provider having their own features, requirements, and procedures, we cannot guarantee that other providers will meet the GrowthZone’s requirements for configuring your DNS settings for your GrowthZone CMS site.
| + | Web accessibility refers to ensuring that people with disabilities or impairments can perceive, understand, navigate, interact with and contribute to websites. |
| | | | |
| − | '''GoDaddy''' | + | '''''Am I required to make my website accessible?''''' |
| | + | In the United States, Title III of the [https://www.ada.gov/ Americans with Disabilities Act(ADA)] requires general accessibility to those with disabilities; though not expressly stated, it has been generally held by the courts that websites are included under the requirements of Title III. Therefore, we strongly recommend all sites to be accessible to those with disabilities or impairment such as the blind/visually impaired or deaf/hard of hearing. |
| | + | |
| | + | Specific requirements pertaining to US ADA compliance have not been issues yet. Until then, [https://www.w3.org/TR/WCAG21/ WCAG 2.1] guidelines should be used. Even though the ADA requirements are not yet published, websites are still required to provide a basic level of accessibility. |
| | | | |
| − | #Click this [https://www.godaddy.com/help/set-custom-nameservers-for-domains-registered-with-godaddy-12317 link] and follow GoDaddy’s instructions.
| + | '''Websites that do not make any attempt at making content accessible risk visitors filing ADA violation complaints with the [https://www.ada.gov/filing_complaint.htm#1| US Office of Civil Rights (OCR)] or other litigation.''' |
| − | #As part of the process, you will need to enter a cName into the records for both the addresses for your site. (e.g. www.example.com & example.com). Enter the cName: ''' | |
| − | hosting1.growthzonesites.com'''
| |
| | | | |
| − | '''CloudFlare''' | + | '''''Is my website "accessible"?''''' |
| | | | |
| − | #Click this [https://support.cloudflare.com/hc/en-us/categories/200275218-Getting-Started link] and follow CloudFlare’s simple instructions to set up a free account, add your website and configure your settings. It will ask about selecting a plan but remember, you should only need to use the free plan. As above, to correctly point your site, enter the following cName address: '''hosting1.growthzonesites.com'''
| + | Growth Zone is continually addressing the changes surrounding [https://www.w3.org/TR/WCAG21/ WCAG 2.1] and ADA compliance in order to ensure that our SmartCMS and GrowthZone CMS websites follow best practices for web accessibility. This ongoing initiative aims to ensure the systems not only incorporate these accessibility requirements, but our customers are informed and trained regarding best practices. We strive to ensure our customers’ sites are compliant when they are given editing access, but it is up to the site owner (our customer) to maintain and ensure ADA compliance of their site and follow SEO best practices for any new content they add themselves. |
| | | | |
| − | {| class="wikitable"
| + | '''''Are there Web Accessibility Guidelines?''''' |
| − | |-
| |
| − | |
| |
| − | [[File:Smallest.png|25px]]
| |
| − | | style="width: 100%"| '''NOTE:''' It may take up to 72 hours for these changes to fully take effect but if setup correctly, you will see no downtime for your site. Once these changes are made, you will not have to make updates/redo this process. If you get stuck or need help with this process, please contact us and we’ll be happy to walk you through the process. Please make sure you have the provider and login information for your domain before calling.
| |
| − | |}
| |
| | | | |
| − | =='''<span style="color:#800080">Website Accessibility'''</span>==
| + | Yes. [https://www.w3.org/WAI/ The Web Accessibility Initiative (WAI)] develops guidelines and techniques to use for websites that are considered to be the international standard with [https://www.w3.org/TR/WCAG21/ WCAG 2.1] being the most current published standard for web content accessibility. |
| − | ----
| |
| − | ==='''<span style="color:#800080">A Practical Guide to Implementing ADA Compliance'''</span>===
| |
| − | ----
| |
| | | | |
| − | The Practical Guide has been created to outline some of the most critical areas of focus for WCAG/ADA compliance, along with practical steps to take to ensure greater compliance so you can provide all of your visitors with the best experience possible. Click [https://growthzone.growthzoneapp.com/ap/CloudFile/Download/mP7oxqjP HERE] to download the guide for review.
| + | '''''Do I need to do anything while maintaining my website for it to be accessible?''''' |
| − | ==='''<span style="color:#800080">Website Accessibility FAQ's'''</span>===
| |
| − | ----
| |
| − | ===='''<span style="color:#800080">What is Website Accessibility?'''</span>====
| |
| − | ----
| |
| | | | |
| − | Web accessibility refers to ensuring that people with disabilities or impairments can perceive, understand, navigate, interact with and contribute to websites.
| |
| − |
| |
| − | ===='''<span style="color:#800080">Am I required to make my website accessible?'''</span>====
| |
| − | ----
| |
| − | In the United States, Title III of the [https://www.ada.gov/| Americans with Disabilities Act(ADA)] requires general accessibility to those with disabilities; though not expressly stated, it has been generally held by the courts that websites are included under the requirements of Title III. Therefore, we strongly recommend all sites to be accessible to those with disabilities or impairment such as the blind/visually impaired or deaf/hard of hearing.
| |
| − |
| |
| − | Specific requirements pertaining to US ADA compliance will be issued in 2018. Until then, [https://www.w3.org/TR/WCAG20/| WCAG 2.0] or 2.1 guidelines, whichever is newer, should be used. Even though the ADA requirements are not yet published, websites are still required to provide a basic level of accessibility.
| |
| − |
| |
| − | '''Websites that do not make any attempt at making content accessible risk visitors filing ADA violation complaints with the [https://www.ada.gov/filing_complaint.htm#1| US Office of Civil Rights (OCR)] or other litigation.'''
| |
| − | ===='''<span style="color:#800080">Is my website "accessible"?'''</span>====
| |
| − | ----
| |
| − | Growth Zone is continually addressing the changes surrounding [https://www.w3.org/TR/WCAG20/| WCAG 2.0]/2.1 and ADA compliance in order to ensure that our SmartCMS and GrowthZone CMS websites follow best practices for web accessibility. This ongoing initiative aims to ensure the systems not only incorporate these accessibility requirements but our customers are informed and trained regarding best practices.
| |
| − |
| |
| − | LiveEdit Aurora customers should refer to LiveEdit's documentation regarding accessibility and ADA compliance.
| |
| − |
| |
| − | ===='''<span style="color:#800080">Are there Web Accessibility Guidelines?'''</span>====
| |
| − | ----
| |
| − |
| |
| − | Yes. The [https://www.w3.org/WAI/| Web Accessibility Initiative (WAI)] develops guidelines and techniques to use for websites that are considered to be the international standard with [https://www.w3.org/TR/WCAG20/| WCAG 2.0] being the most current published standard for web content accessibility.
| |
| − | [https://www.w3.org/TR/WCAG20/| WCAG 2.1] is currently in development and is scheduled to be published in 2018 coinciding with ADA requirements for Web accessibility. You do not have to use WCAG guidelines but they can serve as best practices guide until specific ADA requirements are released.
| |
| − | ===='''<span style="color:#800080">Do I need to do anything while maintaining my website for it to be accessible?'''</span>====
| |
| − | ----
| |
| | Yes. It is important to note that even though a website may be accessible and ADA compliant at launch, it can quickly fall into non-compliant status if accessibility guidelines and best practices are not followed. Since content is added and maintained by you, our customers, we want to share some common pitfalls where sites that were once accessible fall out of compliance. | | Yes. It is important to note that even though a website may be accessible and ADA compliant at launch, it can quickly fall into non-compliant status if accessibility guidelines and best practices are not followed. Since content is added and maintained by you, our customers, we want to share some common pitfalls where sites that were once accessible fall out of compliance. |
| − |
| |
| − | ===='''<span style="color:#800080">Do I have to make the MIC/Hub accessible?'''</span>====
| |
| − | ----
| |
| − |
| |
| − | No. The accessibility requirements for the MIC/Hub and back office are handled by GrowthZone as part of the software.
| |
| | | | |
| | ===Accessibility Approach and Alternative Formats=== | | ===Accessibility Approach and Alternative Formats=== |
| | | | |
| − | While not expressly stated in the requirements, it is generally considered to be a good idea to add a page regarding accessibility and alternative formats for content; this page can go a long way in avoiding a complaint or litigation in case non-accessible content is discovered. A link to this page should appear somewhere on your landing/home page (often in the footer) so that it can be easily found by someone using a screen reader. | + | While not expressly stated in the requirements, it is generally considered to be a good idea to add a page regarding accessibility and alternative formats for content; this page can go a long way in avoiding a complaint or litigation in case non-accessible content is discovered. A link to this page should appear somewhere on your landing/home page (often in the footer) so that it can be easily found by someone using a screen reader. This page covers: |
| − | This page covers: | |
| | *Your commitment to making your content accessible to the visually impaired/ADA compliant including contact info for who should be contacted if a visually impaired visitor has trouble accessing content on the site | | *Your commitment to making your content accessible to the visually impaired/ADA compliant including contact info for who should be contacted if a visually impaired visitor has trouble accessing content on the site |
| − | *How a visitor can access content in other formats (location on the site or contact us) | + | *How a visitor can access content in other formats (location on the site or contact us) |
| | | | |
| | '''Text Alternatives''' | | '''Text Alternatives''' |
| | | | |
| − | Provide text alternatives for any non-text content. For images, the text will be read aloud describing the content for the visually impaired. In the case of video, closed captions should be available for the deaf and hard of hearing. | + | Provide text alternatives for any non-text content. For images, the text will be read aloud describing the content for the visually impaired. In the case of video, closed captions should be available for the deaf and hard of hearing. Depending on which CMS platform and which module you are using for inserting images, there is a always a text field available to place ‘alt text’ or ‘alternative text’ for the image. |
| | | | |
| | '''Alternative Document Formats''' | | '''Alternative Document Formats''' |
| | | | |
| − | Pdfs are great but are not readable by many screen readers. Make sure you are able to provide the document in another format such as Microsoft Word or html. | + | Pdfs are great but are not readable by many screen readers. Make sure you are able to provide the document in another format such as Microsoft Word or html |
| − | Colors and Contrast
| |
| − | Avoid using colors in text and background that are similar. The visually impaired and those with certain types of color blindness will have difficulty distinguishing the text from the background. Always attempt to use text colors that stand out from the background. Never use flashing/strobing text or images or other items whose quick movement makes them difficult to read or understand.
| |
| | | | |
| − | '''Navigation''' | + | '''Colors and Contrast''' |
| | | | |
| − | Accessibility requirements regarding site navigation and menus will be handled when your site is created, yet you may wish to add or remove navigation and menu options later on. Try to keep any menus simple without many layers of bumpouts and dropdowns. Also, avoid having several menus on a single page or mixed in wither other content in the body such as text and images.
| + | Avoid using colors in text and background that are similar. The visually impaired and those with certain types of color blindness will have difficulty distinguishing the text from the background. Always attempt to use text colors that stand out from the background. Never use flashing/strobing text or images or other items whose quick movement makes them difficult to read or understand. |
| | | | |
| − | ===Checking your Site===
| + | '''Navigation''' |
| − | | |
| − | There are several online tools that you can use to check your site. A word of caution, however, as most perform their checks at the highest levels of "accessibility", resulting in flags on areas of your site that do, in fact, meet accessibility requirements. Therefore, they should be used as informative tools only.
| |
| − | | |
| − | [http://wave.webaim.org/| Web Accessibility Check]
| |
| − | | |
| − | ===Want to learn more? Click the links below===
| |
| − | | |
| − | [https://www.w3.org/TR/UNDERSTANDING-WCAG20/| Understanding WCAG 2]
| |
| − | | |
| − | [https://www.w3.org/WAI/tutorials/| Web Accessibility Tutorials]
| |
| − | | |
| − | =General Data Protection Regulation Basics (GDPR)=
| |
| − | | |
| − | The General Data Protection Regulation (GDPR) is a European Union law enacted in 2016 which will take effect with enforcement beginning on May 25th, 2018. This law was enacted with the goal of providing better data and privacy protection and security for European Union (EU) member states’ citizens.
| |
| − | | |
| − | ==Brexit Impact==
| |
| − | In early 2017, UK Prime Minister May outlined several technology related impacts of the impending exit of the UK from the EU (Brexit) which have been reiterated by UK Digital Minister Hancock. According to these reports, the UK plans to keep GDPR provisions by mirroring it via UK regulations. These regulations are not yet in place and will require legislation to be passed in parliament. However, it should be noted that the Brexit process is currently unlikely to terminate prior to the EU GDPR deadline in 2018. Thus, UK customers are recommended to stick with May 25th, 2018 deadline for compliance.
| |
| − | | |
| − | ==GDPR Responsibilities & Accountability==
| |
| − | In dealing with GDPR Compliance, it is important to understand where accountability lies.
| |
| − | | |
| − | For GrowthZone software (including the MIC/Hub), GrowthZone is responsible for complying with the GDPR, communicating compliance to chambers and associations, and reporting issues. Our staff and member apps, as extensions of the back office and MIC/Hubs, fall under this definition as well. SmartCMS and GrowthZoneCMS do not collect member or visitor data. On pages where member or visitor data appears to be collected by these systems, it is in fact due to an integration of the Chambermaster/Memberzone and GrowthZone software and thus these systems do not fall under the GDPR requirements.
| |
| − | | |
| − | Customers that use third party systems for websites or integrations with Chambermaster and GrowthZone software need to be aware GrowthZone is not responsible for the compliance of these systems; GrowthZone is responsible for GDPR compliance of its products only. Chambers and associations are accountable to ensure overall GDPR compliance for the mix of systems they are using to collect and process member and visitor data.
| |
| − | | |
| − | ==Components==
| |
| − | All information regarding the specific regulations can be found on the GDPR site. Requirements of the GDPR are broken down into the following categories or “rights” of individuals:
| |
| − |
| |
| − | #The right to be informed
| |
| − | #The right of access
| |
| − | #The right to rectification
| |
| − | #The right to erasure
| |
| − | #The right to restrict processing
| |
| − | #The right to data portability
| |
| − | #The right to object
| |
| − | #Rights in relation to automated decision making and profiling.
| |
| − |
| |
| − | These rights when viewed together are meant to provide individual users greater clarity and understanding of what personal data is being stored, how it is being used, and how to access/delete that data. In the end, the goal is to provide greater personal data privacy, access and protection. Here’s a brief summary of obligations for GDPR compliance.
| |
| | | | |
| − | #'''Right to be informed:''' Obligation of organization to inform users submitting personal data as to how the data will be kept private and used. Usually issued as part of a privacy notice that must be viewed..
| + | Accessibility requirements regarding site navigation and menus will be handled when your site is created, yet you may wish to add or remove navigation and menu options later on. Try to keep any menus simple without many layers of bump-outs and dropdowns. Also, avoid having several menus on a single page or mixed in wither other content in the body such as text and images. |
| − | #'''Right of access:''' Obligation to confirm a user’s request as to whether their data is being held/processed and the obligation to grant them access to their personal data
| |
| − | #'''Right of rectification:''' Obligation to provide access to rectify any personal data deemed incorrect. Obligation to disclose any personal data given to 3rd parties and contact information for rectification
| |
| − | #'''Right of erasure:''' Obligation to remove/erase all stored personal data upon request
| |
| − | #'''Right to restrict processing:'''Obligation to halt the processing of data that is deemed restricted by the user
| |
| − | #'''Right to data portability:''' Obligation to provide a .csv/export of personal data within one month of request
| |
| − | #'''Right to object:''' Obligation, if requested, to halt processing of data for marketing, profiling, interest, or research purposes
| |
| − | #'''Rights in relation:''' Obligation to provide clarity on types of decisions that are automated and allow for human interaction for those that have a significant legal impact.
| |
| | | | |
| − | A chamber or association may receive a request from an individual regarding these rights or a request from a governmental agency for records and documentation of compliance. Additionally, organizations have specific obligations regarding accountability, data protection, and breach notifications that vary depending on the types of data being collected and processed; these records may also be requested.
| + | '''Do I have to make the MIC/Hub accessible?''' |
| | | | |
| − | ==GDPR Compliance Initiative at GrowthZone==
| + | No. The accessibility requirements for the MIC/Hub and backoffice are handled by GrowthZone as part of the software. |
| | | | |
| − | Getting ready for the upcoming GDPR changes in May of 2018 is a major initiative at GrowthZone with changes and improvements already underway; GrowthZone software will be fully compliant by the May 2018 deadline. As we make changes to ensure compliance, here are some key areas where customers will start to notice changes.
| + | '''Checking Your Site''' |
| | | | |
| − | ==Express Consent==
| + | There are several online tools that you can use to check your site. A word of caution, however, as most perform their checks at the highest levels of "accessibility", resulting in flags on areas of your site that do, in fact, meet accessibility requirements. Therefore, they should be used as informative tools only. [http://wave.webaim.org/ Web Accessibility Check] |
| | | | |
| − | To ensure users are aware of the types of data being collected and for what purpose it is being used along with the need to opt-in, there will be changes, additions, and privacy notices added to screens that collect information. This can include features like the membership application, event registration, etc.
| + | '''Want to learn more? Click the links below''' |
| − | Privacy Settings
| |
| − | Areas such as the MIC and Hub will see additions allowing members even more control over their personal data including contact information, profile information and visibility settings.
| |
| | | | |
| − | ==Reports==
| + | *[https://www.w3.org/WAI/WCAG21/Understanding/ Understanding WCAG 2.1] |
| − | One of the key goals of the GDPR is to provide understanding of what data is stored, allow users access to correct it, and delete it if they choose. Reporting regarding GDPR compliance and specific personal data reports will be added so that chambers and associations to easily identify and document the types of data stored and find specific user’s personal data if requested.
| + | *[https://www.w3.org/WAI/tutorials/ Web Accessibility Tutorials] |
| − | Training
| |
| − | GDPR documentation and training will be provided starting in 2018 helping chambers and associations tackle specific GDPR compliance issues. Offerings will include both technical trainings and general communication with topics ranging from help understanding the law, to running reports, to dealing data.
| |
Overview of your GrowthZone CMS
GrowthZone has designed and built hundreds of engaging and compelling association websites, to help enhance your brand and drive increased traffic, engagement, and usage of your most important public-facing asset. A wide variety of themes are available for you to choose from. View our website gallery.
GrowthZone Content Management System (CMS) puts you in control of your new website 24/7. Your site is based on the WordPress Platform with an added front-end page editor which provides intuitive content editing tools to make it easy to add and manage web pages, as well as incorporate your Chambermaster/MemberZone content into your site in seconds, all from any web browser.
GrowthZone CMS Training Videos - Getting Started
Adding ChamberMaster/MemberZone Content to Your Website
Are you managing your own website instead of using a GrowthZone CMS website and looking for ChamberMaster/MemberZone integration resources? Visit our website integration Knowledge Base
Accessing Links to the Modules for your GrowthZone CMS Website
Several modules from your Chambermaster/MemberZone database can easily be added to your website. You can add the following:
- Contact Us
- Communication
- Events (List View or Calendar View)
- Groups
- Hot Deals
- Job Postings
- Member Directory
- Member Login
- New Member Application
The links have been generated for you and may be accessed through the Message Center in the Customer Service section on the Dashboard of your system.
Integration Settings Control Panel (ISCP)
The Integration Settings Control Panel (or "ISCP") is used as a means to setup and configure your public facing modules, including setting up a base URL for the website (so our server can tell the browser where to load any relatively linked resources from), setting up template locations, and changing the appearance of the CM/MZ-provided pages through the use of color, font, and size fields.
[ISCP Overview]
[ISCP Basics]
- Copy the url(s) from the Module Links you would like to add to your website.
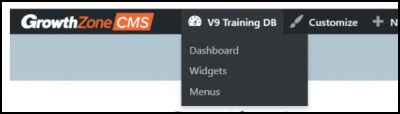
- From the database, click
 icon in the upper right menu of the database. This will provide an edit mode access to your website.
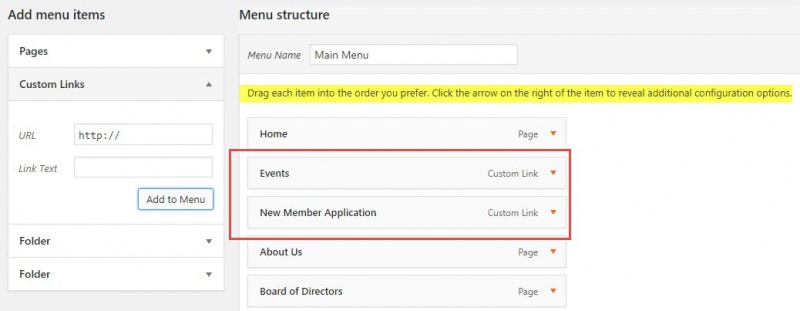
- Hover over the name of your organization in the header bar and click Menus.
- Click the arrow in the Custom Links section.

- Paste the previously copied Entire Url in the URL box.
- Enter the text you would like to appear on the menu for this item in the Link Text box.
- Click Add to Menu.
- Repeat steps to add as many Menu items as needed.
- Notice that the Menu Structure will build as you add the items in Custom Links. You are able to click and drag the added items into the order you would like it to be on your website. You are also able to add sub items and create dropdown menus on the header.
- Click
 to save all the changes to your website.
The menu item(s) for your Chambermaster/MemberZone module have now been added to your main menu structure and viewable on the website.
Chambermaster/MemberZone Widgets
Watch a video on how to add a ChamberMaster/MemberZone Widget to your GrowthZone CMS Website
Below are examples of widgets that will auto-populate on the website using ChamberMaster/MemberZone database content. Please note that the availability of these widgets may differ based on your software subscription package. Some of the database features needed to populate the widgets below are only available with the Pro software.
Basic Module Feed Widgets
Can be populated using the following feeds:
- New Members (automated by join date)
- Featured Members (manually designated)
- Upcoming Events
- Featured Events (manually designated)
- News Releases
Results can be limited to show a certain maximum number of results and/or a certain number of days back/forward.
Event and News Release feeds can display all or filter to show only a single category.
Event feeds can also display the location and/or a snippet of the event description with each item.
Watch a 10 second video of the scrolling animation
The Simple List and Box Style versions require a bit of added code that is not included when generated from the ISCP. Contact our support team for assistance adding this styling to your GZCMS website.
Generate a Widget for a Module Feed
Various module feeds can be included on your website, for example New Members, Featured Members, Featured Events, etc.
To generate the widget code:
- From the Dashboard, click View Website Integration Settings.
- Click the hyperlink for your Integration Settings.
- Enter you login credentials. These are the same credentials used when you login into ChamberMaster/MemberZone.
- Click the Widgets tab.
- Select Module Feed from the Widget Type list.
- Select the desired Data Feed Type.
- Configure desired features:
- Data Type: Do you wish to display text or image
- Maximum Results: How many items do you wish to display in your list?
- No Results Message: If no results are returned what message do you wish to display
- Animation: Select the desired automation.
- Create Links: Do you wish visitors of your website to be able to click into the item and view further details.
- Link Opening Location: Select where you wish the link to be opened.
- Styling Option: Select the desired styling option. If Custom is selected, enter desired styling options.
- Click the Generate button. The widget code will be generated for you. This code can then be copied and pasted to be added to your website.
Quick Access Module Widgets
These simple widgets do not have any alternative style versions, but the placeholder text and colors can usually be set when generating the widget code.
- Directory Search Bar
- Member Login Block
- Event Mini Calendar
Pro or Add-On Module Widgets
The widgets below may require the Pro version of the database software or add-on features.
- Embedded Form
- Shopping Cart
- Banner Ads
Banner ads will automatically display at the top of any module page selected within ChamberMaster, but you can also create a widget to feed in a particular set of ads to a non-module website page by assigning a context ID to indicate placement. Ads will rotate in a randomized order, but the maximum results per page load and rotation delay can be adjusted when generating the widget code.
Watch a video on how to Create Banner Ads & Add Them to Module Pages and Content Pages
Working with Word Press Modules
Working with Buttons
Buttons may be added to your GrowthZone CMS site to take the visitor to a different page, a saved document, etc.
To add a button, open the Page Editor from the black bar across the top of your site. Click the plus (+) symbol in the top right corner, next to the Done button, to start adding content to your page. Click and hold the "Button" item to drag a button to the desired location and drop into place.
- Enter the Text you would like to appear on the button.
- (Optional) Choose an icon to be displayed before or after the button text. You may also choose the visibility of the icon, either constant or fade when hover.
- Select the Click Action:
- Link: enter the desired link. You may select to open the link in a new window or
- Light Box: A lightbox is an overlay or a popup window that goes over the website page. This option allows you to enter html content, or a video.
Watch a Video on How to Link to a PDF Document
Create an Anchor to a section on a Page
An anchor link is a type of link on the page that brings your visitors to a specific place on that same page. It allows them to jump to the section they’re most interested in. Creating an anchor will be a two step process:
- Add an id to the section you wish to anchor to
- Create a hyperlink to the text or section you wish to anchor from
Add an ID to a section you wish to anchor to:
- In editor mode, click the edit icon for the section you wish to anchor to.
- Locate the HTML Element section. This is generally on the the Advanced tab, but may vary dependent on the type of element you are working with.
- In the id section, enter the id to be assigned to this section. This can be anything, but must be all numbers or letters with no spaces. In the example above, the id is be-part-of-solution.
- Click Save.
Create the hyperlink to the anchored section
If you are working with text, and wish to create a link within the text:
- Create your text element, or edit an existing element.
- Highlight the text where you wish to place the hyperlink.
- Click the hyperlink (chain) icon.
- Enter a # followed by the anchor id with no spaces. For example, above we created an anchor id called be-part-of-solution. For the link in the URL field you will enter #be-part-of-solution.
- Click Save.
Publish your page, and you now have a link anchored to a specific section on your page.
Website Accessibility
A Practical Guide to Implementing ADA Compliance
The Practical Guide has been created to outline some of the most critical areas of focus for WCAG/ADA compliance, along with practical steps to take to ensure greater compliance so you can provide all of your visitors with the best experience possible. Click HERE to download the guide for review.
Website Accessibility FAQs
Below is a listen of Frequently Asked Questions regarding website accessibility and ADA Compliance.
What is Website Accessibility?
Web accessibility refers to ensuring that people with disabilities or impairments can perceive, understand, navigate, interact with and contribute to websites.
Am I required to make my website accessible?
In the United States, Title III of the Americans with Disabilities Act(ADA) requires general accessibility to those with disabilities; though not expressly stated, it has been generally held by the courts that websites are included under the requirements of Title III. Therefore, we strongly recommend all sites to be accessible to those with disabilities or impairment such as the blind/visually impaired or deaf/hard of hearing.
Specific requirements pertaining to US ADA compliance have not been issues yet. Until then, WCAG 2.1 guidelines should be used. Even though the ADA requirements are not yet published, websites are still required to provide a basic level of accessibility.
Websites that do not make any attempt at making content accessible risk visitors filing ADA violation complaints with the US Office of Civil Rights (OCR) or other litigation.
Is my website "accessible"?
Growth Zone is continually addressing the changes surrounding WCAG 2.1 and ADA compliance in order to ensure that our SmartCMS and GrowthZone CMS websites follow best practices for web accessibility. This ongoing initiative aims to ensure the systems not only incorporate these accessibility requirements, but our customers are informed and trained regarding best practices. We strive to ensure our customers’ sites are compliant when they are given editing access, but it is up to the site owner (our customer) to maintain and ensure ADA compliance of their site and follow SEO best practices for any new content they add themselves.
Are there Web Accessibility Guidelines?
Yes. The Web Accessibility Initiative (WAI) develops guidelines and techniques to use for websites that are considered to be the international standard with WCAG 2.1 being the most current published standard for web content accessibility.
Do I need to do anything while maintaining my website for it to be accessible?
Yes. It is important to note that even though a website may be accessible and ADA compliant at launch, it can quickly fall into non-compliant status if accessibility guidelines and best practices are not followed. Since content is added and maintained by you, our customers, we want to share some common pitfalls where sites that were once accessible fall out of compliance.
Accessibility Approach and Alternative Formats
While not expressly stated in the requirements, it is generally considered to be a good idea to add a page regarding accessibility and alternative formats for content; this page can go a long way in avoiding a complaint or litigation in case non-accessible content is discovered. A link to this page should appear somewhere on your landing/home page (often in the footer) so that it can be easily found by someone using a screen reader. This page covers:
- Your commitment to making your content accessible to the visually impaired/ADA compliant including contact info for who should be contacted if a visually impaired visitor has trouble accessing content on the site
- How a visitor can access content in other formats (location on the site or contact us)
Text Alternatives
Provide text alternatives for any non-text content. For images, the text will be read aloud describing the content for the visually impaired. In the case of video, closed captions should be available for the deaf and hard of hearing. Depending on which CMS platform and which module you are using for inserting images, there is a always a text field available to place ‘alt text’ or ‘alternative text’ for the image.
Alternative Document Formats
Pdfs are great but are not readable by many screen readers. Make sure you are able to provide the document in another format such as Microsoft Word or html
Colors and Contrast
Avoid using colors in text and background that are similar. The visually impaired and those with certain types of color blindness will have difficulty distinguishing the text from the background. Always attempt to use text colors that stand out from the background. Never use flashing/strobing text or images or other items whose quick movement makes them difficult to read or understand.
Navigation
Accessibility requirements regarding site navigation and menus will be handled when your site is created, yet you may wish to add or remove navigation and menu options later on. Try to keep any menus simple without many layers of bump-outs and dropdowns. Also, avoid having several menus on a single page or mixed in wither other content in the body such as text and images.
Do I have to make the MIC/Hub accessible?
No. The accessibility requirements for the MIC/Hub and backoffice are handled by GrowthZone as part of the software.
Checking Your Site
There are several online tools that you can use to check your site. A word of caution, however, as most perform their checks at the highest levels of "accessibility", resulting in flags on areas of your site that do, in fact, meet accessibility requirements. Therefore, they should be used as informative tools only. Web Accessibility Check
Want to learn more? Click the links below