GrowthZone CMS
Contents
- 1 Overview of your GrowthZone CMS
- 2 GrowthZone CMS Training Videos - Getting Started
- 2.1 GrowthZone CMS Page Editor Overview
- 2.2 How to Create a New Page and Add to the Menu
- 2.3 Working With the Menus, Dropdowns, and Links
- 2.4 GrowthZone CMS Dashboard Overview
- 2.5 Add Content, Rows and Saved Rows
- 2.6 How to use Beaver Theme Layouts and edit header/footer
- 2.7 How to Adjust the Colors and Appearance
- 2.8 How to Link a Button or Image to a PDF
- 2.9 How to Create a Saved Module or Row
- 2.10 How to Add a ChamberMaster/MemberZone Widget to Your GZCMS Website
- 2.11 How to Create Banner Ads & Add Them to Module Pages and Content Pages (Requires ChamberMaster Pro Subscription or Marketing Package)
- 2.12 How to Create and Display a GZCMS Blog Post
- 2.13 How to Use Accordions and Tabs
- 3 Adding ChamberMaster/MemberZone Content to Your Website
- 4 Working with Word Press Modules
- 5 Website Accessibility
Overview of your GrowthZone CMS
GrowthZone has designed and built hundreds of engaging and compelling association websites, to help enhance your brand and drive increased traffic, engagement, and usage of your most important public-facing asset. A wide variety of themes are available for you to choose from. View our website gallery.
GrowthZone Content Management System (CMS) puts you in control of your new website 24/7. Your site is based on the WordPress Platform with an added front-end page editor which provides intuitive content editing tools to make it easy to add and manage web pages, as well as incorporate your Chambermaster/MemberZone content into your site in seconds, all from any web browser.
|
|
Are you managing your own website instead of using a GrowthZone CMS website and looking for ChamberMaster/MemberZone integration resources? Visit our website integration Knowledge Base |
GrowthZone CMS Training Videos - Getting Started
GrowthZone CMS Page Editor Overview
How to Create a New Page and Add to the Menu
Working With the Menus, Dropdowns, and Links
GrowthZone CMS Dashboard Overview
Add Content, Rows and Saved Rows
How to Adjust the Colors and Appearance
How to Link a Button or Image to a PDF
How to Create a Saved Module or Row
How to Add a ChamberMaster/MemberZone Widget to Your GZCMS Website
How to Create Banner Ads & Add Them to Module Pages and Content Pages (Requires ChamberMaster Pro Subscription or Marketing Package)
How to Create and Display a GZCMS Blog Post
How to Use Accordions and Tabs
Adding ChamberMaster/MemberZone Content to Your Website
Are you managing your own website instead of using a GrowthZone CMS website and looking for ChamberMaster/MemberZone integration resources? Visit our website integration Knowledge Base
Accessing Links to the Modules for your GrowthZone CMS Website
Several modules from your Chambermaster/MemberZone database can easily be added to your website. You can add the following:
- Contact Us
- Communication
- Events (List View or Calendar View)
- Groups
- Hot Deals
- Job Postings
- Member Directory
- Member Login
- New Member Application
The links have been generated for you and may be accessed through the Message Center in the Customer Service section on the Dashboard of your system.


Integration Settings Control Panel (ISCP)
The Integration Settings Control Panel (or "ISCP") is used as a means to setup and configure your public facing modules, including setting up a base URL for the website (so our server can tell the browser where to load any relatively linked resources from), setting up template locations, and changing the appearance of the CM/MZ-provided pages through the use of color, font, and size fields.
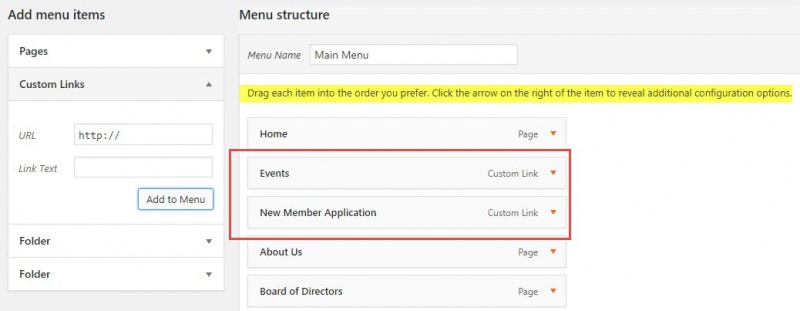
Add a Chambermaster/MemberZone Module as a Menu Item to your GrowthZone CMS website
- Copy the url(s) from the Module Links you would like to add to your website.
- From the database, click
 icon in the upper right menu of the database. This will provide an edit mode access to your website.
 - Hover over the name of your organization in the header bar and click Menus.
- Click the arrow in the Custom Links section.
- Paste the previously copied Entire Url in the URL box.
- Enter the text you would like to appear on the menu for this item in the Link Text box.
- Click Add to Menu.
- Repeat steps to add as many Menu items as needed.
- Notice that the Menu Structure will build as you add the items in Custom Links. You are able to click and drag the added items into the order you would like it to be on your website. You are also able to add sub items and create dropdown menus on the header.
- Click
 to save all the changes to your website.


The menu item(s) for your Chambermaster/MemberZone module have now been added to your main menu structure and viewable on the website.

Chambermaster/MemberZone Widgets

Watch a video on how to add a ChamberMaster/MemberZone Widget to your GrowthZone CMS Website
Below are examples of widgets that will auto-populate on the website using ChamberMaster/MemberZone database content. Please note that the availability of these widgets may differ based on your software subscription package. Some of the database features needed to populate the widgets below are only available with the Pro software.
Basic Module Feed Widgets
Can be populated using the following feeds:
- New Members (automated by join date)
- Featured Members (manually designated)
- Upcoming Events
- Featured Events (manually designated)
- News Releases
Results can be limited to show a certain maximum number of results and/or a certain number of days back/forward. Event and News Release feeds can display all or filter to show only a single category. Event feeds can also display the location and/or a snippet of the event description with each item. Watch a 10 second video of the scrolling animation The Simple List and Box Style versions require a bit of added code that is not included when generated from the ISCP. Contact our support team for assistance adding this styling to your GZCMS website.
Generate a Widget for a Module Feed
Various module feeds can be included on your website, for example New Members, Featured Members, Featured Events, etc. To generate the widget code:
- From the Dashboard, click View Website Integration Settings.
- Click the hyperlink for your Integration Settings.
- Enter you login credentials. These are the same credentials used when you login into ChamberMaster/MemberZone.
- Click the Widgets tab.
- Select Module Feed from the Widget Type list.
- Select the desired Data Feed Type.
- Configure desired features:
- Data Type: Do you wish to display text or image
- Maximum Results: How many items do you wish to display in your list?
- No Results Message: If no results are returned what message do you wish to display
- Animation: Select the desired automation.
- Create Links: Do you wish visitors of your website to be able to click into the item and view further details.
- Link Opening Location: Select where you wish the link to be opened.
- Styling Option: Select the desired styling option. If Custom is selected, enter desired styling options.
- Click the Generate button. The widget code will be generated for you. This code can then be copied and pasted to be added to your website.


Quick Access Module Widgets
These simple widgets do not have any alternative style versions, but the placeholder text and colors can usually be set when generating the widget code.
- Directory Search Bar
- Member Login Block
- Event Mini Calendar

Pro or Add-On Module Widgets

The widgets below may require the Pro version of the database software or add-on features.
- Embedded Form
- Shopping Cart
- Banner Ads
Banner ads will automatically display at the top of any module page selected within ChamberMaster, but you can also create a widget to feed in a particular set of ads to a non-module website page by assigning a context ID to indicate placement. Ads will rotate in a randomized order, but the maximum results per page load and rotation delay can be adjusted when generating the widget code.
Watch a video on how to Create Banner Ads & Add Them to Module Pages and Content Pages

Working with Word Press Modules
Working with Buttons
Buttons may be added to your GrowthZone CMS site to take the visitor to a different page, a saved document, etc.
To add a button, open the Page Editor from the black bar across the top of your site. Click the plus (+) symbol in the top right corner, next to the Done button, to start adding content to your page. Click and hold the "Button" item to drag a button to the desired location and drop into place.


- Enter the Text you would like to appear on the button.
- (Optional) Choose an icon to be displayed before or after the button text. You may also choose the visibility of the icon, either constant or fade when hover.
- Select the Click Action:
- Link: enter the desired link. You may select to open the link in a new window or
- Light Box: A lightbox is an overlay or a popup window that goes over the website page. This option allows you to enter html content, or a video.
Watch a Video on How to Link to a PDF Document
Create an Anchor to a section on a Page
An anchor link is a type of link on the page that brings your visitors to a specific place on that same page. It allows them to jump to the section they’re most interested in. Creating an anchor will be a two step process:
- Add an id to the section you wish to anchor to
- Create a hyperlink to the text or section you wish to anchor from
Add an ID to a section you wish to anchor to:
- In editor mode, click the edit icon for the section you wish to anchor to.
- Locate the HTML Element section. This is generally on the the Advanced tab, but may vary dependent on the type of element you are working with.
- In the id section, enter the id to be assigned to this section. This can be anything, but must be all numbers or letters with no spaces. In the example above, the id is be-part-of-solution.
- Click Save.

Create the hyperlink to the anchored section If you are working with text, and wish to create a link within the text:
- Create your text element, or edit an existing element.
- Highlight the text where you wish to place the hyperlink.
- Click the hyperlink (chain) icon.
- Enter a # followed by the anchor id with no spaces. For example, above we created an anchor id called be-part-of-solution. For the link in the URL field you will enter #be-part-of-solution.
- Click Save.
Publish your page, and you now have a link anchored to a specific section on your page.
Website Accessibility
A Practical Guide to Implementing ADA Compliance
The Practical Guide has been created to outline some of the most critical areas of focus for WCAG/ADA compliance, along with practical steps to take to ensure greater compliance so you can provide all of your visitors with the best experience possible. Click HERE to download the guide for review.
Website Accessibility FAQs
Below is a listen of Frequently Asked Questions regarding website accessibility and ADA Compliance.
What is Website Accessibility?
Web accessibility refers to ensuring that people with disabilities or impairments can perceive, understand, navigate, interact with and contribute to websites.
Am I required to make my website accessible? In the United States, Title III of the Americans with Disabilities Act(ADA) requires general accessibility to those with disabilities; though not expressly stated, it has been generally held by the courts that websites are included under the requirements of Title III. Therefore, we strongly recommend all sites to be accessible to those with disabilities or impairment such as the blind/visually impaired or deaf/hard of hearing.
Specific requirements pertaining to US ADA compliance have not been issues yet. Until then, WCAG 2.1 guidelines should be used. Even though the ADA requirements are not yet published, websites are still required to provide a basic level of accessibility.
Websites that do not make any attempt at making content accessible risk visitors filing ADA violation complaints with the US Office of Civil Rights (OCR) or other litigation.
Is my website "accessible"?
Growth Zone is continually addressing the changes surrounding WCAG 2.1 and ADA compliance in order to ensure that our SmartCMS and GrowthZone CMS websites follow best practices for web accessibility. This ongoing initiative aims to ensure the systems not only incorporate these accessibility requirements, but our customers are informed and trained regarding best practices. We strive to ensure our customers’ sites are compliant when they are given editing access, but it is up to the site owner (our customer) to maintain and ensure ADA compliance of their site and follow SEO best practices for any new content they add themselves.
Are there Web Accessibility Guidelines?
Yes. The Web Accessibility Initiative (WAI) develops guidelines and techniques to use for websites that are considered to be the international standard with WCAG 2.1 being the most current published standard for web content accessibility.
Do I need to do anything while maintaining my website for it to be accessible?
Yes. It is important to note that even though a website may be accessible and ADA compliant at launch, it can quickly fall into non-compliant status if accessibility guidelines and best practices are not followed. Since content is added and maintained by you, our customers, we want to share some common pitfalls where sites that were once accessible fall out of compliance.
Accessibility Approach and Alternative Formats
While not expressly stated in the requirements, it is generally considered to be a good idea to add a page regarding accessibility and alternative formats for content; this page can go a long way in avoiding a complaint or litigation in case non-accessible content is discovered. A link to this page should appear somewhere on your landing/home page (often in the footer) so that it can be easily found by someone using a screen reader. This page covers:
- Your commitment to making your content accessible to the visually impaired/ADA compliant including contact info for who should be contacted if a visually impaired visitor has trouble accessing content on the site
- How a visitor can access content in other formats (location on the site or contact us)
Text Alternatives
Provide text alternatives for any non-text content. For images, the text will be read aloud describing the content for the visually impaired. In the case of video, closed captions should be available for the deaf and hard of hearing. Depending on which CMS platform and which module you are using for inserting images, there is a always a text field available to place ‘alt text’ or ‘alternative text’ for the image.
Alternative Document Formats
Pdfs are great but are not readable by many screen readers. Make sure you are able to provide the document in another format such as Microsoft Word or html
Colors and Contrast
Avoid using colors in text and background that are similar. The visually impaired and those with certain types of color blindness will have difficulty distinguishing the text from the background. Always attempt to use text colors that stand out from the background. Never use flashing/strobing text or images or other items whose quick movement makes them difficult to read or understand.
Navigation
Accessibility requirements regarding site navigation and menus will be handled when your site is created, yet you may wish to add or remove navigation and menu options later on. Try to keep any menus simple without many layers of bump-outs and dropdowns. Also, avoid having several menus on a single page or mixed in wither other content in the body such as text and images.
Do I have to make the MIC/Hub accessible?
No. The accessibility requirements for the MIC/Hub and backoffice are handled by GrowthZone as part of the software.
Checking Your Site
There are several online tools that you can use to check your site. A word of caution, however, as most perform their checks at the highest levels of "accessibility", resulting in flags on areas of your site that do, in fact, meet accessibility requirements. Therefore, they should be used as informative tools only. Web Accessibility Check
Want to learn more? Click the links below