Difference between revisions of "Add Custom Fields for a Rep"
| Line 19: | Line 19: | ||
#On the '''Reps''' tab, click '''Add/Edit Custom Fields''' in the "Custom Fields" area | #On the '''Reps''' tab, click '''Add/Edit Custom Fields''' in the "Custom Fields" area | ||
#Click '''Add a Field'''. | #Click '''Add a Field'''. | ||
| − | # | + | #[[File:customfield1.jpg]] |
#Type desired field name (maximum characters: 128) | #Type desired field name (maximum characters: 128) | ||
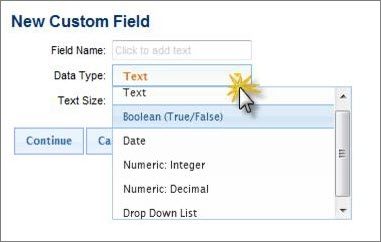
| − | #Click the Data Type | + | #Click the Data Type dropdown list. |
#Click the desired data type. | #Click the desired data type. | ||
##If the selected data type is Text, type the desired Text Size. | ##If the selected data type is Text, type the desired Text Size. | ||
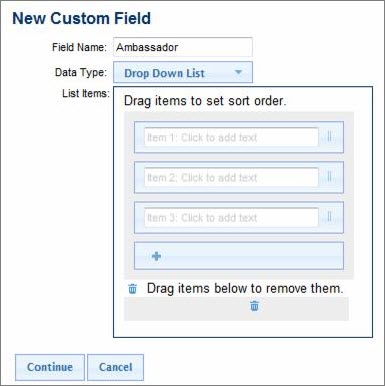
##If the selected data type is Drop Down List, enter the desired list of items. | ##If the selected data type is Drop Down List, enter the desired list of items. | ||
| − | #: | + | #[[File:customfield2.jpg]] |
#Click '''Continue'''. | #Click '''Continue'''. | ||
#Click '''Save & Exit'''. | #Click '''Save & Exit'''. | ||
Revision as of 21:04, 7 August 2015
Contents
What Are Custom Fields?
Custom Fields are designed to give ultimate flexibility in managing your data. When adding a custom field, you will create a database field that is available across all representative records for tracking additional desired information.
Where Can I Use Custom Fields for Reps?
- On a rep's record located in Members > Reps > Custom Fields
- In custom reports
- The data file download from a custom report
- When filtering records in the Members module
Custom Field Types
- Text: Displays a field where text can be entered. Maximum size: 8000 characters
- Boolean (True/False): Displays a check box that can be selected or cleared.
- Date/Time: Displays a field where a date can be entered in many formats i.e. 9-7-06, 9-7-06, Sep 7 2006, Sep 7 06, 9/7/06 but once saved, will always display in the following format: 09/07/2006
- Number: Integer: Displays a field where whole numbers may be entered. Maximum size: 10 whole numbers
- Number: Decimal: Displays a field where numbers with up to 2 decimal values may be entered. Maximum size: 14 whole numbers, 2 decimal values
- Drop Down List: Displays your designated list of options that may be selected.
- Additional custom fields may also be created to use on the member record, event registrations and within your groups.
Add a Custom Field
- On the Reps tab, click Add/Edit Custom Fields in the "Custom Fields" area
- Click Add a Field.
- Type desired field name (maximum characters: 128)
- Click the Data Type dropdown list.
- Click the desired data type.
- If the selected data type is Text, type the desired Text Size.
- If the selected data type is Drop Down List, enter the desired list of items.
- Click Continue.
- Click Save & Exit.


=Remove a Custom Field
1.
On the Reps tab, click Add/Edit Custom Fields in the Custom Fields area. 2.
Click to select the check box at the end of the row of the Field Name that you wish to remove. 3.
Click Remove Selected Fields. 4.
Click Save & Exit. Note: All data in the custom field will be deleted. Note: The MIC Search and MIC Permission selections are new selections that are staging us for future features. The selections MIC Search and Member Permissions are not active yet but will provide some new capabilities in upcoming releases Rename a custom field 1.
On the Reps tab, click Add/Edit Custom Fields in the Custom Fields area. 2.
Click in the text of the Field Name. 3.
Make the desired field name change. 4.
Click Save & Exit. Change the sort order for custom field display 1.
On the Reps tab, click Add/Edit Custom Fields in the Custom Fields area. 2.
Click and drag the field to the desired location. Figure 1-26b Click and drag the field to the desired location 3.
Click Save & Exit.