|
|
| Line 1: |
Line 1: |
| − | <div xmlns="http://www.w3.org/1999/xhtml">
| + | Members that have Read/Write permissions to Employees/Reps have the ability to add a new representative to their membership list. At the completion of creating a rep, there is an opportunity to send an email invitation to this rep so they can create their own login account. |
| − | <div style="text-align: left;">[[Member_Information_Center-TableOfContents|Table of Contents]] | [[Member_Information_Center-Download_vcard_information|Previous]] | [[Member_Information_Center-Update_a_payment_profile_(MICv4)|Next]] | [[Member_Information_Center-Index|Index]]</div>
| + | Create rep and send account creation invitation (Member instructions) |
| − | <div style="color: #999999; font-family: sans-serif; font-size: 10pt; text-align: left;">
| + | |
| − | <span>[[Member_Information_Center-Member_Center_Version_4|Member Center Version 4]]</span> : Add others to their employee/rep list and invite</div>
| + | 1. Member logs into the Member Information Center |
| − | <hr />
| + | |
| − | <div style="color: #808080; font-family: Cambria; font-size: 18pt; margin-bottom: 12pt;"><span id="wwpID0E0DC0FA">Add others to their employee/rep list and invite</span></div>
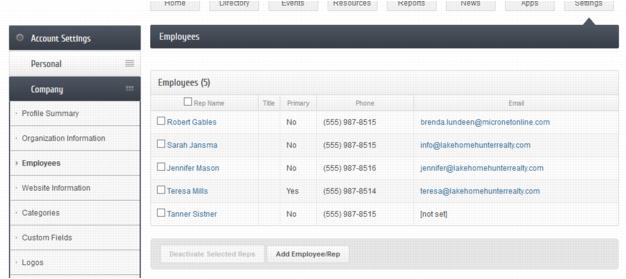
| + | 2. Select '''Settings''' in the top tool bar. |
| − | <div style="font-family: "Times New Roman"; font-size: 11pt; margin-bottom: 12pt; margin-left: 36pt;"><span id="wwpID0E0CC0FA">Members that </span><span style="font-family: Calibri; font-size: 11pt;">have </span><span style="font-family: Calibri; font-size: 11pt; font-weight: bold;">Read/Write</span><span style="font-family: Calibri; font-size: 11pt;"> permissions to </span><span style="font-family: Calibri; font-size: 11pt; font-weight: bold;">Employees/Reps</span> have the ability to add a new representative to their membership list. At the completion of creating a rep, there is an opportunity to send an email invitation to this rep so they can create their own login account.</div>
| + | |
| − | <div style="color: #5F497A; font-family: Cambria; font-size: 11pt; font-weight: bold; margin-left: 18pt;"><span id="wwpID0E0BC0FA">Create rep and send account creation invitation (Member instructions)</span></div>
| + | 3. Click '''Company''' in the left-hand Account Settings menu. |
| − | <div style="margin-left: 36pt;margin-bottom: 12pt;">
| + | |
| − | <table border="0" cellspacing="0" cellpadding="0" width="99%" summary="">
| + | 4. Click '''Employees'''. |
| − | <tr valign="baseline">
| + | |
| − | <td style="width: 18pt"><div style="font-family: "Times New Roman"; font-size: 11pt; text-align: justify;"><span style="font-family: Calibri; font-size: 10pt;">6. </span></div></td>
| + | 5. Click Add Employees/Reps. |
| − | <td><div style="font-family: "Times New Roman"; font-size: 11pt; text-align: justify;"><span id="wwpID0E0AC0FA">Member logs into the Member Information Center v4</span></div></td>
| + | |
| − | </tr>
| + | [[File:Member Information Center-Add others to their employee 2frep list and invite-MemberCenter.1.22.1.jpg]] |
| − | </table>
| + | |
| − | </div>
| + | 6. Complete the information for adding a new rep, making sure to enter an email address. |
| − | <div style="margin-left: 36pt;margin-bottom: 12pt;">
| + | |
| − | <table border="0" cellspacing="0" cellpadding="0" width="99%" summary="">
| + | 7. At the bottom of the screen, click the checkbox to “Email an invitation…”. |
| − | <tr valign="baseline">
| + | |
| − | <td style="width: 18pt"><div style="font-family: "Times New Roman"; font-size: 11pt; text-align: justify;"><span style="font-family: Calibri; font-size: 10pt;">7. </span></div></td>
| + | 8. Click '''Save Employee/Rep'''. |
| − | <td><div style="font-family: "Times New Roman"; font-size: 11pt; text-align: justify;"><span id="wwpID0E06B0FA">Select </span><span style="font-weight: bold;">Settings</span> in the top tool bar.</div></td>
| + | |
| − | </tr>
| + | [[File: Member Information Center-Add others to their employee 2frep list and invite-MemberCenter.1.22.2.jpg]] |
| − | </table>
| + | |
| − | </div>
| + | Note: The account creation invitation is only accessible when a rep is created and is not available to send later. If it is not sent when the rep is created, then it can be sent again to them by the office staff on the Reps tab in the Login Permissions area. |
| − | <div style="margin-left: 36pt;margin-bottom: 12pt;">
| |
| − | <table border="0" cellspacing="0" cellpadding="0" width="99%" summary="">
| |
| − | <tr valign="baseline">
| |
| − | <td style="width: 18pt"><div style="font-family: "Times New Roman"; font-size: 11pt; text-align: justify;"><span style="font-family: Calibri; font-size: 10pt;">8. </span></div></td>
| |
| − | <td><div style="font-family: "Times New Roman"; font-size: 11pt; text-align: justify;"><span id="wwpID0E05B0FA">Click </span><span style="font-weight: bold;">Company</span> in the left-hand Account Settings menu.</div></td>
| |
| − | </tr>
| |
| − | </table>
| |
| − | </div>
| |
| − | <div style="margin-left: 36pt;margin-bottom: 12pt;">
| |
| − | <table border="0" cellspacing="0" cellpadding="0" width="99%" summary="">
| |
| − | <tr valign="baseline">
| |
| − | <td style="width: 18pt"><div style="font-family: "Times New Roman"; font-size: 11pt; text-align: justify;"><span style="font-family: Calibri; font-size: 10pt;">9. </span></div></td>
| |
| − | <td><div style="font-family: "Times New Roman"; font-size: 11pt; text-align: justify;"><span id="wwpID0E04B0FA">Click </span><span style="font-weight: bold;">Employees</span>.</div></td>
| |
| − | </tr>
| |
| − | </table>
| |
| − | </div>
| |
| − | <div style="margin-left: 36pt;margin-bottom: 12pt;">
| |
| − | <table border="0" cellspacing="0" cellpadding="0" width="99%" summary="">
| |
| − | <tr valign="baseline">
| |
| − | <td style="width: 18pt"><div style="font-family: "Times New Roman"; font-size: 11pt; text-align: justify;"><span style="font-family: Calibri; font-size: 10pt;">10. </span></div></td>
| |
| − | <td><div style="font-family: "Times New Roman"; font-size: 11pt; text-align: justify;"><span id="wwpID0E03B0FA">Click </span><span style="font-weight: bold;">Add Employees/Reps</span>.</div></td>
| |
| − | </tr>
| |
| − | </table>
| |
| − | </div>
| |
| − | <div style="font-family: "Times New Roman"; font-size: 11pt; margin-bottom: 12pt; margin-left: 54pt; text-align: justify;"><span id="wwpID0E02B0FA">[[Image:Member_Information_Center-Add_others_to_their_employee_2frep_list_and_invite-MemberCenter.1.22.1.jpg]]</span></div>
| |
| − | <div style="margin-left: 36pt;margin-bottom: 12pt;">
| |
| − | <table border="0" cellspacing="0" cellpadding="0" width="99%" summary="">
| |
| − | <tr valign="baseline">
| |
| − | <td style="width: 18pt"><div style="font-family: "Times New Roman"; font-size: 11pt; text-align: justify;"><span style="font-family: Calibri; font-size: 10pt;">11. </span></div></td>
| |
| − | <td><div style="font-family: "Times New Roman"; font-size: 11pt; text-align: justify;"><span id="wwpID0E01B0FA">Complete the information for adding a new rep, making sure to enter an email address.</span></div></td>
| |
| − | </tr>
| |
| − | </table>
| |
| − | </div>
| |
| − | <div style="margin-left: 36pt;margin-bottom: 12pt;">
| |
| − | <table border="0" cellspacing="0" cellpadding="0" width="99%" summary="">
| |
| − | <tr valign="baseline">
| |
| − | <td style="width: 18pt"><div style="font-family: "Times New Roman"; font-size: 11pt; text-align: justify;"><span style="font-family: Calibri; font-size: 10pt;">12. </span></div></td>
| |
| − | <td><div style="font-family: "Times New Roman"; font-size: 11pt; text-align: justify;"><span id="wwpID0E0ZB0FA">At the bottom of the screen, click the checkbox to “Email an invitation…”.</span></div></td>
| |
| − | </tr>
| |
| − | </table>
| |
| − | </div>
| |
| − | <div style="margin-left: 36pt;margin-bottom: 12pt;">
| |
| − | <table border="0" cellspacing="0" cellpadding="0" width="99%" summary="">
| |
| − | <tr valign="baseline">
| |
| − | <td style="width: 18pt"><div style="font-family: "Times New Roman"; font-size: 11pt; text-align: justify;"><span style="font-family: Calibri; font-size: 10pt;">13. </span></div></td>
| |
| − | <td><div style="font-family: "Times New Roman"; font-size: 11pt; text-align: justify;"><span id="wwpID0E0YB0FA">Click </span><span style="font-weight: bold;">Save Employee/Rep</span>.</div></td>
| |
| − | </tr>
| |
| − | </table>
| |
| − | </div>
| |
| − | <div style="font-family: "Times New Roman"; font-size: 11pt; margin-bottom: 12pt; margin-left: 36pt;"><span id="wwpID0E0XB0FA">[[Image:Member_Information_Center-Add_others_to_their_employee_2frep_list_and_invite-MemberCenter.1.22.2.jpg]]</span></div>
| |
| − | <div style="color: #5F497A; font-family: "Times New Roman"; font-size: 9pt; margin-bottom: 12pt; margin-left: 36pt;"><span style="font-weight: bold;"><span id="wwpID0E0WB0FA">Note:</span></span> The account creation invitation is only accessible when a rep is created and is not available to send later. If it is not sent when the rep is created, then it can be sent again to them by the office staff on the Reps tab in the Login Permissions area.</div>
| |
| − | </div>
| |
Members that have Read/Write permissions to Employees/Reps have the ability to add a new representative to their membership list. At the completion of creating a rep, there is an opportunity to send an email invitation to this rep so they can create their own login account.
Create rep and send account creation invitation (Member instructions)
1. Member logs into the Member Information Center
2. Select Settings in the top tool bar.
3. Click Company in the left-hand Account Settings menu.
4. Click Employees.
5. Click Add Employees/Reps.
6. Complete the information for adding a new rep, making sure to enter an email address.
7. At the bottom of the screen, click the checkbox to “Email an invitation…”.
8. Click Save Employee/Rep.
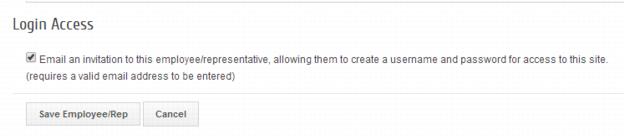
Note: The account creation invitation is only accessible when a rep is created and is not available to send later. If it is not sent when the rep is created, then it can be sent again to them by the office staff on the Reps tab in the Login Permissions area.

