Difference between revisions of "Create Event Invoices from the Events Module"
(Created page with "<div xmlns="http://www.w3.org/1999/xhtml"> <div style="text-align: left;">Table of Contents | ChamberMaster_Billing-Create_Event...") |
Cpetterson (talk | contribs) |
||
| (2 intermediate revisions by one other user not shown) | |||
| Line 1: | Line 1: | ||
| − | + | #Select the desired event. | |
| − | + | #Click the '''Account''' tab. | |
| − | + | #:[[File:Event account 2019.jpg|800px|center]] | |
| − | + | #The number of invoices that need to be created will be displayed on the screen. Click '''Create Invoices Now'''. | |
| − | + | #:[[File:Create Invoices 2019.jpg|800px|center]] | |
| − | + | #On the '''Create Invoices''' screen, if '''Match Found''' is displayed, this indicates that you have previously created a batch for this event. In this case, scroll to the bottom of the screen and click '''New Batch'''. If '''Match Found''' is not displayed, this is the first batch and you can proceed with the steps below. | |
| − | + | #In the list of invoices, select the invoices that you wish to create and how you would like to output the invoices: Email, Print, Both, None. | |
| − | + | #Click '''Save Batch''' or '''Deliver Invoices'''. If clicking '''Save Batch''', you can return to a batch of invoices at any time to deliver them (email or print them). If clicking '''Deliver Invoices''', continue to the next step. Either choice, '''Save Batch''' or '''Deliver Invoices''', will create the batch of invoices. '''Deliver Invoices''' will create the invoices and immediately open a window with options to print and/or email the invoices. | |
| − | + | #If you have selected '''Deliver Invoices''' the '''Deliver Customer Invoices''' window will appear. The '''Delivery Method''' of '''Print Invoices''' is already selected. Those invoices with an Output selection (from the previous window) of '''Print''' or '''Both''' will be selected. Those invoices with an Output selection of Email or None will not be selected. Also, any invoice that does not have complete mailing address information will not be selected. | |
| − | + | #:'''NOTE:''' Changes made to the Contact Name or address on the '''Deliver Customer Invoices''' window does not modify the Member’s Account information. Permanent Billing Rep or address changes must be made in the Members module. | |
| − | + | #:[[File:recurring_inv4.jpg|center]] | |
| − | + | #Complete the '''Delivery Method''' selections as desired. | |
| − | + | #:<html><p class="note">Note: A default Invoice Template may be selected as desired by clicking '''Setup''' > '''Billing Options''' and '''Settings'''. Open the '''Appearance''' area and select a new '''Default Template'''. The templates may also be edited at this location. See “Invoice Templates” for more information.</p></html> | |
| − | + | #When ready, click '''Preview Invoices''' or '''Print Invoices'''. | |
| − | + | #:'''Suggestion: '''Click Mark invoices as Delivered after printing when printing the labels. (if not printing labels, click Mark invoices as Delivered after printing when printing the invoices). This will make it easier to determine later if the invoices in that batch have been printed or not. Later, the selection Print/Email Invoices on the Reports tab will easily identify any outstanding invoices that have not been “delivered”, regardless of which batch they belong to. See “Print/Email All Undelivered Invoices” | |
| − | + | #If mailing labels are desired, click '''Print Mailing Labels''' in the Delivery Method section. | |
| − | + | #:<html><p class="note">Note: When viewing the Member's Account tab after billing: The Next Billed column in the Membership Fees and Dues area reflects the name of the monthly batch that this fee/due will be included in or already has been included in. This column will automatically display the next billing month when the current date passes that month. For instance, if the current date is February 2015 and a fee/due is set to be billed in February 2015, the Next Billed column will display February 2015 until March 1, 2015; then it will automatically switch and display February 2016. To see if a particular fee/due has been billed, refer to the transactions displayed in the Transaction History area.</p></html> | |
| − | + | #:[[File:recurring_inv5.jpg|center]] | |
| − | + | #Make the desired selections. | |
| − | + | #Click '''Print Labels'''. | |
| − | + | #If any invoices need to be emailed, click '''Email Invoices''' in the Delivery Method section. | |
| − | + | #:[[File:invxx.jpg]] | |
| − | + | #Make the desired selections. | |
| − | + | #Click '''Send Emails'''. | |
| − | |||
| − | |||
| − | |||
| − | |||
| − | |||
| − | |||
| − | |||
| − | |||
| − | |||
| − | |||
| − | |||
| − | |||
| − | |||
| − | |||
| − | |||
| − | |||
| − | |||
| − | |||
| − | |||
| − | |||
| − | |||
| − | |||
| − | |||
| − | |||
| − | |||
| − | |||
| − | |||
| − | |||
| − | |||
| − | |||
| − | |||
| − | |||
| − | |||
| − | |||
| − | |||
| − | |||
| − | |||
| − | |||
| − | |||
| − | |||
| − | |||
| − | |||
| − | |||
| − | |||
| − | |||
| − | |||
| − | |||
| − | |||
| − | |||
| − | |||
| − | |||
| − | |||
| − | |||
| − | |||
| − | |||
| − | |||
| − | |||
| − | |||
| − | |||
| − | |||
| − | |||
| − | |||
| − | |||
| − | |||
| − | |||
| − | |||
| − | |||
| − | |||
| − | |||
| − | |||
| − | |||
| − | |||
| − | |||
| − | |||
| − | |||
| − | |||
| − | |||
| − | |||
| − | |||
| − | |||
| − | |||
| − | |||
| − | |||
| − | |||
| − | |||
| − | |||
| − | |||
| − | |||
| − | |||
| − | |||
| − | |||
Latest revision as of 22:44, 4 December 2019
- Select the desired event.
- Click the Account tab.
- The number of invoices that need to be created will be displayed on the screen. Click Create Invoices Now.
- On the Create Invoices screen, if Match Found is displayed, this indicates that you have previously created a batch for this event. In this case, scroll to the bottom of the screen and click New Batch. If Match Found is not displayed, this is the first batch and you can proceed with the steps below.
- In the list of invoices, select the invoices that you wish to create and how you would like to output the invoices: Email, Print, Both, None.
- Click Save Batch or Deliver Invoices. If clicking Save Batch, you can return to a batch of invoices at any time to deliver them (email or print them). If clicking Deliver Invoices, continue to the next step. Either choice, Save Batch or Deliver Invoices, will create the batch of invoices. Deliver Invoices will create the invoices and immediately open a window with options to print and/or email the invoices.
- If you have selected Deliver Invoices the Deliver Customer Invoices window will appear. The Delivery Method of Print Invoices is already selected. Those invoices with an Output selection (from the previous window) of Print or Both will be selected. Those invoices with an Output selection of Email or None will not be selected. Also, any invoice that does not have complete mailing address information will not be selected.
- NOTE: Changes made to the Contact Name or address on the Deliver Customer Invoices window does not modify the Member’s Account information. Permanent Billing Rep or address changes must be made in the Members module.
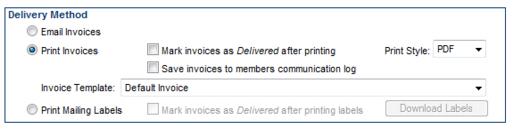
- Complete the Delivery Method selections as desired.
Note: A default Invoice Template may be selected as desired by clicking '''Setup''' > '''Billing Options''' and '''Settings'''. Open the '''Appearance''' area and select a new '''Default Template'''. The templates may also be edited at this location. See “Invoice Templates” for more information.
- When ready, click Preview Invoices or Print Invoices.
- Suggestion: Click Mark invoices as Delivered after printing when printing the labels. (if not printing labels, click Mark invoices as Delivered after printing when printing the invoices). This will make it easier to determine later if the invoices in that batch have been printed or not. Later, the selection Print/Email Invoices on the Reports tab will easily identify any outstanding invoices that have not been “delivered”, regardless of which batch they belong to. See “Print/Email All Undelivered Invoices”
- If mailing labels are desired, click Print Mailing Labels in the Delivery Method section.
Note: When viewing the Member's Account tab after billing: The Next Billed column in the Membership Fees and Dues area reflects the name of the monthly batch that this fee/due will be included in or already has been included in. This column will automatically display the next billing month when the current date passes that month. For instance, if the current date is February 2015 and a fee/due is set to be billed in February 2015, the Next Billed column will display February 2015 until March 1, 2015; then it will automatically switch and display February 2016. To see if a particular fee/due has been billed, refer to the transactions displayed in the Transaction History area.
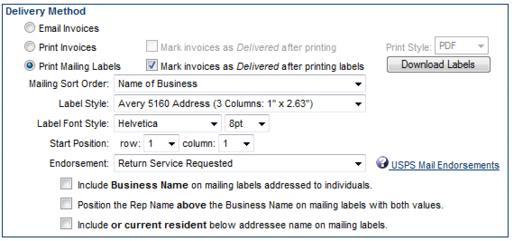
- Make the desired selections.
- Click Print Labels.
- If any invoices need to be emailed, click Email Invoices in the Delivery Method section.
- Make the desired selections.
- Click Send Emails.


