Difference between revisions of "Create Event Invoices from the Events Module"
Jump to navigation
Jump to search


m (SPederson moved page ChamberMaster Billing-Create event invoices (from the Events module) to Create Event Invoices from the Events Module) |
|
(No difference)
| |
Revision as of 14:14, 8 September 2015
1. |
Select the desired event. |
2. |
Click the Account tab. |
If the Create Invoices Now button does not appear, there are no invoices to be created at this time.
Or select Invoices in the Task List and click Create Invoices.
3. |
If registrations have specified a payment method that should result in a transaction, a selection will appear indicating the number of invoices that need to be created. |
Invoices, Payments, and/or Sales Receipts resulting from a credit card transaction will automatically be created and will appear in the Event Batch and in the Member’s Transaction History on the Account tab if applicable.
Figure 6-3 Create Invoices Now
4. |
Click Create Invoices Now. |
5. |
If you have already created this batch and you see the message that says “Match Found”, then most likely you need to scroll down and click New Batch. If a match was found it means you’ve already invoiced this particular set of invoices. If there are some additional invoices that need “added to this batch”, you would want to create a new batch. Invoices that are added to the batch will update the entire batch with any new terms, dates, and payment options which changes those original invoices. Selecting New Batch is typically a better, safer idea. |
-CMBilling.1.095.2.jpg)
6. |
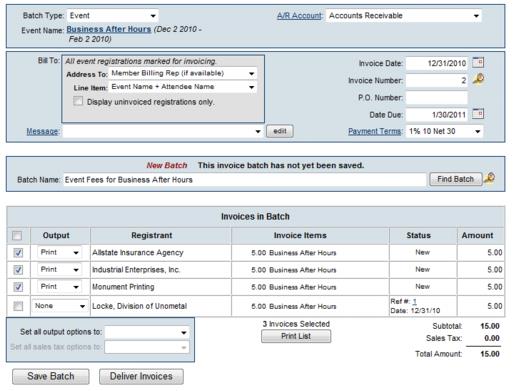
Once you’ve determined you are on the correct batch, make any desired selections in the Address To: box for who the invoice should be addressed to and what items should appear on the invoice line. |
The Address To: selection of Line Item Description will display the content of the Description field of the Fee item.
7. |
Select Display uninvoiced registrations only if desired. |
8. |
If desired, select a message that will be printed on each invoice. Note: click edit to modify the message or create a one-time custom message to display on all invoices. |
9. |
Complete the rest of the fields including Invoice Date, Date Due, and Payment Terms. |
If Transaction Classes have been created, a Class drop-down selection will appear on the screen. Select the desired Class for this transaction.
-CMBilling.1.095.3.jpg)
Figure 6-4 Event Invoicing
10. |
Uncheck any invoices that should be excluded from this Batch. Note: All excluded invoices may be added to this batch later. |
Either choice, Save Batch or Deliver Invoices, will create the batch of invoices. Deliver Invoices will create the invoices and immediately open a window with options to print and/or email the invoices.
11. |
Click Save Batch or Deliver Invoices. If clicking Save Batch, you can return to a batch of invoices at any time to deliver them (email or print them). If clicking Deliver Invoices, you can also return to the batch at any time but this will proceed to the Deliver Customer Invoices screen now. |
12. |
The Deliver Customer Invoices window will appear. Make appropriate Delivery Method selections and follow the instructions on the screen. Refer to “Recurring Member Invoices” in the online help for Events for more detailed instructions on Delivery Method selections. |
Changes made to the Contact Name or address on the Deliver Customer Invoices window does not modify the Member’s Account information. Permanent Billing Rep or address changes must be made in the Members module.