Difference between revisions of "Entering a Single Write-off Transaction"
Jump to navigation
Jump to search
| Line 3: | Line 3: | ||
#Locate the desired invoice to be written-off. | #Locate the desired invoice to be written-off. | ||
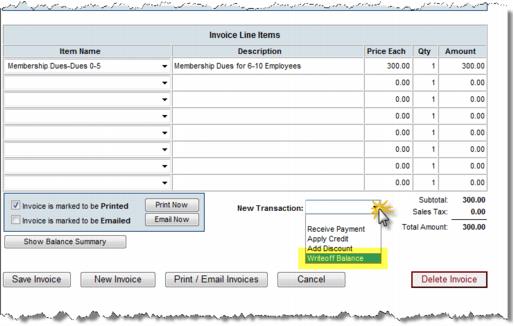
#Click the '''New Transaction''' drop-down arrow. | #Click the '''New Transaction''' drop-down arrow. | ||
| − | #:[[File: | + | #:[[File:Writeoff Balance.jpg]] |
#Click '''Writeoff balance'''. | #Click '''Writeoff balance'''. | ||
#An Invoice Writeoff screen will display. | #An Invoice Writeoff screen will display. | ||
Revision as of 14:24, 7 September 2015
- Click Billing in the left-hand menu.
- Click the Invoices tab.
- Locate the desired invoice to be written-off.
- Click the New Transaction drop-down arrow.
- Click Writeoff balance.
- An Invoice Writeoff screen will display.
- Complete the fields as desired. You may wish to have an Expense account created in your Chart of Accounts to assign this writeoff.
- Note: If Transaction Classes have been created, a Billing Class drop-down selection will appear on the screen. Select the desired Billing Class for this transaction.
- Click Finish.
