Difference between revisions of "Groups"
Cpetterson (talk | contribs) |
Cpetterson (talk | contribs) |
||
| Line 1: | Line 1: | ||
| − | ==''' | + | ==Communicating Using Groups & Mailing Lists== |
| − | + | Sending communication via email and letters may be simplified by creating self-defined groups in the ChamberMaster '''Groups''' module. | |
| + | |||
| + | For instance, if you frequently send emails to your Budget Committee . . instead of selecting the 12 members of that committee each time you send an email, you first create a group in the '''Groups''' module called the Budget Committee. Add each of the 12 members to that group. Then when you go to send the email, you simply select the Budget committee as the recipient of the email with one simple click. | ||
| − | + | If you send a monthly newsletter, the '''Groups''' module is where you will create and maintain this mailing list group. This group may then be selected at the appropriate time throughout ChamberMaster when you desire to send them email or print mailing labels and letters for them. | |
| − | + | [[File:Communication.1.056.1.jpg]] | |
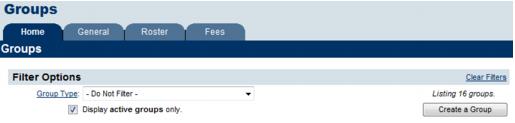
| − | + | '''Figure 9-1''' the Groups module | |
| − | |||
| − | + | ===Creating a group or mailing list=== | |
| − | |||
| − | |||
#Click '''Groups''' in the left-hand menu. | #Click '''Groups''' in the left-hand menu. | ||
| − | |||
#Click '''Create a Group''' on the '''Home''' tab. | #Click '''Create a Group''' on the '''Home''' tab. | ||
| − | #:[[File: | + | #:[[File:Communication.1.057.1.jpg]] |
| − | # | + | #:'''Figure: Create a group''' |
| − | + | #Complete the Create a New Group fields for this new group. | |
| − | # | + | #:[[File:Communication.1.057.2.jpg]] |
| − | # | + | #:'''Figure: "Create a New Group" fields–tabbed view''' |
| − | |||
#Click '''Save.''' | #Click '''Save.''' | ||
#Click the '''Group Name''' of the new group on the '''Home''' tab. | #Click the '''Group Name''' of the new group on the '''Home''' tab. | ||
| − | #Click the '''General''' tab. | + | #Click the '''General''' tab. Make sure the settings are correct. |
| − | #:[[File: | + | #:[[File:Communication.1.057.3.jpg|framed|none|Group Options and Settings]] |
| − | # | + | ##When selected, this roster list will be shown as a group/interest that may be searched by members in the Member Information Center. |
| − | # | + | ##When selected, members will have opportunity to join/leave this group/interest on their own in the Member Information Center. The selection of Group Participant list or Rep Interest list determines where the selection will take place – under Groups or under Interests. Interests. |
| − | + | ##This option allows the group to be contacted through the Member Information Center Message Center | |
| − | # | + | ##When selected, this group will display on your website in the Groups public module available at <nowiki>http://yoursubdomain.yourdomain.com/groups.</nowiki> |
| − | # | + | ##:*Click '''Public Display Settings''' to modify how the group is displayed |
| − | # | + | ##When selected, this group will appear on your public website at the suggested URL where the public may add themselves to the group. Often used for consumers to subscribe to (join) your mailing lists. |
| − | # | + | ##When selected, this group name will be displayed on the email subscription opt-in/out page |
| − | # | + | ##When selected, this group cannot be unsubscribed from |
| − | # | + | ##When selected, this group will be accessible through the community app (when purchased) |
| − | #:: | + | #Click the '''Roster''' tab. |
| − | + | #Click one or more of the Add Group Members selections to add members to your group. | |
| − | + | #Continue adding representatives to your group using the '''Add Group Members''' selections until your group is complete. | |
| − | + | ||
| + | [[Category: Groups]] | ||
| + | |||
| + | ===Selections for adding group members=== | ||
| + | <div xmlns="http://www.w3.org/1999/xhtml"> | ||
| + | <div style="font-family: Calibri; font-size: 11pt; margin-bottom: 12pt; margin-left: 18pt;"><span id="wwpID0E0BV0HA">Examples of the various ways to add group members follows.</span></div> | ||
| + | <div style="color: #808080; font-family: Cambria; font-size: 14pt; margin-left: 36pt; margin-top: 10pt;"><span id="wwpID0E0AV0HA">Add representatives by type/status</span></div> | ||
| + | <div style="font-family: Calibri; font-size: 11pt; margin-bottom: 12pt; margin-left: 36pt; text-align: justify;"><span id="wwpID0E06U0HA">[[Image:Emails_Letters_and_Mailing_Lists-Selections_for_adding_group_members-Communication.1.054.1.jpg]]</span></div> | ||
| + | <div style="font-family: Calibri; font-size: 10pt; margin-bottom: 12pt; margin-left: 54pt; text-align: justify;"><span style="font-size: 10pt; text-transform: uppercase;"><span id="wwpID0E05U0HA">Figure 9-5 Selecting reps </span></span>by type/status</div> | ||
| + | <div style="color: #5F497A; font-family: Calibri; font-size: 9pt; margin-bottom: 12pt; margin-left: 18pt;"><span style="font-weight: bold;"><span id="wwpID0E04U0HA">Community Member Reps</span></span> are those individuals specified on the <span style="font-weight: bold;">Reps</span> tab in the <span style="font-weight: bold;">Members</span> module for the record titled <span style="font-weight: bold;"><nowiki>[</nowiki></span><span style="font-family: Calibri; font-size: 9pt;">Community Member</span><span style="font-weight: bold;"><nowiki>]</nowiki></span>. These individuals are not associated with a particular company/member but may still be selected as group members.</div> | ||
| + | <div style="color: #808080; font-family: Cambria; font-size: 14pt; margin-left: 36pt; margin-top: 10pt;"><span id="wwpID0E03U0HA">Add representatives by member</span></div> | ||
| + | <div style="font-family: Calibri; font-size: 11pt; margin-bottom: 12pt; margin-left: 36pt; text-align: justify;"><span id="wwpID0E02U0HA">[[Image:Emails_Letters_and_Mailing_Lists-Selections_for_adding_group_members-Communication.1.054.2.jpg]]</span></div> | ||
| + | <div style="font-family: Calibri; font-size: 10pt; margin-bottom: 12pt; margin-left: 54pt; text-align: justify;"><span style="font-size: 10pt; text-transform: uppercase;"><span id="wwpID0E01U0HA">Figure 9-6 Selecting reps </span></span>by member</div> | ||
| + | <div style="color: #5F497A; font-family: Calibri; font-size: 9pt; margin-bottom: 12pt; margin-left: 18pt;"><span id="wwpID0E0ZU0HA">When selecting to add reps by member, </span><span style="text-decoration: underline;">all</span> reps from that selected member will be added to the roster list. Then, if desired, you may remove all Inactive reps by clicking <span style="font-weight: bold;">Remove Inactive Reps</span> at the bottom of the roster. All inactive reps from all members would be removed from the group at that time. </div> | ||
| + | <div style="color: #5F497A; font-family: Calibri; font-size: 9pt; margin-bottom: 12pt; margin-left: 18pt;"><span id="wwpID0E0YU0HA">More than one member may be selected by pressing Ctrl-click on each desired member. Then click the </span><span style="font-weight: bold;">>></span> arrow.</div> | ||
| + | <div style="color: #808080; font-family: Cambria; font-size: 14pt; margin-left: 36pt; margin-top: 10pt;"><span id="wwpID0E0XU0HA">Add representatives by category</span></div> | ||
| + | <div style="font-family: Calibri; font-size: 11pt; margin-bottom: 12pt; margin-left: 36pt; text-align: justify;"><span id="wwpID0E0WU0HA">[[Image:Emails_Letters_and_Mailing_Lists-Selections_for_adding_group_members-Communication.1.054.3.jpg]]</span></div> | ||
| + | <div style="font-family: Calibri; font-size: 10pt; margin-bottom: 12pt; margin-left: 54pt; text-align: justify;"><span style="font-size: 10pt; text-transform: uppercase;"><span id="wwpID0E0VU0HA">Figure 9-7 </span></span>Selecting reps by category</div> | ||
| + | <div style="color: #5F497A; font-family: Calibri; font-size: 9pt; margin-bottom: 12pt; margin-left: 18pt;"><span id="wwpID0E0UU0HA">In this example, the Automotive Parts & Service category has only one active member but also one member that may be courtesy, prospective, non-member or dropped. With settings currently displayed, only the one member’s reps will be added to the group.</span></div> | ||
| + | <div style="color: #5F497A; font-family: Calibri; font-size: 9pt; margin-bottom: 12pt; margin-left: 18pt;"><span id="wwpID0E0TU0HA">Only one category may be selected at a time. </span></div> | ||
| + | <div style="color: #808080; font-family: Cambria; font-size: 14pt; margin-left: 36pt; margin-top: 10pt;"><span id="wwpID0E0SU0HA">Add representatives from other groups</span></div> | ||
| + | <div style="font-family: Calibri; font-size: 11pt; margin-bottom: 12pt; margin-left: 36pt; text-align: justify;"><span id="wwpID0E0RU0HA">[[Image:Emails_Letters_and_Mailing_Lists-Selections_for_adding_group_members-Communication.1.054.4.jpg]]</span></div> | ||
| + | <div style="font-family: Calibri; font-size: 10pt; margin-bottom: 12pt; margin-left: 54pt; text-align: justify;"><span style="font-size: 10pt; text-transform: uppercase;"><span id="wwpID0E0QU0HA">Figure 9-8</span></span> Selecting reps from other groups</div> | ||
| + | <div style="color: #5F497A; font-family: Calibri; font-size: 9pt; margin-bottom: 12pt; margin-left: 18pt;"><span id="wwpID0E0PU0HA">Only one group may be selected at a time. </span></div> | ||
| + | <div style="color: #5F497A; font-family: Calibri; font-size: 9pt; margin-bottom: 12pt; margin-left: 18pt;"><span id="wwpID0E0OU0HA">Use this selection to create a new group based on membership from a previous group or to merge reps from another group into this new group. No reps are removed from the source groups – just copied.</span></div> | ||
| + | <div style="color: #808080; font-family: Cambria; font-size: 14pt; margin-left: 36pt; margin-top: 10pt;"><span id="wwpID0E0NU0HA">Add individual representatives</span></div> | ||
| + | <div style="font-family: Calibri; font-size: 11pt; margin-bottom: 12pt; margin-left: 36pt; text-align: justify;"><span id="wwpID0E0MU0HA">[[Image:Emails_Letters_and_Mailing_Lists-Selections_for_adding_group_members-Communication.1.054.5.jpg]]</span></div> | ||
| + | <div style="font-family: Calibri; font-size: 10pt; margin-bottom: 12pt; margin-left: 54pt; text-align: justify;"><span style="font-size: 10pt; text-transform: uppercase;"><span id="wwpID0E0LU0HA">Figure 9-9</span></span> Adding individual representatives</div> | ||
| + | <div style="color: #5F497A; font-family: Calibri; font-size: 9pt; margin-bottom: 12pt; margin-left: 18pt;"><span id="wwpID0E0KU0HA">More than one rep may be selected by pressing Ctrl-click on each desired rep. Then click the</span><span style="font-weight: bold;"> >></span> arrow.</div> | ||
| + | <div style="color: #808080; font-family: Cambria; font-size: 14pt; margin-left: 36pt; margin-top: 10pt;"><span id="wwpID0E0JU0HA">Add specific reps by member name</span></div> | ||
| + | <div style="font-family: Calibri; font-size: 11pt; margin-bottom: 12pt; margin-left: 36pt; text-align: justify;"><span id="wwpID0E0IU0HA">[[Image:Emails_Letters_and_Mailing_Lists-Selections_for_adding_group_members-Communication.1.054.6.jpg]]</span></div> | ||
| + | <div style="font-family: Calibri; font-size: 10pt; margin-bottom: 12pt; margin-left: 54pt; text-align: justify;"><span id="wwpID0E0HU0HA">Figure 9-10</span><span style="font-size: 12pt;"> </span>Adding reps from specific members</div> | ||
| + | </div> | ||
| + | |||
| + | ===Maintaining the group/mailing list=== | ||
| + | <div style="font-family: Calibri; font-size: 11pt; margin-bottom: 12pt;"><span id="wwpID0E0FU0HA">Contact information (i.e. email addresses, phone numbers, addresses etc.) are updated automatically when changes are made in the </span><span style="font-weight: bold;">Members</span> module. Group membership must be maintained through manual selection or removal of names. </div> | ||
| + | <div style="font-family: Calibri; font-size: 11pt; margin-bottom: 12pt;"><span id="wwpID0E0EU0HA">Adding new member names to the groups could be done at any time, however, two detailed concepts are provided below that may assist in providing a consistent procedure at your chamber. The two examples are adding new members to the mailing list either periodically or immediately.</span></div> | ||
| + | <div style="font-family: Calibri; font-size: 11pt; margin-bottom: 12pt;"><span id="wwpID0E0DU0HA">Removing representatives from mailing lists or groups may be done at any time manually or may be completed during the process of changing a member status to </span><span style="font-weight: bold;">Dropped/Inactive</span>.</div> | ||
| + | |||
| + | ===Add new members to a mailing list immediately=== | ||
| + | Group membership must be maintained through manual selection or removal of names. To keep your initial mailing list up-to-date, you might consider adding new members to the appropriate mailing lists immediately after creating the new member record. Following is one example of how this might happen. | ||
| + | |||
| + | 1. Immediately after a new member has been added to the ChamberMaster database and with the new member record selected in the '''Members''' module, click the '''Reps''' tab. | ||
| + | |||
| + | 2. Ensure that all desired reps for this new member have been added. If not, add reps at this time by clicking '''Add a New Rep'''. | ||
| + | |||
| + | 3. Click the name of one of the reps in the '''List of Representatives''' area. | ||
| + | |||
| + | 4. Scroll to the '''Group Participation''' area at the bottom of the screen and click '''Join a Group'''. | ||
| + | |||
| + | [[File:Communication.1.067.1.jpg]] | ||
| + | |||
| + | '''Figure 9-18''' Group Participation area | ||
| + | |||
| + | 5. Click the desired group to join. | ||
| + | |||
| + | 6. Click the double right arrow to move the desired group to the '''Selected Groups''' list box. | ||
| + | |||
| + | 7. Click '''Continue'''. | ||
| + | |||
| + | [[File:Communication.1.067.3.jpg]] | ||
| + | |||
| + | '''Figure 9-19''' Join a group | ||
| + | |||
| + | 8. If this representative should belong to more groups, complete steps 4-7 again until they belong to all desired groups. | ||
| − | + | 9. If other representatives should belong to groups as well, perform steps 3-7 above and select the next desired representative. | |
| − | |||
| − | |||
| − | |||
| − | + | ===Remove representatives from a group manually=== | |
| − | + | <div xmlns="http://www.w3.org/1999/xhtml"> | |
| − | #:[[ | + | <div style="font-family: Calibri; font-size: 11pt; margin-bottom: 12pt; margin-left: 18pt;"><span id="wwpID0E0PS0HA">Representatives are removed from groups manually or during the process of changing a member status to </span><span style="font-weight: bold;">Dropped/Inactive</span>.</div> |
| − | + | <div style="margin-left: 18pt;"> | |
| − | + | <table border="0" cellspacing="0" cellpadding="0" width="99%" summary=""> | |
| − | + | <tr valign="baseline"> | |
| + | <td style="width: 18pt"><div style="font-family: Calibri; font-size: 11pt;">1. </div></td> | ||
| + | <td><div style="font-family: Calibri; font-size: 11pt;"><span id="wwpID0E0OS0HA">Click </span><span style="font-weight: bold;">Groups</span> in the left-hand navigation bar.</div></td> | ||
| + | </tr> | ||
| + | </table> | ||
| + | </div> | ||
| + | <div style="margin-left: 18pt;"> | ||
| + | <table border="0" cellspacing="0" cellpadding="0" width="99%" summary=""> | ||
| + | <tr valign="baseline"> | ||
| + | <td style="width: 18pt"><div style="font-family: Calibri; font-size: 11pt;">2. </div></td> | ||
| + | <td><div style="font-family: Calibri; font-size: 11pt;"><span id="wwpID0E0NS0HA">Click the </span><span style="font-weight: bold;">Home</span> tab.</div></td> | ||
| + | </tr> | ||
| + | </table> | ||
| + | </div> | ||
| + | <div style="margin-left: 18pt;"> | ||
| + | <table border="0" cellspacing="0" cellpadding="0" width="99%" summary=""> | ||
| + | <tr valign="baseline"> | ||
| + | <td style="width: 18pt"><div style="font-family: Calibri; font-size: 11pt;">3. </div></td> | ||
| + | <td><div style="font-family: Calibri; font-size: 11pt;"><span id="wwpID0E0MS0HA">Click the </span><span style="font-weight: bold;">Group Name</span> of the mailing list to be modified.</div></td> | ||
| + | </tr> | ||
| + | </table> | ||
| + | </div> | ||
| + | <div style="font-family: Calibri; font-size: 11pt; margin-bottom: 12pt; margin-left: 36pt; text-align: justify;"><span id="wwpID0E0LS0HA">[[Image:Emails_Letters_and_Mailing_Lists-Remove_representatives_from_a_group_manually-Communication.1.058.1.jpg]]</span></div> | ||
| + | <div style="font-family: Calibri; font-size: 10pt; margin-bottom: 12pt; margin-left: 54pt; text-align: justify;"><span style="font-size: 10pt; text-transform: uppercase;"><span id="wwpID0E0KS0HA">Figure 9-20</span></span> Select the desired group</div> | ||
| + | <div style="margin-left: 18pt;"> | ||
| + | <table border="0" cellspacing="0" cellpadding="0" width="99%" summary=""> | ||
| + | <tr valign="baseline"> | ||
| + | <td style="width: 18pt"><div style="font-family: Calibri; font-size: 11pt;">4. </div></td> | ||
| + | <td><div style="font-family: Calibri; font-size: 11pt;"><span id="wwpID0E0JS0HA">Click the </span><span style="font-weight: bold;">Roster</span> tab.</div></td> | ||
| + | </tr> | ||
| + | </table> | ||
| + | </div> | ||
| + | <div style="margin-left: 18pt;"> | ||
| + | <table border="0" cellspacing="0" cellpadding="0" width="99%" summary=""> | ||
| + | <tr valign="baseline"> | ||
| + | <td style="width: 18pt"><div style="font-family: Calibri; font-size: 11pt;">5. </div></td> | ||
| + | <td><div style="font-family: Calibri; font-size: 11pt;"><span id="wwpID0E0IS0HA">Click to select the check box at the end of the row of the desired rep to be removed.</span></div></td> | ||
| + | </tr> | ||
| + | </table> | ||
| + | </div> | ||
| + | <div style="color: #5F497A; font-family: Calibri; font-size: 9pt; margin-bottom: 12pt; margin-left: 18pt;"><span id="wwpID0E0HS0HA">Finding a rep may be done multiple ways. If the business name is known, sort the roster by Business Name as shown in Figure 9-25. </span></div> | ||
| + | <div style="color: #5F497A; font-family: Calibri; font-size: 9pt; margin-bottom: 12pt; margin-left: 18pt;"><span id="wwpID0E0GS0HA">If the individual rep name is known, sort the roster by Rep Last Name or use the magnifying glass [[Image:Emails_Letters_and_Mailing_Lists-Remove_representatives_from_a_group_manually-Communication.1.058.2.jpg]] to search for rep by last name which displays when displaying a limited number of records on the page.</span></div> | ||
| + | <div style="font-family: Calibri; font-size: 11pt; margin-bottom: 12pt; margin-left: 36pt; text-align: justify;"><span id="wwpID0E0FS0HA">[[Image:Emails_Letters_and_Mailing_Lists-Remove_representatives_from_a_group_manually-Communication.1.058.3.jpg]]</span></div> | ||
| + | <div style="font-family: Calibri; font-size: 10pt; margin-bottom: 12pt; margin-left: 54pt; text-align: justify;"><span style="font-size: 10pt; text-transform: uppercase;"><span id="wwpID0E0ES0HA">Figure 9-21</span></span> Remove a rep</div> | ||
| + | <div style="margin-left: 18pt;"> | ||
| + | <table border="0" cellspacing="0" cellpadding="0" width="99%" summary=""> | ||
| + | <tr valign="baseline"> | ||
| + | <td style="width: 18pt"><div style="font-family: Calibri; font-size: 11pt;">6. </div></td> | ||
| + | <td><div style="font-family: Calibri; font-size: 11pt;"><span id="wwpID0E0DS0HA">Click [[Image:Emails_Letters_and_Mailing_Lists-Remove_representatives_from_a_group_manually-Communication.1.058.4.jpg]]</span></div></td> | ||
| + | </tr> | ||
| + | </table> | ||
| + | </div> | ||
| + | </div> | ||
| − | The | + | ===Remove representatives from a group when dropping or suspending a member=== |
| + | The selection to change a member status is found on the '''General''' tab of the member’s record in the '''Members''' module. Select '''Dropped/Inactive''' when clicking the '''Membership Status''' arrow in the '''Additional Information''' area. | ||
| − | + | 1. When changing the status of a member to '''Dropped/Inactive''', the '''Member Drop Options''' screen will appear. | |
| + | In addition to the member status, each rep has a status of either '''Active''' or '''Inactive''' which is displayed for each rep on the '''Reps''' tab. | ||
| − | |||
| − | |||
| − | |||
| − | + | [[File:Communication.1.069.1.jpg]] | |
| − | |||
| − | |||
| − | |||
| − | |||
| − | |||
| − | + | '''Figure 9-22''' Member Drop Options | |
| − | + | 2.Complete the '''Member Drop Options''' screen as desired. Note the '''Representatives''' area selections as detailed on Figure 9-23 below. | |
| + | |||
| + | '''Rep Status''' | ||
| + | *Active status is appropriate for representatives of members that are currently active. | ||
| − | + | *Inactive status is appropriate for a rep who is no longer acting as a representative for the member. The rep’s information and history will be retained but there is a separate distinction given to them in reports and lists. | |
| − | |||
| − | + | *Deleting a rep should be limited to a rep that was created by mistake. History and all reference to this rep would be removed. | |
| + | Group Status | ||
| − | + | *Disabled reps within a group are not visible in the group list on a regular basis and will not be included when selecting to contact these group members. Disabling a rep also preserves the history of their participation in this group. | |
| − | + | *Deleting a rep from a group, removes all record of their participation in the group. | |
| − | + | [[File:Communication.1.069.2.jpg]] | |
| − | |||
| − | |||
| − | |||
| − | [[File: | ||
| − | |||
| − | |||
| − | |||
| − | + | '''Figure 9-23''' Representative options | |
| − | |||
| − | Both | + | '''Note:''' Both active and inactive reps may be set as disabled in a group. Inactive reps, that are not disabled, are still included in emails sent to the group |
| − | + | '''Note:''' Representatives that have a status of inactive will NOT automatically be returned to active status if a member is reinstated. Individual reps must be returned to active status on the '''Reps''' tab. | |
| − | |||
| − | |||
| − | |||
| − | |||
| − | |||
| − | |||
| − | |||
| − | |||
| − | |||
| − | |||
| − | |||
| − | |||
| − | |||
| − | |||
| − | |||
| − | |||
| − | |||
| − | |||
| − | + | 3. Click '''Save & Exit'''. | |
| − | |||
| − | |||
| − | |||
| − | |||
| − | |||
| − | === | + | ===Disable a rep within a group=== |
| − | + | At times it may be necessary to disable a rep within a group. These members are not visible on a regular basis and will not be included if you select to contact these group members. View them at anytime by clicking '''Show Disabled group members'''. The history of their participation in this group may be preserved this way. | |
| − | |||
| − | |||
| − | |||
| − | |||
| − | |||
| − | |||
| − | |||
| − | |||
| − | |||
| − | |||
| − | |||
| − | |||
| − | |||
| − | |||
| − | |||
| − | |||
| − | |||
| − | |||
| − | |||
| − | |||
| − | |||
| − | |||
| − | |||
| − | |||
| − | + | #Click '''Groups''' in the left-hand menu. | |
| − | + | #Click the '''Roster''' tab of the desired group | |
| − | + | #Click to select the member or members that should be disabled. | |
| − | + | #Click '''Disable Selected members'''. | |
| − | |||
| − | |||
| − | + | '''Note:''' You can also view their group participation on the '''Reps''' tab of the member record. Make changes to the reps status from the Reps tab by clicking the Group name. | |
| − | |||
| − | + | '''Note:''' Both active and inactive reps may be set as disabled. Inactive reps, that are not disabled, are still included in emails sent to the group. | |
| − | |||
| − | |||
| − | |||
| − | + | <html> | |
| − | + | <!-- copy and paste. Modify height and width if desired. --> | |
| − | + | <object id="scPlayer" width="640" height="480" type="application/x-shockwave-flash" data="http://content.screencast.com/users/micronet_training/folders/chambers/media/d8ec121a-ba11-47f2-a1c9-5e9caf260126/mp4h264player.swf" > | |
| − | + | <param name="movie" value="http://content.screencast.com/users/micronet_training/folders/chambers/media/d8ec121a-ba11-47f2-a1c9-5e9caf260126/mp4h264player.swf" /> | |
| − | + | <param name="quality" value="high" /> | |
| − | + | <param name="bgcolor" value="#FFFFFF" /> | |
| + | <param name="flashVars" value="thumb=http://content.screencast.com/users/micronet_training/folders/chambers/media/d8ec121a-ba11-47f2-a1c9-5e9caf260126/FirstFrame.jpg&containerwidth=640&containerheight=480&analytics=UA-62452564-3&content=http://content.screencast.com/users/micronet_training/folders/chambers/media/d8ec121a-ba11-47f2-a1c9-5e9caf260126/c003.mp4&blurover=false" /> | ||
| + | <param name="allowFullScreen" value="true" /> | ||
| + | <param name="scale" value="showall" /> | ||
| + | <param name="allowScriptAccess" value="always" /> | ||
| + | <param name="base" value="http://content.screencast.com/users/micronet_training/folders/chambers/media/d8ec121a-ba11-47f2-a1c9-5e9caf260126/" /> | ||
| + | <iframe type="text/html" frameborder="0" scrolling="no" style="overflow:hidden;" src="http://www.screencast.com/users/micronet_training/folders/chambers/media/d8ec121a-ba11-47f2-a1c9-5e9caf260126/embed" height="480" width="640" ></iframe> | ||
| + | </object> | ||
| + | </html> | ||
| − | === | + | ===Allow members to join group=== |
| − | ---- | + | <div xmlns="http://www.w3.org/1999/xhtml"> |
| + | <div style="font-family: Calibri; font-size: 11pt; margin-bottom: 12pt;"><span id="wwpID0E0CR0HA">Members may choose to join or remove themselves from groups that have been designated by Chamber staff. When a member logs into the Member Information Center, they are able to select the desired groups.</span></div> | ||
| + | <div style="font-family: Calibri; font-size: 11pt; margin-bottom: 12pt; margin-left: 18pt; text-align: justify;"><span id="wwpID0E0BR0HA">[[Image:Emails_Letters_and_Mailing_Lists-Allow_members_to_join_group-Communication.1.061.1.jpg]]</span></div> | ||
| + | <div style="font-family: Calibri; font-size: 10pt; margin-bottom: 12pt; margin-left: 36pt; text-align: justify;"><span id="wwpID0E0AR0HA">Figure 9-24 Member is able to select to belong to group</span></div> | ||
| + | <div style="color: #5F497A; font-family: Cambria; font-size: 11pt; font-weight: bold; margin-left: 18pt;"><span id="wwpID0E06Q0HA">Designate Group as Member self-select</span></div> | ||
| + | <div style="margin-left: 18pt;"> | ||
| + | <table border="0" cellspacing="0" cellpadding="0" width="99%" summary=""> | ||
| + | <tr valign="baseline"> | ||
| + | <td style="width: 18pt"><div style="font-family: Calibri; font-size: 11pt;">1. </div></td> | ||
| + | <td><div style="font-family: Calibri; font-size: 11pt;"><span id="wwpID0E05Q0HA">Click </span><span style="font-weight: bold;">Groups</span> in the left-hand menu.</div></td> | ||
| + | </tr> | ||
| + | </table> | ||
| + | </div> | ||
| + | <div style="margin-left: 18pt;"> | ||
| + | <table border="0" cellspacing="0" cellpadding="0" width="99%" summary=""> | ||
| + | <tr valign="baseline"> | ||
| + | <td style="width: 18pt"><div style="font-family: Calibri; font-size: 11pt;">2. </div></td> | ||
| + | <td><div style="font-family: Calibri; font-size: 11pt;"><span id="wwpID0E04Q0HA">Select the title of the desired Group.</span></div></td> | ||
| + | </tr> | ||
| + | </table> | ||
| + | </div> | ||
| + | <div style="margin-left: 18pt;"> | ||
| + | <table border="0" cellspacing="0" cellpadding="0" width="99%" summary=""> | ||
| + | <tr valign="baseline"> | ||
| + | <td style="width: 18pt"><div style="font-family: Calibri; font-size: 11pt;">3. </div></td> | ||
| + | <td><div style="font-family: Calibri; font-size: 11pt;"><span id="wwpID0E03Q0HA">Click the </span><span style="font-weight: bold;">General</span> tab.</div></td> | ||
| + | </tr> | ||
| + | </table> | ||
| + | </div> | ||
| + | <div style="margin-left: 18pt;"> | ||
| + | <table border="0" cellspacing="0" cellpadding="0" width="99%" summary=""> | ||
| + | <tr valign="baseline"> | ||
| + | <td style="width: 18pt"><div style="font-family: Calibri; font-size: 11pt;">4. </div></td> | ||
| + | <td><div style="font-family: Calibri; font-size: 11pt;"><span id="wwpID0E02Q0HA">Click the checkbox “Allow members to join/leave this group through their Member Information Center login.”</span></div></td> | ||
| + | </tr> | ||
| + | </table> | ||
| + | </div> | ||
| + | <div style="margin-left: 18pt;"> | ||
| + | <table border="0" cellspacing="0" cellpadding="0" width="99%" summary=""> | ||
| + | <tr valign="baseline"> | ||
| + | <td style="width: 18pt"><div style="font-family: Calibri; font-size: 11pt;">5. </div></td> | ||
| + | <td><div style="font-family: Calibri; font-size: 11pt;"><span id="wwpID0E01Q0HA">Click </span><span style="font-weight: bold;">Save Changes</span>.</div></td> | ||
| + | </tr> | ||
| + | </table> | ||
| + | </div> | ||
| + | <div style="font-family: Calibri; font-size: 11pt; margin-bottom: 12pt; margin-left: 36pt; text-align: justify;"><span id="wwpID0E0ZQ0HA">[[Image:Emails_Letters_and_Mailing_Lists-Allow_members_to_join_group-Communication.1.061.2.jpg]]</span></div> | ||
| + | <div style="font-family: Calibri; font-size: 10pt; margin-bottom: 12pt; margin-left: 54pt; text-align: justify;"><span id="wwpID0E0YQ0HA">Figure 9-25 Allowing members to join/leave this group</span></div> | ||
| + | <div style="color: #5F497A; font-family: Cambria; font-size: 11pt; font-weight: bold; margin-left: 18pt;"><span id="wwpID0E0XQ0HA"> </span></div> | ||
| + | <div style="color: #5F497A; font-family: Cambria; font-size: 11pt; font-weight: bold; margin-left: 18pt;"><span id="wwpID0E0WQ0HA">Steps for Member to Join/Leave Group</span></div> | ||
| + | <div style="margin-left: 18pt;"> | ||
| + | <table border="0" cellspacing="0" cellpadding="0" width="99%" summary=""> | ||
| + | <tr valign="baseline"> | ||
| + | <td style="width: 18pt"><div style="font-family: Calibri; font-size: 11pt;">1. </div></td> | ||
| + | <td><div style="font-family: Calibri; font-size: 11pt;"><span id="wwpID0E0VQ0HA">Member accesses </span><span style="color: #003366; font-size: 11pt; text-decoration: underline;">[[http://www.chamberlogin.com/|www.chamberlogin.com]]</span> and logs in to the Member Information Center.</div></td> | ||
| + | </tr> | ||
| + | </table> | ||
| + | </div> | ||
| + | <div style="margin-left: 18pt;"> | ||
| + | <table border="0" cellspacing="0" cellpadding="0" width="99%" summary=""> | ||
| + | <tr valign="baseline"> | ||
| + | <td style="width: 18pt"><div style="font-family: Calibri; font-size: 11pt;">2. </div></td> | ||
| + | <td><div style="font-family: Calibri; font-size: 11pt;"><span id="wwpID0E0UQ0HA">Click </span><span style="font-weight: bold;">Employees/Reps</span> in the <span style="font-weight: bold;">Member Info</span> section of the left-hand menu.</div></td> | ||
| + | </tr> | ||
| + | </table> | ||
| + | </div> | ||
| + | <div style="margin-left: 18pt;"> | ||
| + | <table border="0" cellspacing="0" cellpadding="0" width="99%" summary=""> | ||
| + | <tr valign="baseline"> | ||
| + | <td style="width: 18pt"><div style="font-family: Calibri; font-size: 11pt;">3. </div></td> | ||
| + | <td><div style="font-family: Calibri; font-size: 11pt;"><span id="wwpID0E0TQ0HA">Click to select the checkbox in front of the desire group to join (or click to deselect the desired group to leave).</span></div></td> | ||
| + | </tr> | ||
| + | </table> | ||
| + | </div> | ||
| + | <div style="font-family: Calibri; font-size: 11pt; margin-bottom: 12pt; margin-left: 36pt; text-align: justify;"><span id="wwpID0E0SQ0HA">[[Image:Emails_Letters_and_Mailing_Lists-Allow_members_to_join_group-Communication.1.061.3.jpg]]</span></div> | ||
| + | <div style="font-family: Calibri; font-size: 10pt; margin-bottom: 12pt; margin-left: 54pt; text-align: justify;"><span id="wwpID0E0RQ0HA">Figure 9-26 Member selects desired groups</span></div> | ||
| + | </div> | ||
| − | + | ===Allow the public to join=== | |
| + | Any group can be set so that visitors to your website could add themselves to your group. Select each group as shown below, then make sure you’ve got the appropriate website link added to your public website as shown here: http://aname.yourdomain.com/communication | ||
| − | + | *Allows the public (consumers, non-members) and members to easily sign up for groups. | |
| − | + | *It’s a public module, like the business directory, event calendar, etc. | |
| − | |||
| − | |||
| − | |||
| − | |||
| − | |||
| − | |||
| − | |||
| − | + | [[File:Communication.1.072.1.jpg]] | |
| − | |||
| − | |||
| − | |||
| − | |||
| − | |||
| − | [[File: | ||
| − | |||
| − | |||
| − | + | *Select the “Allow consumers to join/leave this group …“ checkbox on the desired group(s) | |
| − | + | *Have your web designer add the /communication module link to your website | |
| − | + | *Visitors will fill out the contact info and select desired group(s). After replying to a simple confirmation email, the visitor will be added to your group. | |
| − | + | *If the email used on the form matches an existing representative then the group membership is tied to a particular representative, and thus a membership. | |
| − | + | *If the email doesn’t belong to a rep then it is created as a [[Community Member]]. | |
| − | + | *Recipients may unsubscribe via the unsubscribe link in the emails or submit another form with no groups selected. | |
| − | |||
| − | |||
| − | |||
| − | |||
| − | =='''<span style="color:#800080"> | + | ==='''<span style="color:#800080">Group Types'''</span>=== |
---- | ---- | ||
| − | + | Setting up optional group types will make it easy for you to organize and filter on groups that may be created. You may create group types in advance or "on the fly" when you creating your groups. Examples of group types: Committee, Mailing List, etc. | |
| − | |||
| − | |||
| − | |||
| − | |||
| − | |||
| − | + | #Click '''Setup''' in the left-hand navigation panel. | |
| − | + | #Click '''Define Group Types''' in the '''Member Options''' section. | |
| − | + | #Enter a name for the group type in the '''New Group Type Name''' text box. | |
| + | #Click the '''Add Group Type''' button. | ||
| − | + | ===Disable a Group=== | |
| − | + | When a group in no longer needed, best practice is to deactivate the group. When you deactivate a group all of its historical data is maintained in your database, but the group is no longer available for selection in the software (for example: when assigning members or reps to groups). | |
| − | |||
| − | |||
| − | + | #Click '''Groups''' in the left-hand navigation panel. | |
| + | #On the '''Home''' tab, click the name of the group you wish to disable. | ||
| + | #:[[File:Disable Group.jpg|600px|center]] | ||
| + | #Select '''Disabled''' from the '''Status''' drop-down. | ||
| + | #Click '''Save Changes'''. | ||
| − | + | {| class="wikitable" | |
| + | |- | ||
| + | | | ||
| + | [[File:Smallest.png|25px]] | ||
| + | | style="width: 100%"| '''Best Practice''': You may wish to recreate your groups annually, for example an annual volunteer group. In this case: Create the new group and add to the roster by selecting '''add representatives from other groups'''. You can the "move" reps from one group to another, then disable the group from the previous year. | ||
| + | |} | ||
| − | == | + | ===Send Group Email=== |
| − | [[ | + | #Click '''Groups''' in the left-hand navigation panel. |
| + | #On the '''Home''' tab, click the desired group. | ||
| + | #Click the '''Roster''' tab. | ||
| + | #:[[File:Contact Members.jpg|600px|center]] | ||
| + | #Click '''Contact Members'''. | ||
Revision as of 21:54, 8 October 2019
Contents
- 1 Communicating Using Groups & Mailing Lists
- 1.1 Creating a group or mailing list
- 1.2 Selections for adding group members
- 1.3 Maintaining the group/mailing list
- 1.4 Add new members to a mailing list immediately
- 1.5 Remove representatives from a group manually
- 1.6 Remove representatives from a group when dropping or suspending a member
- 1.7 Disable a rep within a group
- 1.8 Allow members to join group
- 1.9 Allow the public to join
- 1.10 Group Types
- 1.11 Disable a Group
- 1.12 Send Group Email
Communicating Using Groups & Mailing Lists
Sending communication via email and letters may be simplified by creating self-defined groups in the ChamberMaster Groups module.
For instance, if you frequently send emails to your Budget Committee . . instead of selecting the 12 members of that committee each time you send an email, you first create a group in the Groups module called the Budget Committee. Add each of the 12 members to that group. Then when you go to send the email, you simply select the Budget committee as the recipient of the email with one simple click.
If you send a monthly newsletter, the Groups module is where you will create and maintain this mailing list group. This group may then be selected at the appropriate time throughout ChamberMaster when you desire to send them email or print mailing labels and letters for them.

Figure 9-1 the Groups module
Creating a group or mailing list
- Click Groups in the left-hand menu.
- Click Create a Group on the Home tab.
- Figure: Create a group
- Complete the Create a New Group fields for this new group.
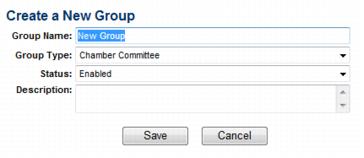
- Figure: "Create a New Group" fields–tabbed view
- Click Save.
- Click the Group Name of the new group on the Home tab.
- Click the General tab. Make sure the settings are correct.
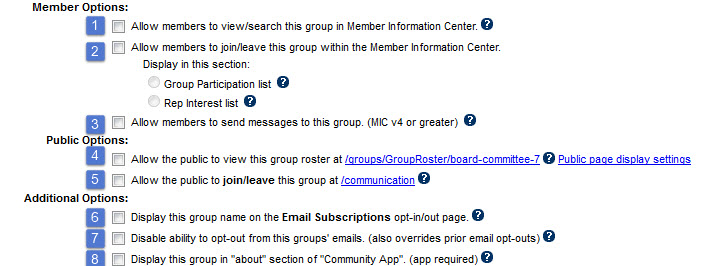 Group Options and Settings
- When selected, this roster list will be shown as a group/interest that may be searched by members in the Member Information Center.
- When selected, members will have opportunity to join/leave this group/interest on their own in the Member Information Center. The selection of Group Participant list or Rep Interest list determines where the selection will take place – under Groups or under Interests. Interests.
- This option allows the group to be contacted through the Member Information Center Message Center
- When selected, this group will display on your website in the Groups public module available at http://yoursubdomain.yourdomain.com/groups.
- Click Public Display Settings to modify how the group is displayed
- When selected, this group will appear on your public website at the suggested URL where the public may add themselves to the group. Often used for consumers to subscribe to (join) your mailing lists.
- When selected, this group name will be displayed on the email subscription opt-in/out page
- When selected, this group cannot be unsubscribed from
- When selected, this group will be accessible through the community app (when purchased)
- Click the Roster tab.
- Click one or more of the Add Group Members selections to add members to your group.
- Continue adding representatives to your group using the Add Group Members selections until your group is complete.


Selections for adding group members


Maintaining the group/mailing list
Add new members to a mailing list immediately
Group membership must be maintained through manual selection or removal of names. To keep your initial mailing list up-to-date, you might consider adding new members to the appropriate mailing lists immediately after creating the new member record. Following is one example of how this might happen.
1. Immediately after a new member has been added to the ChamberMaster database and with the new member record selected in the Members module, click the Reps tab.
2. Ensure that all desired reps for this new member have been added. If not, add reps at this time by clicking Add a New Rep.
3. Click the name of one of the reps in the List of Representatives area.
4. Scroll to the Group Participation area at the bottom of the screen and click Join a Group.

Figure 9-18 Group Participation area
5. Click the desired group to join.
6. Click the double right arrow to move the desired group to the Selected Groups list box.
7. Click Continue.

Figure 9-19 Join a group
8. If this representative should belong to more groups, complete steps 4-7 again until they belong to all desired groups.
9. If other representatives should belong to groups as well, perform steps 3-7 above and select the next desired representative.
Remove representatives from a group manually
1. |
Click Groups in the left-hand navigation bar. |
2. |
Click the Home tab. |
3. |
Click the Group Name of the mailing list to be modified. |

4. |
Click the Roster tab. |
5. |
Click to select the check box at the end of the row of the desired rep to be removed. |

6. |
Click |
Remove representatives from a group when dropping or suspending a member
The selection to change a member status is found on the General tab of the member’s record in the Members module. Select Dropped/Inactive when clicking the Membership Status arrow in the Additional Information area.
1. When changing the status of a member to Dropped/Inactive, the Member Drop Options screen will appear. In addition to the member status, each rep has a status of either Active or Inactive which is displayed for each rep on the Reps tab.

Figure 9-22 Member Drop Options
2.Complete the Member Drop Options screen as desired. Note the Representatives area selections as detailed on Figure 9-23 below.
Rep Status
- Active status is appropriate for representatives of members that are currently active.
- Inactive status is appropriate for a rep who is no longer acting as a representative for the member. The rep’s information and history will be retained but there is a separate distinction given to them in reports and lists.
- Deleting a rep should be limited to a rep that was created by mistake. History and all reference to this rep would be removed.
Group Status
- Disabled reps within a group are not visible in the group list on a regular basis and will not be included when selecting to contact these group members. Disabling a rep also preserves the history of their participation in this group.
- Deleting a rep from a group, removes all record of their participation in the group.

Figure 9-23 Representative options
Note: Both active and inactive reps may be set as disabled in a group. Inactive reps, that are not disabled, are still included in emails sent to the group
Note: Representatives that have a status of inactive will NOT automatically be returned to active status if a member is reinstated. Individual reps must be returned to active status on the Reps tab.
3. Click Save & Exit.
Disable a rep within a group
At times it may be necessary to disable a rep within a group. These members are not visible on a regular basis and will not be included if you select to contact these group members. View them at anytime by clicking Show Disabled group members. The history of their participation in this group may be preserved this way.
- Click Groups in the left-hand menu.
- Click the Roster tab of the desired group
- Click to select the member or members that should be disabled.
- Click Disable Selected members.
Note: You can also view their group participation on the Reps tab of the member record. Make changes to the reps status from the Reps tab by clicking the Group name.
Note: Both active and inactive reps may be set as disabled. Inactive reps, that are not disabled, are still included in emails sent to the group.
Allow members to join group

1. |
Click Groups in the left-hand menu. |
2. |
Select the title of the desired Group. |
3. |
Click the General tab. |
4. |
Click the checkbox “Allow members to join/leave this group through their Member Information Center login.” |
5. |
Click Save Changes. |

1. |
Member accesses [[1]] and logs in to the Member Information Center. |
2. |
Click Employees/Reps in the Member Info section of the left-hand menu. |
3. |
Click to select the checkbox in front of the desire group to join (or click to deselect the desired group to leave). |

Allow the public to join
Any group can be set so that visitors to your website could add themselves to your group. Select each group as shown below, then make sure you’ve got the appropriate website link added to your public website as shown here: http://aname.yourdomain.com/communication
- Allows the public (consumers, non-members) and members to easily sign up for groups.
- It’s a public module, like the business directory, event calendar, etc.

- Select the “Allow consumers to join/leave this group …“ checkbox on the desired group(s)
- Have your web designer add the /communication module link to your website
- Visitors will fill out the contact info and select desired group(s). After replying to a simple confirmation email, the visitor will be added to your group.
- If the email used on the form matches an existing representative then the group membership is tied to a particular representative, and thus a membership.
- If the email doesn’t belong to a rep then it is created as a Community Member.
- Recipients may unsubscribe via the unsubscribe link in the emails or submit another form with no groups selected.
Group Types
Setting up optional group types will make it easy for you to organize and filter on groups that may be created. You may create group types in advance or "on the fly" when you creating your groups. Examples of group types: Committee, Mailing List, etc.
- Click Setup in the left-hand navigation panel.
- Click Define Group Types in the Member Options section.
- Enter a name for the group type in the New Group Type Name text box.
- Click the Add Group Type button.
Disable a Group
When a group in no longer needed, best practice is to deactivate the group. When you deactivate a group all of its historical data is maintained in your database, but the group is no longer available for selection in the software (for example: when assigning members or reps to groups).
- Click Groups in the left-hand navigation panel.
- On the Home tab, click the name of the group you wish to disable.
- Select Disabled from the Status drop-down.
- Click Save Changes.

|
|
Best Practice: You may wish to recreate your groups annually, for example an annual volunteer group. In this case: Create the new group and add to the roster by selecting add representatives from other groups. You can the "move" reps from one group to another, then disable the group from the previous year. |
Send Group Email
- Click Groups in the left-hand navigation panel.
- On the Home tab, click the desired group.
- Click the Roster tab.
- Click Contact Members.
