Difference between revisions of "MIC Resources"
| (14 intermediate revisions by the same user not shown) | |||
| Line 1: | Line 1: | ||
| − | + | Your staff may load documents, photos, videos and website URLs that can be accessed by all members or selected groups in the Member Information Center. | |
| − | + | ==Posting Resources for Members or Groups== | |
| − | [[File:Vid.png|link=http://www.screencast.com/t/GrkfD3JGnx]] Watch [http://www.screencast.com/t/GrkfD3JGnx this video] describing how to upload and use resources | + | [[File:Vid.png|link=http://www.screencast.com/t/GrkfD3JGnx]] Watch [http://www.screencast.com/t/GrkfD3JGnx this video] describing how to upload and use resources. |
| − | [[File:Example_of_resources1.jpg | + | :[[File:Example_of_resources1.jpg]] |
| + | :'''Figure: '''Example of resources that could be available to your members. | ||
| − | '''Note: '''Files uploaded under the back office menu Cloud Drive under Shared Documents in the Member_Only Files can be loaded into the MIC Resources section but will not automatically populate; they must be added individually by following the steps below and selecting Cloud Drive as the Upload Option. | + | |
| + | '''Note: '''Files uploaded under the back office menu '''Cloud Drive''' under '''Shared Documents''' in the '''Member_Only Files''' can be loaded into the '''MIC Resources''' section but will not automatically populate; they must be added individually by following the steps below and selecting '''Cloud Drive''' as the '''Upload Option'''. | ||
===Add files to MIC Resources=== | ===Add files to MIC Resources=== | ||
| − | + | ||
| − | + | 1. Log in to your software. | |
| − | + | ||
| − | + | 2. Click the '''MIC''' button in the upper right-hand tool bar. | |
| − | + | ||
| − | + | :[[File:micbutton.png]] | |
| − | + | ||
| − | + | ||
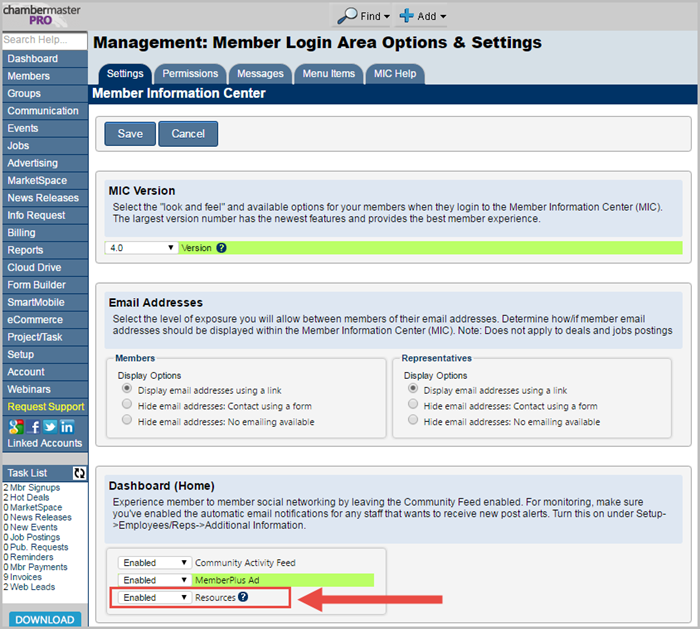
| − | + | 3. Click '''Resources''' in the top tool bar. Note: If the '''Resources''' button is not visible, verify you are using a Standard, Premier or Pro version of the software and make sure the Resources feature is enabled.<ref>To enable Resources, click '''Setup''' ➝ '''Member Login Area Options & Settings''' and go to the '''Dashboard (Home)''' section. Next to '''Resources''', select '''Enabled''' from the dropdown list. | |
| − | + | <br> | |
| − | + | ||
| − | + | [[File:enable_resources.png]]</ref> | |
| − | + | ||
| − | + | 4. Click '''Add Resource'''. | |
| − | + | ||
| − | + | :[[File:add_resource1.jpg]] | |
| − | + | ||
| − | + | ||
| − | + | 5. Select the desired '''Resource Type'''. | |
| + | |||
| + | :[[File:add_resource2.jpg]] | ||
| + | |||
| + | :*'''Document''': Examples include Word, Excel, PDF, image files | ||
| + | :*'''Video''': Accepts most video file formats | ||
| + | :*'''Website''': Allows you to specify a website URL | ||
| + | |||
| + | |||
| + | 6. Select the desired '''Upload''' method. (Depending on which Resource Type selected, the upload options will vary.) | ||
| + | |||
| + | :[[File:add_resource3.jpg]] | ||
| + | |||
| + | |||
| + | 7. Input information required for the '''Upload''' method selected. | ||
| + | |||
| + | 8. Complete the '''Title''' and '''Summary''' (optional) that will display for members. | ||
| + | |||
| + | 9. Select a '''Category''' (although optional is it recommended). | ||
| + | |||
| + | 10. (Optional) Select a group or groups that this resource should be limited to. | ||
| + | |||
| + | 11. Click '''Save Resource'''. | ||
| + | |||
| + | <hr> | ||
Latest revision as of 16:09, 27 April 2016
Your staff may load documents, photos, videos and website URLs that can be accessed by all members or selected groups in the Member Information Center.
Posting Resources for Members or Groups
![]() Watch this video describing how to upload and use resources.
Watch this video describing how to upload and use resources.

- Figure: Example of resources that could be available to your members.
Note: Files uploaded under the back office menu Cloud Drive under Shared Documents in the Member_Only Files can be loaded into the MIC Resources section but will not automatically populate; they must be added individually by following the steps below and selecting Cloud Drive as the Upload Option.
Add files to MIC Resources
1. Log in to your software.
2. Click the MIC button in the upper right-hand tool bar.
3. Click Resources in the top tool bar. Note: If the Resources button is not visible, verify you are using a Standard, Premier or Pro version of the software and make sure the Resources feature is enabled.[1]
4. Click Add Resource.

5. Select the desired Resource Type.

- Document: Examples include Word, Excel, PDF, image files
- Video: Accepts most video file formats
- Website: Allows you to specify a website URL
6. Select the desired Upload method. (Depending on which Resource Type selected, the upload options will vary.)

7. Input information required for the Upload method selected.
8. Complete the Title and Summary (optional) that will display for members.
9. Select a Category (although optional is it recommended).
10. (Optional) Select a group or groups that this resource should be limited to.
11. Click Save Resource.
- ↑ To enable Resources, click Setup ➝ Member Login Area Options & Settings and go to the Dashboard (Home) section. Next to Resources, select Enabled from the dropdown list.