Difference between revisions of "Managing Member Login Area Selections"
(Created page with "Certain selections for enhancing the member listing and some website statistics are available to your Members in their Member Login area. Enabling these in Setup must be done...") |
|||
| Line 23: | Line 23: | ||
4. Click Save. | 4. Click Save. | ||
| − | Note: to allow members to upload their own Search Results icon, the Search Results Icon selection must be enabled in Setup->Member Login Area Options and Settings (see Figure | + | Note: to allow members to upload their own Search Results icon, the Search Results Icon selection must be enabled in Setup->Member Login Area Options and Settings (see Figure above) and then must also be enabled individually for each member as well. See “Add an icon to the search results”. |
Revision as of 02:54, 17 January 2016
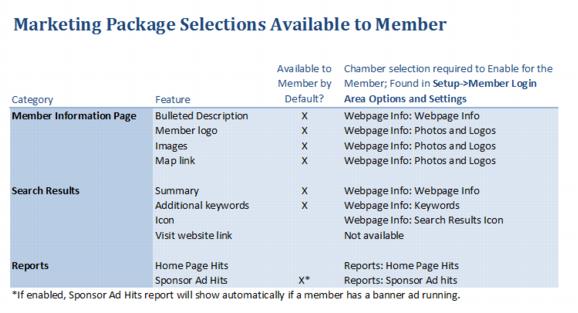
Certain selections for enhancing the member listing and some website statistics are available to your Members in their Member Login area. Enabling these in Setup must be done first in some cases. Banner ads may only be implemented and managed by your staff.
Table: Marketing Package Selections available to Member
Change the Member selections available in their Member Login Area
1. Click Setup in the left-hand menu.
2. Click Member Login Area Options and Settings.
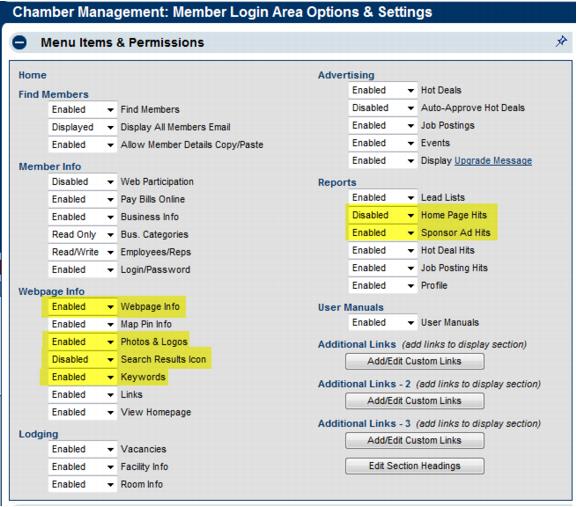
Figure: Member Login Area Options and Settings – selections that relate to Marketing Package features
3. Make the desired changes.
4. Click Save.
Note: to allow members to upload their own Search Results icon, the Search Results Icon selection must be enabled in Setup->Member Login Area Options and Settings (see Figure above) and then must also be enabled individually for each member as well. See “Add an icon to the search results”.

