Difference between revisions of "Member Management-Print a label(s)"
Jump to navigation
Jump to search
(Created page with " 1. On the Communication tab of the desired member, click New Communication and select Print Mailing Label. 2. Click the check box(es) in front of the desired Addressees. Fig...") |
|||
| Line 1: | Line 1: | ||
| + | 1. On the '''Communication''' tab of the desired member, click '''New Communication''' and select '''Print Mailing Label'''. | ||
| − | + | 2. Click the check box(es) in front of the desired Addressees. | |
| − | |||
| − | 2. | ||
| − | Click the check box(es) in front of the desired Addressees. | ||
| − | Figure | + | |
| − | 3. | + | :[[File:printalabel.jpg]] |
| − | Complete the rest of the Mailing Labels screen. See Figure | + | :'''Figure 1: '''Print Label Screen |
| − | 4. | + | |
| − | Click View/Print Labels. | + | |
| − | 5. | + | 3. Complete the rest of the '''Mailing Labels''' screen. See Figure 1. |
| − | The desired output will display on the screen. On the File menu, click Print. | + | |
| − | 6. | + | 4. Click '''View/Print Labels'''. |
| − | Click to select the desired printer and click Print. | + | |
| − | 7. | + | 5. The desired output will display on the screen. On the '''File''' menu, click '''Print'''. |
| − | Click the Close button. | + | |
| − | 8. | + | 6. Click to select the desired printer and click '''Print'''. |
| − | Click Close. | + | |
| + | 7. Click the '''Close''' button. | ||
| + | |||
| + | 8. Click '''Close'''. | ||
Latest revision as of 22:45, 4 September 2016
1. On the Communication tab of the desired member, click New Communication and select Print Mailing Label.
2. Click the check box(es) in front of the desired Addressees.
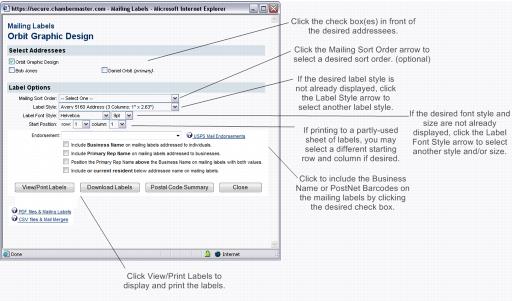
- Figure 1: Print Label Screen

3. Complete the rest of the Mailing Labels screen. See Figure 1.
4. Click View/Print Labels.
5. The desired output will display on the screen. On the File menu, click Print.
6. Click to select the desired printer and click Print.
7. Click the Close button.
8. Click Close.