Difference between revisions of "Send an Email to a Representative"
| Line 6: | Line 6: | ||
:''Or click the checkbox in front of the desired representative name.'' | :''Or click the checkbox in front of the desired representative name.'' | ||
| − | 2. Hover over '''Send email''' and select '''Email with ChamberMaster / | + | 2. Hover over '''Send email''' and select '''Email with ChamberMaster / GrowthZone''' or '''Email with Outlook'''. See [[Email Sending Options]] for more information. |
| − | 3. If selecting '''Email with ChamberMaster / | + | 3. If selecting '''Email with ChamberMaster / GrowthZone''', complete the '''Send an email''' screen. To add an attachment, click Add/Remove Attachments and follow the directions on the screen. If selecting Email with Outlook, complete your own email screen and send using your own familiar steps. |
| Line 22: | Line 22: | ||
1. On the '''Reps''' tab, click to select the check mark in front of the desired reps to be emailed in the "List of Representatives" area. | 1. On the '''Reps''' tab, click to select the check mark in front of the desired reps to be emailed in the "List of Representatives" area. | ||
| − | 2. Hover over '''Send email''' and select '''Email with ChamberMaster / | + | 2. Hover over '''Send email''' and select '''Email with ChamberMaster / GrowthZone''' or '''Email with Outlook'''. See [[Email Sending Options]] for more information. |
| − | 3. If selecting '''Email with ChamberMaster / | + | 3. If selecting '''Email with ChamberMaster / GrowthZone''', complete the '''Send an email''' screen. If selecting '''Email with Outlook''', complete your own email screen and send using your own familiar steps. (These recipients will each be sent a blind carbon copy.) |
:[[File:MemberManagement.1.34.2.jpg]] | :[[File:MemberManagement.1.34.2.jpg]] | ||
Latest revision as of 12:47, 28 April 2017
Send Email is an option located multiple places throughout the software. The Send Email button on the Reps tab is used to generate a quick email to a particular representative (or multiple representatives).
Send an Email to a Representative
1. On the Reps tab, click the desired rep’s name in the List of Representatives area. The selected row will show in yellow.
- Or click the checkbox in front of the desired representative name.
2. Hover over Send email and select Email with ChamberMaster / GrowthZone or Email with Outlook. See Email Sending Options for more information.
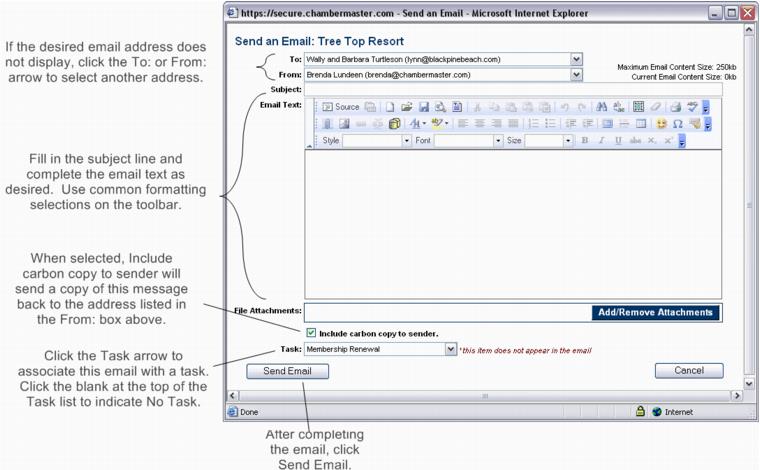
3. If selecting Email with ChamberMaster / GrowthZone, complete the Send an email screen. To add an attachment, click Add/Remove Attachments and follow the directions on the screen. If selecting Email with Outlook, complete your own email screen and send using your own familiar steps.
- Figure: Send an email
4. Click Send Email.
Send an Email to Multiple Reps
1. On the Reps tab, click to select the check mark in front of the desired reps to be emailed in the "List of Representatives" area.
2. Hover over Send email and select Email with ChamberMaster / GrowthZone or Email with Outlook. See Email Sending Options for more information.
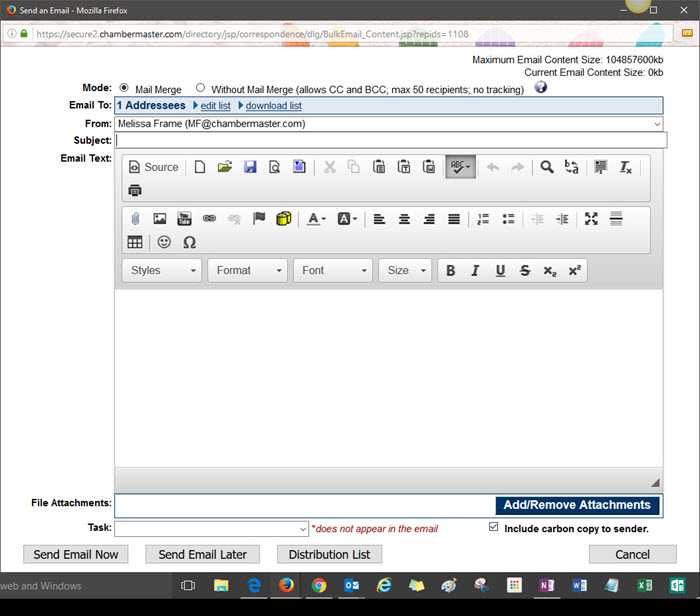
3. If selecting Email with ChamberMaster / GrowthZone, complete the Send an email screen. If selecting Email with Outlook, complete your own email screen and send using your own familiar steps. (These recipients will each be sent a blind carbon copy.)
- Figure: Sending email to multiple recipients
4. Complete the Send an email screen as desired.
5. Click Send Email.

