ECommerce-Member Only products and prices
Jump to navigation
Jump to search
Roles and rights are assigned to your office staff and also to your customers, both members and the general public.
Special pricing can be assigned to these roles or you can limit product and categories to display only to designated roles.
To display a product category to members only
1. |
Click eCommerce in the left-hand menu. |
2. |
Click Catalog. |
3. |
Click Categories. |
4. |
Click List View. |
5. |
Click Add New to create a new members-only category. |
6. |
Type a name for your members-only category. |
7. |
Click Save and Continue Edit. |
8. |
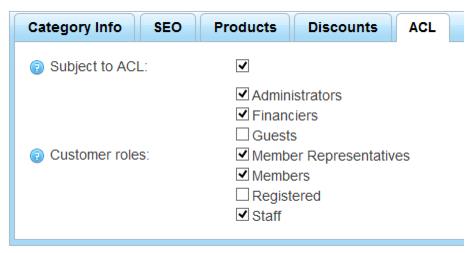
Click the ACL tab. |
9. |
Select the Subject to ACL |
10. |
Select the Customer roles that should be able to view these products. |

Note: Select both Member Representatives and Members to include all your members. Select Administrators, Financiers, and Staff to allow your staff to also view these products when logging in.
11. |
Click Save. |
12. |
Products added to this category will only show to those selected on the ACL. |
To display a particular product to members only
1. |
Click eCommerce in the left-hand menu. |
2. |
Click Catalog. |
3. |
Click Products. |
4. |
Click Manage Products. |
5. |
Click Edit in the row of the desired product to display only to members. |
6. |
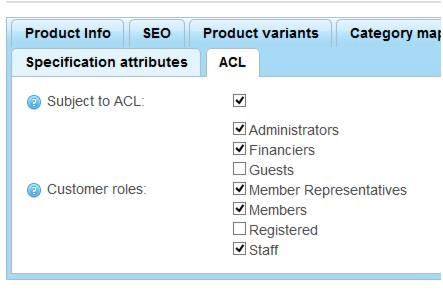
Click the ACL tab. |
7. |
Select the Subject to ACL. |

8. |
Select the Customer roles that should be able to view this product. |
Note: Select both Member Representatives and Members to include all your members. Select Administrators, Financiers, and Staff to allow your staff to also view this product when logging in.
9. |
Click Save. |
10. |
This product will only show to those selected on the ACL. |
To offer special pricing to members only
1. |
Click eCommerce in the left-hand menu. |
2. |
Click Catalog. |
3. |
Click Products. |
4. |
Click Manage Products. |
5. |
Click Edit in the row of the desired product to display only to members. |
6. |
Click Product variants. |
7. |
Click Edit in the row of the desired product variant for which you wish to offer member pricing. |
8. |
Click the Tier prices tab. |
9. |
Click Add new record. |
10. |
Select the Customer role that should have special pricing. |
Note: Add a new record for both Member Representatives and Members to include all your members. Select Administrators, Financiers, and Staff to allow your staff to also have this special pricing.
11. |
Select Quantity of 1 to allow this pricing for even one product purchase. |
12. |
Enter the special member price. |
13. |
Click Insert. |
14. |
Add a new record for all roles that should have special pricing. |
Note: Add a new record for both Member Representatives and Members to include all your members. Select Administrators, Financiers, and Staff to allow your staff to also have this special pricing.
15. |
Click Save. |
16. |
This product will only show to those selected customers roles with the price listed when they are logged in. |