Form Builder
Contents
Overview
Quickly create and publish custom web forms and surveys with Form Builder. Features include an intuitive interface which allows you to select from a variety of form fields. Watch the short video below and check out the resources on how to get started.
Form Builder is available with the Pro Edition of ChamberMaster and MemberZone and for those with v3 or higher public modules. Don't have Form Builder? Contact support@micronetonline.com to get information on upgrading.
Create a Form
- Click Form Builder in the left hand menu.
- On the Home tab, click Create New Form.
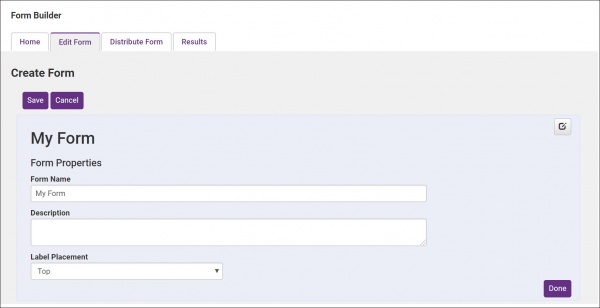
- Enter a Form Name. The form name is displayed at the top of the form.
- (Optional) Enter a Description of the form. This will be displayed on the form, and could be used to provide further details about the purpose of the form.
- Click Add Field and select the type of field you want to add. See Form Field Definitions for information on each field type.
- Click Done.
- Repeat the steps 5 - 6 above to add additional fields to your form.
- Click Done to save the form.
Form Field Definitions
| FormBuilder Field | Description |
|---|---|
| Address Block (US or Canada) | Use this to create an address block containing 5 predefined fields for collecting an address in the desired country. |
| Checkbox | Creates a list of options that allows more than one option to be selected. |
| Date and Time | Creates a field with a calendar for a user to pick a date, time or date and time keeping the data in a standard format. |
| Matrix Table | A Matrix table allows you to create multiple questions that follow a rating matrix for each. By default it gives the user 4 options from Strongly Agree to Strongly Disagree. |
| Multiple Choice | Creates a field with a list of options that only one option can be chosen. Format can be a drop down or a set of Radio Buttons. |
| Name Block (Full or Simple) | Creates a field with 4 (Full) or 2 (Simple) fields to collect a persons name information. |
| Section Label | Creates a label on the form to allow you to separate areas of a form and provide additional instructions. |
| Star Rating Scale | Creates a field where a user can select how many stars they would rate something. |
| Text/Number/Currency field | Creates a generic field allowing for anything (Text), Just a number (Number), or a number formatted as currency (Currency). |
| Upload File | Allows a user to upload a file with their form submission. |
Make a Copy of a Form
Rather than recreate a form, perhaps you want a new form each year but the form is the same, you can make a copy of an existing form.
- Click Form Builder in the left-hand navigation panel.
- Click the
 in the Actions column for the form you wish to copy. The Copy Form screen will be displayed.
 - Rename the form and update fields as needed.
- Click Save.
Activate and Publish a Form
- Select Form Builder in the left-hand navigation panel.
- On the Home tab, click the name of the form you wish to activate.
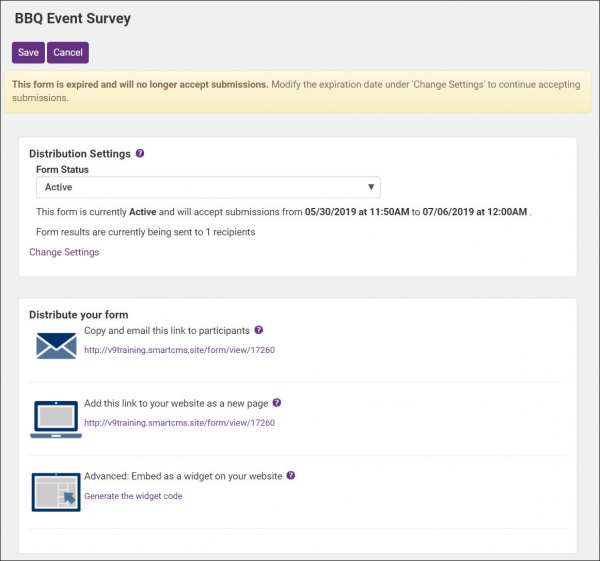
- Click the Distribute Form tab.
- Change the Form Status to Active
- You can also control when users can use the form allowing for submissions only for a specified period of time, click Change Settings at the bottom of the Distribution Settings section.
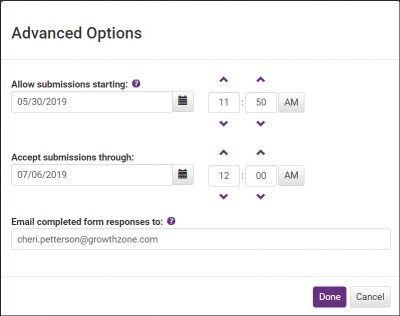
- Specify a Submission start date and a submissions through date.
- Optionally you can also specify an email to receive submissions, in the Email completed form responses to text-box. You can enter multiple email addresses if needed, separate with a comma and no spaces.
- Click Done.
Distribute a Form
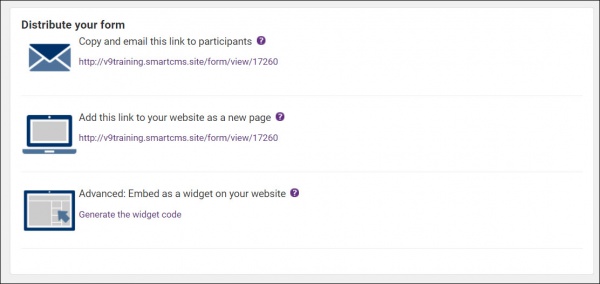
On the Distribute Form tab, you will find three ways to distribute the form to users.
- Email a link to the form directly.
- Add the form to your website for users to find and access it themselves.
- Embed it as a widget within another website page.
View Form Submissions
View Form Submissions by Email
If you choose to receive the results by email after each submission you will need to:
- Go to the Distribute Form tab
- Click Change Settings
- In the Email completed form responses to box enter the email addresses you would like to have receive the results.
- Multiple email addresses can be added. Separate each email addresses with a comma and no spaces.
- Click Done
- Click Save
Now whenever a form is submitted, they will be notified by email.
View Form Submissions via the Database
Staff users can view and sort form submissions on the Form Builder's Results tab. These results can then be downloaded into a spreadsheet file to analyze, share or archive.
- Click Form Builder in the left-hand navigation panel.
- On the Home tab, click the numbered link in the Results Submitted column for the desired form. The Results tab for the survey will display a list of all submissions.
Form Builder FAQ's
Q) How do I prevent spam submissions?
A) There is a simple mathematical CAPTCHA to prevent automated spamming of your form.
Q) Can I disable the CAPTCHA
A) Not at this time however this is being reviewed as a future enhancement for the Form Builder
Q) Can I automatically send responses to those who make submissions?
A) Not at this time. This is being reviewed as a future enhancement for the Form Builder
Q) My multiple choice options all have the first option selected. Can they all be blank instead?
A) This is being reviewed as a future enhancement for the Form Builder


