Mobile Apps
Contents
- 1 Mobile Apps Overview
- 2 ChamberMaster/MemberZone Staff App
- 2.1 Staff App Compatibility Requirements
- 2.2 Staff App Features
- 2.3 Logging into the Staff App
- 2.4 Staff App Dashboard
- 2.5 Navigating the Staff App
- 2.6 Update Your Staff Profile using the Staff App
- 2.7 The Community Feed in the Staff App
- 2.8 Managing Members with the Staff App
- 2.8.1 Add a Member using the Staff App
- 2.8.2 View/Search the Member Directory with the Staff App
- 2.8.3 View Member General Information with the Staff App
- 2.8.4 Call a Member from the Staff App
- 2.8.5 Send an Email to a Member from the Staff App
- 2.8.6 Log a New Note to a Members Communication Tab
- 2.8.7 Add a Rep to a Member using the Staff App
- 2.8.8 Get Directions to a Member using the Staff App
- 2.8.9 View/Edit Member Photos using the Staff App
- 2.9 Managing Representatives with the Staff App
- 2.9.1 View/Search for Representative in the Member Directory with the Staff App
- 2.9.2 Add Representative Profile Photo with the Staff App
- 2.9.3 Call a Rep from the Staff App
- 2.9.4 Send an Email to a Rep from the Staff App
- 2.9.5 View Rep Event Registrations in the Staff App
- 2.9.6 View Rep Group Participation in the Staff App
- 2.10 View/Search for Groups in the Member Directory with the Staff App
- 2.11 Managing Events with the Staff App
- 2.12 Monitoring and Managing Tasks with the Staff App
- 2.13 Send eReferrals using the Staff App
- 2.14 Working with Point of Sale in the Staff App
- 2.15 Staff Apps FAQs
- 3 MemberPlus: An App for Your Members
- 3.1 MemberPlus App Flyer to Share with Your Members
- 3.2 Download the App
- 3.3 MemberPlus Features
- 3.4 Tips for Rolling out the MemberPlus App
- 3.5 Logging in to the MemberPlus App
- 3.6 Navigating the MemberPlus App
- 3.7 Common MemberPlus App Functions
- 3.8 Update Member Profile via the MemberPlus App
- 3.9 The Member Directory in the MemberPlus App
- 3.10 View Representatives in the MemberPlus App
- 3.11 View Favorites in the MemberPlus App
- 3.12 The Community Feed in the MemberPlus App
- 3.13 Working with Events in the MemberPlus App
- 3.14 Working with Hot Deals in the MemberPlus App
- 3.15 Working with Member to Member Deals in the MemberPlus App
- 3.16 View Job Postings in the MemberPlus App
- 3.17 View Resources via the MemberPlus App
- 3.18 Access the MIC via the MemberPlus App
Mobile Apps Overview
The ChamberMaster/MemberZone Mobile App Suite features convenient mobile applications developed for your staff and your members. All of the apps were designed with one common goal in mind – to help your organization engage anywhere, anytime from any device.
ChamberMaster/MemberZone Staff App
The mobile companion for ChamberMaster and MemberZone users that provides real-time membership information no matter where you are. The Staff App helps make your member visits more substantive and meaningful – you can see at a glance if they’re signed up for your upcoming event or when you last sent leads their way. The Staff App is for your staff to use while on the road. It does not replace the full product – rather it is a companion product giving your team access to information when remote. Apps are downloaded to your smartphone and can access certain aspects of your ChamberMaster/MemberZone database.
Available for iOS and Google Play Store devices. ChamberMaster and GrowthZone users can download the app for staff, log in using their current credentials, and begin using it immediately.

Staff App Compatibility Requirements
- Android requirements: Android v 2.2 or later.
- iOS requirements: iPad, iPhone App. Compatible with iPhone 3GS, iPhone 4, iPhone 4S, iPhone 5, iPod touch (3rd generation), iPod touch (4th generation), iPod touch (5th generation) and iPad. NOTE: Requires iOS 10 or later.
|
|
IMPORTANT! The Staff app is NOT compatible with Microsoft Surface devices. |
Staff App Features
Staff App Features - Free Edition
- Search for members, prospects and individuals
- View member profile, web stats and event activity
- Check-in attendees at events
- Check account balance and recurring fees amounts
- Lookup communication notes
Encourage everyone in the office to download the app –it’s free and integrated with your member management software!
Staff App Features - Premium Edition
Upgrade to the premium edition of the Staff App. The rate is just $20 per month for your entire staff to use on unlimited devices! Additional time-saving features are available with the premium edition.
- Mark event registrants as paid
- Create event billing transactions
- Add new notes to communication history
- Add new members to the database, either by ”quick-add” form or full online application
- Auto-selection of random prize winner from event registration list
- Send eReferrals
- Approve or decline Task List items
- Linked phone numbers that will open the phone dialer (if device has phone capabilities)
- Linked email addresses that will open two email options – email through the software or email directly from app
- Linked Member Anniversaries on the Dashboard will open to more member details
How to Upgrade to the Premium Edition of the Staff App
Upgrade to the premium edition of the Staff App. The rate is just $20 per month for your entire staff to use on unlimited devices! Additional time-saving features are available with the premium edition.
- From the back-office, click Account in the left-hand navigation panel.
- Select the Mobile Application tab.
- Click the check-box adjacent to Upgrade my mobile plan to include the premium features. I agree to have an additional $20 added to our monthly bill. If invoiced annually, the chamber will be billed a pro-rated amount. Upon annual renewal, the chamber will be invoiced for the full annual fee. NOTE: If the Premium Edition is already enabled, Premium Mobile Features: Enabled will be displayed on the Mobile Application tab.
- Click Upgrade. Immediately you will have premium features added to all Android and iOS apps downloaded by your entire staff. One upgrade includes unlimited devices on all platforms for your entire staff.

|
|
NOTE: At times, after an upgrade to the Premium Edition, the app does not switch. In this case, within the App, click Settings in the left-hand navigation panel and select Clear Cached Data. Log-out of the app and log back in. If this does not work contact support@growthzone.com. |
Logging into the Staff App
- Click the App icon on your phone.
- Enter Username and Password. These are the same credentials used to access the database.
- Click Sign In

NOTE: The Remember Me slider is enabled by default, so once you have logged, you will remain logged in until you manually log-out. If you do not wish to remain logged in, move the slider to the right.
Click forgot your username/password to be sent an email with instructions on resetting your username and/or password.
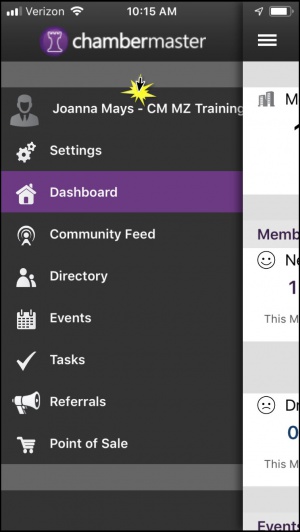
Staff App Dashboard
The Staff App Dashboard provides an at a glance view of your database.

- Memberships: The Memberships section will display the number of Active & Courtesy members. Clicking into the number will open the directory and display those members.
- Membership Activity: This section will display new member and dropped member statistics. Clicking into the number will open the directory and display those members.
- Events: In the events section you will see the number of events for the current week/month (click on the number to view the actual events) and year to date revenue statistics.
- Tasks: In the tasks area, you will see the number of tasks that may require attention. This area will display a list of any tasks (member applications to approve, hot deals to approve, marketspace items to approve, events submitted by your members to approve, and reminders). NOTE: Premium Version of the Staff App is required to approve tasks. Click Here to learn how to upgrade to the Premium Version, and start taking advantage of additional features.
- Anniversaries: This section will display the number of your members who have join anniversaries in the current month. NOTE: Premium Version of the Staff App is required to view anniversaries. Click Here to learn how to upgrade to the Premium Version, and start taking advantage of additional features.
Using the Staff App Dashboard (described above), you can navigate to various functions within the Staff App. Additionally, a navigation panel is displayed by clicking the ![]() in the header.
in the header.

Update Your Staff Profile using the Staff App
You, as a staff member, logged into the Staff App may update your profile, including adding a photo. Profile modifications will be reflected in the database, under Setup > Chamber/Association Employees/Reps. In addition, those of you who have enabled Member Information Center version 4 will have the option to view/edit personal profile information by clicking the MIC button in the upper right-hand toolbar when logged into the back office software. When adding a profile photo via the Staff App, the photo will be displayed in the MIC and in the Staff App.
Add Your Staff Profile Photo using the Staff App
When adding a profile photo via the Staff App, the photo will be displayed in the MIC and in the Staff App.
- Clicking the
 in the header.
 - Click your name in the left-hand navigation panel.
- If you do not have a profile image, the Would you like to add a profile image? screen will be displayed.
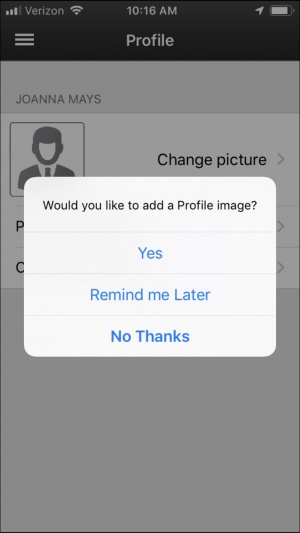
- Click Yes to add your profile image.
- Click Use Camera to take a picture.
- OR, click Choose Existing to choose a photo from the photos on your device.


Change Your Staff Profile Photo using the Staff App
- Click the in the header.
- Click your name in the left-hand navigation panel.
- Click Change Picture.
- Click Use Camera to take a picture.
- OR, click Choose Existing to choose a photo from the photos on your device.


Update Your Staff Profile Information using the Staff App
Using the Staff App, you can update your personal profile information (name, phone number, email,etc.). This information will then be updated in the database, and viewable in Setup > Association Employees/Reps and in the MIC.
- Click the in the header.
- Click your name in the left-hand navigation panel.
- Click Profile Information.
- Make desired changes, and click Save.

Change Your Password using the Staff App
- Click the in the header.
- Click your name in the left-hand navigation panel.
- Click Change Password.
- Enter your Current password.
- Enter your New password.
- Re-enter your new password to Confirm.
- Click Save.

The Community Feed in the Staff App
The Community Feed in the Staff App is a great way to stay in touch with your members while you are on the go, a great way to keep them engaged. The Community Feed is the feed that is available in the Info Hub. You will be able to see hot deals, jobs, comments made by your members and be able to add comments as well. The posts you add using the Staff App will automatically be displayed in the Info Hub as well.
- In the left-hand navigation, click Community Feed.
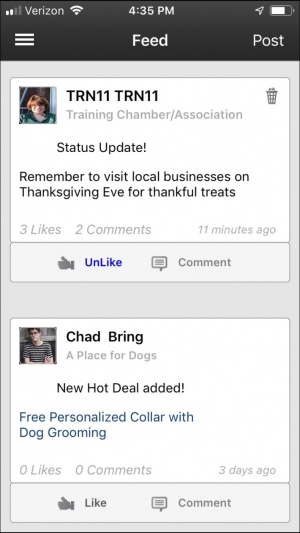
- The Community feed will display the most recent comments first. You and your members have the ability to add posts to the feed, like items, and comment on items.
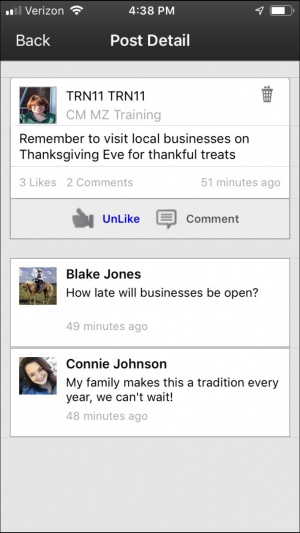
- Click on a post to view further details, comments, and to add comments.
- Click the
 icon to like a post. Click the
  to add a comment to a post.
- Enter comments, and click Post.


Add a Comment to a Post in the Community Feed
- In the left-hand navigation, click Community Feed.
- The Community feed will display the most recent comments first. You and your members have the ability to add posts to the feed, like items, and comment on items.
- Click on a post to view further details.
- Click the to add a comment to a post.
- Enter comments, and click Post.
Like a Post in the Community Feed
- In the left-hand navigation, click Community Feed.
- The Community feed will display the most recent comments first. You and your members have the ability to add posts to the feed, like items, and comment on items.
- Click the icon to like the post.
Add a Post to the Community Feed
- In the left-hand navigation, click Community Feed.
- Click Post.
- Enter desired text for your post.
- (Optional) Click the
 icon to take a picture to add to the post, or select an existing picture from your albums.
 - Click Post.


Delete a Post in the Community Feed
- In the left-hand navigation, click Community Feed.
- Click the
 icon for the post you wish to delete. NOTE: You may only delete posts that you have entered.

Your post is now deleted.
Managing Members with the Staff App
Using the Staff App you an easily manage your contact:
- Search for members, prospects and individuals with a color-coded directory listing
- Sort list by proximity for drop-in visits
- View member profile, web stats and event activity
- Check account balance and recurring fees
- See individual profiles display a picture and show event/group activity
- Tap to call a member*
- View driving directions to a member
- Create, send and track member correspondence via email*
- Sign up members while you’re meeting with them*
- View communication notes
- Enter detailed notes and follow-up reminders*
NOTE: The items marked by an asterisk are available in the Premium Staff App.
Add a Member using the Staff App
|
|
NOTE: Premium Version of the Staff App is required to add members using the Staff App. Click Here to learn how to upgrade to the Premium Version, and start taking advantage of additional features. |
- Click Directory in the left-hand panel. A list of your members will be displayed in alphabetical order.
- Click the + in the header.
- Enter the desired information:
- Organization (Required)
- Contact information
- Address information
- Membership information:
- Type: Click the > to view a list of your membership types to assign this member to.
- Status: Click the > to assign the member to the appropriate status.
- Click Submit.


|
|
NOTE: Alternately, you may select Go to online application. This option is best used when you wish to assign fee items to the membership purchase, as well as gather custom field information, sell additional items, etc. |
View/Search the Member Directory with the Staff App
- Click Directory in the left-hand panel. A list of your members will be displayed in alphabetical order.
- The Directory list is color coded. Active members are displayed in Black, Courtesy members are displayed in Blue , Dropped/Inactive members are displayed in Red , Prospective members are displayed in Green and Non-Members are displayed in Grey .
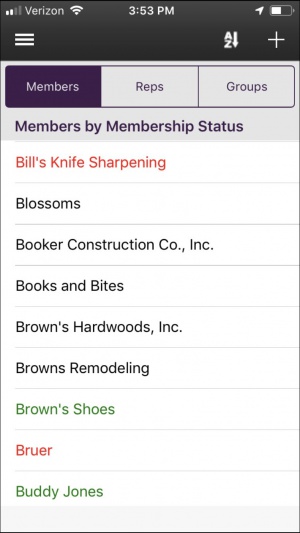
- Type the name of the member into the search box, or simply scroll through the list to find the member.
- OR click the
 icon to apply additional filtering options.
- Click Membership Status Selections if you wish to filter contacts based on status (Active, Prospective, Courtesty, Non-Members, In-Active)
- Click Alphabetical (A-Z) to sort the list of contacts alphabetically. NOTE: Membership Status filters will be applied.
- Click Distance to sort contact based on how close the member is to your current location. Distance is measured from the device location (not your office). The GPS feature in the device must be enabled for the distance to display. NOTE: Membership Status filters will be applied.
- Click Category to filter members to a specific category, then select the desired category. NOTE: Membership Status filters will NOT be applied.
- Click New Members This Month to filter to just those members who joined in the current month. NOTE: Membership Status filters will NOT be applied.
- Click New Members Last Month to filter to just those members who joined in the previous month. NOTE: Membership Status filters will NOT be applied.
- Click New Members YTD to view just those members who joined in the current year. NOTE: Membership Status filters will NOT be applied.
- Click Dropped Members This Month to view just those members who dropped in the current month. NOTE: Membership Status filters will NOT be applied.


NOTE: To clear filter, click the ![]() icon and click Clear.
icon and click Clear.
View Member General Information with the Staff App
- Click Directory in the left-hand panel. A list of your members will be displayed in alphabetical order.
- Type the name of the member into the search box, or simply scroll through the list to find the member.
- Click the name of the member in the list.


The Members page in the staff app consists of the tabs show in the table below
| App Icon | Description |
|---|---|
|
|
General Information - this tab includes the general information displayed in the database on the general tab. It will include address, phone, email information, comments & categories. |
|
|
Information - this tab will display the status, membership type, and renewal month for the member. In addition, it will display any current balance along with total recurring fees. |
|
|
Statistics - this tab will display statistics (web leads, events, web benefits) as displayed on the statistics tab in the back office. |
|
|
Correspondance - this tab will display any emails, or notes that have been logged for this member, as on the communications tab in the back office. This will also display any phone calls you have made to the member from the app. |
|
|
Reps - this tab will display the reps associated to this member. Clicking into the name of a rep will open the reps details page. |
Add/Edit Member General Information with the Staff App
- Click Directory in the left-hand panel. A list of your members will be displayed in alphabetical order.
- Type the name of the member into the search box, or simply scroll through the list to find the member.
- Click the name of the member in the list.
- Click Edit at the top of the screen.
- Click into and edit the field you wish to change.
- Click Save.

Changes made through the Staff App will automatically be reflected in the back office.
Call a Member from the Staff App
|
|
NOTE: Premium Version of the Staff App is required to make calls using the Staff App. Click Here to learn how to upgrade to the Premium Version, and start taking advantage of additional features. |
- Click Directory in the left-hand panel. A list of your members will be displayed in alphabetical order. See View/Search the Member Directory with the Staff App for information on filtering your list of members.
- In the directory list, click the name of the member that you wish to call.
- On the General Information tab, click the phone number that you wish to call.
- Click Call.


NOTE: Your call will be logged on the member's Communication tab, both in the App and in the back-office!

Send an Email to a Member from the Staff App
|
|
NOTE: Premium Version of the Staff App is required to email a member using the Staff App. Click Here to learn how to upgrade to the Premium Version, and start taking advantage of additional features. |
- Click Directory in the left-hand panel. A list of your members will be displayed in alphabetical order. See View/Search the Member Directory with the Staff App for information on filtering your list of members.
- Click the name of the member to whom you wish to send an in the list.
- On the General Information tab, click the member's email address.
- Select one of the following options:
- Email Directly: If this option is selected, the email will not be logged on the members' communication history tab.
- Email via ChamberMaster: If this option is selected, the email will be logged on the member's communication history tab.
- Compose and send your email.


Log a New Note to a Members Communication Tab
|
|
NOTE: The Premium version of the Staff App is required to log new notes using the Staff App. Click Here to learn how to upgrade to the Premium version, and start taking advantage of additional features. |
- Click Directory in the left-hand panel. A list of your members will be displayed in alphabetical order. See View/Search the Member Directory with the Staff App for information on filtering your list of members.
- Click the name of the member in the list.
- Click the
 in the header bar.
- Click New Note.
- Enter the following:
- Contact: If needed click the > to select a different contact. The contacts are displayed alphabetically.
- Task: If needed click the > to select a different tasks. Tasks are communications categories.
- Subject: Enter the subject for this note (required).
- Message: Enter details of the note (required).
- Follow Up Date: If you wish to include a follow-up for this note, click the > and select a follow up date.
- Click Save.


The note is now logged on the members communications tab.
Add a Rep to a Member using the Staff App
- Click Directory in the left-hand panel. A list of your members will be displayed in alphabetical order. See View/Search the Member Directory with the Staff App for information on filtering your list of members.
- Click the name of the member in the list.
- Click the in the header bar.
- Click Add Rep.
- Enter the following information:
- First Name. Required
- Last Name. Required
- Email. Optional
- Title. Optional
- Is Primary. The slider will default to Green, indicating that this representative is the primary for the member. Slide the right to indicate that this rep is not the primary. NOTE: If the new rep is selected as primary, the member's existing primary rep will be changed.
- Click Save.

Get Directions to a Member using the Staff App
- Click Directory in the left-hand panel. A list of your members will be displayed in alphabetical order. See View/Search the Member Directory with the Staff App for information on filtering your list of members.
- Click the name of the member in the list.
- Click the in the header bar.
- Click Get Directions.
- Click Map to view the members location on a map OR
- Click Directions to get directions to the location. NOTE: The App will use whichever mapping application you have installed on your device.

View/Edit Member Photos using the Staff App
- Click Directory in the left-hand panel. A list of your members will be displayed in alphabetical order. See View/Search the Member Directory with the Staff App for information on filtering your list of members.
- Click the name of the member in the list.
- Click the in the header bar.
- Click View/Edit Photos.
- Click the
 icon in the header.
- Select Use Camera to take a new picture. Take the photo and click Use Photo. The photo will be added to the member's profile. You may Retake the photo if needed.
- OR click Choose Existing to select a photo from the albums on your phone.


Managing Representatives with the Staff App
Using the Staff App, you will be able to view representatives associated to your members, update their contact information, call or email them, view the events they are registered for, and the groups that they belong to.
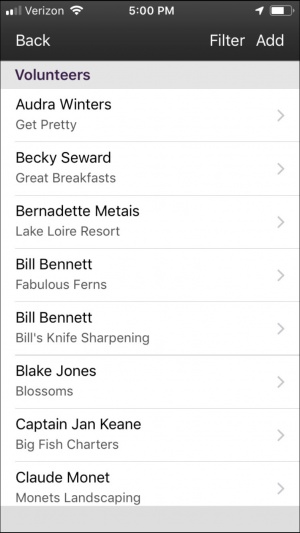
View/Search for Representative in the Member Directory with the Staff App
- Click Directory in the left-hand panel. A list of your members will be displayed in alphabetical order.
- Click the Reps tab. All Active representatives will be displayed in alphabetical order.
- Type the name of the rep in the search box, or scroll through the list to locate the desired representative.
- OR click the
 icon to filter result by Active, Inactive or both.
 - Click the name of the desired representative.

Add Representative Profile Photo with the Staff App
- Click Directory in the left-hand panel. A list of your members will be displayed in alphabetical order.
- Click the Reps tab. All Active representatives will be displayed in alphabetical order.
- Click the name of the rep for whom you wish to add a profile photo.
- Click the
 icon.
icon.
- Choose Use Camera to take a photo, or click Choose Existing to choose a photo from the photos on your phone or ipad.


Call a Rep from the Staff App
|
|
NOTE: Premium Version of the Staff App is required to make calls using the Staff App. Click Here to learn how to upgrade to the Premium Version, and start taking advantage of additional features. |
- Click Directory in the left-hand panel. A list of your members will be displayed in alphabetical order.
- Click the Reps tab.
- Click the name of the rep that you wish to call.
- On the General Information tab, click the phone number that you wish to call.
- Click Call.


NOTE: Your call will be logged on the member's Communication tab, both in the App and in the back-office!

Send an Email to a Rep from the Staff App
|
|
NOTE: The Premium version of the Staff App is required to send emails using the Staff App. Click Here to learn how to upgrade to the Premium version, and start taking advantage of additional features. |
- Click Directory in the left-hand panel. A list of your members will be displayed in alphabetical order.
- Click the Reps tab, and click the desired rep.
- On the General Information tab, click the member's email address.
- Select one of the following options:
- Email Directly: If this option is selected, the email will not be logged on the members' communication history tab.
- Email via ChamberMaster: If this option is selected, the email will be logged on the member's communication history tab.
- Compose and send your email.


View Rep Event Registrations in the Staff App
Using the Staff App, you can view the 30 most current event registrations for a rep. The events listed as the 30 most current registrations are any event registrations that are in the database for the current day forward and then any registrations with dates prior to today’s date until the list displays up to 30 events. This only displays those with a “Registered” status and is not looking at the “actual attendance” field. NOTE: this event list is specifically those that are associated with this particular rep. If an event registration is made using the member record (and the rep name is manually typed in on that registration) then that registration will not appear under the rep. The registration must have been made using the rep record or later associated with that rep.
- Click Directory in the left-hand panel. A list of your members will be displayed in alphabetical order.
- Click the Reps tab, and click the desired rep.
- Click the
 events tab.

View Rep Group Participation in the Staff App
- Click Directory in the left-hand panel. A list of your members will be displayed in alphabetical order.
- Click the Reps tab, and click the desired rep.
- Click the
 groups tab.

NOTE: The list of groups is read only, you are not able to add or remove the rep from a list using the Staff App.
View/Search for Groups in the Member Directory with the Staff App
- Click Directory in the left-hand panel. A list of your members will be displayed in alphabetical order.
- Click the Groups tab.
- In the list of groups, click the > next to the name of the group you wish to view.
- A list of all of the reps associated to the group will be displayed. Click the > next to a rep to view details about that member. The list may be filtered to Show All, Active or In-Active reps by clicking Filter in the header bar.


Add Reps to a Group with the Staff App
- Click Directory in the left-hand panel. A list of your members will be displayed in alphabetical order.
- Click the Groups tab.
- In the list of groups, click the > next to the name of the group to which you wish to add a rep(s).
- Click Add in the header bar. A list of representatives will be displayed.
- Click the name of the representative you wish to add to the group. The rep will be added to the group. To add additional reps, repeat steps 4 - 5 above.

|
|
NOTE: Reps may be added to groups using the Staff App, but they may not be removed.. |
Managing Events with the Staff App
View/Search Events with the Staff App
- Click Events in the left-hand navigation.

A list of all future events will be displayed. You can search for events by typing in the title of the event in the search box (this will only search by title of event). You can also filter the events displayed by clicking the ![]() icon. Choose desired filters:
icon. Choose desired filters:
- Time Frame: Select this option to choose Events This Week or Events This Month.
- Category: Select this option to choose specific event categories.
- Featured: Select this option to filter events to just your Featured Events.
- Members Only: Select this option to filter to members only events.
Click the > to view the details of an event.
|
|
Events are color coded:
These visibility choices are selected on the event in the back office software on the event's General tab in the Placement Options section. |
Add an Event with the Staff App
Quickly post an event on behalf of one of your members using the Staff App. Events added via the Staff App are automatically approved. NOTE: You can then enhance it with additional photos, fees, etc. from the back-office.
- Click Events in the left-hand navigation.
- Click the + in the header.
- Configure the following:
- Add Picture: Click the > to take a photo, or select from the existing photos on your device.
- Event Title
- Start Time/End Time: Enter start and end dates of the event or move the All Day Event slider to the right.
- Visibility: Click Add/Remove to select the calendars on which you wish to display this event.
- Description: Enter a description of the event.
- Click Add.


Register an Attendee with the Staff App
- Click Events in the left-hand navigation.
- Click the desired event.
- Click the
 in the header bar.
- If Registrations fees are associated to the event, you will be sent to the event registration page.
- Complete the registration form and submit.
- OR: If fees are not associated to the event, you will be able to simply choose an existing rep from your database or enter a new attendee.
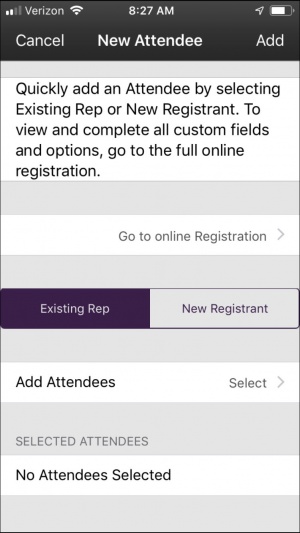
- Select an existing rep by clicking Select > in the Add Attendees row:
- Select the desired rep from the list.
- Click Add in the header bar. The rep is now added to the attendee list.
- OR click New Registrant to enter registrant information and click Add.


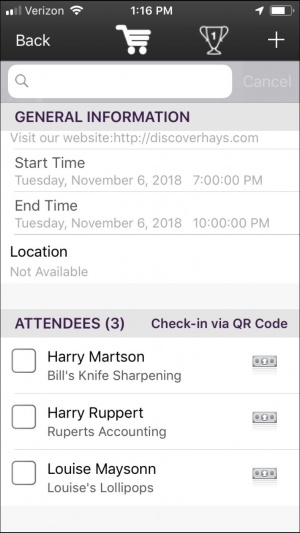
Check-in Event Attendees with the Staff App
Using the Staff App you can easily check-in your attendees manually or by scanning the QR Code included in the event confirmation. See Registration & Billing Preferences for instruction on including a QR Code in the event confirmation email.
|
|
What is the benefit in checking in attendees?
|

Check-in Event Attendees Manually with the Staff App
NOTE: Check-in is available all day on the day of the event. You may, however, accept payment any time prior to the day of the event using the app.
- Click Events in the left-hand navigation.
- Click the desired event.
- In the Attendees section, click the check-box for the registrant(s) you wish to check-in.

The attendee is now checked in, and the update is recorded in the database.
Check-in Event Attendees By Scanning QR Code with the Staff App
If you have included a QR Code in the event registration confirmation, you can easily check-in your attendees by scanning the code. See Registration & Billing Preferences for instruction on including a QR Code in the event confirmation email. NOTE: Check-in is available all day on the day of the event.
- Click Events in the left-hand navigation.
- Click the desired event.
- In the Attendees section click Check-in via QR Code.
- Align the red-line displayed on your phone with the QR Code. The code will automatically be read, and if the attendee exists, the check-in will be successful.


Mark Event Attendees as Paid with the Staff App
The Premium version of the Staff App is required to mark attendees as paid with the Staff App. Click Here to learn how to upgrade to the Premium version, and start taking advantage of additional features.
|
|
NOTE: You must be using GrowthZone Pay as your processor to take payments via the MemberPlus App. |
- Click Events in the left-hand navigation.
- Click the desired event.
- Attendees with unpaid registrations will display the
 icon.
icon.
- Click the
 icon for the attendee you wish to mark as paid.
- Pay with Card: Select this option if you wish to swipe a credit card, or manually enter a card. NOTE: This option will only be displayed if you are using GrowthZone Pay.
- Payment Type: This option is editable only if an invoice has not already been created. Click the > to view payment options. For Example: If you are processing credit cards outside of ChamberMaster, you can select the Credit Card and mark this invoice as paid.
- (Optional) Click on Reference # if you wish to enter a check number, or indicate that the payment was made by cash or third party credit card processing.
- Click the > next to Unpaid
- Click Paid.
- Click Save.


The following will occur dependent on how payment was received:
- Credit Card: A Sales Receipt or invoice/payment is created based on the settings you have established for the event. If you are receiving credit card payment using the Pay with Card option, the Payment Type and Billing Status will automatically be set, and the reference number filled in.
- Cash: A Sales Receipt is created.
- Invoice: If an invoice has already been created, a payment is created and applied. If an invoice has not been created, an invoice and payment will be created.
Draw a Random Winner with the Staff App
From your list of attendees, you can easily draw a random winner using the Staff App.
|
|
NOTE: Premium Version of the Staff App is required to draw random winners using the Staff App. Click Here to learn how to upgrade to the Premium Version, and start taking advantage of additional features. |
- Click Events in the left-hand navigation.
- Click the desired event.
- Click the
 icon in the header bar.


A random winner will be selected from those that you have checked in.

Monitoring and Managing Tasks with the Staff App
With the Staff App, you have the ability to view and approve Hot Deals, view and approve MarketSpace Items, view and approve membership applications, view and approve events submitted by your members, and view your reminders. NOTE: Job Postings and News Releases are not available for viewing/approving in the staff app at this time.
View/Approve Hot Deals with the Staff App
Hot Deals that your members have submitted via the MIC may be viewed and approved (or declined) using the Staff App.
|
|
NOTE: Premium Version of the Staff App is required to approve Hot Deals with the Staff App. Click Here to learn how to upgrade to the Premium Version, and start taking advantage of additional features. |
- In the Tasks section of the Dashboard, Hot Deals will be displayed with a number if there are deals requiring approval.
- Click Hot Deals.
- Click the hot deal you wish to view and approve.
- Click
 to approve the Hot Deal, or click
  to reject the hot deal.


View/Approve MarketSpace Items with the Staff App
MarketSpace Items that your members have submitted via the MIC may be viewed and approved (or declined) using the Staff App.
|
|
NOTE: The Premium Version of the Staff App is required to approve MarketSpace items with the Staff App. Click Here to learn how to upgrade to the Premium Version, and start taking advantage of additional features. |
- In the Tasks section of the Dashboard, MarketSpace Items will be displayed with a number if there are MarketSpace Items requiring approval.
- Click MarketSpace Items.
- Click the MarketSpace Item you wish to view/approve.
- Click to approve the MarketSpace Item, or click to reject the MarketSpace Item.


View/Approve Membership Applications with the Staff App
Membership Applications submitted on-line may be viewed and approved/declined using the Staff App.
- In the Tasks section of the Dashboard, Member Signups will be displayed with a number if there are membership applications requiring approval.
- Click Member Signups.
- Click the applicant name.
- Click to approve the application, or click to decline the application.


|
|
NOTE: Invoices/Receipts will not be created when approving a membership application using the Staff App. You will need to perform this task from the back-office. |
View/Approve Events with the Staff App
Events submitted by your members may be approved using the Staff App.
|
|
NOTE: The Premium version of the Staff App is required to approve events using the Staff App. Click Here to learn how to upgrade to the Premium version, and start taking advantage of additional features. |
- In the Tasks section of the Dashboard, New Events will be displayed with a number if there are events requiring approval.
- Click New Events. A listing of events needing approval will be displayed.
- Click on the name of the event you wish to view/approve.
- Click to approve the event, or click to decline the event.


View Reminders with the Staff App
Reminders will be displayed on the Dashboard, allowing you to keep on top of tasks that you need to perform. NOTE: You can view reminders, however, to complete the reminders you will need to do that from the back office.
- In the Tasks section of the Dashboard, Reminders will be displayed with a number if you currently have reminders.
- Click Reminders to view the list of reminders.
- Click on the name of the desired reminder to view details.


Send eReferrals using the Staff App
eReferrals allow you to provide your members' information to consumers when they ask for it. At the same time you can choose to send that consumer's information to your members giving them a lead. Every eReferral entered via the Staff App is recorded allowing you to show your members the value that you are giving them. Each referral means you are pointing customers to their business.
|
|
NOTE: The Premium version of the Staff App is required to send eReferrals using the Staff App. Click Here to learn how to upgrade to the Premium version, and start taking advantage of additional features. |
- Click Referrals in the left-hand navigation panel.
- Click the
 icon in the To line to select which members you wish to send the referral to. You may select by Member, Rep or Category.
- Select desired recipients, and click Done. NOTE: After making your recipient selection(s), you can click View Recipients to view the list of recipients, and deselect any recipients you do not wish to included.
- Enter the Name of the potential customer.
- Enter the the Email of the potential customer.
- Enter the Phone number of the potential customer.
- Select the Contact Preference. This will default to email. Click the > icon to change contact preference.
- Message: The default message you have configured in your database is displayed. Clicked into the message to add further details about the referral.
- Click Send.


The referral will be sent to the desired recipients, and will be logged on the member's communication tab.
Working with Point of Sale in the Staff App
NOTE: GrowthZone Pay is required for use of the Point of Sale module. To learn more about GrowthZone Pay contact sales@growthzone.com.
The the Staff App Point of Sale module provides a full feature check-out solution. If you wish to sell additional items at your events (raffle tickets, mulligans for golf tournaments, etc.) or you want to easily sell items in the office, this can be accomplished with the Staff App. No longer do you need to tie these items to an event registration or use the back office software to accept credit card payment on-site. Your staff will appreciate the automatic transactions created on the members' account - with no extra effort - it's immediate upon purchase.
Used with the mobile card reader, this new Point of Sale module will provide quick checkout and a smooth, efficient customer experience.
Click here to view a video of how it works.
Using Mobile Readers with the Staff App
| Mobile Reader | Description |
|---|---|
 |
Recommended!!! When your mobile devices have a bluetooth connection, we recommend you purchase the VP3300 BT Model #IDMR-BT93133A. See the product data sheet here.
You may purchase the reader anywhere you prefer. However, distributor, IDScan.net, has given free shipping for USPS ground shipping in the continental US.
|
Mobile Reader Compatibility at a Glance
| Product | Connection | Compatible w/ iOS | Compatible w/ Android | Payment Methods |
|---|---|---|---|---|
| IDTech VP3300 BT | Bluetooth | X | X | Swipe & EMV |
|
|
Important:
|
Pairing the VP3300BT
- Make sure Bluetooth is turned on, on your mobile device. You should see the little Bluetooth symbol at the top of your phone’s screen. If you don’t, go into the settings to enable it.
- IMPORTANT With Android devices, the IDTech VP3300 BT must be paired with their mobile devices when NOT plugged in. It must only be using the bluetooth connection when the pairing occurs. After that, the reader can be plugged into a USB connection if desired (which would be the case if you were charging the device).
- VP3300BT will stay connected to the host indefinitely (via Bluetooth) if powered via the USB cable. If the unit is operating on battery power, it will go to sleep after 20 seconds of idling, to extend battery life. To perform a transaction again, simply press down on the Bluetooth function button to re-establish the Bluetooth connection.
Processing a Card with VP3300BT and IOS Device
Connecting the Device
- Ensure that your Bluetooth is turned on for your IOS Device.
- Turn on the power on the card reader.
- (Optional) You can test connecting your device to the reader by:
- Tap Settings > Card Reader Status in the app.
- Tap VP3300BT when prompted.
- Press the power button on the Bluetooth reader. If successful, the reader will display a green light for 2 seconds and in the App the Card Reader Status will display Connected.
|
|
NOTE: You do NOT need to pair your IOS Device to the Card Reader prior to use. You will connect the reader during the checkout process. |
Processing the Card
|
|
NOTE: The reader must be powered on in order to process cards. A slow blinking blue light will indicate that the reader can be connected to. The device is set to go to sleep after 20 seconds, if connected only via Bluetooth. You simply need to press the start power button on the left side of the device to wake it up when you need to use it. If you wish to keep the device from going to sleep, connect the USB cable to the device after it has been paired. Pairing must happen when disconnected to the USB cable; then you can connect to the USB. The USB cable connects to any device with a USB connection such as a laptop or a USB charging cord. |
- Process your sale in the App per usual.
- Proceed to check-out (this will vary dependent on the type of sale: POS item vs. Event Registration), to reach the “Payment by Card Reader” screen.
- On the Payment by Card Reader screen, if the reader is available, the App will look for it to connect. NOTE: If you do not see Looking for card reader… then, click Check for Reader Now and then choose VP3300BT when prompted.
- If necessary, wake up the card reader by clicking the power button on the left side of the device. The blue light will begin a fast blink when it has connected to your IOS device.
- Click Swipe/Tap Card or Insert Card. NOTE: Tap Card refers to ApplePay / GooglePay. This is a feature that is not yet available. Swipe or Insert are the only choices at this time.
- Swipe or Insert the Credit Card. NOTE: When swiping a card, you will hear a loud beep indicating that the card has been read. When inserting a card, the yellow led light will come on while the card is being read.
- If the card is successfully read the green led light will turn on temporarily (you may not see this light, but an indication that the card was read successfully will be displayed in the App.). Click Submit Payment in the App.
- If the card can’t be read or the transaction fails, the red light will come on. An indication will be displayed in the App.
LED Indicators
| Color | Description |
|---|---|
| Blue |
|
| Yellow |
|
| Red |
|
| Green |
|
Processing a Card with VP3300BT an Android Device
Connecting the device
- Ensure that your Bluetooth is turned on for your Android Device.
- Turn on the power on the card reader.
- Follow Android instructions for pairing the card reader with your Android device. NOTE: You MUST pair prior to processing payments. Once paired, you will see the blue light flashing quickly. Leave the Reader unplugged after pairing and ensure that the blue light is no longer flashing before connecting to the app during checkout.
- Optional: After pairing, you can test connecting your device to the reader by tapping Settings > Card Reader Status in the app. Tap “VP3300BT” when prompted. Then press the power button on the Bluetooth reader. If successful, the reader will display a green light for 2 seconds and in the App the Card Reader Status will display “Connected”.
Processing the Card
|
|
NOTE: The reader must be powered on in order to process cards. A slow blinking blue light will indicate that the reader can be connected to. The device is set to go to sleep after 20 seconds, if connected only via Bluetooth. You simply need to press the start power button on the left side of the device to wake it up when you need to use it. If you wish to keep the device from going to sleep, connect the USB cable to the device after it has been paired. Pairing must happen when disconnected to the USB cable; then you can connect to the USB. The USB cable connects to any device with a USB connection such as a laptop or a USB charging cord. |
- Complete your sale in the App as per usual.
- Proceed to check-out (this will vary dependent on the type of sale: POS item vs. Event Registration), to reach the “Payment by Card Reader” screen.
- Once you reach the Payment by Reader screen, power up the reader by clicking the button on the left-hand side. The blue LED will display a fast blink when connected.
- Once connected, the App will display options to swipe, insert or manually enter card. Click the option you will use. NOTE: “Tap Card” refers to ApplePay / GooglePay a feature that is not yet available. Swipe or Insert are the only choices at this time.
- If the card is read successfully, confirmation will be displayed in the App. Click Submit Payment Now.
- If the card can’t be read or the transaction fails, the red light will come on. An indication will be displayed in the App.
LED Indicators
| Color | Description |
|---|---|
| Blue |
|
| Yellow |
|
| Red |
|
| Green |
|
Do you have any tips on making sure my blue tooth mobile device and the VP3300BT are able to pair with each other?
- Make sure the two devices are in close enough proximity to one another. While you wouldn’t think someone might try to pair an iPad with a keyboard if the two weren’t sitting right next to each other, it’s probably worth noting that you should make sure any devices you're trying to pair are within five feet of one other.
- Power the devices off and back on. A soft reset sometimes can resolve an issue. With phones, an easy way to do this is by going into and out of airplane mode.
- Remove old Bluetooth connections. If you're having trouble pairing your phone with the reader, it could be because the you phone is trying to connect to an old device. Some older devices are very simple. They just try to connect with the last thing they paired with. If a Bluetooth device was previously paired with something else, turn off that other gadget. And if you are no longer planning on using that other gadget, unpair it from your Bluetooth device to prevent future issues. In iOS settings, you can remove a device by tapping on its name and then Forget this Device. In Android settings, tap on a device’s name, then Unpair. After removing a device, start at step 1 above. You can also reset Bluetooth on devices that can pair to more than one device. This clears all pairings from the device so you can start fresh. Search "reset" device name to instructions from the manufacturer.
- Charge up both devices you're trying to pair. Some devices have smart power management that may turn off Bluetooth if the battery level is too low.
- Delete a device from a phone and rediscover it. If your phone sees a device but isn’t receiving data from it, sometimes it helps to start from scratch. In iOS settings, you can remove a device by tapping on its name and then Forget this Device. In Android settings, tap on a device’s name, then Unpair. After removing a device, start at step 1 above.
- Move away from the Wi-Fi router. Another potential obstacle to successful pairing is interference from devices that use the same spectrum, such as your Wi-Fi router. Wi-Fi has been designed to cope with this, but it might not be a good idea to have your devices directly on top of the router.
- Move away from a USB 3.0 port. Interference from USB 3.0 is also possible. Newer laptops, for example, often have the higher-speed USB 3.0 port, so if the connection isn't happening, try pairing your Bluetooth gadgets away from the computer.
- Make sure the devices you want to pair are designed to connect with each other. Whether it’s a headset, speaker, mouse, keyboard, camera or something else, your device has a specific profile that spells out what it can connect with. If you’re not sure, check the user manual.
- Update the hardware’s firmware. If you’re not sure how to get the latest firmware for your hardware, check with the device manufacturer.
- Limit data shared between devices. Android and Windows devices let you choose the information you share between devices. So, for instance, you can choose to share phone audio, media audio, contacts and text messages with your car. If you don't need to share all of the data, deselecting one or more of the types of information may enable the devices to pair. For Android devices, go to Settings > Bluetooth and select the device. If there are options to select, they will appear. For Windows, go to Control Panel > Hardware and Sound > Devices and Printers and right click on the Bluetooth device in question. Then select the Services tab to choose which types of information to share.
- Clear the Bluetooth cache (Android only). Sometimes apps will interfere with Bluetooth operation and clearing the cache can solve the problem. Go Settings > Backup and restart > Reset network settings.
VP3300BT FAQ's
- Does it matter what mobile device I use as along as the device supports bluetooth? You can use any device that supports bluetooth. The VP3300 works with all blue tooth devices including the BLE (BlueTooth Low Energy).
Point of Sale - Initial Setup
The only setup required for using the Point of Sale module is configuration of Fee Items of type Point of Sale. Once fee items are created they will automatically be available in the Staff App for sale. See Working with Fee Items for instruction on setting up your Point of Sales Fee Items.
Selling Point of Sale Items with the Staff App
- Click Point of Sale in the left-hand navigation of the staff app.
- Click the name of the item(s) you wish to sell.
- Enter the Quantity if needed.
- Click Add.
- Click additional items OR click Continue to check out.
- Click the Existing Member tab or the Existing Rep' tab and select the appropriate member or rep. A list of your members or reps will be displayed. Choose the appropriate member/rep, and click Continue.
- OR click Continue to checkout as a guest.
- Swipe the credit card (if using the Mobile Reader) OR click Manual Entry and enter credit card details. An appropriate invoice & payment or sales receipt will be created on the member or guest account. The transaction created (invoice/payment or sales receipt) is determined by the setting under Setup->Billing Options and Settings in the Credit Card section.


|
|
NOTE: You can also access the Point of Sales functions from an event, by clicking the |
Staff Apps FAQs
MemberPlus: An App for Your Members
A free mobile app is available to all members of associations that use ChamberMaster or GrowthZone software. By providing your members with a Chamber mobile app, your Chamber is offering so much more than easy, direct access to your Chamber office.
Mobile apps, downloadable on any Apple or Android mobile phone or tablet, create a brand new multimedia channel for retaining and engaging your members, especially those who already are active mobile users.
While people of all ages use mobile apps, a mobile member app will often appeal to younger members. However, even older members appreciate the ease of using a mobile app on their smartphones or tablets.
There’s no additional cost to your association or your members. The MemberPlus app is available in both the iTunes and Google Play stores. It’s designed for your members, much like the ChamberMaster/GrowthZone Staff app was designed for you to use. Essentially we wanted to create an easier way for your members to update their personal and company information, register for events, interact with other members, access the Resource center (where you can upload documents and links for all or groups of members), etc…
Encourage your members to use the MemberPlus App. Download this flyer and share with your members.
Download the App
- Download from the iTunes store here - MembersPlus iOS version. NOTE: Requires iOS 10 or later.
- Download from the Google Play store here - MemberPlus Android version
- View a video presentation about our App Suite
MemberPlus Features
The top five essential features of a mobile member app are:
- Push notifications from your Association/Chamber to members
- The ability for members to update their own profiles, contact information
- The opportunity to connect with other members
- The ability to register, pay, and check-in for events and other Association/Chamber activities
- Easy access to post and view jobs, hot deals, and member-to-member specials
Tips for Rolling out the MemberPlus App
As you roll it out to members, we suggest adding the direct links to the MemberPlus app download pages in the iTunes app store and Google Play store.
It does require that the member have a rep login to access it so you might want to send out an email with their rep logins merged in – just in case they forgot it. Which is exactly why this is so cool, once they download it, they can click the “remember me” option and it’s so much easier to use than going out to a website and trying to remember logins.
Have your staff and board members download it right away and make some posts in the social feed so as soon as members log in, they already see activity and can “like” or add posts of their own. Perhaps have your staff post a question so that members have something to respond to easily. Sometimes it just takes an easy example to get them started. There’s an icon in the upper right corner of your database called “MIC”. You can click on that to login with staff level access. You’ll be able to add posts and as staff, there’s a delete post option icon next to each post, should you ever need to remove a post that was made in error.
Logging in to the MemberPlus App
See Logging in to the MemberPlus App in the ChamberMaster/MemberZone Knowledge Base
When your members first access the MemberPlus App, the screen will display the home page, including various shortcuts. By clicking the icons displayed, you can access those functions. For example, click Events to access the events pages.

By clicking the ![]() in the header, the left hand navigation panel is displayed. From this panel, members can access:
in the header, the left hand navigation panel is displayed. From this panel, members can access:
- Home: Click this link to return to the main home screen described above.
- Business Directory: Displays the directory, and allows members to search the directory.
- Events Calendar: Displays a list of all upcoming events, and allows members to view details of the events as well as register for events.
- Hot Deals: Displays a list of current hot deals, and allows members to add hot deals.
- Member to Member Deals: Displays a list of member to member deals, and allows members to add hot deals.
- Job Search: Displays a list of current job postings.
- News: Displays a list of current news releases.
- Resources: Allows the member to access the MIC Resources.
- Member Info Center: Logs the member into the MIC.
- App Info: Displays your organization, app version, etc.
- Logout Allows you to log-out of the app.
Common MemberPlus App Functions
Place a Phone Call using the MemberPlus App
Where Phone is displayed in the app (i.e. Members, Reps, Job Postings, etc.), clicking on Phone will allow you to place a phone call.

Email using the MemberPlus App
Where Email is displayed in the app (i.e. Members, Reps, Job Postings, etc.), clicking on Email will allow you to send an email.

Get Map/Directions using the MemberPlus App
Where Maps & Directions is displayed in the app (i.e. Members), clicking on Map & Direction will allow you to view a map of the location and/or get directions to the location.

Update Member Profile via the MemberPlus App
Your members can easily update their photo, profile information, and group participation using the MIC.
Update Member Profile Picture via the MemberPlus App
- Click the in the header, to display the navigation panel.
- Click your name. NOTE: If you have not already included a picture, when you access this page, you will be asked if you would like to add a profile picture. You may do so by following the steps below.
- Click Change picture.
- Select Use Camera to take a picture, or Choose Existing to choose a photo from the photos on your device.

The new photo will be displayed in the App, as well as in the MIC.
Update Member Profile Information via the MemberPlus App
Using the MemberPlus App your members can easily update their contact and address information.
- Click the in the header, to display the navigation panel.
- Click your name.
- Click Profile Information.
- Make changes by clicking into the desired areas.
- Click the
 icon to save changes.

Change Password via the MemberPlus App
- Click the in the header, to display the navigation panel.
- Click your name.
- Click Change Password.
- Enter your Current password.
- Enter your New password.
- Re-enter the new password, to Confirm.
- Click the icon to save changes.

Manage Group Participation via the MemberPlus App
Members will be able to remove themselves from groups using the MemberPlus App. Additionally, groups that have been configured as Allow members to join/leave this group within the Member Information Center will be available to your members to join.
- Click the in the header, to display the navigation panel.
- Click your name.
- Click Groups.
- Click the check-boxes to either join a group, or leave a group.
- Click the icon to save changes.

The Member Directory in the MemberPlus App
With the MemberPlus App, your members will be able to search the member directory, as well a search for reps, and groups. From the directory, members will be able to connect by getting directions, sending emails and making phone calls directly from the App.
View the Directory in the MemberPlus App
- Click the in the header, to display the navigation panel.
- Click Business Directory.

You can search for members by typing the name of the member in the search box, additionally, you can click the ![]() icon in the header bar to filter by member name, member distance (calculated from your current location), or category.
icon in the header bar to filter by member name, member distance (calculated from your current location), or category.

View Member Details the MemberPlus App
- Click the in the header, to display the navigation panel.
- Click Business Directory.
- Click the desired member.

From the member's directory listing, you can call the member, email the member, get directions, etc. See Common MemberApp Plus Functions for details.
View Representatives in the MemberPlus App
|
|
NOTE: Only representatives where Display Preferences for the Member Information Center (MIC) have been enabled will be displayed in the MemberPlus App. See Set Display Preferences for a Rep for details. |
- Click the in the header, to display the navigation panel.
- Click Business Directory.
- Click the Reps tab.
- Click on the name of the desired rep.

From the representative information, you can call and/or email the representative (Only the options that are enabled under the reps Display Preferences will be available) and see further details of a reps business. See Common MemberApp Plus Functions for details.
View Favorites in the MemberPlus App
|
|
NOTE: Representatives marked as favorites will be displayed on the favorites tab. See Mark a Representative as a Favorite in the MemberPlus App. |
- Click the in the header, to display the navigation panel.
- Click Business Directory.
- Click the Favorites tab.

Click a Rep name to see further information.
The Community Feed in the MemberPlus App
The Community Feed in the MemberPlus App displays the feed included in the Member Information Center. From the feed, your members will be able to view posts, comment & like posts, as well as add new posts.
View the Community Feed in the MemberPlus App
- Click the in the header, to display the navigation panel.
- Click Community Feed.


The Community Feed will display posts with the newest first. The name, and profile image (if available) of the person who added the post will be displayed. Posts may be "liked" by clicking the ![]() icon. Additionally, members may add comments to a post by clicking the
icon. Additionally, members may add comments to a post by clicking the ![]() icon.
icon.
Add a Post to the Community Feed in the MemberPlus App
- Click the in the header, to display the navigation panel.
- Click Community Feed.
- Click Post in the header.
- Enter your text, and/or click the
 icon to take a picture (or choose a picture from your device) to add to the post.
 - Click Post in the header bar.

Delete a Post in MemberPlus App Community Feed
Members may delete the posts that they have added to the feed.
- Click the in the header, to display the navigation panel.
- Click Community Feed.
- Click the
 icon for the post you wish to delete. NOTE: You may only delete posts that you have entered.

Your post is now deleted.
Working with Events in the MemberPlus App
With the MemberPlus App, your members can view and register for upcoming events, as well as add events if they have permissions to do so.
View the Events Calendar in the MemberPlus App
|
|
NOTE: Only events where visibility is set to Display on Member Information Center Calendar will be listed in the MemberPlus App. See Placement Options for further information. |
- Click the in the header, to display the navigation panel.
- Click Events Calendar.

A list of future events will be displayed. You can search the events by entering the title of the event in the search box. This search option only searches by title (not description).
View Event Details in the MemberPlus App
- Click the in the header, to display the navigation panel.
- Click Events Calendar.
- Click the desired event in the list, to view details.

Register for an Event in the MemberPlus App
|
|
NOTE: Registration via the MemberPlus App will only be available if the event is configured for Allow members to register online for this event. |
- Click the in the header, to display the navigation panel.
- Click Events Calendar.
- Click the desired event in the list, to view details.
- Scroll to the Registration section.
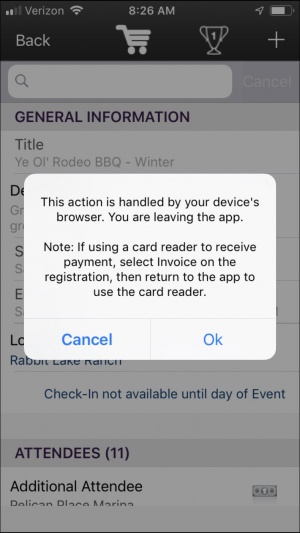
- Click Register.

By clicking register, the device's browser will be opened to display the event registration page. Complete the registration page, as you would if accessed on-line via your web-site or the MIC.
Add an Event via the MemberPlus App
|
|
NOTE: The member must have Read/Write access to Events in the MIC in order to add events using the MemberPlus App. Events submitted via the MemberPlus App require staff approval. |
- Click the in the header, to display the navigation panel.
- Click Events Calendar.
- Click the
 icon in the header.
 - Enter the details of the event as desired.
- Click Save. You can approve (or decline) this event through the back-office.
- Click OK. The event has now been submitted for approval, and your staff will be able to view details, approve or decline.

Working with Hot Deals in the MemberPlus App
With the MemberPlus App, your members can view Hot Deals, as well as add Hot Deals if they have permission to do so.
View Hot Deals in the MemberPlus App
- Click the in the header, to display the navigation panel (alternately, you can click the hot deals icon in the Shortcuts section of the home screen).
- Click Hot Deals.
- A list of all current Hot Deals is displayed. Click on a Hot Deal to see further details.
For the member offering the Hot Deal, you can click on Phone to call the member; click into Email to send the member an email; and click on About This Business to view the member's directory listing.
Add Hot Deals via the MemberPlus App
|
|
NOTE: The member must have Read/Write access to Hot Deals in the MIC in order to add using the MemberPlus App. Hot Deals submitted via the MemberPlus App require staff approval. See Setup Member Log-in Permissions for further information. |
- Click the in the header, to display the navigation panel.
- Click the
 icon in the header.
 - Enter the details of the Hot Deal.
- Click Save.
- Click OK. The Hot Deal has been submitted for approval.
Working with Member to Member Deals in the MemberPlus App
With the MemberPlus App, your members can view Member to Member Deals, as well as add Member to Member Deals if they have permission to do so.
View Member to Member Deal via the MemberPlus App
- Click the in the header, to display the navigation panel.
- Click Member to Member Deals.
- A list of all current Member to Member Deals will be displayed. Click on a deal to see further details.
You may place a call, send an email and see further information about the business. See Common MemberPlus App Functions for further information.
Add Member to Member Deal via the MemberPlus App
|
|
NOTE: The member must have Read/Write access to Member to Member Deals in the MIC in order to add using the MemberPlus App. See Setup Member Log-in Permissions for further information. |
- Click the in the header, to display the navigation panel.
- Click Member to Member Deals.
- Click the icon in the header.
- Enter details for the Member to Member Deal.
- Click Save.
- Click OK. The Member to Member Deal has now been submitted for approval.
View Job Postings in the MemberPlus App
With the MemberPlus App, your members can view Job Postings in the MemberPlus App. Additionally, members can contact the company that posted a job by either sending an email or making a phone call. NOTE: At this time, Job Postings may not be added using the MemberPlus App.
- Click the in the header, to display the navigation panel.
- Click Job Search.
- A list of all current Job Postings will be displayed. Click on a Job Posting to view further details.
For the member offering the job, you can click into Phone > to call the member; click into Email > to send an email; and click into the member's name to view the business directory listing. See Common MemberPlus App Functions for further information.
View Resources via the MemberPlus App
Using the MemberPlus App, Reps can easily access resources that have been uploaded to the Member Information Center.
- Click the in the header, to display the navigation panel.
- Click Resources.
- Resources are available in the MIC, and you must leave the MemberPlus App to access. Click OK.
Your device will open the MIC on the resources page. From here you can view and download available resources.
Access the MIC via the MemberPlus App
Using the MemberPlus App, Reps can easily access the Member Information Center.
- Click the in the header, to display the navigation panel.
- Click Member Info Center.
- To access the MIC, you must leave the MemberPlus App to access. Click OK.
Your device will open the MIC.