Reports and Downloads
Contents
- 1 Overview
- 2 Common Membership Calculations
- 3 Member Reports
- 4 Representative Permissions Report
- 5 Member Engagement (Most Active)
- 6 Member Engagement (At Risk)
- 7 Member Listing by Join Date
- 8 Membership Drop Analysis Report
- 9 Member Directory Report
- 10 Historical Membership Comparison
- 11 Member Directory Listing with Logos
- 12 Printable Membership Directories
- 13 Directory Category & Attribute Assignments Report
- 14 Member Benefit Batch Print or Email (Edited)
- 15 Quarantined Invalid Email Address
- 16 Communications Reports
- 16.1 Member Contact Report
- 16.2 Email Status Summary
- 16.3 Member Contact Benchmark
- 16.4 Prospects and Communication by Rep: Detail
- 16.5 Prospects and Communication by Rep; Summary
- 16.6 Prospect Conversion by Date
- 16.7 Event Reports
- 16.8 Billing/Financial Reports
- 16.9 Receivables Reports
- 16.10 Sales Reports
- 16.11 Advanced Custom Report Builder
- 17 Organizational Dashboard
Overview
Numerous pre-defined reports are ready-to-go. Click Reports in the left-hand menu. Type a keyword to describe what you need and all possible matching reports will list. Or access your reports by category if you prefer.

- Run member engagement reports
- Create a group from custom criteria
- Create custom report layouts
- Downloading ChamberMaster data
- Mail Merge with Microsoft Word
Common Membership Calculations
Does the thought of having to calculate retention, churn, or the cost of acquiring a new member make your head hurt? For many association pros, crunching numbers is (unfortunately) a part of their daily grind. You don’t have to be a math person to use these 7 common calculations to determine everything from renewal rates to average length of membership.
Retention Rate
Retention Rate is the percentage of members retained over a given period of time. This metric can be calculated if you know how many members you had at the beginning of a period, and many you had at the end of a period.
| CALCULATION: (End Count - New Members) ÷ Start Count = Retention Rate |
Start Count and End Count can be found by using the Active members report Dashboard > Membership Tab > Active Members > View Detailed Report. Generate the report for the desired date range. NOTE: This report is only updated on Mondays, so it will not do an exact month/year.
- Click Dashboard in the left-hand navigation panel.
- Click the Membership tab.
- In the Active Members section, click view detailed report
- Set the Date From and Through to the desired date range. NOTE: This report is only updated on Mondays, so it will not do an exact month/year.
- Click Refresh Listing. The start counts and end counts will be displayed on the left of the graph.


New Members can be found by going to Dashboard > Membership tab > New Members > View Detailed Report.
- Click Dashboard in the left-hand navigation panel.
- Click the Membership tab.
- In the New Member section, click view detailed report.
- In the Join Date From and To fields, use the same date range used to find the Start Count and End Count described above.
- Click View Report.


(1208 - 201) ÷ 1173 = .85 85% Retention Rate
Lapse Rate (Churn)
The Lapse Rate (Churn) is the percentage of members that discontinue their membership over a given period of time.
| CALCULATION: Dropped Members ÷ Start Count = Lapse Rate |
Dropped members can be found by going to Dashboard > Membership tab > Dropped members:
- Click Dashboard in the left-hand navigation panel.
- Click the Membership tab.
- In the Dropped Members section, click view detailed report.
- Enter the Drop Date From and To for the desired date range. NOTE: You will use a Start Count as described above for the calculation, so the date range should be the same used to determine the start count.
- Click View Report.


Start Count is calculated as described in the Retention Rate calculation, described above.

(185 ÷ 1173) = .15 15% Lapse Rate
Renewal Rate
Renewal Rate is the percentage of members that renew their membership over a given time period.
| CALCULATION: # of Renewals ÷ Eligible Members = Renewal Rate |
Your # of Renewals can be found using the Receipts by Member Report:
- Click Billing in the left-hand navigation panel.
- Click the Reports tab.
- In the Sales section, click Payment/Receipts by Member.
- Select Dues in the Fee Item Type drop-down.
- In the Payment Date Between and And fields, filter for payments made in the desired date range (example 1-1-2017 – 12-31-2017)
- Enable Member Join Date Before and enter the first date in your desired date range (1-1-2017).
- Click View Report.
- Click the excel link to export the report, to easily count the # of Renewals. Members that paid Member Dues during the specified date range and that were members previous to the Member Join Date Before date are considered a Renewal.


Eligible Members can be found by using the Sales by Member report:
- Click Billing in the left-hand navigation panel.
- Click the Reports tab.
- In the Sales section, click Sales by Member.
- Set the Sale Date From and To for the desired date range (example 1-1-2017 – 12-31-2017)
- Set the Member Join Date from your earliest Member Join Date (example: 1-1-1990). NOTE: You can use the Custom Member report to find your earliest join date.
- Set the Through date to the day just prior to the specified date range (12-31-2016).
- Set the Item Type to Member Fees/Dues.
- Click Refresh Report.
- Download the report results to Excel, to count the members that were invoiced this will be the Eligible Members.


Example:
- # Renewals = 273
- # Eligible Members = 326
- Calculation: # of Renewals ÷ Eligible Members.
- 273 ÷ 326 = .83 83% Renewal Rate
Average Membership Tenure (AMT)
Average Membership Tenure is the average length of time a member stays with the organization. This can be useful in projecting expected membership tenure for new members
| CALCULATION: 1 ÷ Lapse Rate = AMT |
Lapse Rate is calculated as shown in Lapse Rate (Churn), shown above.
1 ÷ .15 = 6.66
Average Membership Tenure in Years is 6.66 years.
Member Lifetime Value (MLV)
Member Lifetime Value (MLV) is the measure of monetary value of member based on projected length of membership.
| Calculation: Net member-paid revenue ÷ # of members x AMT = MLV |
To get Net member-paid revenue you need to total all dues and non-dues revenue generated by your members. To find this, use the Payment / Receipts by Member report and filter to Active Member Status for the specific date range and do not filter out any items (include all dues and non-dues).
- Click Billing in the left-hand navigation panel.
- Click the Reports tab.
- In the Sales section, click Payment/Receipts by Member.
- Select Any in the Fee Item Type drop-down.
- Enter the desired date range in the Payment Date Between/And text boxes.
- Select Active from the Member Status drop-down.
- Click View Report.

The Grand Total displayed on the final page of the report is the member paid revenue. To get the Net-member paid revenue, you need to subtract your operating costs from the Grand Total total. You can get your operating costs from your accountant. NOTE: It's critical to subtract operating costs from revenue to establish net member-generated revenue when calculating MLV.
The End Count can be obtained from the Retention Rate calculation, described above.
AMT can be obtained from the Average Membership Tenure (AMT), described above.
Example:
- In 2017, there were 3,000 total members who collectively invested $550,000 in dues and contributed $325,000 in non-dues revenue. The operating costs were $650,000 and the organization’s AMT (average membership tenure) was 17 years.
- $550,000 + $325,000 = $875,000 (dues revenue plus member-generated nondues revenue)
- $875,000 – $650,000 = $225,000 (total member-generated revenue minus total operating costs)
- $225,000 ÷ 3,000 = $75 (net member-generated revenue divided by number of members)
- $75 x 17 = $1,275 (average member contributed revenue x AMT)
- MEMBER LIFETIME VALUE = $1,275
Member Acquisition Cost (MAC)
Member Acquisition Cost (MAC) is the total monetary cost associated with recruiting a new member. To effectively maintain and/or grow an organization, it is necessary to assign an average monetary value to potential membership sales.
| Total recruitment cost ÷ # of new members = MAC |
- Calculate the # of new members as described in Retention Rate above.
- The Total Recruitment cost would be available from your accountant.
Example:
- At the end of 2017, 75 new members had joined and $28,875 was spent on new member recruitment.
- $28875 ÷ 75 = $385
- MEMBER ACQUISITION COST = $385
MLV to MAC ratio
The MLV to MAC ratio is the measurement of the relationship between the lifetime value of a member and the cost of acquiring that member. Best Practice: Aim for 3:1 as the target ratio.
| CALCULATION: MLV : MAC |
Calculate your Member Lifetime Value (MLV) and Member Acquisition Cost (MAC) as described above.
- Example: In 2017, the average lifetime value per member was $1,275. $32,000 was budgeted for member recruitment and $28,875 was spent. Breaking down those numbers further means the budgeted recruitment cost was $425/ new member and the actual recruitment spend was $385/ new member.
- Goal ratio = 3 : 1 ($1,275 : $425)
- Actual ratio = 3.3 : 1 ($1,275 : $385)
Member Reports
Custom Member Report
The Custom Member Report allows you to customize the report to get specific information about your members. For example, you can use the customer member report to generate a report of membership renewals for a specific month.
- Click Reports on the left-hand menu.
- Click Custom Member Report and then click the green arrow.
- Click the category where the desired field is located in the list of Available Fields.
- Click the check box in front of the desired field.
- Continue selecting fields until all desired report fields are listed in the Selected Fields box.
- Make any desired changes to the order of the fields or the sort choices.
- Click Continue.
- Complete the Filters, Additional Options, and Save Report sections as desired.
- At least one filter option must be selected or else no records will be displayed
- Groups are defined by clicking Add a New Group in the Groups menu.
- Using the Save Current Report As: selection retains the field selections, sort order, filters, criteria and format options. However, the data in the report will be pulled fresh from the database every time the report is accessed.
- If you desire to save a report and also “save” the data at a point in time, you must print the report, copy and paste the resulting report to another file or click Download Report.
- Click View/Print Report.
- The records matching the selected criteria will display. To print, click Print from the File menu. After selecting the desired local printer, click Print.
- Optional: Click Create Group to create a group from the members that are displayed on this report.


Create a Group based on Custom Member Report results
You can create a group from the results of your Custom Member Report. This unique, custom group can be used throughout the software as recipients of email, event invitations, or as a record of those meeting your specific criteria at that point in time.
- Click Reports in the left-hand menu.
- Click Custom Member Report.
- Select the desired fields and any other desired selections on the Member Listing screen. Click Here for further information on configuring the Custom Member Report.
- Click Continue.
- Select the desired filters and custom criteria.
- Click View/Print Report.
- Verify the displayed contacts are those that should be included in the group.
- Click Create Group.
- Type the New Group Name.
- Select the Members reps to include: in the group. You may include just the primary reps, billing reps, and so on.
- Click Submit. The Groups module will be displayed.

Make any desired changes on the group General tab. You may also select to contact these members immediately by clicking Contact Members. Click Here for further information on managing groups.
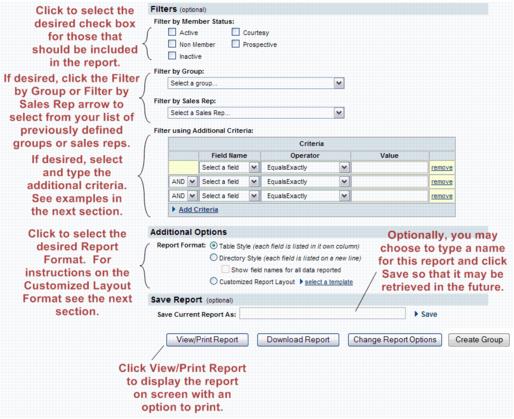
Custom Representative Report
The Custom Representative Report allows you to customize the report to get specific information about your representatives. For example, you can use the customer representative report to generate a report of representatives who do not have login credentials to the MIC.
- Click Reports in the left-hand navigation panel.
- Enter Custom in the Report Finder text box.
- Click Search.
- Click the green arrow icon
 adjacent to Custom Representative Report.
 - Expand the Available Fields: links to view fields available to include in your report. For Example: If you wish to include the rep's first and last name, click the Rep Personal Information link.
- Click the check-box(es) for the fields you wish to include in the report. They will be displayed in the Selected Fields: box.
- (Optional) Select a Primary Sort: from the drop-down list. This allows you to configure how the output of the report will display. For Example: If you wish to sort report output by last name. If no selection is made the report will be sorted by the first item in the Selected Fields.
- (Optional) Select a Secondary Sort: option form the drop-down list. Use this option if you have selected a Primary Sort and then wish to sort by a secondary option.
- Click Continue.
- Select any additional filters that you would like to (Optional):
- Filter by Reps Status: Select the desired status(es) of the reps to include in your report.
- Filter by Representative Type: Select the desired representative type(s). For Example: If you wish to only include billing reps in your report, click the Billing Reps check-box.
- Filter by Member Status: Select the desired member status(es). For Example: If you wish to only include prospects in your report, click the Prospects check-box.
- Filter by Membership Type: Select the desired membership type(s) to limit the report output to just those types.
- Filter by Group: Select a group, if you wish to filter the results to just a specific group.
- Filter by Sales Rep: Select a sales rep, if you wish to filter the results to a specific sales rep.
- Filter using Additional Criteria: This option allows you to filter based on additional criteria. For Example: if you wish to view all reps that do not have an email address, set your filters as shown below.
- Select desired report format:
- Table Style: Select this option to display each field in the report in a separate column, as shown below.
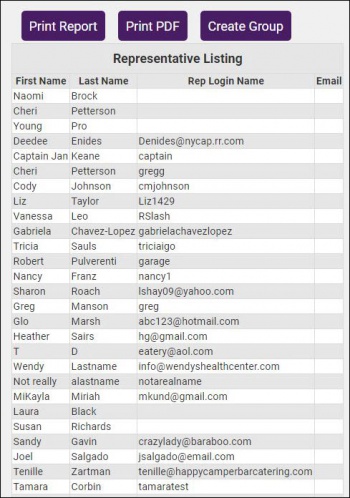
- Directory Style: Select this option to display each field in the report on a new line. Click Show field names for all data reported if you wish to include the names of the fields in your report. As shown below.
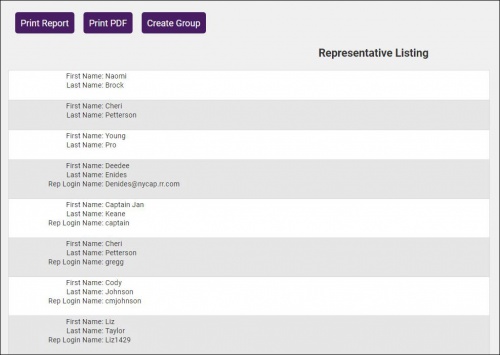
- Click View/Print Report.


Save Custom Representative Report as New Report
Create a Group based on Custom Representative Report results
You can create a group from the results of your Custom Representative Report. This unique, custom group can be used throughout the software as recipients of email, event invitations, or as a record of those meeting your specific criteria at that point in time.
- Create your report as described in Custom Representative Report
- Click View/Print Report.
- Verify the displayed contacts are those that should be included in the group.
- Click Create Group.
- Type the New Group Name in the text box.
- Click Submit. The group has now been created, and you can update/edit it within the Groups module.


Retention Reporting
Membership Growth Report
By reviewing the Membership Growth report, you will be able to see if your growth is trending up, down or remaining flat. Comparison to previous term will also provide insight into your current growth trends. The report can be run on monthly, quarterly, quarterly terms. This allows you to compare one time frame to another in terms of growth or decline rate.
- Click Reports in the left-hand navigation panel.
- Enter Growth in the Search by Keyword text-box and click Search.
- Click next to Membership Growth Report.
- Select the desired Term from the drop-down, or enter specific Dates From/Through.
- Click Refresh Report.


Active Members Report
The Active Members report provides a listing of active members over a specified date range. This report can also be used to view prospects, dropped/inactive, courtesy and non-members.
|
|
NOTE: Calculations for the report are done each Monday morning. |
- Click Dashboard in the left-hand navigation panel.
- Click the Membership tab. On this tab you will see a chart of your active members over time.
- Click the view detailed report link.
- Enter the desired date range in Date From/Through.
- Select the desired View. Select Summary to see grand totals only, or select Detail to view totals for each week and all statuses in the selected date range.
- Select the statuses you wish to include in your results.
- Click Refresh Listing.


Member Listing by Join Date
The Member Listing by Join Date report provides statistics about members who have joined over a selected date range.
- Click Dashboard in the left-hand navigation panel.
- Click the Membership tab. The New Members chart displays all members, regardless of their current membership status, based on their Join Date.
- Click the view detailed report link.
- Select desired filters:
- Sales Rep: (Optional) Select a sales rep to view joins generated by an individual Sales Rep or select Do not filter by Sales Rep to view all joins.
- Join Date from/to: This is required and allows you to filter joins to a specific date range.
- Display Options: Select how you would like the report to be displayed.
- Include Active Members Only?: If you wish the report to display only those members that are currently active, select Yes. If you wish to see results for members who joined, but are currently no longer active, select No. For example, a member may have joined in thee date range selected, but subsequently dropped.
- Show Totals: Select this option if you wish to see the total fees associated to the members in the report. This will display a the total amount of fees set on the members' Recurring Fee Schedule.
- Include One-Time Fees: Select this option if you would like one-time fees, included in the members' Recurring Fee Schedule to be included in the total fees.
- Use Fee Active and Exp. Dates in Criteria:
- Include Web Tab Description: Select Yes if you wish to include web description information in your report.
- Member Name Option: Select from: Use Company Name or Use File-by-Name.
- Sort Option: Select the order in which you would like the report to be sorted.
- Click Refresh Report.


The report may be saved as: PDF, Excel, or Word.
Member Listing by Drop Date
The Member Listing by Drop Date provides you with statistics about your member drops over a selected date range. This report will provide you with a view into why your members are dropping, as well as totals of revenue lost due to the drop.
The report may be accessed from the Dashboard or from the Reports module.
- Click Dashboard in the left-hand navigation panel.
- Click the Membership tab. The Dropped Members section will display a graph of the number of members that have dropped in the past year.
- Click the view detailed report link to add additional filtering criteria, and see further details, such as drop reasons.
- Enter desired filtering criteria.
- Select a Sales Rep if you wish to see results for an individual sales rep.
- Enter Drop Date From/To if you wish to see dropped members in a specific date range.
- Select desired Display Options:
- Summary: This options will display the name of the member, the drop date, status, web participation, drop reason and drop notes..
- Details: This option will include member contact information (address, phone, email, primary contact, etc.) as well as join date.
- Details with Fees & Dues: This option will include the details described above, along with the members scheduled dues. This can be useful in analyzing revenue lost.
- Spreadsheet: This option will display the details with fees and dues in a spreadsheet. This is a good selection if you wish to use Excel for further reporting/filtering. The fees will be totaled if Show Totals is selected.
- Use Fee Active and Exp. Dates in Criteria:
- Show Totals: If this option is selected, dependent on the options selected above for Display Options the system will total the members and the fee items.
- Include Currently Active/Courtesy Members?: Select yes, if you wish to include members who may have previously dropped (have a drop date in the date range you selected) but have now rejoined your organization. The status column in the report results will indicate the current member status.
- Click Refresh Report.


This report can be printed or downloaded. NOTE: When the report is downloaded, additional contact information is included, such as the primary contact, email and address information.
Member Update Activity
The Member Update Activity report displays changes made to a member record, and who made the change. The report can be filtered to specific date range, member or change type.
- Click Reports in the left-hand navigation panel.
- Select Member Update Activity.
- Enter desired filtering criteria. For example, you can search for changes in a specific date range, or for a specific change type.
- Click Refresh Listing.

Representative Permissions Report
The Representative Permissions report can be used to view the permissions assigned to your reps, and to determine if your reps have login credentials to the MIC.
Member Engagement (Most Active)
The Member Engagement (Most Active) report will help you to identify members those members most engaged. You can configure engagement weighting factors (such as number of events attended, events sponsored, etc.).
Engagement is gauged on the following factors:
- Events Attended
- Events Sponsored
- Hot Jobs
- Deals
- Referrals
- Logins
- Past Dues (Past Due amounts of $0.00 receive the assigned Engagement Factor)
Applying additional filters to the report will allow you to generate the report for a selected date range, membership status, event attendance, group, and membership type.
Member Engagement (At Risk)
The Member Engagement (At Risk) report will help you to identify members who have not been actively engaged. You can configure engagement weighting factors (such as number of events attended, events sponsored, etc.) to identify which members are at risk of dropping across a selected date range.
Engagement is gauged on the following factors:
- Events Attended
- Events Sponsored
- Hot Jobs
- Deals
- Referrals
- Logins
- Past Dues (Past Due amounts of $0.00 receive the assigned Engagement Factor)
Applying additional filters to the report will allow you to generate the report for a selected date range, membership status, event attendance, group, and membership type.

You can adjust the weighting of each of these factors by clicking the adjust factors link. For example: If event attendance carries more weight in engagement for your organization, you may wish to adjust the default weighting. Or, if you are not using job postings, you would set the weight to 0.

The report displays the number of each factor applicable to your members, and multiplies that by the weight assigned to the factor, sums all to provide the Factor Total. The lower the Factor Total the higher risk of the member dropping.

Member Listing by Join Date
The Member Listing by Join Date report provides summary or detailed member information based on their join date. You can optionally show fees on the report.

Membership Drop Analysis Report
The Member Drop Analysis Report provides you with statistics about your member drops over a selected date range. This report will provide you with a view into why your members are dropping, along with your drop rate percentage. By showing you both the join date and the drop date, you can analyze how quickly your members are dropping.

This report can be printed or downloaded. NOTE: When the report is downloaded, additional contact information is included, such as the primary contact, email and address information.
Member Directory Report
The Member Directory Report allows you to build a custom membership list, alphabetically or by category, show/hide courtesy members, etc. Good starting point for building a printed directory.
Historical Membership Comparison
For a few years a small snapshot of your current membership levels has been saved in a database. This small report lets you look up and compare the data from two of those snapshots.

Member Directory Listing with Logos
This report will allow you to generate a simple member directory listing of all active members only. Your organization logo will display at the top of the report if loaded at Setup>Organization information. Member logos will display only with the Marketing Package or if running a Member Benefit Campaign. Those logos are loaded under Members>Web tab>Search results icon.
Printable Membership Directories
Printable Membership Directory
The Printable Membership Directory is a simple directory designed to be printed. To print as a booklet requires a printer capable of duplex booklet printing. Export the report to a PDF file and open the file. In print settings, choose landscape as the orientation. Set your printer to its duplex booklet printing option and choose "Open to Right" for the booklet binding. For best results set "Page Scaling" to 'Fit to Printable Area'. The title lines and subtitle lines are customizable, includes chamber logo on the cover and member logos where available.
Three-Column Printable Membership Directory
The Three-Column Printable Membership Directory is a membership directory in three-column format with the options for choosing what member information is displayed. Export to a PDF file for best printing.
NOTE: Members who have Does Not Display On Web selected in their Web Participation Options do not get included in this directory.
Two-Column Printable Membership Directory
The Two-Column Printable Membership Directory is a membership directory in two-column format with the options for choosing what member information is displayed and optional member logos. Export to a PDF file for best printing.
NOTE: Members who have Does Not Display On Web selected in their Web Participation Options do not get included in this directory.
Directory Category & Attribute Assignments Report
The Directory Category & Attribute Assignment report provides a listing of your directory categories, the members assigned to those categories, as well as associated attributes. The report may be configured to display just the primary category, or all categories, include or exclude attributes, filtering options for the members to include, and an option to include the member description. This report is useful in reviewing your members category and attributes assignment.

Member Benefit Batch Print or Email (Edited)
The Member Benefit Batch Print or Email report allows you to print or email the Member Benefit report across a group of members or by renewal month. The information displayed in this report, is the same benefit information displayed on an individual member's Stats tab. A best practice in retaining your members would be to send this information to them to provide them an understanding of how they are benefiting from membership.
The report may be filtered by:
- Members by status
- Members by name
- Members by category
- Members by renewal month
Once you have selected the members to whom you wish to send the report, you may enter email text. A great email template to use is the Update your membership listing template, or you may enter your personalized message.

Quarantined Invalid Email Address
The Quarantined Invalid Email Address report provides a list of all emails that have been marked as invalid, and removed from your database. Due to increased vigilance from outside organizations that rank email sender reputation, having a clean email address list is very important to ensure all of our customers can continue to communicate reliably to their members. The following types of addresses would be considered invalid: Addresses where the syntax is incorrect (e.g. multiple @ symbols, extra space, etc.), the domain of the email address doesn't exist, the address of the recipient no longer exists on the receiving server, and when the MX record of the domain itself doesn't exist. These are all cases where the email would never make it through to anyone.
The report consists of two sections: Emails Quarantined and Will Be Quarantined. The report includes the email address, name of member or rep, the member/rep ID, location in the database the address has been removed from (clicking the location will take you to the page in the database where the email was used), reason why the address was removed, date of removal.
|
|
NOTE: The system needs to check ALL email addresses in your database, because they can still be included in emails you send out. This includes all active, courtesy, non-members, dropped/inactive, and prospects in your database. You can modify the report results to only include a particular status, for example Active, as shown below. |


Recheck an Invalid Email
On the Quarantined Invalid Email Report click the Re-check link next to the email address you would like to check.

The results of the re-check will be displayed, as shown below.

If the address is found to be valid, will be removed from the Quarantine list. If the address is found to be invalid, it will remain on the quarantine list.
Mark an Invalid Email as Good
After running Re-Check, if you've personally verified this address is good even though the verification system indicates it is not, we've given you an option to mark it as good and remove it from the Quarantine list. Please do not abuse this option; we want to protect your email sender reputation.

- On the Quarantined Invalid Email Report click the MarkAsGood link next to the email address you would like to mark as good.
- Review the warning information on the Mark as Good dialog box.
- If you wish to proceed, click the Mark as Good button.

Change an Invalid Email address
Using the Quarantined Invalid Email report, you can correct an invalid email address. The correction will be updated throughout their record; the current address will then be removed from the Quarantine list.

- On the Quarantined Invalid Email Report' click the Change link next to the email address you would like to change.
- Enter the new email address in the Please replace email address... text-box.
- Click the Replace button.

Communications Reports
Member Contact Report
The Member Contact Report displays a history of communication by staff person, member, and other criteria within a date range. This report may be used to analyze your touch points (emails and notes) with members. Filter options allow you to generate the report for a selected date range, member, task/category, and so on. For example: If you wish to see all communications for a particular member, click the select a member link and choose the desired member.
- Click Communication in the left-hand navigation panel.
- Click Member Contact Report in the Monitor and Manage Communication section.
- Enter desired filtering criteria.
- Click Refresh Listing.


Click the Report button to print a summary or detail report, or download the report in csv format.
Email Status Summary
The Email Status Summary provides a way for you to track whether your emails are being delivered, and if they are being opened by the recipient. Email status is broken down into the following statistics:
- Message Queued: The number of email messages queued up in ChamberMaster/MemberZone to be sent out.
- Sent: The email has been sent.
- Opens: The number of times the email was opened. Opens are recorded when the email recipient has images enabled in their email client and cannot be used as a complete indicator of receipt.
|
|
NOTE: Email dates are listed based on the date sent from the Central time zone server (GMT-06:00). |
- Click Communication in the left-hand navigation panel.
- Click Email Status Summary in the Monitor and Manage Communication section.
- Enter/Select desired filtering criteria:
- Sent Date From/Through: Enter the date range for which you would like to see statistics.
- Sender: If you wish to see emails sent by a specific individual, select from the list.
- Task/Category: If you wish to see emails of a specific category, select from the list.
- Click Refresh Report.
- For an email that you wish to investigate further, click the View Full Details link.

|
|
NOTE: Invalid email addresses are not identified in this report. Instead emails sent to invalid addresses would potentially result in a bounce back message to your email client. Results may vary because the incoming email server is responsible for sending bounce-back messages. Be aware - Messages sent to an invalid domain (the 2nd part of the address after the @) will not typically return a bounce-back message. Check your email addresses carefully. |
Member Contact Benchmark
The Member Contact Benchmark report provides a measure of your communication with members, and may be filtered by membership status.
The report is color coded:
- Green - Contacted within the last 30 days
- Yellow - Contacted within the last 31-60 days
- Red - Have not contacted for more than 60 days.
NOTE: This will only report on non-bulk communications (5 or less recipients).

Prospects and Communication by Rep: Detail
The Prospects and Communication by Rep: Detail report provides a detailed list of Sales Representatives and all of the prospective members associated with them. It includes total prospective members by Rep and the number of days since each prospective member was contacted.

The report may be exported to PDF, Excel, or CSV.
Prospects and Communication by Rep; Summary
The Prospects and Communication by Rep; Summary report provides a list of Sales Representatives and the total number of prospective members associated with them, with the average number of days since the Rep's members have been contacted.

The report may be exported to PDF, Excel, Word, CSV, or MHTML.
Prospect Conversion by Date
The Prospect Conversion by Date report lists the prospective leads that have been converted to members between a specified date range, sorted by Sales Rep or Groups. Further investigation into the steps taken to convert this prospect into a member can provide insight into effectiveness of your sales program.
The report may be filtered on a selected date range, and by and by sales representative or group.

The report may be exported to PDF, Excel, Word, CSV, or MHTML.
Event Reports
Event Activity Summary
The Event Activity Summary provides high level information (number of registrants, number of sponsors, etc.) about events in a selected date range.
- Select Reports in the left-hand navigation panel.
- Select the Event Activity Summary report.
- Enter the desired date range.
- (Optional): Check Include only events with fees to limit the report results to just those for which you charged.
- Click Refresh Listing.

Event Attendance Summary – Members
The Event Attendance Summary - Members provides statistics about your member's event attendance in a specified date range.

Event Attendance Summary – Non Members
The Event Attendance Summary - Non Members provides statistics about non-member event attendance in a specified date range.

Event Participation by Company and Rep
The Event Participation by Company and Rep report provides a list of representatives grouped by company with a sub-list of events attended by the rep. The report can be filtered by date range and event type.

Event Representative Participation
The Event Representative Participation report lists the people that registered for your events that were held within a date range.

Billing/Financial Reports
ePayment Fee Assignment
The ePayment Fee Assignment report provides a list of all epayments assigned to your members or reps, both manual or automatic epayments. The report will display for how much, how often, and the start or end dates assigned. You can also report on a specific month and year to view a scheduled total of epayment fees that would be billed that month. This report is applicable to GrowthZone Pay or Authorize.Net with CIM enabled.
- Click Billing in the left-hand navigation panel.
- On the Reports tab, click epayment Fee Assignment in the Banking section.
- Select Manual from the 'ePayment Type: list.
- Click View Report.


Bundled Fee Usage Report
The Bundled Fee Usage Report allows you to see which items in the bundles have been used and which items are remaining to be used within their membership term. The report may be generated based on membership status, membership type, bundled fee items, renewal month, member name, and specified date range.

The report may be exported to Excel.
Revenue Recognition by Payment Date
The Revenue Recognition by Payment Date indicates the amount that should be recognized for a certain month starting on the Invoice date or Due Date. Any payments received prior to the invoice (or due date depending on the selection) would not be recognized yet, but are displayed in a separate section titled deferred revenue and shown as amounts that remain to be recognized.
- The payment can be recognized starting on Invoice Date or Invoice Due Date (Choose Recognition Date Option in report filters)
- Prepaid items (Deferred revenue) are now included in the report as amounts remaining to be recognized
- Multiple payments applied to the same invoice are now properly reported without duplication of totals
- Single Month Recognitions are available to be displayed if desired
|
|
NOTE: Before using the recognized income reports, account codes need to be assigned within the chart of accounts. Each deferred liability account should have its own account code so that revenue can be recognized and moved to the appropriate income account each month. Setting up the required account codes is done through the Chart of Accounts. See Chart of Accounts for more details. |
- Click Billing in the left-hand navigation panel.
- Click the Reports tab.
- Click Recognized Income by Payment Date (New & Improved Version!) in the Executive section.
- Select desired filtering options:
- Month: Select the month for which you wish to view revenue recognition.
- Year: Select the desired year.
- Account Code: Select the desired account code. Account codes are associated to accounts in your Chart of Accounts, to identify which should be included in the revenue recognition reports.
- Recognition Date Option: Select on which date the revenue begins to be recognized.
- Individual Applied Transactions: Select whether you wish to show or hide individual transactions.
- Single Month Recognitions: Select whether you wish to show or hide single month recognitions.
- Click Refresh Report.

Transactions by Member
The Transactions by Member report allows you to display all billing transactions of any or all of your members in a single report.
The report allows you to:
- Select one, multiple members, or all members
- View transactions in a specified date range
- View single, multiple or all transaction types (Invoice, Payment, Write-off, Refund, Receipts)
- View a single, multiple or all item types
- View a detailed or summary view
- Click Reports in the left-hand navigation panel.
- Enter Transactions by Member in the Search by Keyword text-box and click Search.
- Select the desired filtering criteria:
- Members: By default, all members will be included in the report. If you wish to select specific members, click Unselect All then select the desired members from the drop-down list.
- Start Date/End Date: Enter the date range over which you wish to view member transactions.
- Sort By: Select how you wish to sort your report results. By default, results are sorted by Date. Alternately, you may choose to sort by transaction type.
- Transaction Type: By default, all transaction types will be included in your report. If you wish to limit the result to one or multiple transaction types, click Unselect All then select the desired transactions from the list.
- Fee Item Type: By default, all fee items types will be included in your report. If you wish to limit the results to one or multiple fee item types, click Unselect All then select the desired Fee Item Type(s).
- Report Type: Select Detail or Summary. Summary has details AND the totals listed at the bottom. Detail lists all transactions within the selected date range for each member.
- Click View Report.


Invoice Summary
The Invoice Summary report can be used to view all invoices, open invoices, past due invoices or invoices with a zero balance, in a certain date range. This report can be useful in re-sending over-due invoices.
- In the Billing module, click the Reports tab.
- Click Invoice Summary in the Transactions section.
- Enter the desired Filter Options:
- You can filter the report by Invoice Date or Due Date range. You may also select to Do not filter by dates.
- Select Show Active/Courtesy members only. to include only invoices for this status of member, or deselect to include all invoices.
- Include voluntary fee items: Select this option if you wish to include invoices that contain only voluntary fees.
- Invoice Status: Select the desired invoice status. For example if you wish to view and resend over-due invoices, select Past-Due Invoice.
- Item Type: This option allows you to select a specific item type, for example, just membership dues. If no selection is made all item types will be included. You may also select Use Specific Fee Items to display only those invoices containing those fee items. This may be useful for events.
- Item Basis: You may choose to report on accrual or cash basis. If no selection is made, both will be included in the report.
- Specific Batch: If you wish to see only invoices generated in a specific batch, click the link to select the desired batch.
- Click Refresh Report.

If you wish to resend the invoices in the list, click the Resend Invoices button at the bottom of the report. You will then be prompted to select the invoices you wish to resend, and output options.
Payment/Receipts by Account
The Payment/Receipts by Account report, provides a total of all payments received in a selected date range, summarized by account. This report can be useful as a companion to the Sales by Account report, to provide an understanding of what the actual receipts were vs. the sales.
- In the Billing module, click the Reports tab.
- Click Payment / Receipt by Account in the Transactions section.
- Enter desired filtering criteria:
- GL Account: Select All to view results for all GL accounts, or select the desired account(s)
- Payment Applied Between/And: Enter the desired date range.
- Item Collection Basis: Select Any to view payments for both accrual and cash basis, or select the desired accounting methodology.
- Fee Item Type: Select Any to view all fee item types, or select the desired fee item(s).
- Display Option Select Summary to view totals by account, or select Detail to view the individual transactions summarized by account.
- Member Status: Select All to view payments for all member statuses, or select the desired member status(es).
- (Optional) Member Join Date After: Enter a join date to filter results to payments received after a specific join date.
- (Optional) Member Join Date Before: Enter a join date to filter results to payments received after a specific join date.
- Click View Report.


Payment Summary
The Payment Summary report will show you all payments that you have received over a given date range. This report can be useful in matching records to your accounting software, as well as identifying any un-applied payments.
- In the Billing module, click the Reports tab.
- Click Payment Summary in the Transactions section.
- Enter/Select the desired filtering criteria:
- Date From/Through: Enter the date range for which you would like to view payments. You can also click more... to select pre-set date ranges, such as this month, last month, etc.
- Specific Batch: If you wish to see only payments made towards a specific batch of invoices, click the Choose a Batch hyper-link, and select the desired batch.
- Show Active/Courtesy members only: If this option is disabled, payments from contacts of all statuses will be included in the report.
- Payment Method: If you wish to see only payments made in a specific way, for example check, select a payment option from the list. If no selection is made, all payment methods are included in the report.
- Item Type: If you wish to see only payments made towards a particular item time (for example: Membership Fees/Dues), select the type from the list. If no choice is made, all item types are included in the report.
- Item Basis: If you wish to see only payments made for a particular accounting method (Cash or Accrual), select the basis from the list. If no choice is made, all will be included in the report.
- Click Refresh Report.


Member Balance Summary
The Member Balance Summary report can be used to check how much you members currently owe you. It is also a report that can be used to identify any customers with open credits. It will also allow you to view voluntary fees (paid or unpaid).
- Click Billing in the left-hand navigation panel.
- Click the Reports tab.
- Enter desired Filter Options:
- Show Active/Courtesy members only: Deselect this option if you wish to see balances for ALL contacts in your database.
- Include members with $0.00 balances: Select this option to include members that do not have balances. This option should be selected if you wish to find open credits on members that do not have open invoices.
- Include voluntary fee items in member balance: If this option is selected, voluntary fees will be added to the member's balance, shown in the final column of the report. If deselected, you will still be able to view the voluntary fees, but the member's balance will not be adjusted by the voluntary fee amount.
- Click Refresh Listing.


Membership Renewals Report
The Membership Renewals report can be used to identify members who are scheduled to renew in a future month. This report can be useful for planning and budgeting.
- Click Billing in the left-hand navigation panel.
- Click the Reports tab.
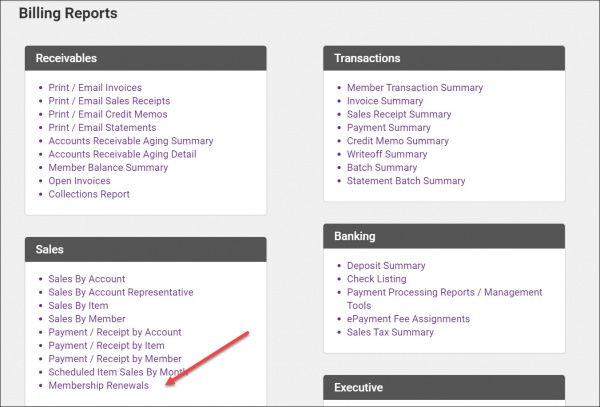
- Click Membership Renewals in the Sales section.
- Enter desired filtering criteria.
- Click Refresh Report.


Receivables Reports
Accounts Receivable Aging Detail
The Accounts Receivable Aging Detail report displays detailed information on aging customer accounts. The report displays “detail” information; instead of balances and summary information, the detail report includes individual transactions. The aging report can be used as a primary tool used by collections personnel to determine which invoices are overdue for payment.
Accounts Receivable Aging Summary
The Accounts Receivable Aging Summary report allows you to keep on top of outstanding invoices. It will give you a solid understanding of your existing and future cash flow position. It provides a list of all invoices in specific aging ranges (Current, 1 - 30 days, 31 - 60 days, 61 - 90 days, 91 - 120 day, and 121+ days). by specific product category (ie. Membership Dues) or Accounts. Reviewing your accounts receivable aging report at least monthly—and ideally more often—can help to ensure that your members are paying you. It at least tells you where they stand so you can take steps to collect if necessary.
Member Balance Summary
The Member Balance Summary tells you how much each member owes you. The report includes what payments, and can be useful on a monthly or annual basis in identifying members that are over-due, or who have unapplied payments/credits.
- Click Billing in the left-hand navigation panel.
- Click the Reports tab.
- Click Member Balance Summary in the Receivables section.
- Select desired filtering criteria.
- Click Refresh Report.


The report may be downloaded to use Excel functionality for further filtering.
Sales Reports
Prospective Sales Pipeline
The Prospective Sales Pipeline report report provides a way for you to forecast new member revenue beyond the current month using custom fields that must be created, managed and maintained by your staff.
Pre-requisites to working with the Prospective Sales Pipeline report
The Prospective Sales Pipeline report relies on custom member fields. The following custom fields are required (NOTE: Field names/data types must match exactly as described below).

- Rating: Rating allows you to indicate the likelihood of making the sale. This custom field should be created as a Drop Down List data type. Selections in the list are your rating scale (how likely you are to make the sale). A simple alphabetic rating is suggested, with A+ meaning the prospect is extremely likely to join whereas a C- is not so likely.
- Source – How did you hear about us: Lead sources allow you to track how you learned of the sales opportunity. Lead sources may include your events, email campaign, cold calls, etc. This custom field should be created as a Drop Down List.
- Date Added to Pipeline: This allows you to identify the date a prospect was entered into your system. This is useful in reviewing how long prospects have been in the pipeline. This custom field should be created as a Date data type.
- Forecasted Month: This field allows you to track what month you forecast this prospect to join. This custom field should be created as a Drop Down List data type, and selection should include all months of the year.
- Dues Amount: This field allows you to track the dues you expect to receive if the prospect joins. This can be useful for budgeting purposes. This custom field should be created as a Numeric:Decimal data type.
- Signed as a New Member: Indicates whether the prospect has joined your organization, and would be selected once you have made the prospect active. This custom field should be created as a Boolean data type.
|
|
Note: Field names/data types must match exactly as described above. Click Here for instructions on setting up Custom Member Fields. |
Generating the Prospective Sales Pipeline Report
The Prospective Sales Pipeline report can be filtered by lead source of prospects, quality rating of prospects, and what month you forecast this prospect to join. NOTE: The report is hard-coded to look at only Prospective status records and of those, only those that have not yet been marked “Signed as New Member”.
- Click Reports in the left-hand navigation panel.
- Enter Pipeline in the Search by Keyword text-box.
- Click Search.
- Click the green arrow next to Prospective Sales Pipeline Report.
- Select desired filtering criteria:
- Source: From the drop-down, select those sources you wish to include in the report, or click Select All to generate the report for all sources.
- Rating: From the drop-down list, select the ratings you wish to include in the report, or click Select All to generate the report for all ratings.
- Forecasted Month: From the drop-down list, select the months you wish to include in the report, or click Select All to generate the report for all months.
- [Optional] Added to Pipeline After: If desired, you can generate the report based on when the prospect was added to the pipeline. To enter a date, clear the None check-box and enter desired date.
- [Optional] Added to Pipeline Before: If desired, you can generate the report based on when the prospect was added to the pipeline. To enter a date, clear the None check-box and enter desired date.
- Click View Report.


|
|
Need help with this report? For more information on creating custom fields, contact support@growthzone.com.
For more information on the strategy of how to use this custom report, email shari@sharipash.com, the owner and president of Strategic Solutions for Growth, the initiator of this reporting tool. |
Sales by Item Report
The Sales by Item report provides the details of your sales over a selected date range, based on a specific member join date, specific item type (as defined by your fee items), a specific fee item, and/or a specific event.
- From the Billing module, click the Reports tab.
- Click Sales by item in the Sales section.
- Enter the Sales Date From/Through if you wish to see sales for a specific date range. Alternately, you can click the more... link to select pre-defined date range such as This Month, This Quarter, This Year, etc.
- Enter Member Join Date From/Through if you wish to see sales based on specific member join dates.
- Select an Item Type if you wish to see only sales of a specific type, for example, 'Membership Fees & Dues. You may also select specific fee items only to include in your report by selecting Use Specific Fee Items from the Item Typedrop-down list. When this option is selected, you will be presented a list of all fee items you have configured in your system. Select those fee items you wish to include in the report.
- Select an Item Basis if you wish to see sales based on Accrual or Cash.
- Select the desired view. If Summary is selected, total sales by member will be displayed in the report. If detail is select all invoices that make up the total sales by member will be included in the report.
- Check Show write-off transactions to include write-offs in the report. If write-offs are included: The total of the write-offs in your selected time period, is shown at the bottom of the report, and subtracted from total sales.
- Check Include refunds/negative sales receipts to include refunds in your report. If refunds are included, the value of the refund is subtracted from total sales.
- Click Refresh Report.


Scheduled Sales by Month Report
The Scheduled Sales by Month report, helps in budgeting for the following year as well as planning for cash-flow in the coming year. This report, filtered by month provides a view into recurring fees assigned to your current active members.
- From the Billing module, click the Reports tab.
- Click Sales by Month in the Sales section.
- Enter/Select desired filtering criteria:
- Sales Month: Select the month for which you wish to view scheduled sales, or select Full Year.
- Member Join Date From/Through: If you wish to view sales based on when members joined your organization enter the desired date range.
- View: Select Summary to view totals for each scheduled fee item. Select Detail to view the fee items total with the associated member details.
- Item Type: If you wish to see only sales for a particular item type, for example Membership Fees & Dues, select the type from the list. If no selection is made all item types will be included in the report. NOTE: You can also filter the report to individual fee items by selecting Use Specific Fee Items from the list. When selected you will be able to choose the fee item(s) that you wish to report on.
- Item Basis: If you wish to filter the report to a specific accounting method (Cash vs. Accrual), select the basis from the list.
- Show Active/Courtesy members only: Select this option to included scheduled sales for active/courtesy members only.
- Hide item types with no fees scheduled: Select this option if you only wish to see results for fees that are scheduled.
- Click Refresh Listing.


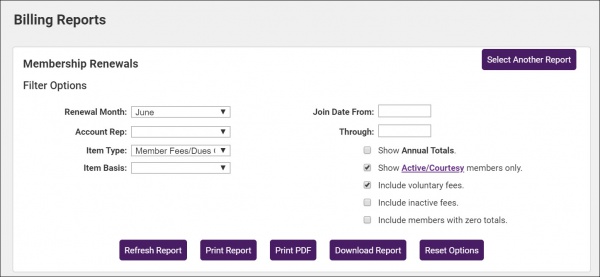
Membership Renewals
The Membership Renewals report will provide a listing of members and their assigned fees. This report can be used for analysis and budgeting purposes.
- Click Billing in the left-hand menu.
- Click the Reports tab.
- Click Membership Renewals in the Sales section.
- Enter the desired filtering options:
- Renewal Month: Select the month for which you wish to view fees OR select Do Not Filter to generate the report for all months.
- Account Rep: If you wish to generate the report for an individual sales rep, select the desired rep.
- Item Type: If you wish to generate the report for a specific item type, select from the list. For Example: Select Member Fees/Dues Only if you wish to view scheduled membership fees.
- Item Basis: If you wish to generate the report based on accounting method, select the method from the drop-down list.
- Join Date From/Through: To limit the report to members that joined in a certain date range, enter the desired dates.
- Show Annual Totals: Select this option if you would like to see the billed amount for a selected year in your totals. When this option is selected, you can choose the year you wish to include, as well as Received Amount, Balance and Credited Amount.
- Show Active/Courtesy members only: Deselect this option if you wish to include members of all statuses in your report.
- Include voluntary fees: Select this option if you wish to include voluntary fees in your report.
- Include inactive fees: Select this option if you wish to include inactive fees in your report.
- Include members with zero totals: Select this option if you wish to include members with zero total fees.
- Click Refresh Report.
Your report will display for viewing purposes. Click Print Report, Print PDF, or Download Report to output the report.
|
|
NOTE: If any of your members do not have a Renewal Month assigned on the Account tab of their record, your screen will display a notification. You can assign a Renewal Month to these members by clicking the View/Edit members with no renewal month link. |
Advanced Custom Report Builder
The Advanced Custom Report Builder allows you to create and save your own custom reports:
- Select from over 350 database fields
- Filter with powerful criteria
- Start from a template, add & remove fields and tweak criteria to get your results quickly
- Find fields much easier - four main sections to pick from - Events, Groups, Members, Representatives
- Field name options are
- Consistent with back office naming
- Alphabetized for locating easily
- Grouped together when appropriate (e.g. all address fields displayed together)
- Rename output column titles to something more friendly for your own purposes
- Temporarily disable specific criteria filters without removing the filter - enable it later without rebuilding the query
- Export to Excel or CSV
- Create and send emails directly from report window
- Create new groups or add resulting records to existing groups
Organizational Dashboard
Organizational Dashboard reports provide graphs and information as a high level snapshot of the activity and health of various areas of your organization. These areas include:
- Graphs of your membership by type, status and category.
- Comparison graph of new members and member drops the current year over the previous year.
- Sales analysis by staff member, as well as analysis by sales stage.
- Event statistics including analysis of attendance and revenue over the past twelve months.
- Analysis of Sponsorship over the past twelve months.