Selecting Payment and Receipt Deposit To Account
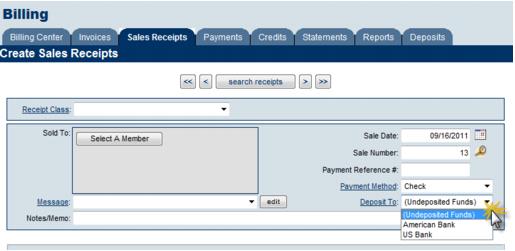
ChamberMaster Billing allows you to receive payments and receipts to an account called “Undeposited Funds”. Any payments you receive from customers into this holding account will be held until you deposit the payment using the Billing > Deposits tab. The Undeposited Funds account acts as a holding account, similar to holding money in a drawer until you make a deposit to your financial institution.
- Figure: Receiving a payment and selecting Deposit To account
- Figure: Creating a sales receipt and selecting Deposit To account
Another option is to receive payments and receipts directly to your designated bank account. If you choose this option, funds are transferred immediately to the bank account. The funds do not appear in the Undeposited Funds account and you will not be able to deposit them using the Billing > Deposits tab.
Depositing receipts and payments into Undeposited Funds is a common practice when a lump sum entry into your bank account is desired. When making the deposit, you can select which payments and receipts are included in the deposit which makes it possible to create only one transaction in your bank account per deposit (instead of one transaction per receipt/payment).
- Note: If planning to export your transactions to QuickBooks or other 3rd party billing software, making a deposit using the ChamberMaster deposit options does not take away your option of being able to create a deposit in QuickBooks. The ChamberMaster deposit transaction can be excluded from your export, allowing you to also make the deposit in QuickBooks, using the QuickBooks deposit selections.
Create a “Deposit To” Account
- Note: Undeposited Funds is automatically created by the application and cannot be removed.
1.Click Setup in the left-hand menu.
2. Click Chart of Accounts.
3. Click Add Account.
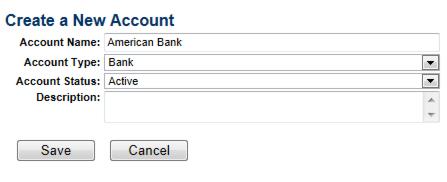
- Figure: Creating a new “Deposit To” account
4. Complete the "Create a New Account" window making sure to select Account Type: Bank.
5. Click Save.
Set a Default “Deposit To” Account
1. Click Setup in the left-hand menu.
2. Click Billing Options and Settings.
3. Select the desired Payment Deposit Account.
- Figure: Setting a default “Deposit To” account
4. Click Save.


