Difference between revisions of "ChamberMaster Billing-Assign Individual Tax Items to a Tax Set"

From Support Wiki
Jump to navigation Jump to search
(Created page with "<div xmlns="http://www.w3.org/1999/xhtml"> <div style="text-align: left;">Table of Contents | ChamberMaster_Billing-Create_indiv...")
 
Line 1: Line 1:
<div xmlns="http://www.w3.org/1999/xhtml">
+
:<h3><span style="color: #808080">Assign Individual Tax Items to a Tax Set</span></h3>
  <div style="text-align: left;">[[ChamberMaster_Billing-TableOfContents|Table of Contents]] | [[ChamberMaster_Billing-Create_individual_tax_items|Previous]] | [[ChamberMaster_Billing-Ensure_that_the_Non_Tax_Set_has_no_tax_assigned|Next]] | [[ChamberMaster_Billing-Index|Index]]</div>
+
 
  <div style="color: #999999; font-family: sans-serif; font-size: 10pt; text-align: left;">
+
::1. Click '''Setup''' in the left-hand menu.
    <span>[[ChamberMaster_Billing-Getting_Started|Getting Started]]</span> : <span>[[ChamberMaster_Billing-Sales_Tax|Sales Tax]]</span> : Assign Individual Tax Items to a Tax Set</div>
+
 
  <hr />
+
::2. Click '''Sales Tax''' in the '''Billing''' area.
  <div style="color: #808080; font-family: Cambria; font-size: 14pt; margin-left: 18pt;"><span id="wwpID0E03WB0HA"><br />Assign Individual Tax Items to a Tax Set</span></div>
+
 
  <div style="margin-left: 36pt;">
+
::3. All Tax Sets and all individual Tax Items will display.
    <table border="0" cellspacing="0" cellpadding="0" width="99%" summary="">
+
 
      <tr valign="baseline">
+
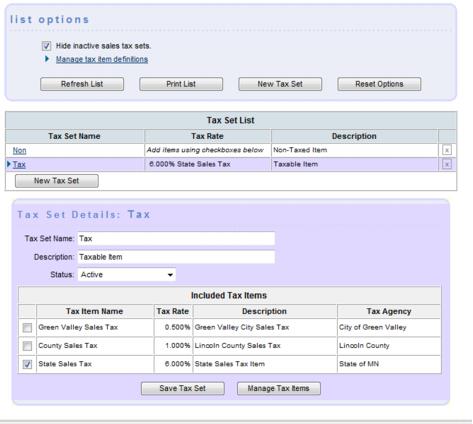
::4. Click the title of the Tax Set that you wish to modify. (Most likely you will be modifying the “Tax” tax set.)  The selected Tax Set will display in a purple color.
        <td style="width: 18pt"><div style="font-family: Calibri; font-size: 11pt;">1. </div></td>
+
 
        <td><div style="font-family: Calibri; font-size: 11pt;"><span id="wwpID0E02WB0HA">Click </span><span style="font-weight: bold;">Setup</span> in the left-hand menu.</div></td>
+
::[[Image:ChamberMaster_Billing-Assign_Individual_Tax_Items_to_a_Tax_Set-CMBilling.1.008.1.jpg]]
      </tr>
+
 
    </table>
+
:::Figure 1-7 Editing the Tax Set
  </div>
+
 
  <div style="margin-left: 36pt;">
+
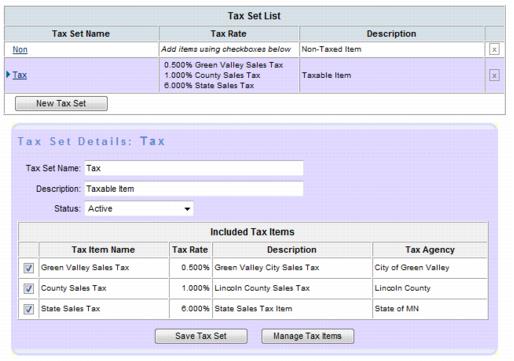
::5. Click to select the check boxes of the desired individual tax items that you wish to include in this Tax Set.
    <table border="0" cellspacing="0" cellpadding="0" width="99%" summary="">
+
 
      <tr valign="baseline">
+
::[[Image:ChamberMaster_Billing-Assign_Individual_Tax_Items_to_a_Tax_Set-CMBilling.1.008.2.jpg]]
        <td style="width: 18pt"><div style="font-family: Calibri; font-size: 11pt;">2. </div></td>
+
 
        <td><div style="font-family: Calibri; font-size: 11pt;"><span id="wwpID0E01WB0HA">Click </span><span style="font-weight: bold;">Sales Tax</span> in the <span style="font-weight: bold;">Billing</span> area.</div></td>
+
:::Figure 1-8 Selecting individual tax items
      </tr>
+
 
    </table>
+
::6. Click '''Save Tax Set'''.
  </div>
 
  <div style="margin-left: 36pt;">
 
    <table border="0" cellspacing="0" cellpadding="0" width="99%" summary="">
 
      <tr valign="baseline">
 
        <td style="width: 18pt"><div style="font-family: Calibri; font-size: 11pt;">3. </div></td>
 
        <td><div style="font-family: Calibri; font-size: 11pt;"><span id="wwpID0E0ZWB0HA">All Tax Sets and all individual Tax Items will display.</span></div></td>
 
      </tr>
 
    </table>
 
  </div>
 
  <div style="margin-left: 36pt;">
 
    <table border="0" cellspacing="0" cellpadding="0" width="99%" summary="">
 
      <tr valign="baseline">
 
        <td style="width: 18pt"><div style="font-family: Calibri; font-size: 11pt;">4. </div></td>
 
        <td><div style="font-family: Calibri; font-size: 11pt;"><span id="wwpID0E0YWB0HA">Click the title of the Tax Set that you wish to modify. (Most likely you will be modifying the “Tax” tax set.)  The selected Tax Set will display in a purple color.</span></div></td>
 
      </tr>
 
    </table>
 
  </div>
 
  <div style="font-family: Calibri; font-size: 11pt; margin-bottom: 12pt; margin-left: 36pt; text-align: justify;"><span id="wwpID0E0XWB0HA">[[Image:ChamberMaster_Billing-Assign_Individual_Tax_Items_to_a_Tax_Set-CMBilling.1.008.1.jpg]]</span></div>
 
  <div style="font-family: Calibri; font-size: 10pt; margin-bottom: 12pt; margin-left: 54pt; text-align: justify;"><span id="wwpID0E0WWB0HA">Figure 1-7 Editing the Tax Set</span></div>
 
  <div style="margin-left: 36pt;">
 
    <table border="0" cellspacing="0" cellpadding="0" width="99%" summary="">
 
      <tr valign="baseline">
 
        <td style="width: 18pt"><div style="font-family: Calibri; font-size: 11pt;">5. </div></td>
 
        <td><div style="font-family: Calibri; font-size: 11pt;"><span id="wwpID0E0VWB0HA">Click to select the check boxes of the desired individual tax items that you wish to include in this Tax Set.</span></div></td>
 
      </tr>
 
    </table>
 
  </div>
 
  <div style="font-family: Calibri; font-size: 11pt; margin-bottom: 12pt; margin-left: 36pt; text-align: justify;"><span id="wwpID0E0UWB0HA">[[Image:ChamberMaster_Billing-Assign_Individual_Tax_Items_to_a_Tax_Set-CMBilling.1.008.2.jpg]]</span></div>
 
  <div style="font-family: Calibri; font-size: 10pt; margin-bottom: 12pt; margin-left: 54pt; text-align: justify;"><span id="wwpID0E0TWB0HA">Figure 1-8 Selecting individual tax items</span></div>
 
  <div style="margin-left: 36pt;">
 
    <table border="0" cellspacing="0" cellpadding="0" width="99%" summary="">
 
      <tr valign="baseline">
 
        <td style="width: 18pt"><div style="font-family: Calibri; font-size: 11pt;">6. </div></td>
 
        <td><div style="font-family: Calibri; font-size: 11pt;"><span id="wwpID0E0SWB0HA">Click </span><span style="font-weight: bold;">Save Tax Set</span>.</div></td>
 
      </tr>
 
    </table>
 
  </div>
 
</div>
 

Revision as of 21:05, 25 February 2016

Assign Individual Tax Items to a Tax Set

1. Click Setup in the left-hand menu.
2. Click Sales Tax in the Billing area.
3. All Tax Sets and all individual Tax Items will display.
4. Click the title of the Tax Set that you wish to modify. (Most likely you will be modifying the “Tax” tax set.) The selected Tax Set will display in a purple color.
ChamberMaster Billing-Assign Individual Tax Items to a Tax Set-CMBilling.1.008.1.jpg
Figure 1-7 Editing the Tax Set
5. Click to select the check boxes of the desired individual tax items that you wish to include in this Tax Set.
ChamberMaster Billing-Assign Individual Tax Items to a Tax Set-CMBilling.1.008.2.jpg
Figure 1-8 Selecting individual tax items
6. Click Save Tax Set.