Difference between revisions of "Create a Group from Custom Criteria"
Jump to navigation
Jump to search
Cpetterson (talk | contribs) |
|||
| (4 intermediate revisions by the same user not shown) | |||
| Line 1: | Line 1: | ||
| − | + | You can create a group from the results of your '''Custom Member Report'''. This unique, custom group can be used throughout the software as recipients of email, event invitations, or as a record of those meeting your specific criteria at that point in time. | |
| − | + | #Click '''Reports''' in the left-hand menu. | |
| + | #Click '''Custom Member Report'''. | ||
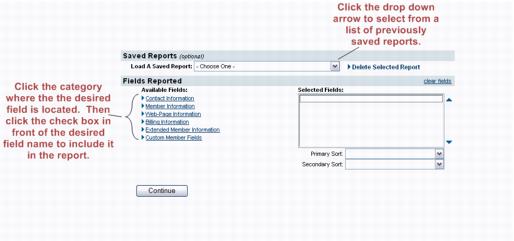
| + | #Select the desired fields and any other desired selections on the Member Listing screen. '''[[Reports_and_Downloads#Creating_a_Custom_Member_Report|Click Here]]''' for further information on configuring the '''Custom Member Report'''. | ||
| + | #:[[File:ReportsGuide.1.17.1.jpg|center]] | ||
| + | #Click '''Continue'''. | ||
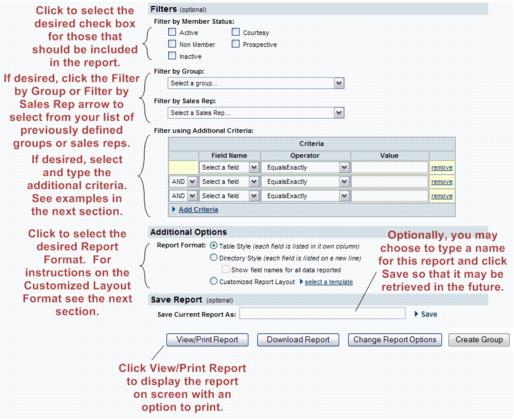
| + | #Select the desired filters and custom criteria. | ||
| + | #:[[File:ReportsGuide.1.17.2.jpg|center]] | ||
| + | #Click '''View/Print Report'''. | ||
| + | #Verify the displayed contacts are those that should be included in the group. | ||
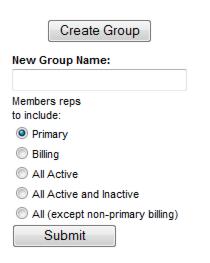
| + | #Click '''Create Group'''. | ||
| + | #:[[File:ReportsGuide.1.17.3.jpg|center]] | ||
| + | #Type the '''New Group Name'''. | ||
| + | #Select the '''Members reps to include:'''. | ||
| + | #Click '''Submit'''. | ||
| − | + | Make any desired changes on the group General tab. You may also select to contact these members immediately by clicking '''Contact Members'''. '''[[Groups#Create_a_Group|Click Here]]''' for further information on managing groups. | |
| − | |||
| − | |||
| − | |||
| − | |||
| − | |||
| − | |||
| − | |||
| − | |||
| − | |||
| − | |||
| − | |||
| − | |||
| − | |||
| − | |||
| − | |||
| − | |||
| − | |||
| − | |||
| − | |||
| − | |||
| − | |||
| − | |||
| − | |||
| − | |||
| − | |||
| − | |||
| − | |||
| − | |||
| − | |||
| − | |||
| − | |||
| − | |||
| − | |||
| − | |||
| − | |||
| − | |||
| − | |||
| − | |||
| − | |||
| − | |||
Latest revision as of 01:48, 29 September 2017
You can create a group from the results of your Custom Member Report. This unique, custom group can be used throughout the software as recipients of email, event invitations, or as a record of those meeting your specific criteria at that point in time.
- Click Reports in the left-hand menu.
- Click Custom Member Report.
- Select the desired fields and any other desired selections on the Member Listing screen. Click Here for further information on configuring the Custom Member Report.
- Click Continue.
- Select the desired filters and custom criteria.
- Click View/Print Report.
- Verify the displayed contacts are those that should be included in the group.
- Click Create Group.
- Type the New Group Name.
- Select the Members reps to include:.
- Click Submit.
Make any desired changes on the group General tab. You may also select to contact these members immediately by clicking Contact Members. Click Here for further information on managing groups.


