Difference between revisions of "Using Add Member Button"
Jump to navigation
Jump to search
| (5 intermediate revisions by the same user not shown) | |||
| Line 5: | Line 5: | ||
* Billing Information | * Billing Information | ||
* Web Display Information<br /> | * Web Display Information<br /> | ||
| − | |||
When you click '''Finish''', your member is automatically added to the database. | When you click '''Finish''', your member is automatically added to the database. | ||
# Click '''Members''' in the left-hand menu. | # Click '''Members''' in the left-hand menu. | ||
# On the '''Add''' menu, click '''Member'''. | # On the '''Add''' menu, click '''Member'''. | ||
| − | #:[[File:MemberManagement.1.05.1.jpg]] | + | #:[[File:MemberManagement.1.05.1.jpg]]<br /> |
| − | #:<small>'''Figure 1-3: Add Member Wizard | + | #:<small>'''Figure 1-3:''' Add Member Wizard</small> |
# When '''Step 1: Basic Information''' opens, type the correct member information. See Figure 1-4. | # When '''Step 1: Basic Information''' opens, type the correct member information. See Figure 1-4. | ||
#:<small>Note: An immediate warning will appear if trying to create a duplicate member. [[Will the software warn me if I try to create a duplicate member|See more info]].</small> | #:<small>Note: An immediate warning will appear if trying to create a duplicate member. [[Will the software warn me if I try to create a duplicate member|See more info]].</small> | ||
| − | #:[[File:MemberManagement.1.05.2.jpg]] | + | #:[[File:MemberManagement.1.05.2.jpg]]<br /> |
| − | #:<small>Figure 1-4 | + | #:<small>'''Figure 1-4:''' Step 1: Basic Information</small> |
#:*'''Globe icon''' – Click the globe icon to open an internet connection and test the website address that is entered. This will ensure that you have typed the address correctly if the correct page opens in the browser window. | #:*'''Globe icon''' – Click the globe icon to open an internet connection and test the website address that is entered. This will ensure that you have typed the address correctly if the correct page opens in the browser window. | ||
#:*'''Call First''' – Check this box as a reminder for you to “call first” before sending a fax to this member. | #:*'''Call First''' – Check this box as a reminder for you to “call first” before sending a fax to this member. | ||
| Line 20: | Line 19: | ||
#:<small>'''Tip:''' The Mailing Address fields must contain an address in order to print labels for this member. Either type an address or click Use Physical Address as the Mailing Address.</small> | #:<small>'''Tip:''' The Mailing Address fields must contain an address in order to print labels for this member. Either type an address or click Use Physical Address as the Mailing Address.</small> | ||
# Click '''Next''' to continue. | # Click '''Next''' to continue. | ||
| − | # When '''Step 2: Additional Information''' opens, type the correct member information. See Figure 1-5 and | + | # When '''Step 2: Additional Information''' opens, type the correct member information. See Figure 1-5 and |
| − | #:[[File:MemberManagement.1.05.3.jpg]] | + | #:[[File:MemberManagement.1.05.3.jpg]]<br /> |
| − | #:<small> | + | #:<small>'''Figure 1-5:''' Step 2: Additional Information</small> |
| − | |||
# Click '''Next''' to continue. | # Click '''Next''' to continue. | ||
# When '''Step 3: Lodging (not available in all editions)''' opens, select '''Enable Lodging for this member''' if desired. If not, click '''Next'''. | # When '''Step 3: Lodging (not available in all editions)''' opens, select '''Enable Lodging for this member''' if desired. If not, click '''Next'''. | ||
| − | # When '''Step 4: Billing Information''' opens, complete the desired fields and click Next to continue. See Figure 1-6 and | + | # When '''Step 4: Billing Information''' opens, complete the desired fields and click Next to continue. See Figure 1-6 and |
| − | #:[[File:MemberManagement.1.05.4.jpg]] | + | #:[[File:MemberManagement.1.05.4.jpg]]<br /> |
| − | #:<small> | + | #:<small>'''Figure 1-6:''' Step 4: Billing Information</small> |
| − | + | # When '''Step 5: Web Display Information''' opens, complete the desired fields and click '''Finish''' to complete the process. See Figure 1-7. | |
| − | # When '''Step 5: Web Display Information''' opens, complete the desired fields and click '''Finish''' to complete the process. See Figure 1-7 | + | #:[[File:MemberManagement.1.05.5.jpg]]<br /> |
| − | [[File:MemberManagement.1.05.5.jpg]] | + | #:<small>'''Figure 1-7:''' Step 5: Web Display Information</small> |
| − | <small>Figure 1-7 Step 5: Web Display Information</small> | ||
| − | |||
When you click '''Finish''', your member is automatically added to the database and included in the online directory (unless the '''Does Not Display on Web''' check box is selected). | When you click '''Finish''', your member is automatically added to the database and included in the online directory (unless the '''Does Not Display on Web''' check box is selected). | ||
Latest revision as of 16:07, 15 July 2016
When adding a new member to the database, you simply fill in the requested information as the wizard walks you through four information screens.
You will be asked to fill in the following information screens:
- General Information
- Additional Information
- Billing Information
- Web Display Information
When you click Finish, your member is automatically added to the database.
- Click Members in the left-hand menu.
- On the Add menu, click Member.
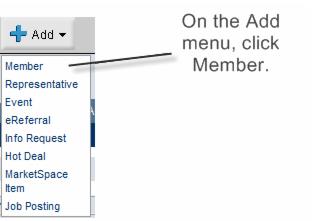
- Figure 1-3: Add Member Wizard
- When Step 1: Basic Information opens, type the correct member information. See Figure 1-4.
- Note: An immediate warning will appear if trying to create a duplicate member. See more info.
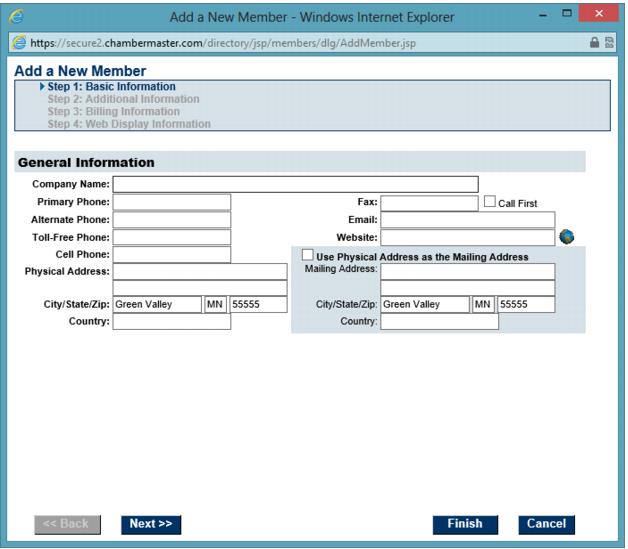
- Figure 1-4: Step 1: Basic Information
- Globe icon – Click the globe icon to open an internet connection and test the website address that is entered. This will ensure that you have typed the address correctly if the correct page opens in the browser window.
- Call First – Check this box as a reminder for you to “call first” before sending a fax to this member.
- Check Use Physical Address as the Mailing Address if both the physical and mailing address are the same address. This will save time so you won’t need to type the address twice.
- Tip: The Mailing Address fields must contain an address in order to print labels for this member. Either type an address or click Use Physical Address as the Mailing Address.
- Click Next to continue.
- When Step 2: Additional Information opens, type the correct member information. See Figure 1-5 and
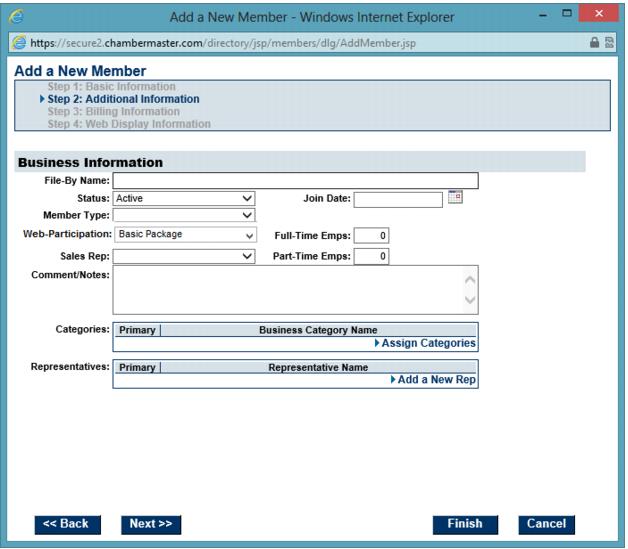
- Figure 1-5: Step 2: Additional Information
- Click Next to continue.
- When Step 3: Lodging (not available in all editions) opens, select Enable Lodging for this member if desired. If not, click Next.
- When Step 4: Billing Information opens, complete the desired fields and click Next to continue. See Figure 1-6 and
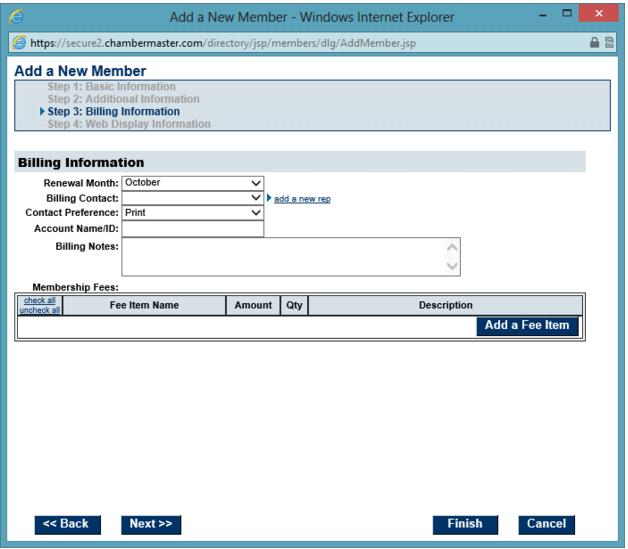
- Figure 1-6: Step 4: Billing Information
- When Step 5: Web Display Information opens, complete the desired fields and click Finish to complete the process. See Figure 1-7.
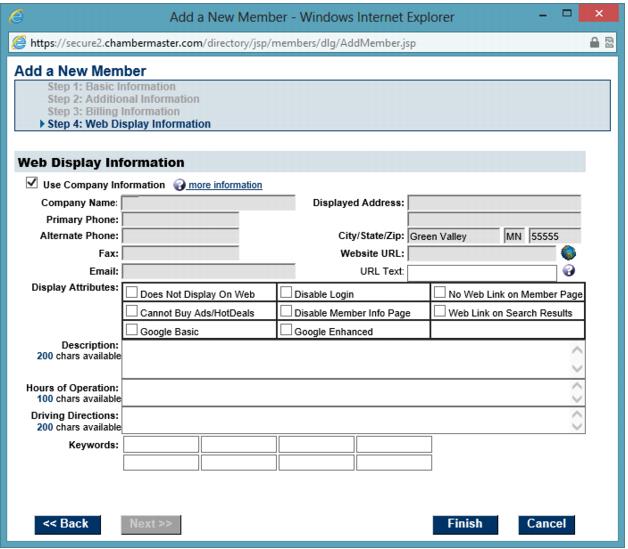
- Figure 1-7: Step 5: Web Display Information


When you click Finish, your member is automatically added to the database and included in the online directory (unless the Does Not Display on Web check box is selected).