Project/Task Manager - Quick Start
Contents
Overview
Project/Task Manager can help you manage and track projects by allowing you to assign tasks to staff members, monitor the project’s progress and keep an eye on deadlines. NOTE: Currently, this tool is in the beta stage and is available on the Pro version of ChamberMaster and MemberZone.

Using Project/Task Manager will give you the ability to:
- Assign projects and tasks to your staff members
- Track their progress with a “percentage complete” value
- Set deadlines for projects and tasks
- Keep an eye on the “big picture” with the Summary and Task Calendar pages
- Create templates for recurring projects like bringing on a new member
Create a New Project
- Click Projects/Task in the left-hand navigation panel.
- Click the Projects tab.
- Click the New Project button.
- Enter the following:
- Category: (Optional) Select a category project. Assigning categories make it easy to filter and report on project.
- Template: (Optional) If you have previously designed a template that can be used for this project, select it from the drop-down list.
- Name: Provide a name for the project. For Example: If you are creating a project for an event, you may wish to name it the same as the event. This field is required.
- Start Date: Enter the project start date.
- End Date: Enter the project end date. This field is required.
- Project Owner: Select a project owner from the drop-down list. All of your active staff members will be available for selection.
- Click Done.


The Projects tab will display the new project in the list of projects.
Add Tasks to a Project
Once a project has been created, you can add the tasks necessary to complete the project. A task can be big or small, easy or hard — but it's never more than a job that needs to get done to successfully complete your project.
- On the Projects tab, click the hyper-link for the project to which you wish to add tasks.
- On the Tasks screen, click the New Task button. Note: You may create tasks on the Tasks tab as well. See Create Tasks for further information.
- Enter the following information:
- Name: Provide a name for this task.
- Project: The project will default to the project that you clicked on the projects tab.
- Parent Task: If you wish to associate this task to a parent, enter the parent task name, or click the magnifying glass to search for the task.
- Description: (Optional) Enter a description of the task. While this is optional, it provides a means to add additional information about what needs to be accomplished to complete the task.
- Start Date: Enter the date on which activity on this task should begin.
- End Date: Enter the date this task should be completed. The end date will be used to identify tasks that are over-due.
- Assigned To: Select the staff member who is responsible for completing this task.
- Type: (Optional) Select the type of task from the drop-down list. Types are used for reporting and filtering. Color-coding tasks make it easy to see the different types of tasks on the calendar. To add additional types, click the edit hyper-link.
- Priority: Select the priority you wish to associate to this event.
- Click Done.


Create a Project Template
Instead of developing a new project each time, you can use a template and simply change the desired information. For Example: If you have a standard approach and tasks for on-boarding your new members, you can create a template. Then, you can select this template each time you setup a new member on-boarding project.
- Click Project/Task in the left-hand navigation panel.
- On the Projects/Task screen, click the Templates tab.
- Click the New Template button.
- Enter the following information:
- Project Category: Select a project category. Categorization makes it easy for you to filter and report on your projects. When Event is selected, this type of template will be displayed for selection on the Tasks tab of an event. When Member is selected, this template will be available on the Tasks tab of a member.
- Name: Enter a name for this project. Best practice is to provide a name which at a glance lets you know what this template is used for. This is a required field.
- Description: (Optional) Add further information about this template.
- Add tasks to the template. Add the tasks that are involved in completing this project. When you actually use the template, you will be able to add additional tasks or remove tasks that are not needed.
- In the Task List
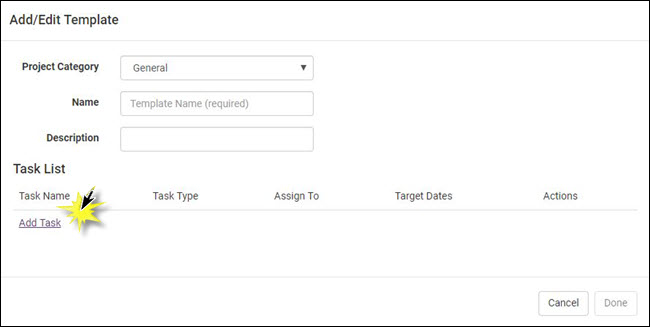
- Click the Add Task hyper-link.

- Configure the following:
- Children must be completed first.: If this task is a parent task, select this option if all child tasks must be marked as completed prior to this task being marked as completed.
- Task Name: Enter a name for this task. Best practice is to provide a name which,at a glance, describes the activity of the task. This is a required field.
- Description: (Optional) Provide additional details about this task, such as the activities the task includes.
- Start: Select the number of <days, weeks or months> before or after the project start date that this task must begin. When this template is used for a project, and a start date is defined, specific start dates will be associated to the task.
- Start: Select the number of <days, weeks, months> before or after the project end date that this task must be completed. When this template is used for a project, and an end date is defined, specific end dates will be associated to the task.
- Assigned To:: You may select the staff member to whom this task is to be assigned. This is optional when creating a template, and best practice is to assign the staff member when you use the template for a project.
- Type: (Optional) Select a project Type, or click the edit type hyper-link to add new types. Types are used for sorting on the tasks screen and on the 'Task Calendar.
- Priority: (Optional) Set a task priority of Low, Normal, High, Critical.
- Click Done.


Updating/Completing Tasks
Your staff can monitor their tasks, update and mark tasks as completed from the Project/Tasks Summary tab, on a member's Tasks tab, or on an event's Tasks tab.
Update Completion Progress
Updating progress on a task allows you to see the percent of work that has been completed, and the percent of work remaining. By reviewing task progress, you have a good understanding of whether the project will be completed on time.
- Click the task that requires updating.
- To mark the progress of completion, the percent complete may be entered in the % complete text box
- OR
- If the task is completed, click the Completed check-box.
- Click Done.
Add Comments to a Task
Another way to communicate task progress is by simply adding comments when you update your percent complete. Comments can also be used to provide additional details about the work being done on the task.
- Click the task that requires updating.
- Click the Comments hyper-link.
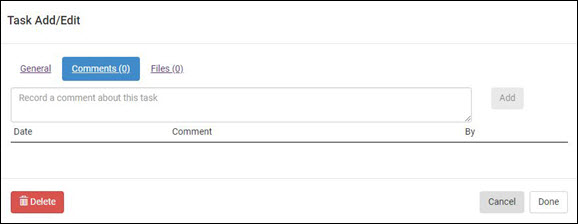
- The comments dialog box will display all comments that have been entered for this task.
- Enter desired comments in the text-box.
- Click Add.
- Click Done.

Add Files to a Task
- Click the task that requires updating.
- Click the Files hyper-link.
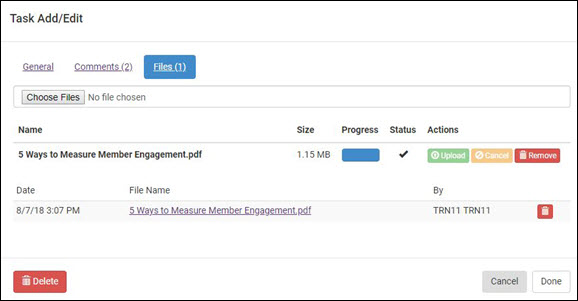
- The Files page will display a list of all files previously imported for this task.
- Click the Choose Files button to browse and upload the desired file.
- Click Done.

Monitoring Projects/Tasks
The Summary tab in the Project/Tasks module provides an overall view of all projects/tasks.

Task Summary By Person
The Task Summary By Person section on the Summary Tab provides a view of all staff members to whom tasks have been assigned, tasks that are coming due, tasks that are over-due, and tasks recently completed. Having visibility into every team member's task list is also useful for understanding whether people are falling behind and provides you with the opportunity to re-assign tasks to another team member, if needed.

Clicking a person's name, will display a list of that person's tasks.

Projects with Open Items
The Projects with Open Items section of the Summary tab will display all projects with items that remain open.

Click on a project name to view all tasks assigned to the project (both open and completed will be displayed).

Overdue Tasks
The Overdue Tasks section of the Summary tab will display a list of all overdue tasks.

Click on a task name to view further details of the task.

Upcoming Tasks
The Upcoming Tasks section of the Summary tab, provides a view of tasks and their upcoming due dates.

Clicking on the project name will open the full project, clicking on the task will display the details of the task, and clicking on the staff member's name will open the tasks tab filtered to that staff member. Over-due tasks will be identified by a red yield sign ![]() .
.
Working with the Project/Task Calendar
An alternate view of all of your tasks is available on the Task Calendar tab. The calendar can be filtered to display the tasks for all projects or an individual project; all staff members or an individual staff member; all categories or an individual category; and all task types or an individual task type. Color-coding of tasks makes it easy for you to identify the types of tasks.

You can click into any of the tasks to view details, and update the task.