Using the NAHB - WMS Database Fields and Upload Tool
Contents
Overview
To simplify the process of uploading member changes to the National Association of Home Builders (NAHB) through WMS each month we have integrated the required fields into various areas within the GrowthZone system. Additionally the NAHB/WMS file export tool will allow you to pull, error check and generate your monthly data upload for NAHB/WMS quickly and easily.
The NAHB/WMS Export tool will automatically pull all the information for your monthly NAHB/WMS export including:
- New Members
- Membership Renewals
- New Council Members
- Council Renewals
- Company Information Updates
- New Contacts
- Contact Information Updates
- New Spike
- Member Type Change
Understanding the NAHB/WMS Fields
There are specific fields that are required for the different types of data to be given to NAHB. These fields are located in one of three locations depending on their purpose.
Member/Companies NAHB/WMS Information
Within the Members module on the general tab is a section called NAHB/WMS Information

- HBA Number - This is the number for your Home Builders Association
- NAHB Company ID - The company ID provided by NAHB/WMS for this member after they signup for membership.
- Primary Business Activity Code - The primary area of business for the company. These codes are defined by NAHB.
- Secondary Business Activity Code - An additional area of business for a company. These codes are defined by NAHB.
- Tertiary Business Activity Code - An additional area of business for a company. These codes are defined by NAHB.
- Dollar Volume Code - The range of revenue dollars the company generates annually. The revenue ranges are defined by NAHB.
- Number of Units Code - The range of dwelling units a company starts annually. The ranges are defined by NAHB.
Representatives NAHB/WMS Information
Found under the Members module on the Representatives Tab is a section called NAHB/WMS Information.

- Contact Person ID (PIN) - NAHB/WMS generated representative ID
- Subscription ID (MSN) - NAHB/WMS generated membership subscription ID
- Membership Type - NAHB/WMS Membership Type
- Spike HBA Number - HBA number for the spike(sponsor) of that membership
- Spike Person ID - Person ID(PIN) for the spike(sponsor) of that membership
NAHBA Groups/Councils
The NAHBA Groups/Councils are included in your database, and may be found under the groups module. To view only the NAHBA Groups/Councils filter the list of groups on NAHB/WMS Councils from the Group Type options.

Each of these councils has a roster where you will add representatives who are members of the council. See Adding Members/Reps to a Group for details on adding or removing members from the roster. NOTE: You may also add reps to the groups on the member's rep tab.
After you've added a representative to a council you will be able to click on their name to access the following NAHB/WMS fields.

- [Council Name] Subscription ID (MSN) - NAHB/WMS generated council membership subscription ID
- [Council Name] Spike HBA Number - HBA number for the spike(sponsor) of that council membership
- [Council Name] Spike Person ID - Person ID(PIN) for the spike(sponsor) of that council membership
Creating Fee Items for HBA Membership and/or Council Memberships
In order for the system to properly recognize which members have paid their renewals and in turn need to be reported as renewals to NAHB/WMS the renewal items need to be properly setup. See Working with Fee Items for information on setting up your fee items.
Assigning Fees to Reps for New HBA New Memberships/Renewals
Once fee items have been created, you may assign those fee items to the member on the member's Billing Tab. See Editing/Assigning Fees & Dues for details on setting up the recurring schedule. When setting up the recurring schedule, you must select the fee item created for use in your HBA memberships.
Special WMS Recurring Fees Setup Notes - Memberships
- You will manage the membership renewals for all HBA representatives of a member, from the the member's Account tab. When setting up recurring fees schedule, you will need to select the appropriate Bill To contact for each representative. If each individual representative is responsible for their own fees/dues, select the desired name of the representative in the Bill To drop-down list. In the example below, Greg Brown is the representative who will be billed for this membership fee.

- If the Member Organization will pay for all representative renewals, when creating the recurring fees schedule, select the organization's billing representative from the Bill To drop-down list AND include the exact name of the representative this fee is associated to in the Description text box. In the example below, the system will recognize that this membership fee is for Mark Addams, however the bill will go to Greg Brown as the billing contact for the organization.

Assigning Fees to Reps for New Council Memberships/Renewals
Once fee items for council memberships have been created, you may assign those fee items to the member on the member's Billing Tab. See Editing/Assigning Fees & Dues for details on setting up the recurring schedule. When setting up the recurring schedule, you must select the fee item created for use in your Council memberships.
Special WMS Recurring Fees Setup Notes - Council Memberships
- You will manage the new council memberships and council membership renewals for all representatives of a member, from the the member's Account tab. When setting up recurring fees schedule, you will need to select the appropriate Bill To contact for each representative. If each individual representative is responsible for their own fees/dues, select the desired name of the representative in the Bill To drop-down list. In the example below, Melissa Anderson is the representative who will be billed for this membership fee. She is NOT the billing representative for this organization.

- If the Member Organization will pay for all representative renewals, when creating the recurring fees schedule, select the organization's billing representative from the Bill To drop-down list AND include the exact name of the representative this fee is associated to in the Description text box. In the example below, the system will recognize that this council membership fee is for Melissa Anderson, however the bill will go to Craig Ostrom as the billing contact for the organization.

Changing Primary Contact for Membership
In cases where the primary contact is changed in the middle of a renewal period:
- Copy the MSN number from the old primary contact and paste it in the MSN# field for the new primary contact. Click Save.
- Remove the MSN Number and Membership Type from the old primary contact. Click Save.
- Mark the new contact as the Primary rep. NOTE: If the contact has already been marked as Primary Rep, un-mark them as primary and re-mark them as Primary. As your database only allows for one primary rep, the old contact will no longer be marked as primary.
- Make sure the new primary contact has a first and last name and all rep address lines filled in.
This transaction will now show in the transaction queue as New Contact. See Eligible NAHB Export Transactions for further information.
WMS Export Tool Settings
The WMS Export Tool Settings allow you to define the default settings to be used by the system when you run the export tool. To view and/or change these settings:
- Click WMS/NAHB in the left-hand navigation panel.
- Click the Settings tab.
Transaction Queue Settings
The Transaction Queue Settings allow you to define which transactions the system will automatically search for when you run the WMS Export Tool. You may choose to Include or Ignore transactions.

Additional Transaction Finder Settings
Default HBA Number
If your association manages only one HBA you can enter the HBA number in the Default HBA Number field. This will save you time when entering new members as you can simply leave the HBA number blank in the General tab and the value entered in this field will be the assumed HBA number for all transactions put into the export file. If you manage multiple HBA's then this field should be left blank, and the HBA number should be recorded individually on the General tab of the Members module.

Strategies for Identifying NAHB Renewals
The Renewal Search Strategy field allows you to define what constitutes a "Renewal" for NAHB Membership. If your association reports a renewal to WMS in the month that the appropriate fee item has been paid, by selecting Strategy 1 the queue/transaction finder will look for invoices in the given month that have PAID fee items matching your selections in the "Fees for New Memberships and Renewals" section below and report those as renewals (or new members if they have no MSN# currently.) Strategy 2 differs slightly such that renewals will be triggered when appropriate fee items have been paid in recent months and the current/given month matches the member's assigned renewal month. Under Strategy 2 if a member pays their renewal invoice in January but their renewal month is February then the renewal transaction record will be put into the February queue (instead of January).
Fees for New Memberships and Renewals (WMS)
In the Fees for New Memberships and Renewals section, you must select the fees that the system is to look for when identifying new memberships and/or renewals of HBA memberships. These fee items must be on PAID invoices. A list of all of your fee items will be displayed for selection, enable the appropriate fee items.

Fees for Council Memberships
In the Fees for Council Memberships section, you must select the fees that the system is to look for when identifying new council memberships and/or renewals of council memberships. These fee items must be on PAID invoices. A list of all of councils are displayed, select the appropriate fee item for each council (wheree applicable) from the drop-down list.

Using the NAHB/WMS Export Tool
Eligible NAHB Export Transactions
Using the WMS Import Tool you may export the following transaction types, provided the criteria has been met, from your MemberZone database:
- New Members: Transactions will be available for export if:
- The Member has a Join Date that falls within the report date range.
- The Member's membership status is Active or Courtesy.
- The Member has a Representative marked as Primary
- A paid invoice' which includes the HBA fee items identified in the WMS/NAHBSettings that falls within report date range. See WMS Export Tools Settings for details.
- The Member data field for HBA Number must have a value.
- EITHER the Member data field for NAHB Company ID must have a value OR:
- Information on the the member's General tab is filled out as thoroughly as possible, including address information and the Primary Business Activity Code.
- Renewals: Renewal transactions will be available for export if:
- The Member data field for HBA Number must have a value
- The Member data field for Subscription ID (MSN) must have a value
- Must have a paid invoice for the renewal fees in the report range. See WMS Export Tools Settings for details.
- Cancellation: Cancellation transactions will be available for export if:
- The Member data field for HBA Number must have a value.
- The Member data field for Subscription ID (MSN) must have a value.
- The member must have been marked as Dropped during the report date range.
- The member must currently have a status of Dropped/Inactive.
- Contact Info Changed: This transaction occurs when information for the existing contact for a membership is changed. Changes that will trigger this transaction include: Rep Work Phone, Rep Address, Rep Email, Rep First/Last Name, Rep set as primary (and has MSN#). Contact Info Changed transactions will be available for export if:
- The Member data field for HBA Number must have a value.
- The Member data field for Subscription ID (MSN) must have a value.
- The Rep data field for Contact Person ID (PIN) must have a value.
- The Rep data field for First Name and Last Name must have a value.
- The Rep must have address information filled out.
- New Contact: This transaction occurs when a new primary contact is associated with a membership. New Contact transactions will be available for export if:
- The Member data field for HBA Number must have a value.
- The Member data field for Subscription ID (MSN) must have a value.
- The Rep must have a Contact Person ID (PIN) OR the Rep data field for First Name/Last Name must have a value And the Rep must have address information filled out.
- Company Info Change: This transaction occurs when the information for the existing company associated with a membership changes. Company Info Change transactions will be available for export if:
- The Member must have an HBA Number.
- The Rep must have a Subscription ID (MSN).
- The Member must have an NAHB Company ID.
- The Member data field for Company Name must be populated
- The Member mailing addressmust be filled out.
- he Member's Primary Business Activity Code must be populated.
- The Member data field for ‘Full-Time Emps’ must be populated.
- New Spike: This transaction occurs when new spike is entered for an existing membership. The change must occur during the export report range. New Spike transactions will be available for export if:
- The Member data field for HBA Number must have a value.
- The Member data field for Subscription ID (MSN) must have a value.
- The Member data field for Spike HBA Number must have a value.
- The Member data field for Spike Person ID must have a value.
- NOTE: When a PIN is provided for the Spike of a membership, that person must be associated with a company that already has an active builder or associate membership with NAHB. When Spike information is provided instead of a PIN, the company provided must have an active builder or associate membership with NAHB.
- Member Type Changes: This transaction occurs when there is a change to the type of an existing membership (within the export report date range). New Member Type Changes will be available for export if:
- The Member data field for HBA Number must have a value.
- The Member data field for Subscription ID (MSN) must have a value.
- WMS Requires a valid NAHB Membership type to be sent.
Reviewing NAHB Transactions Available for Export
- Click WMS/NAHB in the left-hand menu. The WMS Export tab is displayed by default.
- Choose the month for which you wish to view/export transactions from the Month to View drop-down list.
- Choose the transactions you wish to export from the Transaction Queue filter options. The transactions that you selected on the Settings tab will be check by default.
- From the Sort By drop-down, select the order in which you would like the results to displayed. By default results will be displayed by Status. Status will indicate whether there are any errors with the data. The transactions with errors will be displayed at the top of the list.
- Click Load. Transactions matching your filter criteria will be displayed.
- Review the loaded data. Your goal is to get all records to be green before you move it to the queue and do your export:
 The green check indicates those records are ready to go.
 The red triangle indicates that something is missing or incorrect for this record and requires attention.
- If the red triangle is displayed, click the More button to to see what needs to be fixed. The majority of the issues are missing or incorrect information. Changes will be required on either the member's General tab, or the member's Rep tab.
- After making changes to the member's information, reload the report to ensure that you have resolved the issue.


Create Batch of NAHB Transactions
Once you have loaded the transactions you wish to export (See Reviewing NAHB Transactions Available for Export above):
- Select the specific line items that you would like to include or exclude in a batch:
- The following options are available:
- Take No Action: If this option is selected, the transaction will remain in the queue and NOT be exported.
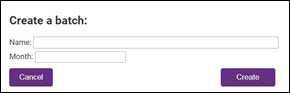
- Add to Batch: If this option is selected, you will be prompted to select the batch to which you wish to add this transaction. If no batches are available, or you wish to create a new batch, click [New Batch], to name a new batch.
- Hold Until: If this option is selected, you may select the month in which you would like to process this transaction.
- Remove Permanently from List: Select this option if you do not wish to ever process this transaction. NOTE: You will be able to view (and process if needed) permanently removed transactions by selecting Show hidden/removed when loading the monthly transactions.
- NOTE: The Set All To option allows you to select the action to be performed on all transactions.
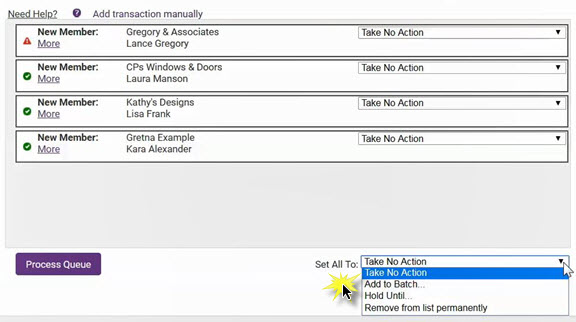
- For example: If you wish to add all of the transactions to a batch, select Add to Batch. You will then be prompted to select the batch to which you wish to add the transactions. If no batches are available or you wish to create a new batch, click [New Batch], and name the new batch.
- Once all selections have been made, click Process Queue.


Download NAHB Transaction File
Once you've sent the desired records from the queue to the batch(es), you are ready to open the batch and download.

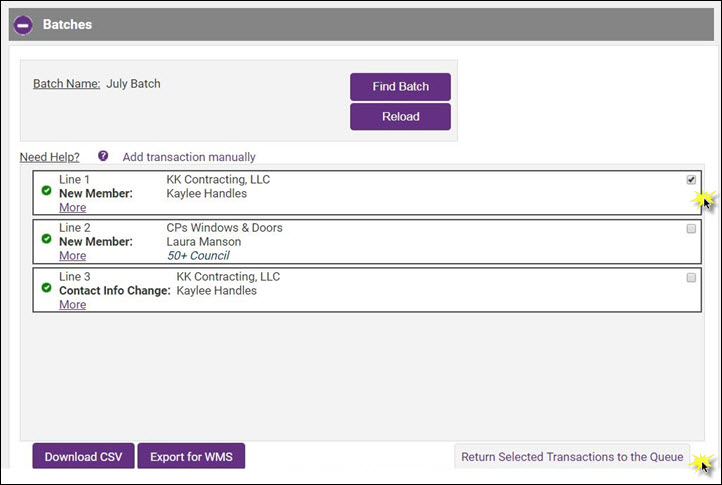
- In the Batches section, click Find Batch.
- Select the desired batch from your list of saved batches and click Open Batch.
- Click the Export for WMS button to create the file formatted for import to the NAHB. A file will be downloaded to your computer. NOTE: If there are transactions in the batch that you do not wish to download, you may select those and click Return Selected Transactions to Queue prior to clicking Export for WMS.
- Click Save if you are prompted.
- NOTE: The Download CSV allows you to download a list of records in the currently selected batch in a format that is easy for a human to read. This is NOT the file to be used for WMS import, but may be used for your review and records.
- When ready to create the version that will be imported into WMS, select Export for WMS, which is the version that will be uploaded to WMS.
- Login to your WMS account and import the file.


Errors in Importing File to WMS
If errors occur when the file is imported to WMS – the errors will refer to Warnings on Line X. Most errors are “missing” or “invalid” data. WMS will reject the entire file if there is an error.

To review the line items causing the warning(s):
- Click WMS/NAHB in the left-hand navigation panel.
- On the WMS Export tab in the Batches section, click Find Batch.
- Select the batch you wish to review.
- Locate the line that caused the Warning in WMS.
- Go to the member's profile to fix the error identified by WMS. You may have to compare the member records in WMS and MemberZone and update appropriately. After fixing the issue, you may re-export the batch. See Create and Download NAHB Transaction File for instructions.
- OR
- You may remove the transaction(s) from the queue until you can fix the error.
- Select the check-box for the transactions you wish to remove.
- Click the Return Selected Transactions to the Queue button.
- After removing the transaction, you may then re-export the batch by clicking Export for WMS.

Using the NAHB/WMS Import Tool
The WMS/NAHB Import tool allows you to import records from the NAHB database to update the MemberZone database with matching information.
- Download the file from WMS (Login to WMS and select Export Member Data. Select the members to download. Choose the comma-seperated value (CSV) data format do NOT make changes to the format of the file, as the file is formatted in the manner in which MemberZone expects).
- In MemberZone, click WMS/NAHB in the left-hand menu and click WMS Import.
- Click Choose File under Step 2, locate and select the file downloaded from WMS.
- Choose the desired import options in Step 2:
- Drop members not present in import file: This option will set any Active MemberZone record to the Dropped/Inactive status if they are not found in the import file.
- Set Inactive members to Active if present in import file: This option will set any inactive MemberZone record to Active status if they are found in the import file.
- Use "[CompanyName] - [RepFirstName] [RepLastName]" as Member FileBy Name when creating new Members: When this option is enabled, if the import creates a new member in your database, the File-By Name will be appended with the representative's first and last name, making it easy for staff to identify them in the drop-down list in the back office software.
- NOTE:If your intention in importing is to REPLACE your current MemberZone records with the imported records, you will likely want to select all 3 optional checkboxes. If you are simply trying to UPDATE existing MemberZone records with new information from WMS (i.e. Contact Pin #, Company # etc) then you will NOT want to select the 3 checkboxes. For more information, read the details of each checkbox by clicking the associated help icon on-screen.
- Click Preview under Step 3. By previewing the data, you can see that the MemberZone records have been matched with the correct WMS record. This will tell you if the correct record is going to be updated. You can modify any incorrect matches by clicking into the MemberZone Company or Representative column in that record. Additionally, you can remove a record by clicking the
 icon in the Delete column.
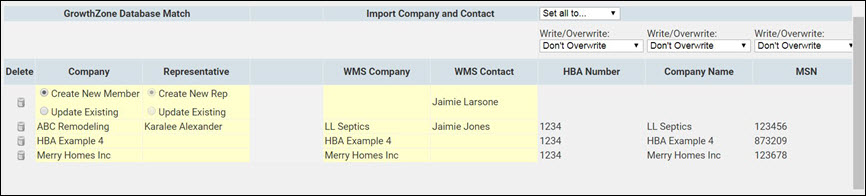
- NOTE: Records with issues are sorted to the top of the preview list for evaluation.
- Set the Write/Overwrite settings for each column as desired. For instance, if you wish to update the MemberZone Contact Pin #, then scroll to right and locate the Contact Pin # column. and select Always.
- If Blank: MemberZone will only populate the field in the database if the field is empty.
- Don’t Over-write: If there is information in the field in the database, MemberZone will not replace the field with new information
- Always: MemberZone will write the information to the database from the import file regardless of whether the field is populated or not.
- Once all the settings are correct and the records are matched as you desire, click Import under Step 4.
- A summary will appear. This is your final opportunity to ensure that records in the database are updated accurately.
- To complete the import, click Finish Import, OR if you wish to make further changes, click Cancel.


Note: the Member Record Updates report will indicate that these records have been updated by the WMS Import tool.
How does MemberZone evaluate incoming WMS Data
Multiple passes are made over the imported data looking at them in different ways to attempt to successfully match them to an existing record. An overview of the matching passes:
- Records with exact MSN number (Subscription ID) , FirstName, LastName, Email, and HBA number match
- CompanyName match, rep first/last match and HBA number match
- CompanyName match, mail address match, company phone match and HBA number match
If after all matching attempts, the import record still doesn’t line up with an existing record, it is assumed to be a new member and will be set to have a new record created.
Viewing WMS Import Database Updates
Changes made to the MemberZone Database by the import of the WMS file can be viewed on the Member Record Updates report. These changes are shown as Changed By the System Administrator.
- Click Reports in the left hand navigation panel.
- Enter Member Record Updates in the Report Finder search box.
- Click Search
- Select Member Record Updates in the results. The report will default to the current date.

In addition to the Member Record Updates report, changes made by the import file will be noted on the member's General tab and on the Reps tab.
