Working with Job Postings/Hot Deals/Member to Member Deals
Contents
- 1 Manage Job Postings
- 1.1 Initial Setup - Job Posting Settings
- 1.1.1 Setup Job Posting Purchase Options
- 1.1.2 Enable Option to Allow Public to Submit Job Postings
- 1.1.3 Edit the Title displayed for Job Postings on your Public Page
- 1.1.4 Define Public Search Options for the Jobs Page
- 1.1.5 Set List Size for Job Posting RSS feed.
- 1.1.6 Manage Job Categories
- 1.1.7 Enable/Configure Custom Job Search Attributes
- 1.2 Add a Job Posting for a Member (Back-office)
- 1.3 Approve Job Postings
- 1.4 Job Postings - Complete a Transaction "In Cart"
- 1.5 View All Job Postings
- 1.6 Preview Public Job Posting
- 1.7 Job Posting Views - Web Statistics
- 1.1 Initial Setup - Job Posting Settings
- 2 Manage Hot Deals/Member to Member Deals
- 2.1 Hot Deal Settings
- 2.1.1 Configure who Receives Notification of Hot Deal Submissions
- 2.1.2 Define Pricing/Billing Options for Hot Deals
- 2.1.3 Define Different Hot Deal Pricing Packages for Basic vs. Enhanced Web Participation Packages
- 2.1.4 Configure Hot Deal Display Settings
- 2.1.5 Configure Hot Deal Terminology
- 2.1.6 Configure Hot Deal RSS Feed Limit
- 2.1.7 Allow Visitors to your Web-site to Subscribe to the Hot Deals E-Newsletter
- 2.1.8 Display Hot Deals/Member to Member link in footer of public modules
- 2.1.9 Enable Member To Member Deals
- 2.2 Add A Hot Deal
- 2.3 Approve Hot Deals/Member to Member Deals
- 2.4 Disable a Hot Deal or M2M Deal
- 2.5 Delete a Hot Deal
- 2.6 Hot Deal Expiration Reminder Email
- 2.7 View All Hot Deals
- 2.8 Update Hot Deals/Member to Member Deals Publish Dates
- 2.9 Hot Deals - E-Newsletter Mailing List
- 2.10 Hot Deal Reporting
- 2.1 Hot Deal Settings
Manage Job Postings
Job Postings are job openings that your members would like to advertise to other members and to the general public. Members may submit a job posting when logged in to the Member Information Center (MIC). As an association staff member, you may add a job posting on behalf of a member. If you choose, you can allow job submissions by anyone on your public website.
Initial Setup - Job Posting Settings
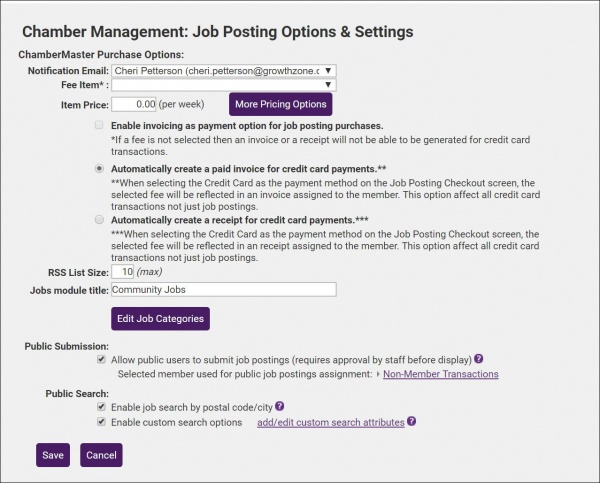
Within the Job Posting Settings you will configure fees for your job postings (if applicable), job posting categories & attributes, search options, public visibility and submission options.
- Click Setup in the left-hand navigation panel.
- Click Job Posting Settings in the Association Options section.
See details of all settings below.
Setup Job Posting Purchase Options
You can choose to simply offer Job Postings to your members as a benefit, or you can charge for listings to generate non-dues revenue. In the Job Posting Settings you will be able to configure your fees for job postings, as well as configure credit card processing options.
- Click Setup in the left-hand menu.
- Click Job Posting Settings in the "Association Information" section.
- Configure the following:
- Notification Email: Select a staff email for the staff member who should receive a notification when a new job posting is entered.
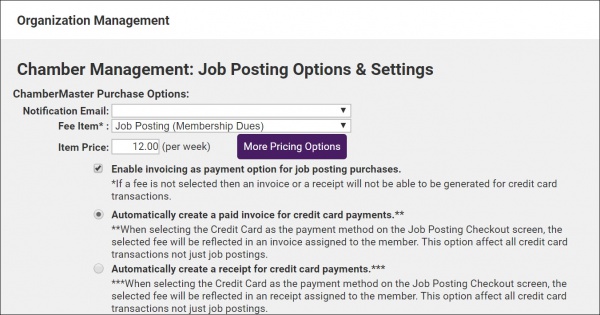
- Fee Item: Select the fee item to which the job posting will be associated. The fee item (Member Due) must be created in the Billing or QuickBooks module in order to have the Fee Item selection available here. Fees for jobs are charged on a week by week basis only. Click here for instructions on setting up fee items. If the Fee Item option is left blank, members and the general public will NOT be charged for job postings. If a fee IS entered, it will only apply to those that submit through the MIC (e.g. typically members). See note below for public job posting submissions.
- Item Price: Enter the price for the job postings, this is a per week price. NOTE: You may setup pricing for both basic packages and enhanced packages by clicking the More Pricing Options button. The Enhanced Package option will only apply if you have purchased the Marketing Package
- Invoicing Options: NOTE:Cash payment is not available as a payment method for job postings.
- Enable invoicing as payment option for job posting purchases - select this option if you wish to allow members to be invoiced when they enter a job posting on-line. NOTE: The check-box is only available if you have selected a fee item.
- Automatically create a paid invoice for credit card payments - select this option if you want to automatically create a paid invoice when a job posting is purchased by credit card.
- Automatically create a receipt for credit card payments - select this option if you want to automatically create a receipt when a job posting is purchased by credit card.
- Click Save.
Enable Option to Allow Public to Submit Job Postings
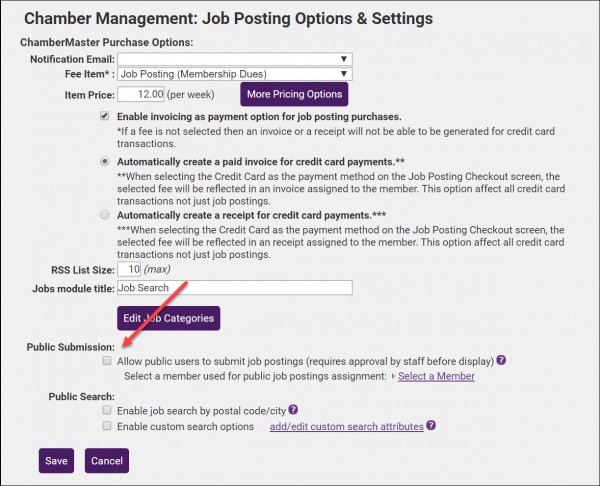
If you wish to allow the general public to submit jobs:
- Click Setup in the left-hand menu.
- Click Job Posting Settings in the "Association Information" section.
- In Public Submission, tick the Allow public users to submit job postings (requires approval by staff before display check-box.
- To track the job postings, they must be assigned to a member. Click the Select a Member link to choose a member. Best Practice: Create a contact in your database, as a non-member, perhaps called Non-member Jobs to track these postings. Or, you may wish to use the system default member Nonmember Transactions.
- Click Save.
| IMPORTANT: When allowing jobs to be submitted from the public, if any job posting fees are being assessed, they will not be collected during that public submission. Instead the job will be displayed in your Task List as "Pending". You will then be able to invoice the individual or contact them for payment. Future releases may integrate payment into the public job posting but is not available at this time. Jobs submitted from the Member Information Center will collect payment. |
Edit the Title displayed for Job Postings on your Public Page
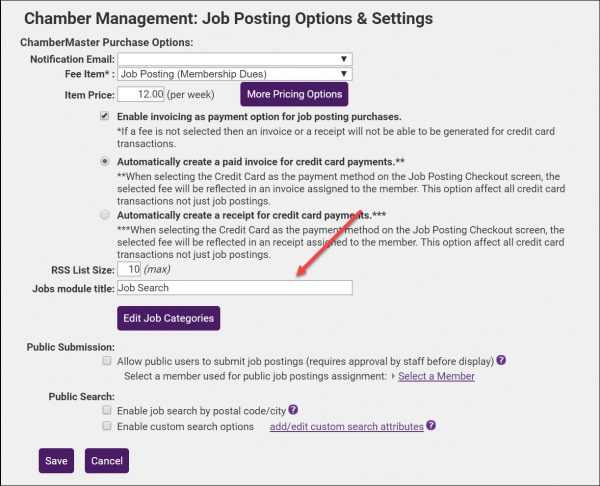
By default, when you add the job postings widget to your public web-site, the title will be Job Search, you can change this to suit your business needs.
- Click Setup in the left-hand menu.
- Click Job Posting Settings in the "Association Information" section.
- Enter your title in the Jobs module title text box.
- Click Save.
| IMPORTANT: When allowing jobs to be submitted from the public, if any job posting fees are being assessed, they will not be collected during that public submission. Instead the job will be displayed in your Task List as "Pending". You will then be able to invoice the individual or contact them for payment. Future releases may integrate payment into the public job posting but is not available at this time. Jobs submitted from the Member Information Center will collect payment. |
Define Public Search Options for the Jobs Page
Public Search settings allow you to configure how your jobs may be searched on your web-site.
- Click Setup in the left-hand menu.
- Click Job Posting Settings in the "Association Information" section.
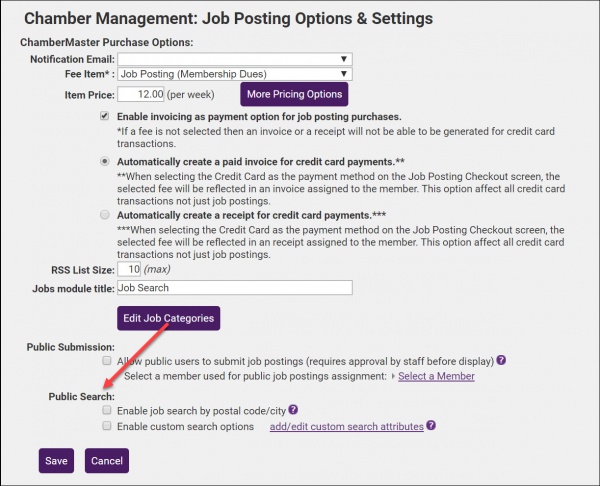
- In the Public Search section, configure the following:
- Enable job search by postal code/city - This selection will turn on the ability for job seekers to search for job postings based on the postal code and city that is entered in the Contact Information of the job posting. When enabled, this geographic search is available in the public job search page and also in the Member Information Center. Note: Geo-coding of the zip and/or city happens when jobs are entered from the MIC or the public page. If there is zip or city on the Contact Information of the job posting then the zip/postal information on the associated member record will be looked at. At the present time, updates to the zip and/or city on the Contact Information the job posting does NOT update the geo-coding.
- Enable custom search options - This settings allows you to include additional criteria for job seekers to use when searching job postings. For example, you might include a Salary Range attribute. NOTE: All custom criteria will display as options when a new job posting is being submitted. Only the custom criteria that are associated with the active jobs will display as search options when job seekers are searching for a job. Click the add/edit custom search attributes link to add and/or edit attribute groups.
- Click Save.
Set List Size for Job Posting RSS feed.
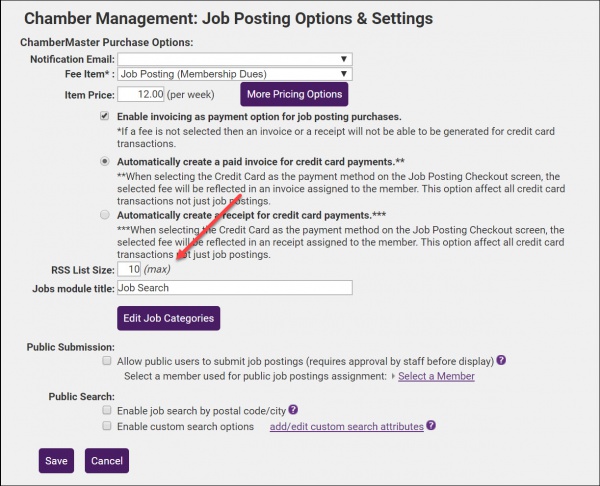
If you are including an RSS feed of job postings on your web-site, you can define the number of jobs that will be displayed in the list:
- Click Setup in the left-hand menu.
- Click Job Posting Settings in the "Association Information" section.
- Set the maximum number of jobs to be displayed in your list in the RSS List Size text-box.
- Click Save.
Manage Job Categories
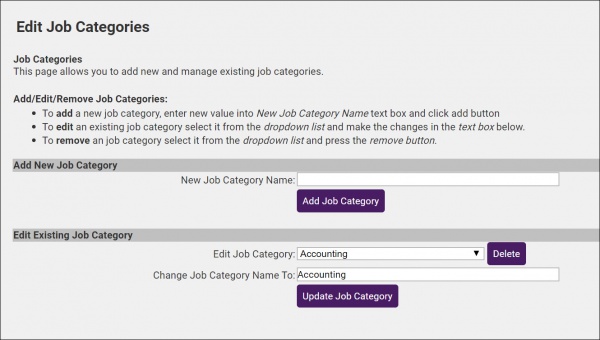
Job categories will allow for easily searching your job postings. A default list of job categories in seeded in the database, and you may add additional categories to suit your business needs. You can update Job Categories either from the Job Posting Settings screen, or within the Jobs Module.
Add a Job Category
- Click Jobs in the left hand navigation panel.
- Click Job Categories.
- New Job Category Name
- Enter a name for the new category.
- Click Add Job Category
Edit a Job Category
- Click Jobs in the left hand navigation panel.
- Click Job Categories.
- From the Edit Job Category drop-down list, select the category you wish to edit.
- In the Change Job Category Name To text box, make the needed edits.
- Click the Update Job Category button.
Enable/Configure Custom Job Search Attributes
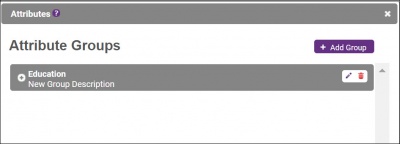
Adding job attributes provides additional criteria for job seekers to use when searching you job listings. Create custom attributes such as salary range or number of hours per week to encourage targeted job searches. When creating attributes, you first create a grouping of the attributes (for example, education) then you add attributes to that group (for example, HS Diploma).
- Click Setup in the left-hand navigation panel.
- Click Job Posting Settings in the Association Options section.
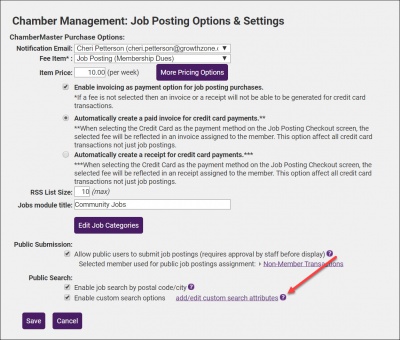
- In the Public Search section, click Enable custom search options.
- Click add/edit custom search attributes to add, edit or delete attributes.
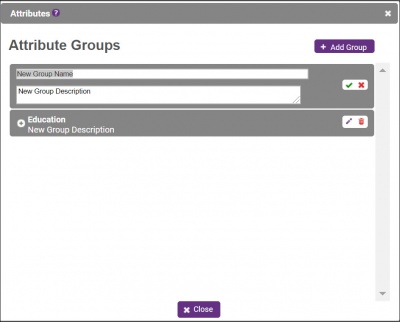
- Click Add Group.
- Enter a name for the group in the New Group Name text-box.
- (Optional) Enter a description of the group.
- Click the
 green check mark.
 - Click the
 sign next to the Group Name.
 - Click the Add button.
- Enter the name of the attribute in the New Attribute Name text-box.
- Click the
 green check mark.
 - Repeat steps 10 - 12 above to add additional attributes.
- Once all attributes have been added, click Close.
| NOTE: With attributes assigned to your job posting, a link for advanced search options is displayed on the page. The job searching area can be defaulted to always display the Advanced Search in the open position by logging in to your Internet Settings Control Panel (ISCP) and selecting Always Open or Default Open for #9 Basic Search Filter Display and #10 Advanced Search Filter Display on the General tab. This setting applies to the public business directory as well as the job posting search. |
Add a Job Posting for a Member (Back-office)
- On a Member's page, click the Advanced tab. Note: Alternately, you can access job postings by clicking Jobs in the left-hand menu.
- Click New Job Posting in the Job Postings section.
- Complete the form in the Job Specifications pop-up form:
- Title: This is the title of the job, displayed on your web-site.
- Image: Click the Add Image button to upload an image. For best results, upload an image that is 400 x 400. A larger image may be uploaded but will maintain the 1 x 1 aspect ratio. This provides a uniform look for the deals/jobs on the public directory search results and fit in the space provided in all directory locations.
- Description: Enter the description of the job. You may use all of the Rich Text Editor options to customize.
- Meta Description: Enter a 1-2 sentence summary of this job posting. The characters entered in this new field are often visible in search engine results, social media posts and shares. This gives you the opportunity to better target your message and hopefully improve your click-through-rate. If this field is left blank, it will automatically populate with the first 160 characters of the Job Description. The field is limited to 320 characters overall.
- Display Posting Date: Version 4 public modules ONLY. This is the date that a job was posted so visitors can tell how old/new a posting is.
- Category: Select a job category from the drop-down list. If needed, click the category hyper-link to add/edit categories. See Manage Job Categories for further instruction.
- Contact Information: The member contact information will be populated by default, but may be changed if needed. This will be displayed on your web-page with the job posting.
- Active Dates: Click the desired active dates. Click on the dates you want your job posting to run. All dates must be selected at this point, active dates cannot be changed once the job posting has been submitted. Job Postings are run on a week by week basis, beginning on Sunday of each week.
- If you do not have job postings fee set up, click Save & Exit. The job posting will be automatically approved and active based on the dates you selected. If you do have a job postings fee setup, click Continue and complete the checkout process.
| NOTE: If you have given reps Read/Write access to Job Posting in the MIC, they will be able to add job postings. |
Edit a Job Posting
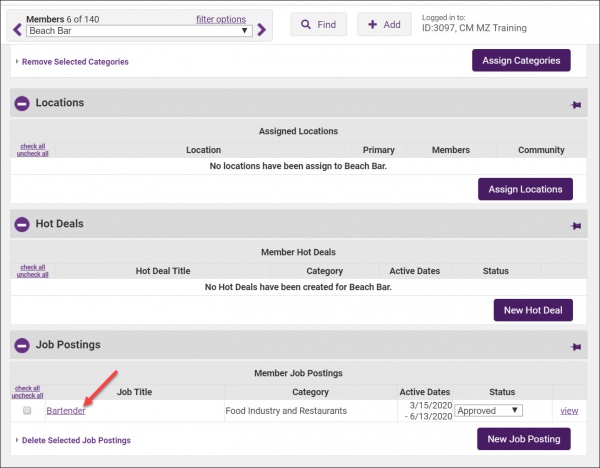
- For the desired member, click the Advanced tab. Note: Access job postings for all members by clicking Job Postings in the left-hand menu.
- Expand the Job Postings section if needed.
- Click the title of Job Posting you wish to edit.
- Make desired changes.
- Click Save.
| IMPORTANT: If you are charging for Job Postings, you will NOT be able to change the Active Dates. If the member wishes to extend a Job Posting, you will need to create a new posting. |
Disable a Job Posting
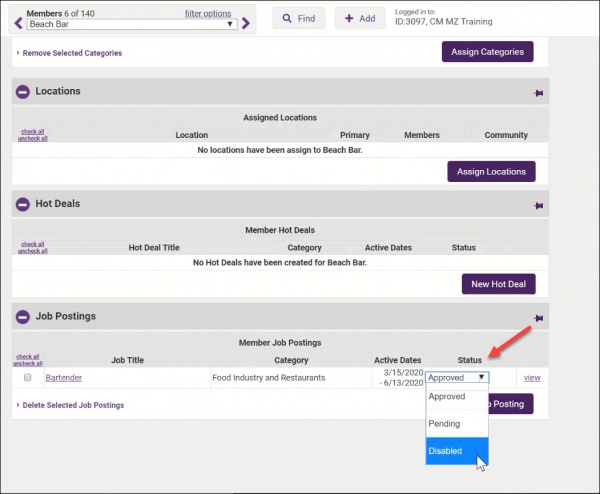
- For the desired member, click the Advanced tab. Note: Access job postings for all members by clicking Job Postings in the left-hand menu.
- Expand the Job Postings section if needed.
- For the desired job posting, select Disabled from the Status list.
Remove a Job Posting
- For the desired member, click the Advanced tab.
- Expand the Job Postings section if needed.
- Tick the checkbox next to the job posting you wish to remove.
- Click Delete Selected Job Postings.
Approve Job Postings
The Task List will indicate the number of pending job postings that need your approval. Job postings submitted in the MIC or public website will not be displayed on your public website until they have been approved. Staff who have subscribed to the Content (deal, job, event etc.) was submitted that may need approval notification will receive an email when a job posting is submitted for approval.
- Click the numbered Job Posting link in the Task List.
- If needed, click the name of the job posting to view the details. NOTE: The field Displayed Posting Date is not a field that can be populated via the MIC. You may wish to populate this field when approving the job posting. If this field is NOT filled in, it will be auto-populated with the current date. (v4 Modules only).
- Select Approved from the Status list. When a job posting is Approved, it will display on your public website and/or in the Member Information Center (depending on how you have it setup).
Job Postings - Complete a Transaction "In Cart"
If you are charging for job postings, the status of a posting may display as In Cart which is an indication that the posting needs to be paid for. To complate this transaction (this step can be done from the member's Advanced tab, or by clicking Jobs in the left-hand navigation panel):
- For the desired member, click the Advanced tab.
- Expand the Job Postings section if needed.
- Click the In Cart link.
- Click Checkout
- Enter desired payment method, and click Checkout.
| NOTE: After completing the check-out, you may need to complete by marking the job posting as approved. See: Approve Job Postings. |
View All Job Postings
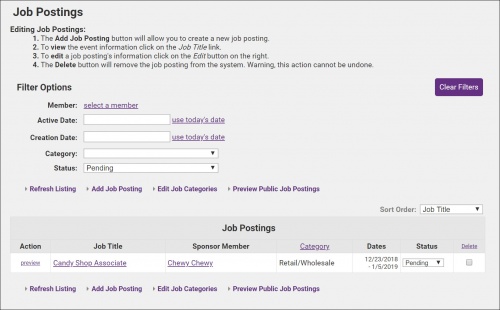
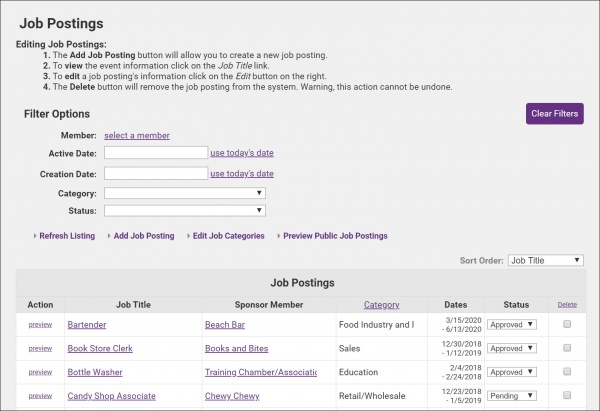
You can view a complete list of all job postings in the Jobs module. You will also be able to approve postings, add new postings, update your job categories, and preview your public page postings.
- Click Jobs in the left-hand navigation panel. NOTE: If you have customized the terminology for job postings, your customized term will be displayed in the navigation panel and throughout the software.
- Click View/Edit Job Postings.
- Enter desired Filter Options
- Click Refresh Listing.
Preview Public Job Posting
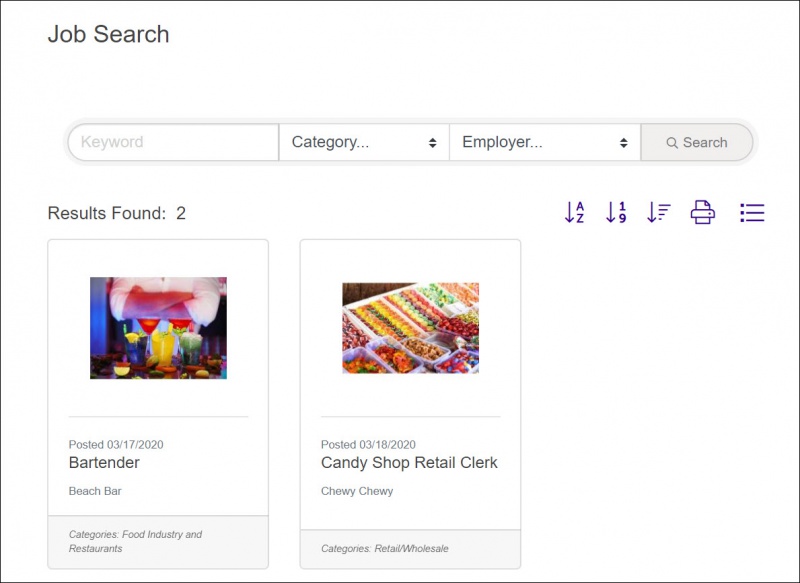
The preview options allows you to view your job postings, as they are seen by the public.
- Click Jobs in the left-hand navigation panel. NOTE: If you have customized the terminology for job postings, your customized term will be displayed in the navigation panel and throughout the software.
- Click Preview Public Job Postings.
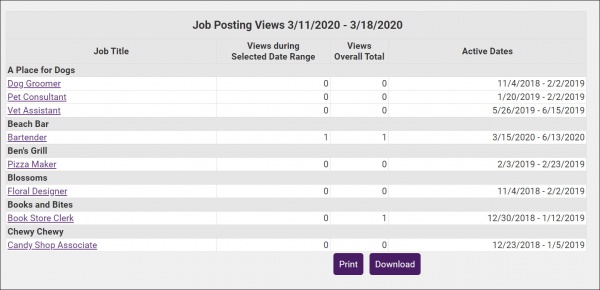
Job Posting Views - Web Statistics
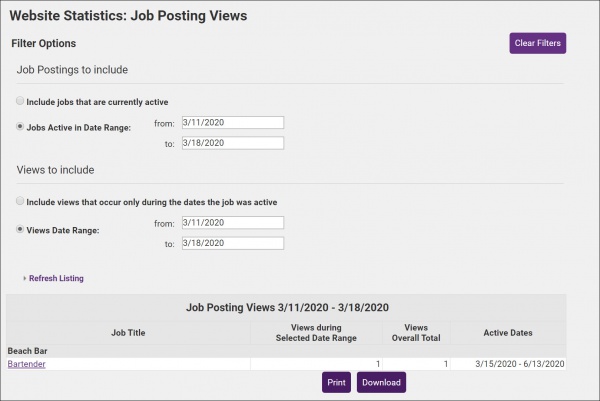
- Click Jobs in the left-hand navigation panel. NOTE': If you have changed the terminology for Jobs, your custom terminology will be displayed in the navigation panel.
- Click Job Posting Views.
- Enter desired filtering criteria for report.
- Click Refresh listing.
- Views during Selected Date Range: Indicates the number of times the job posting was viewed in the date range selected for the report.
- Views Overall Total: Indicates the number of times overall that the job posting was viewed.
| NOTE: You can also see the number of views, for an individual member, on the member's Stats tab. |
Manage Hot Deals/Member to Member Deals
One of the benefits you can offer your membership is the opportunity to share special discounts or “Hot Deals” with other members and your community. Hot Deals, sometimes called Community Deals, are specials that a member desires to post for consumer viewing on your association's website. Member-to-Member (M2M) deals are also created here (Plus edition or greater with v2 or greater public modules).
Members may submit deals through the Member Information Center or a staff person may add a deal on behalf of the member. By default, deals require approval by a staff person if the member submits them through the Member Information Center, which can be set to send off an email to your staff. Regardless, the Task List will indicate the number of pending deals that need your approval. After approval, members are sent an automatic email notice of approval.
When new deals are added, subscribers to the eNewsletter Mailing list will receive an automatic email notification. Members are sent an automatic reminder email three days prior to the expiration of a Hot Deal.
| NOTE: If a member has an active deal in place when they are dropped, an option will display at that time giving opportunity to disable the deal at that moment. |
Hot Deal Settings
Hot Deal Settings apply to both Hot Deals (Community Deals) and Member-to-Member Deals. Note: Member to Member deals are available only for those with Plus edition or greater.
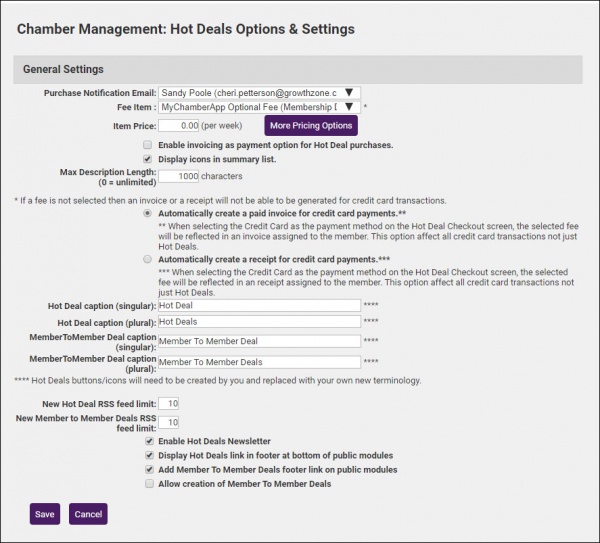
- Click Setup in the left-hand menu.
- Click Hot Deal Settings in the Association Options section.
Descriptions of each of the settings are provided below.
Configure who Receives Notification of Hot Deal Submissions
- Click Setup in the left-hand menu.
- Click Hot Deal Settings in the Association Options section.
- Select the staff member to whom an email should be sent in the Purchase Notification Email list.
| NOTE: Staff can also be subscribed to receive notification, when content is submitted via the MIC, under Setup > Association Employees/Reps > Additional Settings. |
Define Pricing/Billing Options for Hot Deals
Hot Deals may simply be a benefit that you offer to your members, or, you can sell hot deals for non-dues revenue.
- Click Setup in the left-hand menu.
- Click Hot Deal Settings in the Association Options section.
- General Settings:
- Fee Item: Select the fee item from the list. This is the fee item that will be used when a Hot Deal is purchased, fee items that have been created of type Member Fees & Dues are available for selection.
- The fees selected here apply to both public Hot Deals and Member-to-Member Deals. Fees for deals are charged on a week by week basis – a full week at a time. The week is determined by the number of days – 1-7 days = 1 week; 8-14 days= 2 weeks etc.
- Item Price - enter the price of a Hot Deal. Pricing is based on a Hot Deal being displayed on a weekly basis. Click the More Pricing button if you wish to differentiate pricing between your basic web package members and your enhanced web package members. See Define Different Hot Deal Pricing Package for Basic vs. Enhanced Web Participation.
- Fees for Hot Deals are charged on a week by week basis – a full week at a time. The week is determined by the number of days – 1-7 days = 1 week; 8-14 days= 2 weeks etc.
- Enable invoicing as payment option for Hot Deal purchases - If you wish to allow your members to be invoiced when submitting hot deals, enable this option. NOTE: Cash payment is not available as a payment method for deals.
- Automatically create a paid invoice for credit card payments - select this option if you want the system to create an invoice and payment when a hot deal is paid for on-line
- Automatically create a receipt for credit card payments: Select this option if you want the system to create a receipt when hot deal is paid for on line.
- Click Save.
Define Different Hot Deal Pricing Packages for Basic vs. Enhanced Web Participation Packages
If you wish to offer different pricing to your member, perhaps Hot Deals are at no charge to Enhanced members, follow the instructions below:
- Click Setup in the left-hand menu.
- Click Hot Deal Settings in the Association Options section.
- In the General Settings section, click the More Pricing Options button for Item Pricing.
- Enter pricing for Basic Package and Enhanced Package.
- Click Save.
Change Pricing for Hot Deals
- Click Setup in the left-hand menu.
- Click Hot Deal Settings in the Association Options section.
- Make the desired price change in the General Settings section:
- Enter the new price for a Hot Deal in Item Price in the General Settings section. If you have set different pricing for Basic and Enhanced web participation packages, click the More Pricing button to make the desired changes.
- Click Save.
Configure Hot Deal Display Settings
- Click Setup in the left-hand menu.
- Click Hot Deal Settings in the Association Options section.
- Display icons in summary list - when selected display icons will show the graphic that has been selected in that deal on the public website in the search results in addition to displaying on the coupon itself. Only available with SEO integration.
- Max Description Length: (0 = unlimited) - enter the maximum number of characters allowed in the description of the hot deal.
Configure Hot Deal Terminology
Hot Deal and Member to Member captions allow you to specify your own custom phrase to describe these deals. The custom title will be reflected on the associated public website modules and throughout the software. For example, you may wish to rename "Hot Deals" to "Offers from our Members".
- Click Setup in the left-hand menu.
- Click Hot Deal Settings in the Association Options section.
- Hot Deal caption (singular) - this setting allows you to customize your own custom phrase for your hot deals (both on your public web-site and on the MIC). This will be used instead of Hot Deal. The custom title will be reflected on the associated public website modules and throughout the software. Website graphics must be designed and replaced by your website designer.
- Hot Deal caption (plural) - - this setting allows you to customize the header for your hot deals. This will be used instead of Hot Deals.
- MemberToMember Deal caption (singular) - this setting allows you to customize the header for member to member deals in the MIC. This terminology will be used instead of Member to Member Deal.
- MemberToMember Deal caption (plural)- this setting allows you to customize the header for member to member deals in the MIC. This terminology will be used instead of Member to Member Deals.
| NOTE: The terminology changes made here will also update the terminology in the back-office. |
Configure Hot Deal RSS Feed Limit
If you have embedded the Hot Deals RSS feed on your web-site, you can set a limit on the number of deals to be displayed at one time.
- Click Setup in the left-hand menu.
- Click Hot Deal Settings in the Association Options section.
- New Hot Deal RSS feed limit: RSS Feed limits for deals determine how many deals will display at one time in the RSS feeds. RSS feeds are commonly used to display a easy-glance list on your website home page.
- New Member to Member Deals RSS feed limit - RSS Feed limits for member to member deals determine how many deals will display at one time in the RSS feeds. RSS feeds are commonly used to display a easy-glance list on your MIC.
- Click Save.
Allow Visitors to your Web-site to Subscribe to the Hot Deals E-Newsletter
To allow visitors to your web-site (and promote your members!), enable the Hot Deals E-Newsletter. When new deals are added, subscribers to the E-Newsletter Mailing list will receive an automatic email notification.
- Click Setup in the left-hand menu.
- Click Hot Deal Settings in the Association Options section.
- Tick the check-box for Enable Hot Deals Newsletter.
- Click Save.
- Click Setup in the left-hand menu.
- Click Hot Deal Settings in the Association Options section.
- Display Hot Deals link in footer at bottom of public modules and Add Member To Member Deals footer link on public modules: Enable Hot Deals as a public module and Enable Member to Member Deals as a public module control whether the link appears at the bottom of the modules on the public website. If deselecting the Member to Member Deals as a public module, you can still select Allow users to add M2M Deals while public module is disabled so that members may add deals in the Member Information Center but not have the link display for the public.
Enable Member To Member Deals
Member to Member deals, often referred to as M2M, are opportunities for member to offer specials to members only.
| NOTE: Member to Member Deals are available with Plus edition or greater of the software. |
- Click Setup in the left-hand menu.
- Click Hot Deal Settings in the Association Options section.
- Enable Allow creation of Member To Member Deals.
- Click Save.
Add A Hot Deal
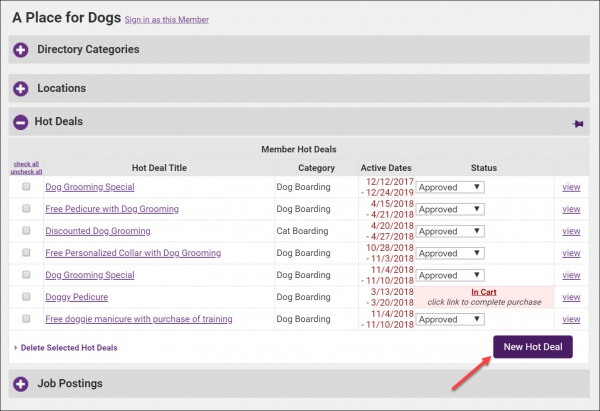
- Click Members in the left-hand menu.
- Select the desired member.
- Click the Advanced Options tab.
- Expand the Hot Deals section if needed.
- Click the New Hot Deal button.
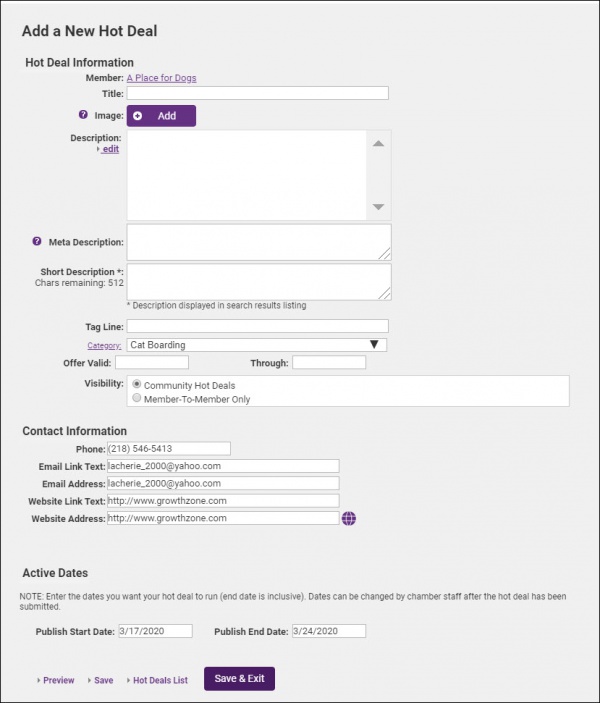
- Complete the fields in the Add a New Hot Deal screen:
- Enter a Title. The title is displayed for the consumer on the public website; get their attention with this phrase. The title also shows as a highlight in the online directory search results with v3 public modules.
- Select an Image. Click the Add Image Button to upload an image.
- Enter a Description of the hot deal. To enter the Description, click the edit hyper-link.
- Enter a Meta Description. The meta description is often visible in search engine results, social media posts and shares. Having the meta description customizable, gives you the opportunity to better target your message and hopefully improve your click-through-rate. NOTE: If this field is left blank, it will automatically populate with the first 160 characters of the Deal Description.
- Enter a Short Description. The short description will display "teaser text" in the deals search results on your own website. NOTE: The Short Description field is only available to customers that have v3 public modules. Customers with v1 or v2 public modules will not display this field at all and will only see the Meta Description field.
- Enter a Tagline. The Tagline text appears on the Hot Deal Listing page in the highlighted box – a quick phrase to grab their attention.
- Select a Category. Categories listed are those that this member belongs to. Click the Category hyper-link if you wish to add a new category.
- Enter the Offer Valid' and Through dates. These dates will display for the public on the website coupon.
- Select Visibility for this hot deal. Deals are either Community Hot Deals (displayed on your public web-site) or Member to Member (M2M) deals. M2M deals display on the website under a different URL than Community Hot Deals. M2M deals are only available with Plus edition and SEO integration.
- The Contact Information will automatically be populated with the information of this member, but may be changed.
- Enter the Active Dates. These dates determine when the coupon will display on the public website. Dates may be modified by staff later if no charges are applied to this deal. Charges are setup under Settings -> Hot Deal Settings.
- Click Save Exit If Hot Deals are setup at no charge, the deal is automatically approved OR if there is a charge for Hot Deals, click In Cart to continue to the checkout screen.
Edit a Hot Deal/Member to Member Deal
- For the desired member, click the Advanced tab.
- Expand the Hot Deals section if needed.
- Click the Hot Deal for which you wish to edit.
- Make desired changes.
- Click Save & Exit.
Change the Publish Dates of a Hot Deal
- For the desired member, click the Advanced tab.
- Expand the Hot Deals section if needed.
- Click the Hot Deal for which you wish to change the publish dates.
- Change the Publish Start and Publish End dates as needed.
- Click Save & Exit.
| NOTE: The dates that the Hot Deal will be displayed on the website (a.k.a. active dates) may be modified by staff as long as the deal was saved with no charges associated. If the original deal was saved with a charge associated, then the dates may not be modified. If this were the case, change the status of the original event to Disabled and simply create a new event with the correct dates. Publish Dates may not be changed by a member in any situation. |
Approve Hot Deals/Member to Member Deals
- Click the Hot Deal task in the Task List. The Advertising / Hot Deals screen will open, displaying a list of Hot Deals that require approval. Status of these Hot Deals will display as Pending.
- If needed, click the preview link to view the details.
- Select Approved from the status drop-down list.
Receive Notification when Hot Deals are Submitted
You may allow your members to submit Hot deals via the MIC. Staff can subscribe to the Content (deal, job, event etc.) was submitted that may need approval under Setup > Association Employees/Rep. Additionally, if you have configured your system to require approval of these deals, a notification will be sent to the Purchase Notification Email you assigned in the Hot Deal Settings, and a task will be noted in the Task List.
Hot Deals - Complete a Purchase in Cart
- For the desired member, click the Advanced tab.
- Expand the Hot Deals section if needed.
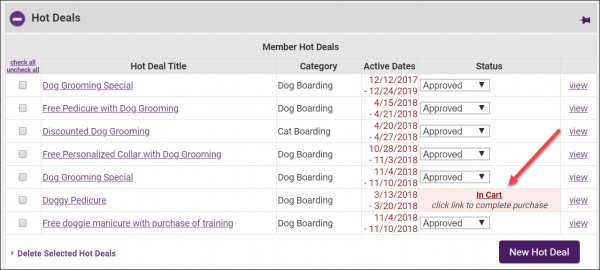
- Click the In Cart link.
- Follow instructions on the screen to complete the purchase.
Disable a Hot Deal or M2M Deal
- For the desired member, click the Advanced tab.
- Expand the Hot Deals section if needed.
- For the desired Hot Deal, select Disabled from the Status list.
Delete a Hot Deal
- Click Members in the left-hand menu.
- Select the desired member.
- Note: Access all Hot Deals/Member-to-Member Deals by clicking Advertising in the left-hand menu.
- On the Advanced tab, click to select the check box in front of the Deal that you wish to remove in the Hot Deals area.
- Click Delete Selected Hot Deals.
Hot Deal Expiration Reminder Email
A reminder email "Your Hot Deal is about to expire" will be sent to your member prior to the expiration of a hot deal. The email is sent out three days prior to the Hot Deal expiration at approximately 6:30 a.m. CDT. Example: Expiration of Saturday at midnight would send an email on Wednesday morning. If a custom title is assigned for “Hot Deals” than that title will be used in the email subject line.
| NOTE: These emails are not logged in the member comm. history. Contact support if you wish to have this email communication turned off. |
View All Hot Deals
To view and edit hot deals, you may do this on a members Advanced tab, or you may view all hot deals in the Advertising module.
- Click Advertising in the left-hand navigation panel.
- Click View/Edit Hot Deal in the Hot Deals section. By default all hot deals regardless of status will be displayed.
You can filter the report by active date, creation date, member, status, or category. If you select filters, click Refresh Listing.
Update Hot Deals/Member to Member Deals Publish Dates
If you wish to extend the publish date for a Hot Deal/Member to Member Deal, you can update this from the back-office.
- Click Advertising in the left-hand navigation panel.
- Click View/Edit Hot Deal in the Hot Deals section. By default all hot deals regardless of status will be displayed.
- Click the link for the Hot Deal/Member to Member Deal that you wish to update.
- Scroll to the bottom of the page, and change the Publish End Date as needed.
- Click Save.
| NOTE: If you charge for hot deals/member to member deals you will NOT be able to change the publish start and end dates. |
Hot Deals - E-Newsletter Mailing List
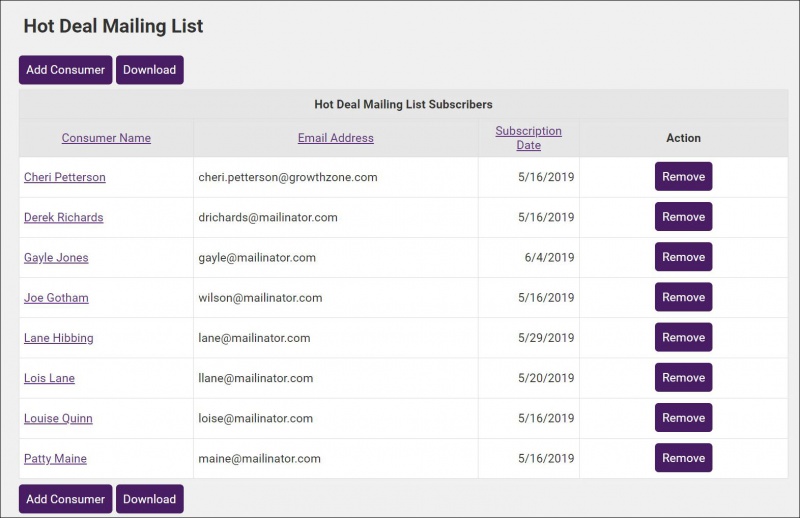
When new Hot Deals are added, subscribers to the eNewsletter Mailing list will receive an automatic email notification. Consumers may sign-up for this list through a link on the Hot Deals website page or you may manually add consumers to the list under Advertising > eNewsletter Mailing List.
Enable Hot Deals E-Newsletter
You enable the E-Newsletter option under Setup > Hot Deals. See: Enable Hot Deals Newsletter for instructions.
| NOTE: Member to Member Deals are not included in the E-Newsletter |
View Hot Deals eNewsletter Recipient List
- Click Advertising in the left-hand navigation panel.
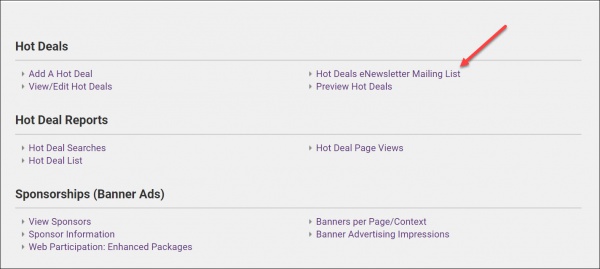
- Click Hot Deals eNewsletter Mailing List in the Hot Deals section.
Add a Contact to the Hot Deals eNewsletter List
- Click Advertising in the left-hand navigation panel.
- Click Hot Deals eNewsletter Mailing List in the Hot Deals section.
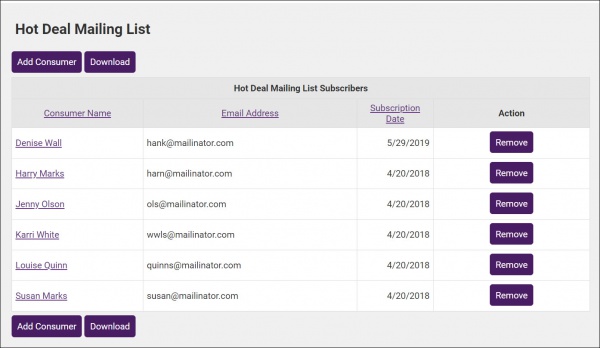
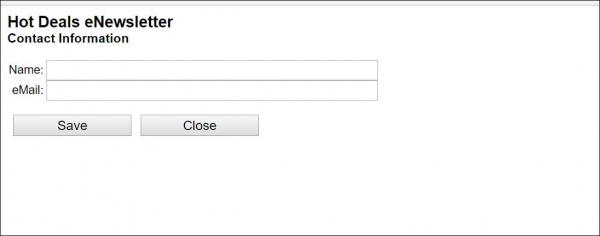
- Click the Add Consumer button.
- Enter the Name and Email for the new contact.
- Click Save.
Remove a Contact from the Hot Deals eNewsletter List
- Click Advertising in the left-hand navigation panel.
- Click Hot Deals eNewsletter Mailing List in the Hot Deals section.
- Click the Remove button, in the Actions column for the contact you wish to remove.
Hot Deal Reporting
Various reports are available to you to view and analyze your Hot Deals.
Hot Deal Searches
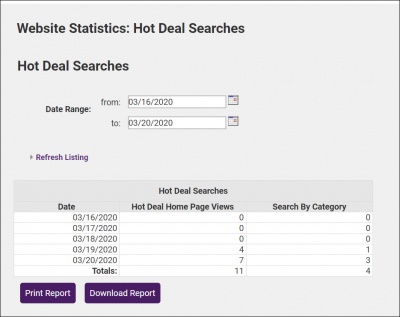
The Hot Deal Searches report provides you with an analysis of the number of times your hot deals page has been visited, and the number of times the visitor has searched by category over a selected date range.
- Click Advertising in the left-hand navigation panel.
- Click Hot Deal Searches in the Hot Deals Reports section. By default the report will automatically generate for the past 30 days. You may change the date range as needed, and choose to include non-active hot deals.
- Click Refresh Listing.
Information on the report:
- Hot Deal Home Page Views: Number of times the Hot Deals Home Page was viewed on the selected date.
- Search By Category: Number of times Hot Deals were searched by category on the selected date.
Hot Deal Page Views
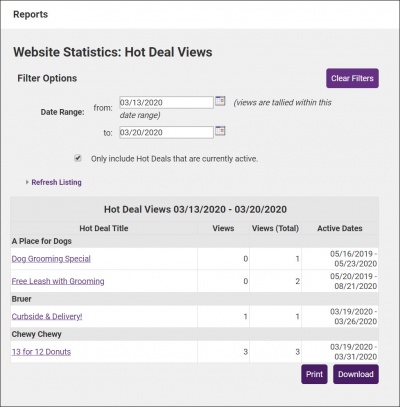
The Hot Deal Page Views report displays the number of views that current or past Hot Deals have received. The statistics are are updated nightly.
- Click Advertising in the left-hand navigation panel.
- Click Hot Deal Page Views in the Hot Deals Reports section. By default the report will automatically generate for the past seven days. You may change the date range as needed.
The information in the report includes :
- Views: Number of times this hot deal has been viewed in the date range used to generate the report.
- Views (Total): Total number of times this hot deal has been viewed.
