Communication
Contents
- 1 Getting Started
- 2 Communication Basics
- 2.1 Email Sending Options
- 2.2 Archive emails (record) in the database even when not logged in
- 2.3 Quick Guide to Sending an Email
- 2.4 Send a Mass Email
- 2.5 Schedule an Email
- 2.6 Send Communication by Delivery Preference
- 2.7 Send Communication Based on Custom Report Criteria
- 2.8 Creating a Letter
- 2.9 Create Mass Mailing Labels
- 2.10 Create/Send Fax Output
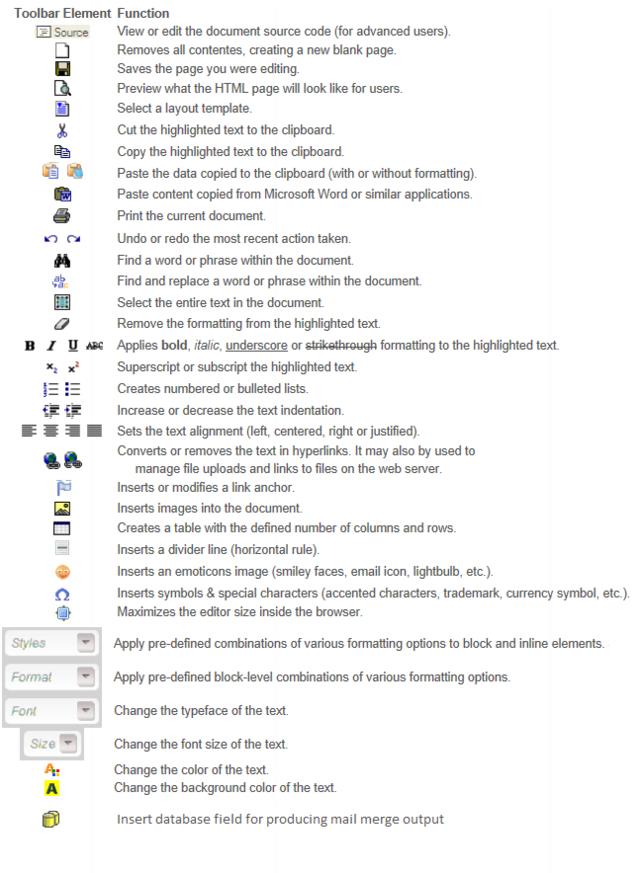
- 2.11 Editor menu selections
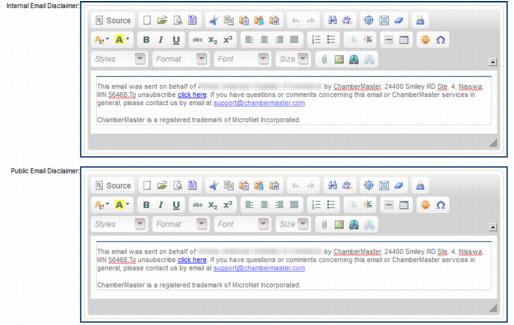
- 2.12 Email Disclaimer
- 2.13 Adding an attachment
- 3 Viewing and Recording Communication History
- 4 Documents and Templates
- 5 Blogs
- 6 Mail Merge
- 7 Remove Unwanted Headers & Footers
- 8 Creating a Signature Block
- 9 Communicating Using Groups & Mailing Lists
- 10 eReferral
- 11 Storing Documents - Cloud Drive
- 12 Using and Integrating Constant Contact
- 13 Using and Integrating MailChimp
- 14 Sample Automatic Emails Sent Out by ChamberMaster/GrowthZone
- 15 FAQ
- 16 Help Documentation
Getting Started
Communication is a pivotal tool used everyday in your association to foster and maintain valuable relationships. ChamberMaster/GrowthZone offers the ability to communicate via email, SMS text, fax and print.
If you are just getting started with the Communication module, watch this overview video. Otherwise, just scroll down for FAQ, Common Tasks, and this module's Help Documentation.
Communication Basics
Email Sending Options
Once email recipients are selected in ChamberMaster/GrowthZone, there are two methods of sending the email.
- Using ChamberMaster/GrowthZone's built in email tool.
- Using Microsoft Outlook (if installed on your computer).
Depending on your needs, you may choose to send some email directly from ChamberMaster/GrowthZone and some from Microsoft Outlook. Each method has its own strengths.
Advantages to Sending Email with ChamberMaster/GrowthZone
- Easy access if already logged in
- Gives access to current addresses in your database
- Ability to create “mail merge” emails
- Ability to embed attachments as links
- Ability to use templates
- Ability to schedule the email for future delivery (for users of the Plus edition or greater)
Advantages to Sending Email with Outlook
- Access to additional email addresses not in your database
- May add additional CCs and BCCs
- Familiarity
Both methods of sending email will record in the Communication History. See Recording Communication History for more information.
Note: This selection will open whatever the email program is set as the default for your web browser. Whatever email program opens when you click on a “mailto” link is the email program that will be used when you click Email with Outlook.
Archive emails (record) in the database even when not logged in
![]() View a video showing how to archive an email
View a video showing how to archive an email
To use the archive feature, you must be sending the email from an email address that is listed as a staff email address under Setup->Employee/Reps. |
Emails forwarded or cc'd to archive@youraname when multiple members/reps in your database share the same recipient address will be recorded in Communication ->Unmatched Archive Emails. |
In cases where there are two reps with an identical email address that belong to the same member, it will be recorded on that member’s history. |
In cases where two reps with identical email address belong to two different members, the archived email will still go to the unmatched archive email list. |
Quick Guide to Sending an Email
1. |
Locate one of the screens mentioned in “Communication Basics” and click the email selection. |
2. |
If applicable, select Email with ChamberMaster / MemberZone. |
3. |
If sending from the Communication module using New Email to Multiple Members or Form Letters, you will need to select the desired recipients first. |
4. |
Create the email and click Send Email Now or Send Email Later*. |
5. |
ChamberMaster/MemberZone will send the email immediately or at the scheduled time and record it on the Communication tab of the member’s record. |
1. |
Locate one of the screens mentioned in “Communication Basics” that is marked with an * (asterisk) and click the email selection. |
2. |
Select Email with Outlook. |
3. |
If sending from the Communication module using New Email to Multiple Members, you will need to select the desired recipients first. |
4. |
Create the email using features and selections from your own email program and send the email. |
5. |
ChamberMaster/MemberZone will automatically record it on the Communication tab of the member’s record. |
Send a Mass Email
1. |
Click Communication in the left-hand menu. |
2. |
Click New Email to Multiple Members. |
3. |
Select desired recipients. |
4. |
Click remove next to those identified as having no contact info, duplicate emails, or invalid emails. |
5. |
Click Edit with ChamberMaster.* |
6. |
Compose the email message. |
7. |
Click Send Email Now or Send Email Later.** |
Schedule an Email
1. |
Locate one of the screens mentioned in “Communication Basics” and click the email selection. |
2. |
If applicable, select Email with ChamberMaster. |
3. |
If sending from the Communication module using New Email to Multiple Members or Form Letters, you will need to select the desired recipients first. |
4. |
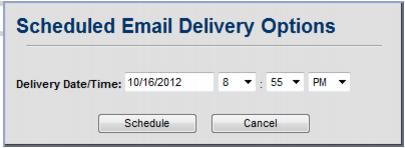
Create the email and click Send Email Later. |
5. |
Select the desired date and time for the email to be sent. |
6. |
Click Schedule. |
7. |
Click OK. |
8. |
ChamberMaster will send the email at the scheduled time and record it on the Communication tab of the member’s record. |
9. |
To view the scheduled email to edit or delete, click Communication and click Manage Scheduled Email Messages. |
1. |
Click Communication. |
2. |
Click Manage Scheduled Email Messages. |
3. |
Click Edit to edit the content or change the delivery time. |
1. |
Click Communication. |
2. |
Click Manage Scheduled Email Messages. |
3. |
Click Delete to remove the email from the delivery schedule. |
1. |
Click Communication. |
2. |
Click Manage Scheduled Email Messages. |
3. |
Click the Past Scheduled Emails tab. |
Send Communication by Delivery Preference
1. |
Click Communication in the left-hand menu. |
2. |
Click Form Letters. |
3. |
Select desired recipients. |
4. |
Select Preferred Communication Type as the way to Distribute By: |
5. |
If applicable, click remove next to those identified under Preferred Communication Type as having no contact info, duplicate, or invalid info. |
6. |
Click Continue. |
7. |
Compose the letter. |
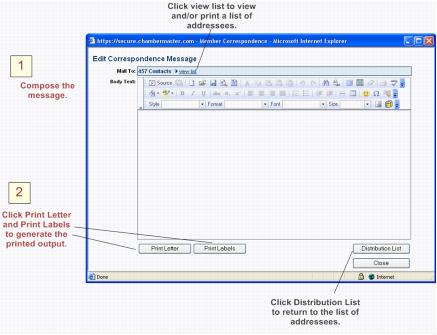
8. |
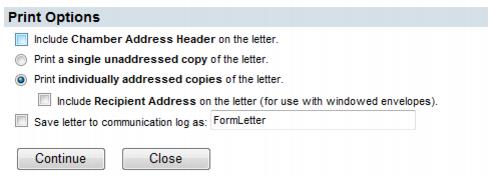
Click Print Letters, complete the Print Options selections and click Continue. |
9. |
Preview the letters on-screen. Select Print Preview if desired to view the formatted output and remove unwanted headers and footers if applicable. |
10. |
Close the letter-printing windows and return to the letter composition window. |
11. |
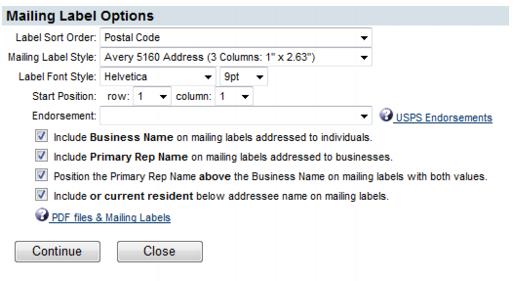
Click Print Labels, complete the Mailing Label Options selections and click Continue. |
12. |
Preview the labels on-screen and then select to print. Ensure that your print selections are set with Page Scaling set to None. |
13. |
Close the label-printing windows and return to the letter composition window. |
14. |
Click Continue>>Faxes. |
15. |
Make any modifications to the fax output. |
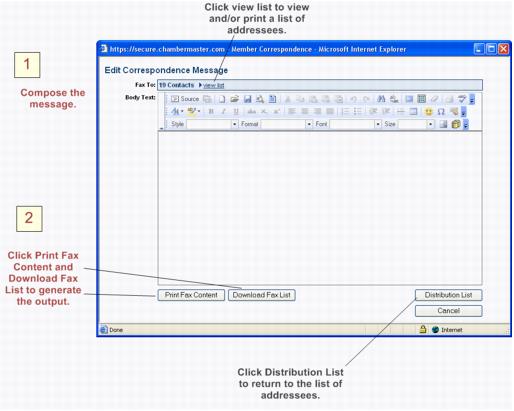
16. |
Click Print Fax Content and/or Download Fax List. Read more information on fax output options. |
17. |
Click Continue>>Emails. |
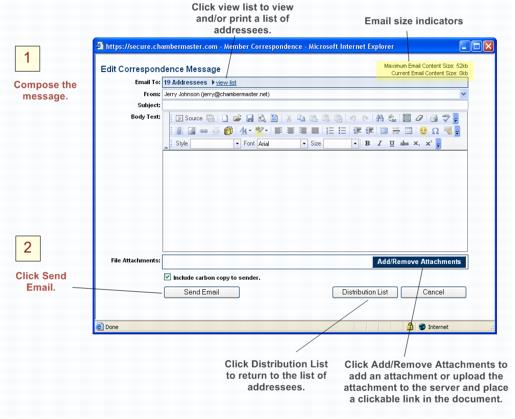
18. |
Make any modifications to the email output. Make sure to type a subject line. Add attachments and links as desired. |
19. |
Click Send Email. |
Selecting Recipients
Composing a Letter
Composing an Email Message
Composing Fax Output
Send Communication Based on Custom Report Criteria
Creating a Letter
1. |
Click Communication in the left-hand menu. |
2. |
Click Form Letters. |
3. |
Select the desired recipients. |
4. |
Select Mail Only as the way to Distribute By: |
5. |
If applicable, click remove next to those identified under Mail Only as having no contact info, duplicate addresses, or invalid addresses. |
6. |
Click Continue. |
7. |
Compose the letter. |
8. |
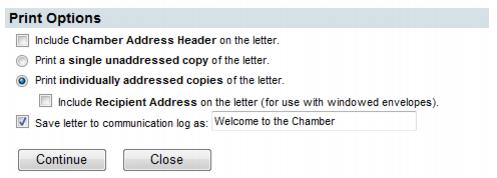
Click Print Letters, complete the Print Options selections and click Continue. |
9. |
Preview the letters on-screen. Select Print Preview if desired to view the formatted output and remove unwanted headers and footers if applicable. |
10. |
Close the letter-printing windows and return to the letter composition window. |
11. |
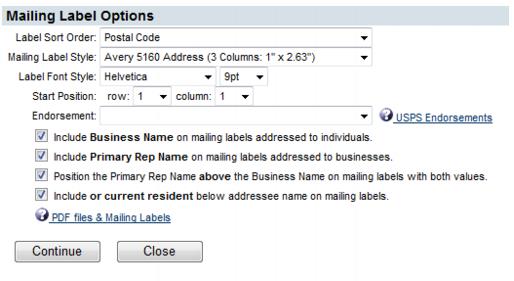
Click Print Labels, complete the Mailing Label Options selections and click Continue. |
12. |
Preview the labels on-screen and then select to print. In the Print window that appears, ensure that Page Scaling is set to None. For specific selections based on your version of Adobe Reader, see “Proper settings for label output” below. |
13. |
Close the label-printing windows and return to the letter composition window. |
14. |
Click Close. |
Create Mass Mailing Labels
Single labels for a particular member are available in the Members module on the General tab, the Reps tab, and the Communication tab. |
Selections for printing mailing labels for multiple members are found in the Communication module (Form Letters) and the Reports module (Mailing Labels). The Reports module selection gives additional options specific to mailing labels that are not available when printing labels in the Communication module, such as a selection to download the labels and view a postal code summary. |
1. |
Click Reports in the left-hand menu. |
2. |
Click Mailing Labels in the Common Reports area. |
3. |
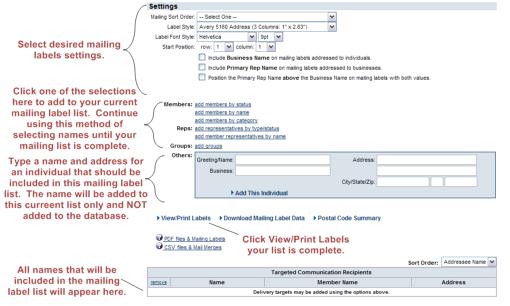
Add those that should have a label printed using one or more methods in the Settings area. See Figure 1-12. |
4. |
Select other desired mailing label settings. |
5. |
Click View/Print Mailing Labels. |
6. |
The selected labels will display. |
7. |
Insert the labels into your printer and click Print from the File menu or other desired method within your browser window. |
8. |
In the Print window that appears, ensure that Page Scaling is set to None. For specific selections based on your version of Adobe Reader, see “Proper settings for label output”. |
9. |
After selecting the desired local printer, click Print. |
1. |
Click Communication in the left-hand menu. |
2. |
Click Form Letters in the Correspondence area. |
3. |
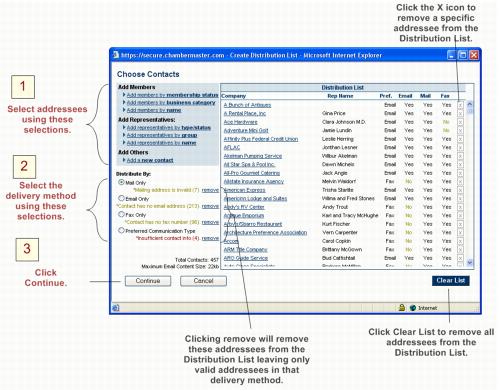
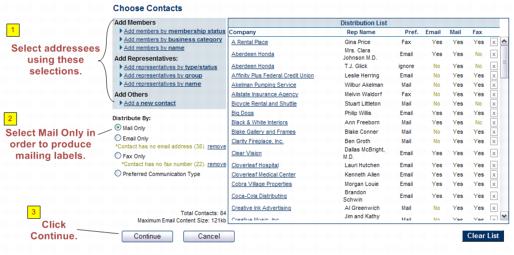
Select the desired addressees from the selections in the designated blue area. See Figure 1-13 below. |
4. |
Select Mail Only in the Distribute By area. |
5. |
Click Continue. |
6. |
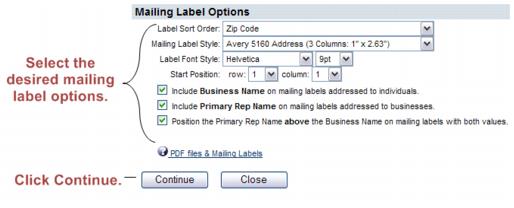
Click Print Mailing Labels. |
7. |
Select the desired mailing label options. |
8. |
Click Continue. |
9. |
The selected labels will display. |
10. |
Insert the labels into your printer and click Print from the File menu or other desired method within your browser window. |
11. |
In the Print window that appears, ensure that Page Scaling is set to None. For specific selections based on your version of Adobe Reader, see “Settings for label output”. |
12. |
After selecting the desired local printer, click Print. |
13. |
Settings for label output
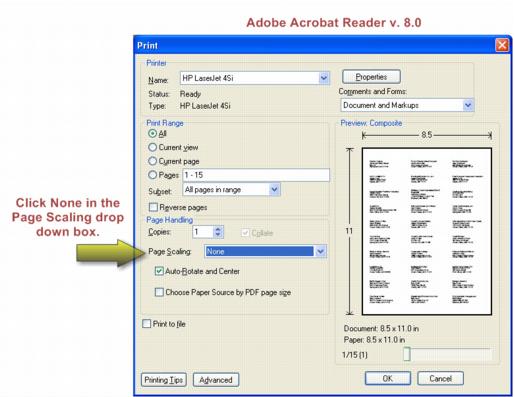
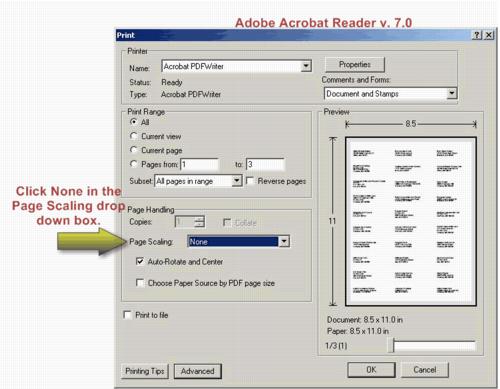
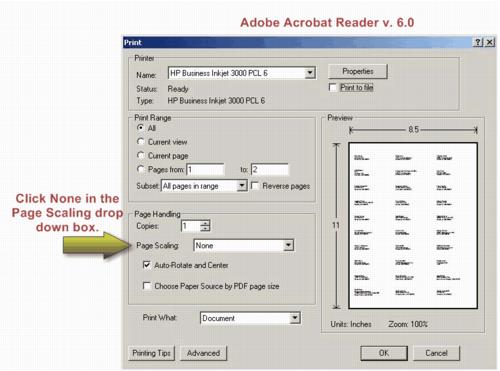
Labels printed through your software will first display on your screen in Adobe Reader, allowing you to preview the resulting labels before sending to the printer. However, one selection in the print dialog box must be changed from the default to allow proper control of label placement. This selection looks different based on the version of Adobe Reader that is installed on your own computer.
Page Scaling should always be set to None or 100% or Actual (wording varies depending on Adobe version). When Page Scaling is set to anything other than None (or the above identified choices), your labels may print off the labels or “slide” down the page as they print. You may say the labels shift or have improper alignment.
- Tip: Sometimes your browser will open the PDF in a “mini reader” instead of using the Adobe program which doesn’t allow you to change these settings. You’ll need to disable these mini-readers in order to allow the software to control the label output properly. Watch a video to understand how this works.
- Chrome Users: type in chrome://plugins and press Enter. Then disable the Chrome PDF Viewer and the Adobe Reader. See this page
- Firefox Users: Select Options from the Tools menu. Click Applications tab and search for Adobe and also for PDF. Change each selection to Use Adobe Reader.
- Internet Explorer Users: Select Manage Add-ons from the Settings menu. With Toolbars and Extensions selected change the Show drop-down to All-Add-ons. Then set the Adobe PDF Reader to Disabled.
Your Adobe Reader version will determine what this setting will look like.
Adobe Reader v. 8.0
Adobe Reader v. 7.0
Adobe Reader v. 6.0
Create/Send Fax Output
1. |
Click Communication in the left-hand menu. |
2. |
Click Form Letters. |
3. |
Select desired recipients. |
4. |
Select Fax Only as the way to Distribute By: |
5. |
If applicable, click remove next to those identified under Fax Only as having no contact info, duplicate fax #, or invalid fax #. |
6. |
Click Edit with ChamberMaster. |
7. |
Create the fax output. |
8. |
Click Print Fax Content and/or Download Fax List. Read more information on fax output options. |
1. |
Click Communication in the left-hand menu. |
2. |
Click Form Letters. |
3. |
Select desired recipients. |
4. |
Select Fax Only as the way to Distribute By: |
5. |
If applicable, click remove next to those identified under Fax Only as having no contact info, duplicate fax #, or invalid fax #. |
6. |
Click Edit with ChamberMaster. |
7. |
click Add/Remove Attachment. |
8. |
Select Append your file to the email directly. |
9. |
Click Continue. |
10. |
Click Browse… to locate the desired fax attachment file. |
11. |
Click Attach. |
12. |
Click Return. |
13. |
Click Send Faxes via . . . |
Email Disclaimer
1. |
Click Setup in the left-hand menu. |
2. |
Click General Options and Settings. |
3. |
Open the Email Server Settings area. |
4. |
Edit the desired disclaimer |
5. |
Click Save. |
Internal Email Disclaimer: appear on emails sent from inside the database, typically emails sent from you to your members. Disclaimers do not appear on the bottom of emails sent using the “Send with Outlook” selection |
Public Email Disclaimer: appear on emails that are generated by visitors that access your public website and click links that send emails to you or your members. For instance the “Request Info” link found on the members’ public information page. |
Adding an attachment
Sending an email with a link that will display the attachment
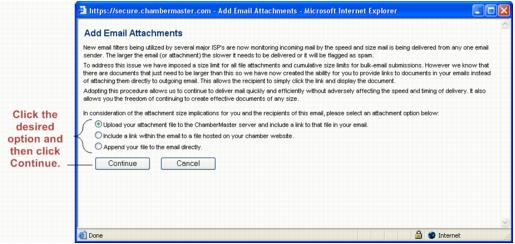
2. |
Click Upload your attachment file to the ChamberMaster server and include a link to that file in your email. See Figure 2-2 below. |
3. |
Click Continue. |
4. |
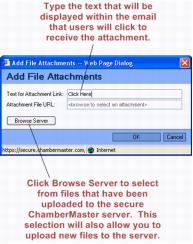
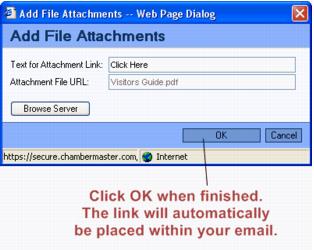
Type the desired text in the Text for Attachment Link field. Then click Browse Server. See Figure 2-3 below. |
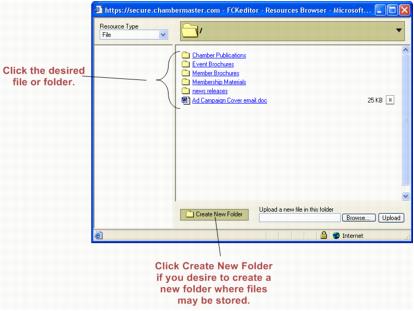
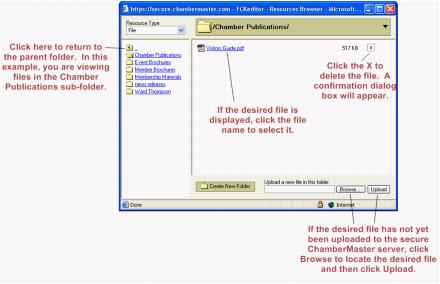
5. |
Browse to the desired file and click it to select. See Figure 2-4 below. Or you may upload a new file to the ChamberMaster server by clicking Browse, browsing to the desired file, click to select, click Open, and then click Upload. See Figure 2-5 below. Then you may click the desired file to select it. See Figure 2-4 again. |
6. |
Click OK. See Figure 2-6 below. |
Turn on email links
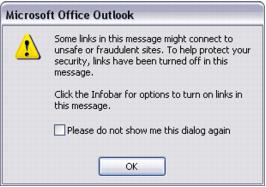
Possible error displayed when trying to open a link in Microsoft Outlook 2003
1. |
After clicking the disabled link in the email, click Click here to turn on links in the Information bar above. See Figure 2 below. |
2. |
Click Turn on Links (not recommended). |
3. |
Click the link within the email again. |
1. |
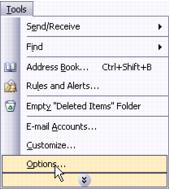
Before opening the email that has the links, click Options from the Tools menu. |
2. |
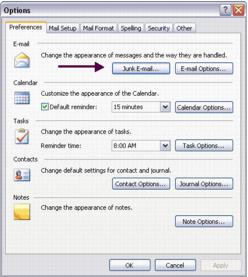
Click Junk Mail on the Preferences tab. |
3. |
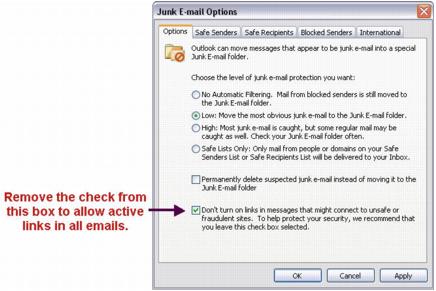
On the Options tab, click to clear the check box Don’t turn on links in messages . . . |
4. |
Click OK. |
5. |
Click OK. |
6. |
Open the desired email and try clicking the links again. |
Possible error displayed when trying to open a link in Microsoft Outlook 2007
1. |
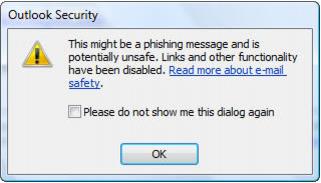
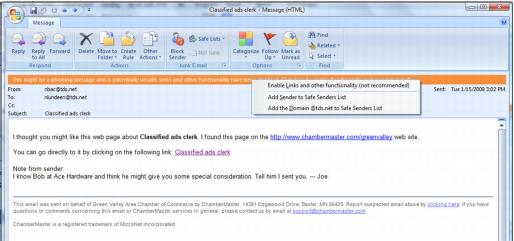
After clicking the disabled link in the email, click This might be a phishing message . . . (not recommend) in the Information bar above. See Figure 7 below. |
2. |
Click Enable Links and other functionality (not recommended). |
3. |
Click the link within the email again. |
To turn on email links for all emails (Microsoft Outlook 2007)
1. |
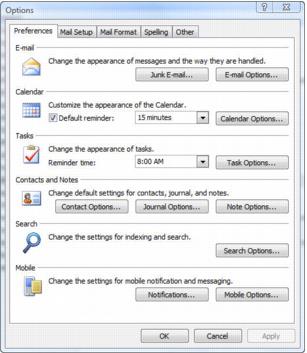
Before opening the email that has the links, click Options from the Tools menu. |
2. |
Click Junk Mail on the Preferences tab. |
3. |
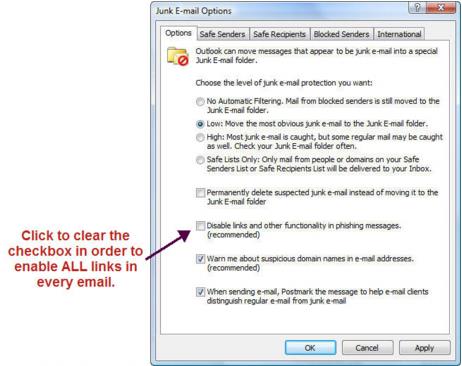
On the Options tab, click to clear the check box Disable links and other functionality in phishing message. |
4. |
Click OK. |
5. |
Click OK. |
6. |
Open the desired email and try clicking the links again. |
Viewing and Recording Communication History
View history communication history
1. |
Select the desired member in the Members module. |
2. |
Click the Communication tab. |
1. |
Click Communication in the left-hand menu. |
2. |
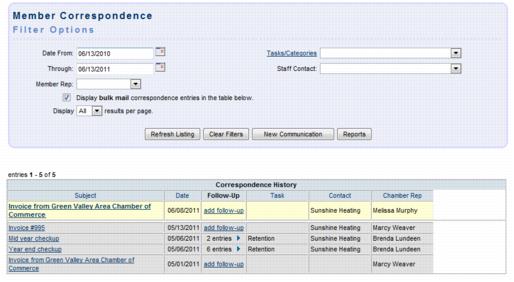
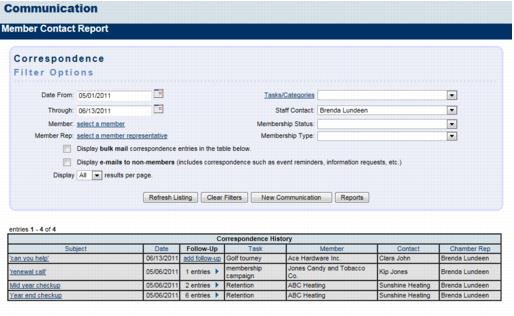
Click Member Contact Report. |
3. |
Select desired filters and click Refresh Listing. |
1. |
Find the communication history using one of the ways listed above. |
2. |
Hover over the Subject title of the entry that you wish to view. |
3. |
The contents of the entry will display immediately in a pop-over window. |
1. |
Find the communication history using one of the ways listed above. |
2. |
Click the title of the desired item in the Subject column. |
3. |
Click Delete. |
1. |
When viewing the communication history, click Reports and select Print Summary Report or click Print Detailed Report. |
2. |
Follow the on-screen steps to print the output. |
1. |
When viewing the communication history, filter the history as desired. |
2. |
Click Reports and select Download Detail Report. |
3. |
Follow the prompts on your screen to either open or save the Comma Separated Value (.csv) file. If the data is displayed immediately, you may wish to select Save from the File menu to ensure this data is available for viewing at a later time. |
Quick Communication Application (QCA)
1. |
Login to your software with administrator privileges. |
2. |
Click Setup in the left-hand menu. |
3. |
Click Install Quick Communication Application. |
4. |
Click Install. |
5. |
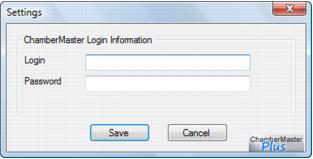
Type your database login name and password of the individual that will be recording the history. |
6. |
Click Save. |
7. |
8. |
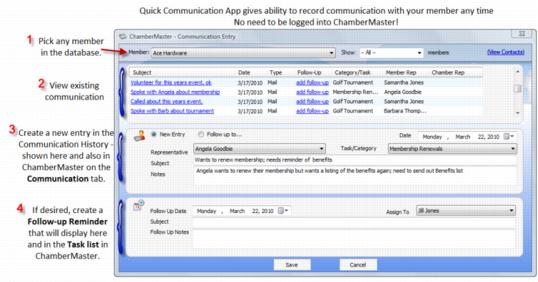
Right click the icon to quickly record a communication entry, eReferral, or Info Request. |
1. |
3. |
Make the desired selection: New Communication, New eReferral, New Info Request. |
4. |
Complete the onscreen entries which will be recorded in your software. |
Inserting a graphic
Insert a graphic within communication
1. |
2. |
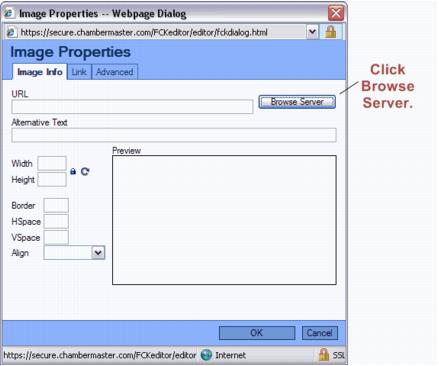
Click Browse Server. |
3. |
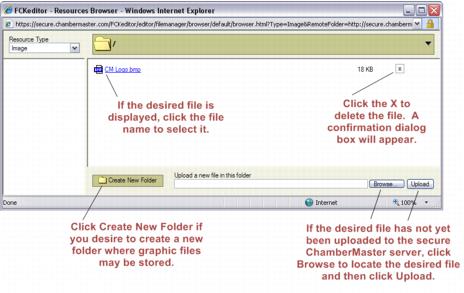
Browse to the desired file and click it to select. See Figure 4-2 below. Or you may upload a new file to the ChamberMaster server by clicking Browse, browsing to the desired file, click to select, click Open, and then click Upload. Then you may click the desired filename to select it. |
4. |
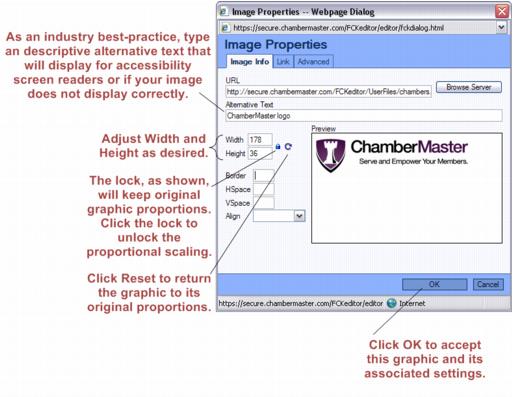
Make any desired changes on the Image Properties screen and then click Continue. See Figure 4-3. |
Modify an existing graphic (graphic size, borders, alternative text)
Remove an existing graphic (from the editor screen)
Remove a graphic (from the ChamberMaster server)
Documents and Templates
Blogs
Mail Merge
Creating a Signature Block
Communicating Using Groups & Mailing Lists
eReferral
Storing Documents - Cloud Drive
Using and Integrating Constant Contact
Using and Integrating MailChimp
Sample Automatic Emails Sent Out by ChamberMaster/GrowthZone
FAQ
- How do I add an attachment to an email?
- Who is able to view the attachment that comes when I send myself a carbon copy?
- Why do some of my email messages not make it through to the recipient?
- Are there any systems in place to help ensure the delivery of my emails?
- How can we ensure that our members are not spammed through the Contact Us link on their member page?
- Why do the links inside my email not open for me or my members?
Find answers to more commonly asked questions about Communication on the FAQ page
Help Documentation
Browse the Communication Table of Contents


