SmartText
SmartText, group text messaging, available right within your ChamberMaster database allows you to contact your members, community, or other individuals via group text messaging. Use it to promote your own events or gain non-dues revenue by offering the service to your members at a fee.
Contents
SmartText Basic Concepts
SmartText has great capabilities and is easy-to-use. Here are some foundational concepts to help understand how SmartText works with ChamberMaster.
Availability
- SmartText is currently limited to subscribers on US mobile phone carriers.
Credits & Costs
- One credit equals one text – either a received text or a sent text.
- One credit currently costs .05 cents. Credits do not have an expiration date and are non-refundable.
- Purchase additional credits right in your ChamberMaster database under SmartText->Purchase tab.
- When someone subscribes to your list, that will cost 2 credits = 1 for the incoming request and 1 for the automatic thank-you reply. So, one subscription will cost .10 cents at the current rate.
- Examples:
- Sending a single group text to 100 subscribers would cost $5.00.
- Sending a single group text to 500 subscribers would cost $25.00.
- Sending a single group text to 1000 subscribers would cost $50.00.
Subscribing
- This list is opt-in only; Subscribers must opt in to be included in your subscriber groups. Lists of phone numbers may not be imported. Existing mobile phone numbers in ChamberMaster will not auto-populate your subscriber list.
- In order to have subscribers opt in, you must create a keyword – either a shared keyword (no charge) or a custom keyword ($25/month). (done on the Setup tab)
- Practice and testing can happen without a keyword.
- If desiring to have different lists of subscribers (event list, board member group etc), you must create a group and have your subscribers opt in to each group. You must setup these groups prior to advertising your opt-in information to the public so that subscribers are placed in the proper groups. Subscribers may not be moved from one group to another.
Smart Text Setup
- Click Communications in the left hand navigation panel.
- Click Smart Text in the Other Communication Tools section.
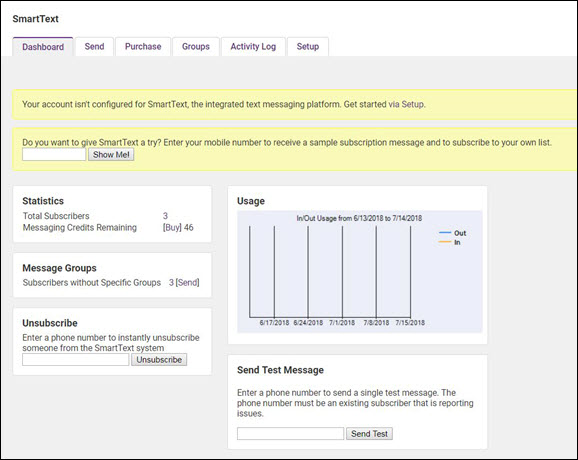
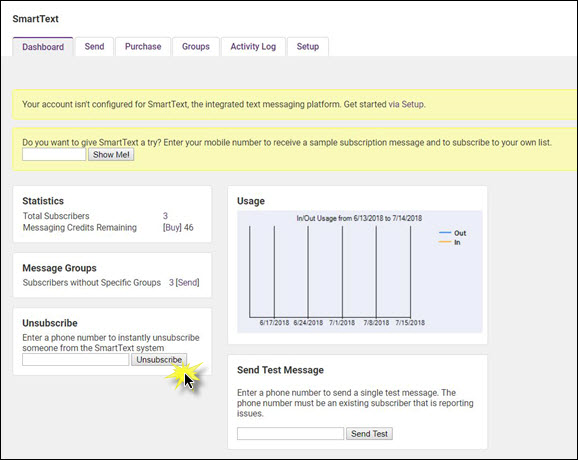
- You will note on the Dashboard a message stating Your account isn't configured for SmartText, the integrated text messaging platform. Get started via Setup.
- Click the Setup tab.
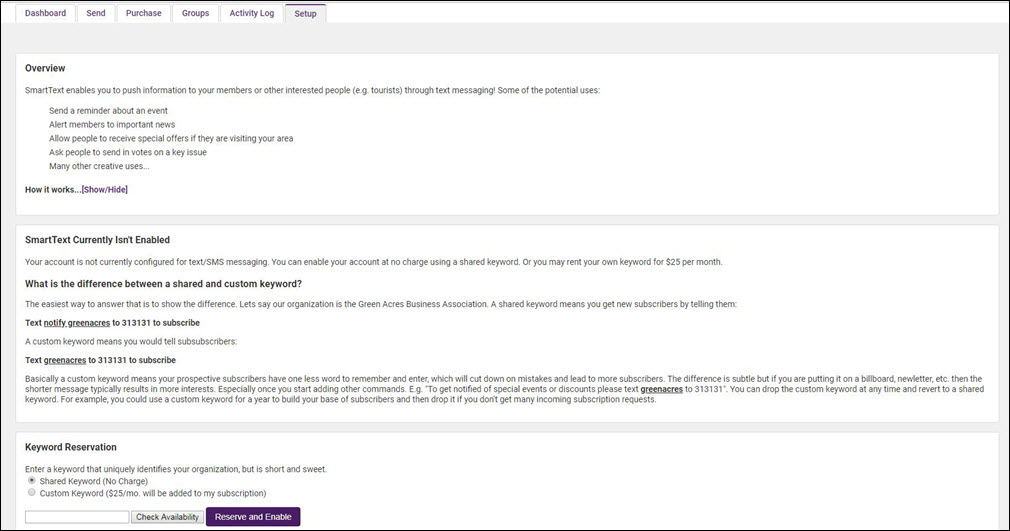
- Read the Overview and the Differences between Shared and Custom Keywords information.
- Keyword Reservation:
- Click the Shared Keyword (No Charge) radio button OR
- Click the Custom Keyword ($25/mo. will be added to my subscription) radio button
- Enter your key word (this is required regardless of Shared or Custom selection).
- Click Check Availability to ensure your keyword is not already in use. If the key word is available:
- Click Reserve and Enable. custom keyword. The Current Keywords' section will populate with your unique SmartText information.
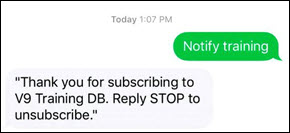
You are ready to advertise and start receiving subscriptions to your text service! In the shared keyword example above, you would advertise that your subscribers should text Notify training to 313131. This would subscribe them to your generic list titled Subscribers without Specific Groups. A response will be sent to them, confirming the subscription and providing instructions on how to unsubscribe.
If you would like different lists of subscribers (event list, board member group etc), you can create groups and have your subscribers opt in to specific groups. See Create Subscriber Groups for Smart Text for instructions. Best Practice is to setup these groups prior to advertising your opt-in information to the public so that subscribers are placed in the proper groups. Subscribers may not be moved from one group to another.
Create Subscriber Groups for Smart Text
If you would like to have different lists of subscribers (event list, board member group etc), you can create groups and have your subscribers opt into specific groups. You must setup these groups prior to advertising your opt-in information to the public so that subscribers are placed in the proper groups. Subscribers may not be moved from one group to another.
- Click Communications in the left hand navigation panel.
- Click Smart Text in the Other Communication Tools section.
- Click the Groups tab.
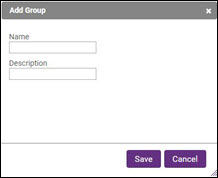
- Click Add New Group.
- Type the name for the group (board, events etc.) that will be used by the subscriber in the opt-in subscription text. Example advertisement: Text “notify training events” to 313131 when the shared keyword “training” is reserved.
- Type a Description for your internal purposes.
- Click Save.
You are ready to advertise and start receiving subscription to your text service for this specific group. In the shared keyword example (where the key word is "training" with a group called events, you would advertise that your subscribers should text Notify training events to 313131 This would subscribe them to your specific group titled “events”.
View List of Smart Text Subscribers
You can view subscribers to your smart texts on the Smart Text Dashboard or on the Smart Text Groups tab.
View Smart Text Subscribers from the Smart Text Dashboard
The Message Groups section will display all of your smart groups.
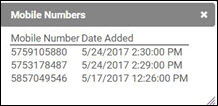
Click the numbered link for the desired group. The mobile number subscribed and the join date will be displayed. NOTE: Names are not displayed.
View Smart Text Subscribers on the Smart Text Groups tab
Click the Subscriber/Member number for the group you wish to view. The mobile number subscribed and the join date will be displayed. NOTE: Names are not displayed.
Testing Smart Text
Prior to going live with advertisement of your group texting ability, you will want to test the functionality of SmartText on your own.
Testing without Subscribing
- Note: 50 free credits are provided to accommodate messages such as these. Sending test messages will reduce your available credits.
- Click Communication in the left-hand menu.
- In the Other Communication Tools section click SmartText
- Click the Dashboard tab.
- Type your mobile number in the Send Test Message box and click Send Test.
- A test message will arrive on your mobile device.
- Example Message: “This is a test message sent at (date/time).”
Testing and Self-Subscribing to SmartText
- Note: 50 free credits are provided to accommodate messages such as these. Sending test messages will reduce your available credits.
- Click Communication in the left-hand menu.
- In the Other Communication Tools section click SmartText
- Click the Dashboard tab.
- Type your mobile phone number and click Show Me! (only available if you have not yet setup your account.)
- A sample text message will arrive on your mobile device.
- This thank you subscription message is the message all your subscribers will receive. The association name listed in this message is pulling from the name listed under Setup>Organization Information.
- You will also notice your Dashboard Statistics shows an additional Subscriber and one less credit than before. Note: 50 free credits were given when SmartText became available.
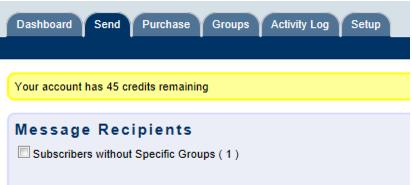
- You will also notice, if you click on the Send tab, that you belong to the subscriber list Subscribers without Specific Groups.
- You are officially part of the list of subscribers that would receive a message if this group “Subscribers without Specific Groups” is selected as a recipient.
Send a Smart Text
A group text may be sent to those that are included in the subscribers list(s) on the Send tab. The default group of “Subscribers without Specific Groups” will always be available and may be the only group available if no additional groups have been created. To send a group text
- Click Communications in the left hand menu.
- Click SmartText
- Click the Send tab.
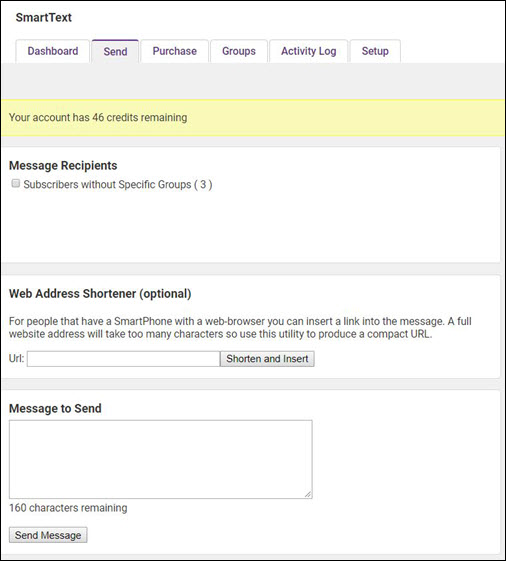
- Click to select the group(s) in the Message Recipients section that should receive your group message.
- Type your outgoing text message in the Message to Send box. NOTE: Messages are limited (universally) to 160 characters in length. The Message to Send box will not allow more than 160 characters to be entered.
- Note: For people that have a SmartPhone with a web-browser you can insert a link into the message. A full website address will take too many characters so use the Web Address Shortener to produce a compact URL. Type your full website URL, click Shorten and Insert. The short version will be inserted within your message.
- Click Send Message. NOTE: When sending a message, if not enough credits are available, a message will appear indicating how many credits are needed in order to complete the current message delivery. Incoming subscriptions and auto-replies are allowed to create a negative balance. But the next message that is sent will require you to purchase additional credits in order to complete the current message delivery.
Unsubscribe from Smart Texts
Subscribers may unsubscribe from smart texts by texting Stop Notify <shared keyword>. Unsubscribing will unsubscribe from all groups.
- Stop Notify <shared keyword> if you have reserved a shared keyword OR
- Stop <custom keyword> if you have reserved a custom keyword.
Staff may also unsubscribe users from the SmartText via the SmartText Dashboard.
In the Unsubscribe section enter a phone number to instantly unsubscribe someone from the SmartText system.
