Social Network Publishing
ChamberMaster/MemberZone can automatically publish your events, hot deals, news, new members, and job postings to Twitter or Facebook if you have an account on these social networking sites.
| NOTE: Requires ChamberMaster/MemberZone Plus edition or greater. |
Contents
An approximate flow of Automatic Posting to Social Accounts
- Once per hour a scan is run, through your database, and to find newly created items. Any new items found are "queued" to be posted (Events are queued up based on event start date and the number of days you set in in the Settings are below for "Publish events X days before the starting date.").
- During the publishing window you define in the Settings area below; once every 15 minutes we will take an item at random from the queue (if any) and publish it to each of the social networks you have setup. The post will contain the title and description text you created with the item as well as a link to the item's page on your site.
- The published item is marked "as published" and will not be posted again.
- Publishing continues at a rate of one item every 15 minutes until your queue is empty or until the end of the publishing window you set up in the Settings area below.
Connect to Twitter
One time selections must be made in ChamberMaster/MemberZone to associate with your Twitter account. Once connected, you will select which items will be published. Items that can be published are: Events, News, New Members, Hot Deals, and Job Postings.
- Click Setup in the left-hand menu.
- Click Social Network Publishing in the Association Options section.
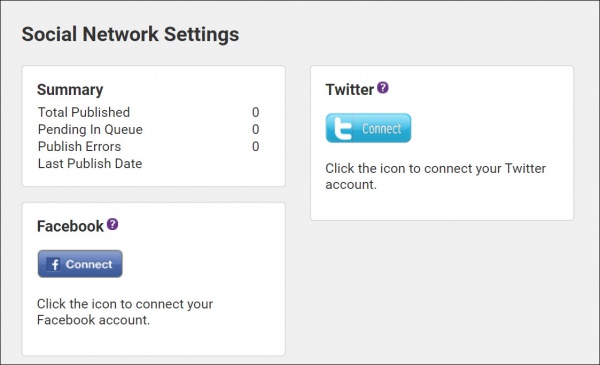
- Click the Twitter Connect icon to connect your Twitter.
- Enter your Login Name and Password for your Twitter.
- Click Sign-in. This will connect your Twitter account to ChamberMaster/MemberZone.
- Click Save
Configure what will be published to Twitter
Once you have connected to your Twitter account, you can select what you wish to publish and the window within which you will publish.
- Click Setup in the left-hand menu.
- Click Social Network Publishing in the Association Options section.
- In the Settings Section, configure the following as needed:
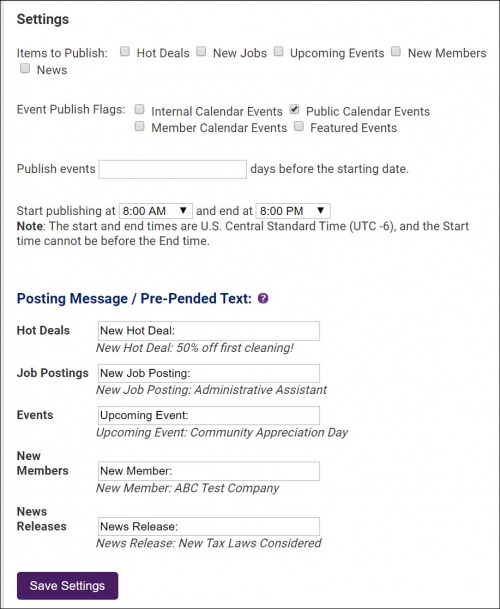
- Items to Publish: Tick the check-boxes for the items that you would like to publish to Twitter. Items that can be published are: Events, News, New Members, Hot Deals, and Job Postings.
- Event Publish Flags: Select the calendars from which events should be published. For example, if you only wish to publish events that are visible on your website calendar, tick the check-box for Public Calendar Events.
- Publish events: If you are publishing events, enter the number of days prior to an event that you would like to publish. NOTE: Events are only automatically published to your Twitter account one time.
- Enter the start time and end time for publishing your events. This is the time within which new items will be published to Twitter.
- In the Posting Message / Pre-Pended Text section, configure the following as needed. Pre-pended text is text added to the very beginning of the title for the item being published in the case of Twitter (Pre-Pended Text). The purpose of this text is to give the reader more information about what kind of post they are reading. You may wish to change some of these to suit your needs. For example, you might change New Members to "Welcome New Member".
- Hot Deals: By default, Hot Deals are prepended with "New Hot Deal:".
- Job Postings: By default, Job Postings are prepended with "New Job Posting:"
- Events: By default, events are prepended with "Upcoming Event:"
- New Members: By default, New Members are pre-pended with "New Member":
- News Releases: By default, News Releases are prepended with "New News Release:"
- Click Save Settings.
Disconnect from your Twitter account
Disconnecting from your Twitter account may be useful in troubleshooting. Additionally, if you have connected to the wrong Twitter account by mistake, or you no longer wish to publish to Twitter. Disconnection steps are completed in the Twitter software.
- Login to your Twitter account.
- Click Profile.
- Click Edit your Profile.
- Click Applications.
- Click ChamberMaster.
- Click Revoke Access.
Connect to Facebook
One time selections must be made in ChamberMaster/MemberZone to associate with your Facebook account. Once connected, you will select which items will be published. Items that can be published are: Events, News, New Members, Hot Deals, and Job Postings.
- Click Setup in the left-hand menu.
- Click Social Network Publishing in the Association Options section.
- Click the Facebook Connect icon.
- Enter your Login Name and Password for your Facebook.
- Click Sign-in. This will connect your Facebook account to ChamberMaster/MemberZone.
- Click Save
Once you have connected to your Facebook account, you can select what you wish to publish. See Configure what will be published to Facebookbelow.
Configure what will be published to Facebook
Once you have connected to your Facebook account, you can select what you wish to publish, the posting window, and messages to be included.
- Click Setup in the left-hand menu.
- Click Social Network Publishing in the Association Options section.
- In the Settings Section, configure the following as needed:
- Items to Publish: Tick the check-boxes for the items that you would like to publish to Twitter. Items that can be published are: Events, News, New Members, Hot Deals, and Job Postings.
- Event Publish Flags: Select the calendars from which events should be published. For example, if you only wish to publish events that are visible on your website calendar, tick the check-box for Public Calendar Events.
- Publish events: If you are publishing events, enter the number of days prior to an event that you would like to publish. NOTE: Events are only automatically published to Facebook one time.
- Enter the start time and end time for publishing your events. This is the window within which new items will be published to Facebook.
- In the Posting Message / Pre-Pended Text section, configure the following as needed. The posting message text is text added to the very beginning of the title for the item being published in the case of Facebook (Posting Message). The purpose of this text is to give the reader more information about what kind of post they are reading. You may wish to change some of these to suit your needs. For example, you might change New Members to "Welcome New Member".
- Hot Deals: By default, Hot Deals includes the post message "New Hot Deal:".
- Job Postings: By default, Job Postings includes the post message "New Job Posting:"
- Events: By default, events includes the post message "Upcoming Event:"
- New Members: By default, New Members includes the post message "New Member":
- News Releases: By default, News Releases includes the post message "New News Release:"
- Click Save Settings.
| NOTE: The logo that you have uploaded under Setup -> Organization Information will be displayed next to Facebook posts. If you do not have a logo uploaded, the post will display a Powered by ChamberMaster logo. See Upload Your Logo for instructions. |
Auto-publish New Members to Facebook
If you have enabled New Members in your Social Networking settings (See Configure What Will be Published to Facebook), ChamberMaster/MemberZone will automatically publish a new member if the following apply:
- The member is set to Active.
- The member must have a join date set when the member is set to active. The join date is NOT in the past.
- The "new" member has not already been published to Facebook. If the member has previously joined your organization, then dropped, then rejoined the system will NOT republish the member. If you wish to manually push a member to Facebook, see Manually Publish a Member to Faceebook/Twitter.
Manually Publish a Member to Facebook/Twitter
New Members will only post to Facebook/Twitter one time. In the event that a member drops, then rejoins, the system will NOT post again. Changing the join date will not make this happen as the system has already marked the member as posted. In this scenario, you can manually post the member to Facebook/Twitter:
- On the member's Web tab, click the Preview Web Page button.
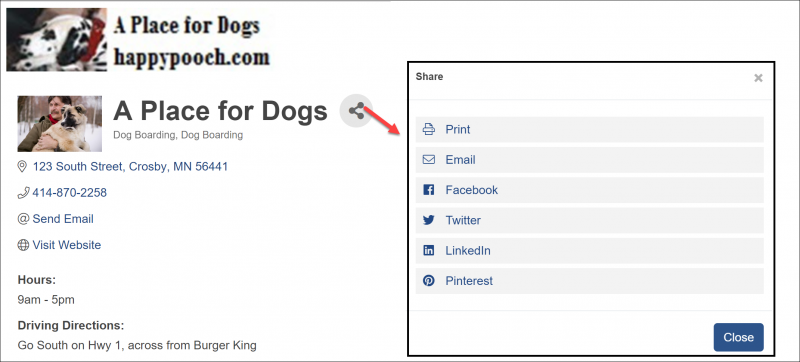
- On the member's directory listing, click the sharing icon
- Click Facebook or Twitter.
- Proceed with the Facebook/Twitter sharing instructions.
Publishing Events to Facebook
If you have enabled Upcoming Events in the Social Network Publishing settings, new events will be published to your Facebook page, once. Descriptions and images will be published to your page, as described below:
- The Search Description field, configured for the event (on the event's General tab) determines the phrase that appears at the bottom of the Facebook post. See Add an New Event for further details. If no data is saved in this field, the first 160 characters of the Event Description is used for the Facebook post.
- The Main Event Photo found on the event's General tab under Photos and Images is being suggested to Facebook as the appropriate image to use in the event post. Facebook requires that the image be a minimum of 200 x 200. If the image does not meet these requirements, then Facebook will pull an image from the event page (on your website) that best meets the size requirement. If an appropriate sized image is not found, then the post will not include an image. See Add a Main Event Photo for further details.
| NOTE: Events are posted ONCE to Facebook. If you wish to repost an event, this will need to be done manually. See Repost an Event to your Facebook Page. |
Repost Single Event to Your Facebook page
If you have enabled automatic posting of your events to Facebook, the system will post one time only. If needed, you can re-post the event manually from your website.
- Find the desired event page on your website.
- Click the Share on Facebook icon.
- Select On Your Page from the Share drop-down menu.
- Select which page you’d like to post on.
Disconnect Facebook from ChamberMaster/MemberZone
If you have connected to the wrong Facebook account, to discontinue publishing to Facebook, or for troubleshooting, you may wish to disconnect Facebook from the ChamberMaster/MemberZone connection.
- Login to the Facebook account you wish to disconnect.
- Click the menu arrow in the upper right-hand corner.
- Click Account Settings.
- Click Apps
- Find ChamberMaster on the list.
- Click the x at the end of the ChamberMaster entry.
- Click Remove.
- Click Okay.


