Managing Billing
Contents
- 1 Setup Payment Terms
- 2 Manage Billing Templates
- 3 Manage Cover Letter Templates
- 4 Manage Customer Messages for Invoices
- 5 Send Collections Letters
- 6 Billing Options & Setting
- 6.1 Define Default Contact to be Used for Non-Member Transactions
- 6.2 Set Look Ahead for Task List Invoices
- 6.3 Set the Default Tax Rate for Your Organization
- 6.4 Set Default Deposit/Bank Accounts
- 6.5 Connect to QuickBooks On-line
- 6.6 Configure Default A/R Account used when Invoicing
- 6.7 Define Default Payment Terms used when Invoicing
- 6.8 Define Customer Message included on Invoices
- 6.9 Define Default Delivery Method for Invoices
- 6.10 Choose Discount Memo Display Options
- 6.11 Define Default Templates for Invoices, Cover Letters & Statements
- 6.12 Setup Credit Card Processing
- 6.13 Include Terms & Conditions on Check-out
- 6.14 Add "This charge will appear as.." on Credit Card Purchase Receipts
Setup Payment Terms
Add a Payment Term
- Click Setup in the left-hand menu.
- Click Payment Terms in the Billing area. The current list of Payment Terms will display.
- Click Add Payment Term. Type the name of the new term in the Name field (replacing –New Payment Term). Modify the Due Dates Offset if desired.
- Click Save Changes.
Remove a Payment Term
- Click Setup in the left-hand menu.
- Click Payment Terms in the Billing area. The current list of Payment Terms will display.
- Click the x at the end of the row of the desired Payment Term to be removed.
- Click Save Changes.
Rename a Payment Term
- Click Setup in the left-hand menu.
- Click Payment Terms in the Billing area. The current list of Payment Terms will display.
- Click within the Name or the Due Date Offset of the desired Payment Term. Make desired changes.
- Click Save Changes. Note: All previously recorded entries that used this Payment Term will now have the new Name and new Due Date Offset.
Manage Billing Templates
Default templates for them emails sent for invoices, statements, credit memos, receipts, payments, notification letters, thank you letters and collection letters are available in your database. You may use these templates as designed or customize them to meet your business needs.
View/Edit Invoice Templates
Within in your database, the Default with Logo invoice has been provided for use in creating your invoices. You can edit this template to meet your needs in needed.
- Select Setup in the left-hand navigation panel.
- Click Template Manager in the Billing section. By default the Transaction type will display Invoice. The loaded template lists the name of the template currently displayed.
- From the loaded template drop-down list, select the template you wish to view/modify.
- Edit the template as desired. Rich Text Editor functions are available to customize the template. See Working with the Rich Text Editor for instructions.
- Insert the desired field by clicking Add Database Field, open the Billing Template Fields, scroll to and click the desired field.
- Type a new name for this edited template in the Template Name field and click Save As (so not to modify the original in case you need to return to the old template).
- Make sure to select this new template when creating your invoices.
|
|
NOTE: The database field titled [invoice_compact_lineitems] generates a unique output when used and is not commonly included on templates except in rare occasions. This database field will take all individual line items billed to the customer and compact them into a single item on the invoice that is displayed to the customer. The line item total will include the total of all individual line items. The line item description for the first item on the invoice is the only item that will display to the customer. In your software, you will still see all individual line items but the customer is kept from getting bogged down with all the items that make up that single item that you’d like to bill them. |
View/Edit Statement Templates
- Select Setup in the left-hand navigation panel.
- Click Template Manager in the Billing section.
- Select Statement from the Transaction Type list.
- From the Loaded Template drop-down list, select the template you wish to view/modify.
- Edit the template as desired. Rich Text Editor functions are available to customize the template. See Working with the Rich Text Editor for instructions.
- Type a new name for this edited template in the Template Name field.
- Click Save As (so not to modify the original in case you need to return to the old template).
- Click Close.
View/Edit Credit Memo Templates
- Select Setup in the left-hand navigation panel.
- Click Template Manager in the Billing section.
- Select Credit Memos from the Transaction Type list.
- From the Loaded Template drop-down list, select the template you wish to view/modify.
- Edit the template as desired. Rich Text Editor functions are available to customize the template. See
- Insert the desired field by clicking Add Database Field, open the Billing Template Fields, scroll to and click the desired field.
- Type a new name for this edited template in the Template Name field.
- Click Save As (so as not to modify the original in case you need to return to the old template).
- Click Close.
View/Edit Payment Templates
- Select Setup in the left-hand navigation panel.
- Click Template Manager in the Billing section.
- Select Payments from the Transaction Type list.
- From the Loaded Template drop-down list, select the template you wish to view/modify.
- Edit the template as desired. Rich Text Editor functions are available to customize the template. See Working with the Rich Text Editor for instructions.
- Insert the desired field by clicking Add Database Field, open the Billing Template Fields, scroll to and click the desired field.
- Type a new name for this edited template in the Template Name field.
- Click Save As (so as not to modify the original in case you need to return to the old template).
- Click Close.
View/Edit Collection Letter Templates
- Select Setup in the left-hand navigation panel.
- Click Template Manager in the Billing section.
- Select Collection Letter from the Transaction Type list.
- From the Loaded Template drop-down list, select the template you wish to view/modify.
- Edit the template as desired. Rich Text Editor functions are available to customize the template.
- Insert the desired field by clicking Add Database Field, open the Billing Template Fields, scroll to and click the desired field.
- Type a new name for this edited template in the Template Name field.
- Click Save As (so as not to modify the original in case you need to return to the old template).
- Click Close.
View/Edit Notification Letter Templates
- Select Setup in the left-hand navigation panel.
- Click Template Manager in the Billing section.
- Select Notification Letter from the Transaction Type list.
- From the Loaded Template drop-down list, select the template you wish to view/modify.
- Edit the template as desired. Rich Text Editor functions are available to customize the template. See Working with the Rich Text Editor for instructions.
- Insert the desired field by clicking Add Database Field, open the Billing Template Fields, scroll to and click the desired field.
- Type a new name for this edited template in the Template Name field.
- Click Save As (so as not to modify the original in case you need to return to the old template).
- Click Close.

|
|
IMPORTANT Make sure not to modify the items in [] brackets. These items contain custom programming that will automatically populate with specific information from your member’s account. If you accidentally modify/delete these fields, do not save but close the window. If the accidental modification was already saved, click the Add Database field icon to replace the item and save your updates. |
View/Edit Thank You Letter Templates
- Select Setup in the left-hand navigation panel.
- Click Template Manager in the Billing section.
- Select Thank You Letter from the Transaction Type list.
- From the Loaded Template drop-down list, select the template you wish to view/modify.
- Edit the template as desired. Rich Text Editor functions are available to customize the template. See
- Insert the desired field by clicking Add Database Field, open the Billing Template Fields, scroll to and click the desired field.
- Type a new name for this edited template in the Template Name field.
- Click Save As (so as not to modify the original in case you need to return to the old template).
- Click Close.
Manage Cover Letter Templates
Cover Letter Templates can be created to be included as the email sent along with your invoices. You may, for example, have a cover letter that is used when you initially send out your renewal invoices, and then a separate email template that is used when you send reminder invoices.
View/Edit Invoice Cover Letter Templates
To view/edit your invoice cover letter templates:
- Click Setup in the left-hand navigation panel.
- Click Template Manager - Cover Letters in the Billing Section. The Layout Editor screen will, by default, display Invoice cover letters, but this screen can be used for updating cover letters for statements, credits, receipts and payments.
- Select the cover letter that you wish to view and edit from the Loaded Cover Letter drop-down list.
- Edit the template as desired. Rich Text Editor functions are available to customize the template. See Working with the Rich Text Editor for instructions.
- To save the changes to an existing template, simply click Save OR To save the cover letter as a new template, enter the Cover Letter name and click Save As.
- If you wish to set this cover letter as your system default, click the Save as default check-box.
- Click Close
View/Edit Statement Cover Letter Templates
- Click Setup in the left-hand navigation panel.
- Click Template Manager - Cover Letters in the Billing Section.
- Select Statement Cover Letter (Statement attached as PDF) or Statement embedded in E-mail from the Cover Letter Type list. When sending out your statements, you will choose whether to attach the statement or embed, so be sure to select the cover letter type that matches your process.
- Select the cover letter that you wish to view and edit from the Loaded Cover Letter drop-down list.
- Edit the template as desired. Rich Text Editor functions are available to customize the template.
- To save the changes to an existing template, simply click Save OR to save the cover letter as a new template, enter the Cover Letter name and click Save As.
- If you wish to set this cover letter as your system default, click the Save as default check-box.
- Click Close.
View/Edit Credit Memo Cover Letter Templates
View/Edit Payment Cover Letter Templates
View/Edit Sales Receipt Cover Letter Templates
View/Edit Collection Letter Templates
- Select Setup in the left-hand navigation panel.
- Click Template Manager in the Billing section.
- Select Collection Letter from the Transaction Type list.
- From the Loaded Template drop-down list, select the template you wish to view/modify.
- Edit the template as desired. Rich Text Editor functions are available to customize the template. See Working with the Rich Text Editor for instructions.
- Insert the desired field by clicking Add Database Field, open the Billing Template Fields, scroll to and click the desired field.
- Type a new name for this edited template in the Template Name field.
- Click Save As (so as not to modify the original in case you need to return to the old template).
- Click Close.
Manage Customer Messages for Invoices
When sending out invoices, you can add a customized message on the invoice. You may create as many customer messages as you wish, then use them as appropriate. For Example, you may have one message that you use for membership invoices and another that you use for event invoices.
Create a Customer Message for Invoice
- Click Setup in the left-hand navigation panel.
- Click Customer Messages in the Billing section. A list of all messages you have previously be created will be displayed.
- Click the Add New Message button. -New Message- will be displayed in the Message Name column.
- Type in the name of the message over -New Message-.
- Click the edit text button.
- Enter your message. Use the Rich Text Editor icons to customize as needed.
- Click Continue.
- Click Close.


|
|
Did you know...Customer messages may also be created "on the fly" when generating invoices. |
Edit a Customer Message for Invoice
- Click Setup in the left-hand navigation panel.
- Click Customer Messages in the Billing section. A list of all messages you have previously be created will be displayed.
- Click the edit text button for the message that you wish to change.
- Change the message text as desired.
- Click Continue.
|
|
NOTE: Customer messages may also be edited "on the fly" when generating invoices. |
Send Collections Letters
Unfortunate, but at times you may need to send collection letters to those that have not paid their invoices. In creating the collection letters, you will be able to select who should receive these letters and which letter they should receive by selecting the appropriate filter choices.
- In the Billing module, click the Reports tab.
- Click Collection Letters in the Letters section.
- Complete the filter as desired, making sure to select the desired Aging and/or specific Batch. If sending a reminder for membership dues only, you may wish to select an Item Type of Members Fees/Dues Only.
- Click Refresh Listing.
- Double-check the Output column to ensure the correct delivery method is selected for each member.
- Click Create Letters to use the existing, selected template. (or click Letter Template: to edit the current template)
- Select the desired Delivery method: Email or Print Letters.
- If selecting Email, double-check the Email From address and Subject Line and then click Send Emails. (or first click Preview Emails if desired)
- If selecting Print Letters, click Print Letters to view and print the letters.
- Note: Include return address should be selected if you desire that your association return address be placed at the top of the printed output.
- If needed, click Create Letters again and select Print Labels as the Delivery Method to print matching labels for the printed letters.
Billing Options & Setting
The Billing Options & Settings allow you to establish defaults for such things as number of days ahead of renewal month you wish the task list to notify you that invoices need to be created, default invoice & statement templates you wish to use, credit card processing/manual e-payment settings, etc.
- Click Setup in the navigation panel.
- Click Billing Options & Settings in the Billing Section.

Define Default Contact to be Used for Non-Member Transactions
When non-members purchase such things as event registrations, invoices/payments/receipts must be logged in the database. This setting allows you to designate a contact. When purchases are made, the appropriate billing transactions will be logged on this contact's Account tab.
- Click Setup in the navigation panel.
- Click Billing Options & Settings in the Billing Section.
- Select the Default member record where non-member invoices/receipts will be assigned for purchases: Select the member record to which invoices for non-members will be attached. For example, if a non-member registers for an event, the system needs a place to store these invoices/payments/receipts. A default contact Non Member Transactions' has been setup for this. If you have setup an alternate contact, click the hyper-link to choose the contact.
- Click Save.

Set Look Ahead for Task List Invoices
Based on your business processes, you can define the number of months the system will look ahead for recurring fees for which invoices need to be generated. The task list will use this look ahead to notify you.
- Click Setup in the navigation panel.
- Click Billing Options & Settings in the Billing Section.
- In the # of months to look ahead for task list invoice count text-box, enter the number of months in advance that you prepare your membership renewal invoices. This setting will then trigger the task list to display the invoices pending for that period.
- Click Save.

Set the Default Tax Rate for Your Organization
- Click Setup in the navigation panel.
- Click Billing Options & Settings in the Billing Section.
- In the Sales Tax Rate: select the default sales tax rate to be used.
- Click Save.

Set Default Deposit/Bank Accounts
Your system will make the appropriate entries for payments and deposits. You can define which accounts, by default, should be used for undeposited fund and the bank account for deposits. These accounts should first be created under your Chart of Accounts.
- Click Setup in the navigation panel.
- Click Billing Options & Settings in the Billing Section.
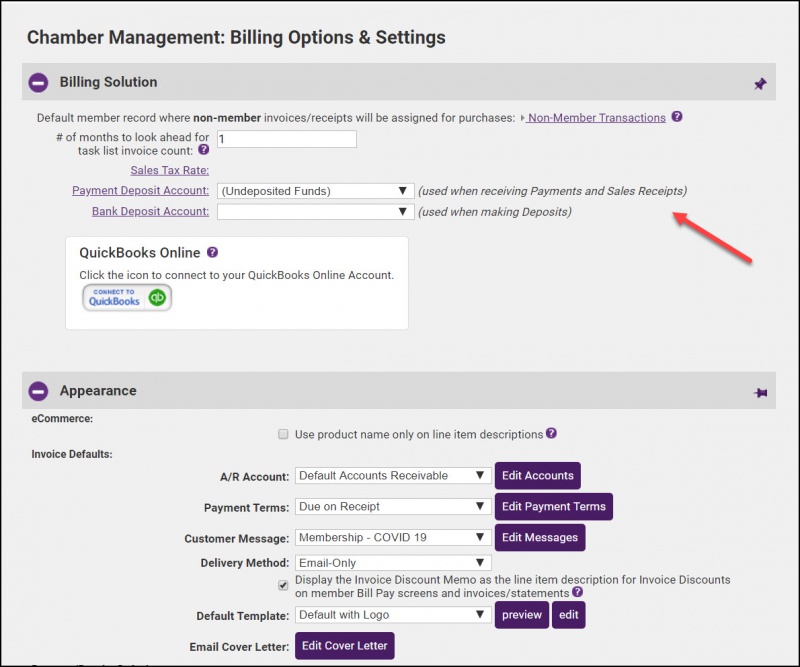
- Payment Deposit Account: Select the default deposit account to be used when receiving payments or processing sales receipts.
- Bank Deposit Account: Select the default deposit account to be used when depositing funds.
- Click Save.

Connect to QuickBooks On-line
If you are using QuickBooks On-line, you will first need to establish a connection to your QuickBooks software.
- Click Setup in the navigation panel.
- Click Billing Options & Settings in the Billing Section.
- Click on the QuickBooks Online Connection button.
- Enter your QuickBooks online login information and say yes to the connections.
- Click Save. The screen should indicate that you are now connected to QuickBooks on-line.


Configure Default A/R Account used when Invoicing
In the Appearance section of Billing Options & Settings you will be able to define default A/R account to be used when generating invoices. If you have multiple A/R accounts, best practice is to choose the account that is used the majority of the time. The A/R account must have been created in your Chart of Accounts.
- Click Setup in the navigation panel.
- Click Billing Options & Settings in the Billing Section.
- Select theA/R Account: to be used by default. You may edit (or add new accounts) by clicking the Edit Account button.
- Click Save.

Define Default Payment Terms used when Invoicing
By setting default Payment terms, this term will be applied to all invoices you generate. If needed, you will have the opportunity over-ride the terms when invoices are created.
- Click Setup in the navigation panel.
- Click Billing Options & Settings in the Billing Section.
- Select the Payment Terms that you wish to use by default. You will be able to over-ride these terms as needed when creating an invoice, best practice is to select the terms that you use the most frequently. You can add or edit terms by clicking the Edit Payment Terms button.
- Click Save.

Define Customer Message included on Invoices
When sending invoices you have the opportunity to include a customer message. You can define a default, one you wish to use the majority of the time, under Billing Options & Settings.
- Click Setup in the navigation panel.
- Click Billing Options & Settings in the Billing Section.
- Select the Customer Message that will be included on your invoices by default. When you are creating invoices, you will be able to select the message you wish to apply from a drop-down list.
- Click Save.

|
|
NOTE: You will also be able to edit the Customer Message on the fly, when generating your invoices. |
Define Default Delivery Method for Invoices
- Click Setup in the navigation panel.
- Click Billing Options & Settings in the Billing Section.
- Select your preferred Delivery Method for invoices. You will have the ability to over-ride this option when delivering invoices. Best practice is to select the method that you use the majority of the time.
- Click Save.

Choose Discount Memo Display Options
You have the option to include a discount memo on invoices.
- Click Setup in the navigation panel.
- Click Billing Options & Settings in the Billing Section.
- Enable Display the Invoice Discount Memo as the line item description for Invoice Discounts on member Bill Pay screens and invoices/statements. When this setting is enabled, the Memo field (your custom message) will be displayed to members when they view a Discount line item on their invoices, statements, on their Bill Pay screen or in their Transaction History. When this setting is off, Discount line items will display the word "Discount" in member-facing locations. NOTE: The Memo field is available when creating/editing an Invoice Discount. For instance, when editing an Invoice that has a remaining balance, click Add a Discount. The next window has a Memo field where you can make comments or notes about the purpose and reason for a discount.
- Click Save.

Define Default Templates for Invoices, Cover Letters & Statements
Under Billing Options & Settings you can set the invoice template, statement template, etc. for your accounting transactions.
- Click Setup in the navigation panel.
- Click Billing Options & Settings in the Billing Section.
- Expand the Appearance section if needed.
- Select the Default Template you want the system to use by default.You will have the ability to override the template when creating invoices as needed. Best practice is to select the template that you use most frequently.
- Select the Email Cover Letter that you wish to use, by default, in delivering your invoices (email). You will have the ability to override the cover letter when delivering invoices. Best Practice is to select the cover letter that you use the most frequently. If needed, click the Edit Cover Letter button to make changes or choose a different letter.
- In Statement Defaults, select the Default Template to be used when generating statements. You can preview or edit the statement template. You will have the ability to over-ride this default when generating your invoices.
- Click Save.

Setup Credit Card Processing
With your ChamberMaster/MemberZone software you can automate credit card processing. GrowthZone will assist you with the initial setup. Additional settings for credit card processing can be configured under Billing Options & Settings.
- Add link to bottom of email to pay bills online" selected by default when emailing invoices: Select this option to make it easy for your members to access their bills and pay on-line. NOTE: The rep to whom the invoice is sent must have a login to the MIC, and must have permissions set to read write for on-line bill payment.
Configure Staff Member to Receive Notification of On-line Credit Card Payments
When payments are received on-line, one of your staff members can be setup to receive notifications. Under Billing Options & Settings you can set the invoice template, statement template, etc. for your accounting transactions.
- Click Setup in the navigation panel.
- Click Billing Options & Settings in the Billing Section.
- Expand the Credit Card section if needed.
- In the Send an automatic notification email to the Chamber, enter the name of the staff person that should receive an email message when a credit card payment is made on line. At this time only one email address can be selected.
- Click Save.

Select the Credit Cards you Accept
Under Billing Options & Settings you can set the invoice template, statement template, etc. for your accounting transactions.
- Click Setup in the navigation panel.
- Click Billing Options & Settings in the Billing Section.
- Expand the Credit Card section if needed.
- Select the credit cards that you will accept: Visa, MasterCard, American Express, Discover.
- Click Save.
- Add Credit Card Billing Address as required field: Enable this check-box if you require billing address for credit card transactions.
- Add Credit Card Security Code as required field: Enable this check-box to require the credit card security code.

Define Billing Transactions to be created for Credit Card Charges
Under Billing Options & Settings you can set the invoice template, statement template, etc. for your accounting transactions.
- Click Setup in the navigation panel.
- Click Billing Options & Settings in the Billing Section.
- Expand the Credit Card section if needed.
- Select Automatically create a paid invoice for credit card payments if you want an invoice created for each credit card transaction. If selected, you will have both an invoice and a payment record for the sale.
- OR
- Select Automatically create a receipt for credit card payments if you want only a receipt to be created for each credit card transaction.
- Click Save.

Include Terms & Conditions on Check-out
If you wish to display your terms & agreements will appear in the checkout cart (which includes member payments from the Member Information Center, purchases of jobs and deals and event registration), you can enable this option under Billing Options & Settings. Typical agreement statements include privacy policy info, website disclaimers and other items as recommended by your legal counsel. Under Billing Options & Settings you can set the invoice template, statement template, etc. for your accounting transactions.
- Click Setup in the navigation panel.
- Click Billing Options & Settings in the Billing Section.
- Expand the Credit Card section if needed.
- Select Display Terms and Conditions agreement in checkout cart. When selected, you will be able to add a check-out statement, and your actual terms and conditions.
- Click Save.

Add "This charge will appear as.." on Credit Card Purchase Receipts
To avoid potential credit card disputes, you can add an additional message to credit card purchases. This will allow you to tell purchasers how the charge will be displayed on their credit card statement.
- Click Setup in the navigation panel.
- Click Billing Options & Settings in the Billing Section.
- Expand the Credit Card section if needed.
- Enter the Merchant or Store Name [Optional]. This will be used to generate an additional message on Credit Card Purchase Receipts that will read: Important: This charge will appear as [Your Merchant or Store Name] on your Credit Card statement.
- Click Save.
