Difference between revisions of "Using the NAHB - WMS Database Fields and Upload Tool"
m |
|||
| Line 128: | Line 128: | ||
| − | ==Frequently Asked Questions== | + | ==Frequently Asked Questions (FAQ)== |
'''Q)''' Why is a member not showing on my export report? | '''Q)''' Why is a member not showing on my export report? | ||
| + | |||
'''A)''' This can be caused by a different things. Start by looking at the date of their payment. Was it made in the month you're reporting? Next you can look at the invoice - are the items that were billed selected in the WMS report settings to be included? | '''A)''' This can be caused by a different things. Start by looking at the date of their payment. Was it made in the month you're reporting? Next you can look at the invoice - are the items that were billed selected in the WMS report settings to be included? | ||
Revision as of 15:55, 1 February 2016
To simplify the process of uploading member changes to the National Associtiaon of Home Builders (NAHB) through WMS each month we have integrated the required fields into various areas within the MemberZone system. Additionally the NAHB/WMS file export tool will allow you to pull, error check and generate your monthly data upload for NAHB/WMS quickly and easily.
Contents
NAHB/WMS Fields
There are specific fields that are required for the different types of data to be given to NAHB. These fields are located in one of three locations depending on their purpose.
Member/Companys
Within the Members module on the general tab is a section called NAHB/WMS Information.
- HBA Number - This is the number for your Home Builders Association
- NAHB Company ID - The company ID provided by NAHB/WMS after they signup for membership.
- Primary Business Activity Code
- Secondary Business Activity Code
- Tertiary Business Activity Code
- Dollar Volume Code
- Number of Units Code
Representatives
Found under the Members module on the Representatives Tab is a section called NAHB/WMS Information.
- Contact Person ID (PIN) - NAHB/WMS generated representative ID
- Subscription ID (MSN) - NAHB/WMS generated membership subscription ID
- Membership Type - NAHB/WMS Membership Type
- Spike HBA Number - HBA number for the spike(sponsor) of that membership
- Spike Person ID - Person ID(PIN) for the spike(sponsor) of that membership
Councils
Found under the groups module are 6 NAHB councils.
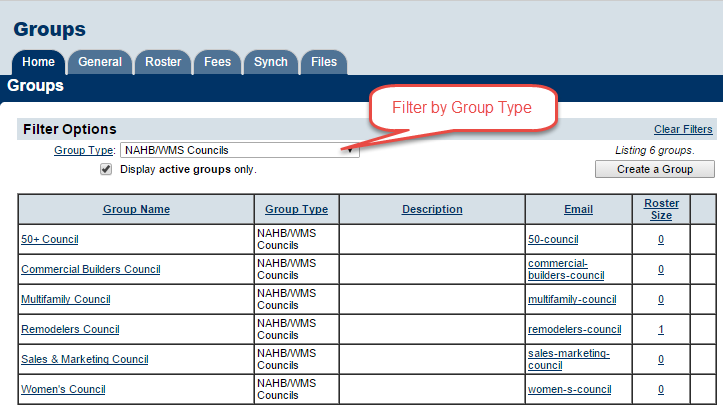 NAHB/WMS Councils shown in the Groups Module

Each of these councils has a roster where you will add representatives who are members of the council.
After you've added a representative to a council you will be able to click on their name to access the following NAHB/WMS fields.

- [Council Name] Subscription ID (MSN) - NAHB/WMS generated council membership subscription ID
- [Council Name] Spike HBA Number - HBA number for the spike(sponsor) of that council membership
- [Council Name] Spike Person ID - Person ID(PIN) for the spike(sponsor) of that council membership

Setting up Renewal Fees
In order for the system to properly recognize which members have paid their renewals and in turn need to be reported as renewals to NAHB/WMS the renewal items need to be properly setup.
Setting up the Fee Items
Because your membership fees typically are split 3 ways or more the best way to configure these fees is by setting up Bundled Fees. Bundled fees will allow you to place multiple fees such as your local, state and national fees into a single membership fee so that your members see their simple fee but you can still easily have your income reported properly.
Before you can setup a bundled fee you first need to setup each of the smaller fees for local, state and national amounts. Below is an example of the 3 fees configured and the bundled fee item at the top.
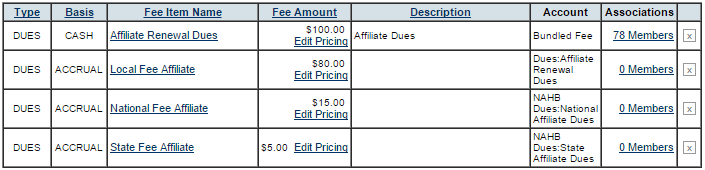 NAHB/WMS Bundled Fee and the fees it's made of

Assigning fees for membership renewals
To setup your members for their renewal billing you need to:
- Go to your members module and to the account tab.
- Expand the membership fees and dues section and click Assign Fee Items
- Choose the bundled item that was created above.
- In fee item type choose the appropriate bundled fee item created in the previous section
- Modify the description if desired
- Adjust the billing cycle and month if needed
- Set status to Active
- Use active in a date range for fees that have a future start date or an billing end date
- Choose the bill to representative to correspond to who's membership this fee is for.
- If using ACH Processing options you can use the Charge to ACH checkbox.
- Click "Save & Exit"
Assigning fees for council renewals
To setup your members for their Council renewal billing you need to:
- Go to your members module and to the account tab.
- Expand the membership fees and dues section and click Assign Fee Items
- Choose the bundled item that was created above.
- In fee item type choose the appropriate bundled fee item created in the previous section
- Modify the description if desired
- Adjust the billing cycle and month if needed
- Set status to Active
- Use active in a date range for fees that have a future start date or an billing end date
- Choose the bill to representative to correspond to who's membership this fee is for.
- If using ACH Processing options you can use the Charge to ACH checkbox.
- Click "Save & Exit"
Using the NAHB/WMS Upload Tool
The NAHB/WMS Upload tool will automatically pull all the information for your monthly NAHB/WMS export including:
- New Members
- Membership Renewals
- New Council Members
- Council Renewals
- Company Information Updates
- New Contacts
- Contact Information Updates
- New Spike
- Member Type Change
Getting to the export tool
To access the NAHB/WMS Upload Tool you need to:
- Go to the reports module.
- In the keyword search type in WMS.
- Click the green arrow next to the report to load the report.
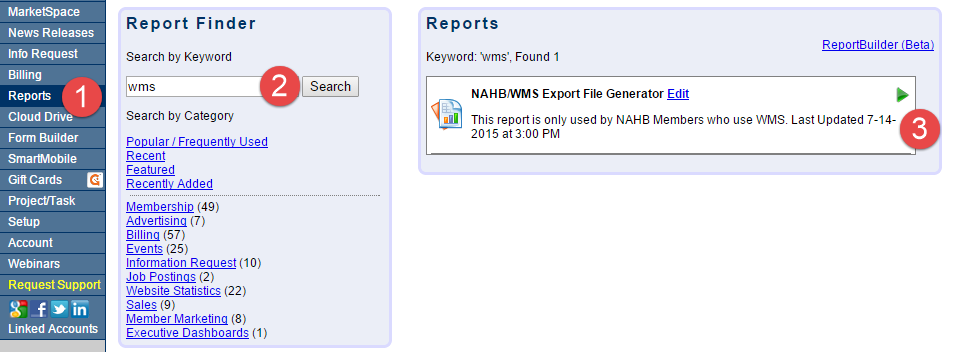 Finding the NAHB/WMS Export Tool

Settings
If this is your first time running the tool be sure to click the Settings tab at the top to select the appropriate renewal fees for the tool to look at.
- Select the fee/bundled fee that is used for each membership renewal
- Select the fee/bundled fee associated with each council
- Select any transaction types you wish to include or exclude from the report
- Select whether strict address validation is enabled or not
- Click Save Settings
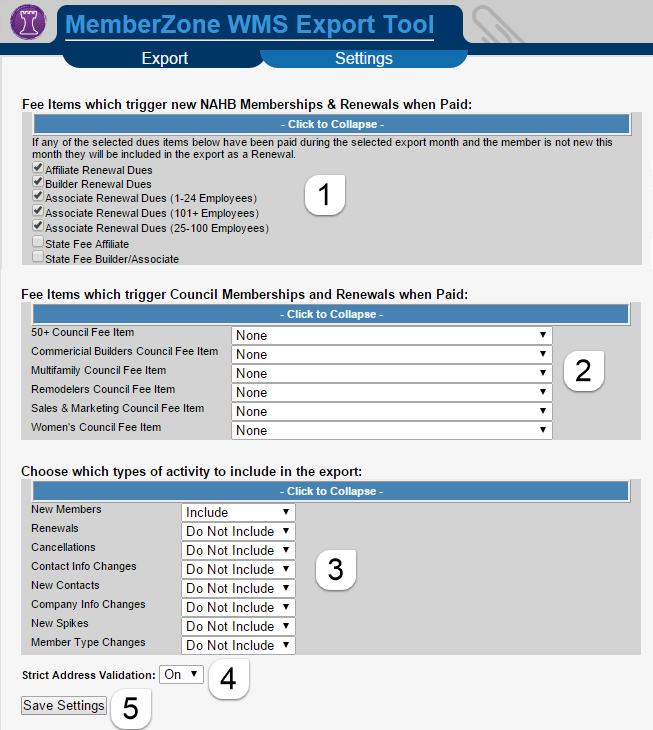 NAHB/WMS Export Tool Settings

Review the data
On the Export tab of the NAHB/WMS Export Tool you will first select the month which you are working with which will default to the current month.
The list of transactions to be exported will be displayed.
 The green check indicates those records are ready to go.
 The red triangle indicates that something in missing or incorrect for this record and requires attention.
 The gray X indicates that transaction is excluded this month.
Your goal is to get all records to be green before you do your export. Any records that are gray or red will not be included in the export for NAHB/WMS.
Fix a record
- Click on this record to see what is needing to be fixed.
- Go to the member's record to correct the issue.
- Refresh the report to see that the update is recognized.
Exclude a record
- Click on the record
- Select the option to exclude this record from the export.
- The report will refresh with that record excluded.
Re-include an excluded record
- Check the check box Show Excluded Records and then click Refresh
- Records that are excluded will show a gray X next to their line.
- Click on an excluded record to open your options
- Click Include this record in the export.
- The report will refresh without the record excluded
Download Listing
The download listing option allows you to download the list of records as you have it currently filtered. This will display all those who are marked to be exported as well as any errors that may correspond to those records.
Create the export file
Once you have all your records showing green you are ready to export the file to use with NAHB/WMS.
- With the tool open to the export screen click the button at the bottom called Generate the Export File(s)
- A file will be downloaded to your computer. Click save if you are prompted.
- TIP: Keep the export tool open and open WMS in a new window or browser.
- Login to your WMS account and import the file.
- If WMS finds any issues it will tell you what the issue is and what line is affected.
- Go back to the WMS tool and the left column numbers will correspond to the line from the WMS error.
- TIP: Start from the bottom if you are going to exclude any records as the numbers will change if you start from the top.
- After making any fixes or exclusions generate a new file and import that to WMS
Frequently Asked Questions (FAQ)
Q) Why is a member not showing on my export report?
A) This can be caused by a different things. Start by looking at the date of their payment. Was it made in the month you're reporting? Next you can look at the invoice - are the items that were billed selected in the WMS report settings to be included?