ChamberMaster Billing-Getting started 2
Jump to navigation
Jump to search
Check Chart of Accounts
Before performing any exports, you will want to double-check your Chart of Accounts.
1. |
In ChamberMaster / MemberZone, click Setup in the left-hand menu. |
2. |
Click Chart of Accounts. |
3. |
Compare this list with your Chart of Accounts. |
QuickBooks and QuickBooks Online users: Ensure your chart of accounts in ChamberMaster matches either the exact names* or numbers given to your Chart of Accounts in QuickBooks. These need to be exactly the same – no spelling or punctuation differences. Capitalization is not looked at.
*If using names, sub accounts may be identified by placing a colon after the main category name and before the sub category name. Example: Events:Luncheon
Peachtree users: Ensure your chart of accounts in ChamberMaster matches the exact Account ID given to your Chart of Accounts in Peachtree.
QuickBooks and QuickBooks Online users only: Check Transaction Classes (if applicable)
If using Classes in QuickBooks, make sure ChamberMaster has matching Transactions Classes created. The Class Name should match exactly the class name in QuickBooks.
Parent and child categories are supported in the export as well, if desired. See “Create Transaction Classes” for more information.
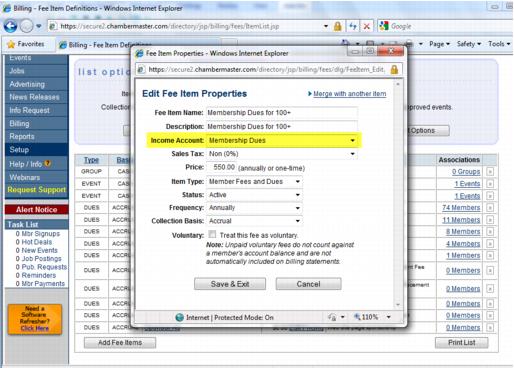
Check fee items
Then in ChamberMaster also click through each fee item and ensure that the item is pointing to the correct Account.
1. |
Click Setup in the left-hand menu. |
2. |
Click Fee Items List. |
3. |
Click on each Fee Item Name and verify that the Income Account listed is correct (it should match the name of an account in your accounting software that is also identified in your ChamberMaster Chart of Accounts). |
Note: Never assign a Fee Item to Accounts Receivable. It must be assigned to an Income account. If you are unsure of which Income Account to use, check with an accountant.

Figure 8-1 Fee Item Income Account verification
Check Sales Tax Items
If charging Sales Tax, make sure that each tax item is also assigned to a matching account in your accounting software.
1. |
Click Setup in the left-hand menu. |
2. |
Click Sales Tax. |
3. |
Click Manage Tax Items at the bottom of the window. |
4. |
Click on each Sales Tax Item and verify that the Tax Account listed is correct (it should match the name of an account in your accounting software that is also identified in your ChamberMaster Chart of Accounts) |
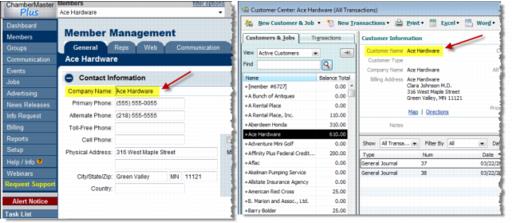
QuickBooks and QuickBooks Online users only: Check Customer Names
One last thing is to check on is your QuickBooks customer names. Customers who exist in your ChamberMaster database (under Company Name), but not in your QuickBooks company file must be added to QuickBooks exactly as they appear in ChamberMaster.
For customer names you already have in QuickBooks, you will want to ensure that the QuickBooks Customer Name matches the Company Name in ChamberMaster. These two fields are the comparison fields used for making sure the transaction goes on the correct customer record. If there are any differences in spelling or punctuation, the import will fail.

Figure 8-2 ChamberMaster Company Name compared to QuickBooks Customer Name
Compare these two lists by viewing the QuickBooks Customer Contact List under Reports with a Custom Report in ChamberMaster where you might only need to select the Company Name. Fix any discrepancies between the two customer lists
Note: Before regular exports, you will be able to run the Member Update Activity report in ChamberMaster to view any changes to member names that should be updated in QuickBooks prior to running the export.