Billing
The Billing section is designed to assist in the setup and daily activities of staff/employees who use the Integrated Billing solution. Note: This this section is not intended for those using the legacy CQI integration.
Contents
Initial Billing Setup
Setup/Modify Chart of Accounts
If not imported from your data, the default Chart of Accounts will include only three selections: Accounts Receivable, Membership Dues (income), and Sales Tax (liability). Create or modify these accounts as desired.
![]() Here's a quick video tutorial for setting up and modifying the chart of accounts
Here's a quick video tutorial for setting up and modifying the chart of accounts
- Click Setup in the left-hand menu.
- Click Chart of Accounts in the "Billing" area.
- The current Chart of Accounts will display.
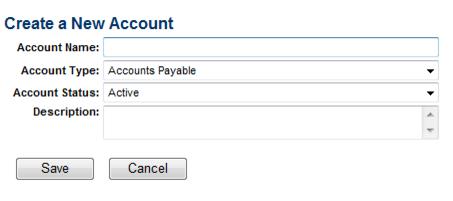
- a. To create a new account, click Add Account and complete the next window. See
- Note: Chart of Accounts names created by users who intend to export transactions to PeachTree should name their accounts here with the Peachtree Account ID (numeric value) instead of the Account name. For QuickBooks users that have the option enabled to use account numbers, EITHER the account number or the account name may be used. If using the account name, sub-accounts must be added with all heading accounts included (ex. Renewal Dues is set up as a sub-account of Membership Dues - account name would be entered as Membership Dues:Renewal Dues - a colon needs to separate the two account names)

- Figure: Create a New Account
- b. To remove an account, click the title of the Account in the Account Name column and then click Delete. NOTE: Best practice is to inactivate accounts as opposed to deleting.
- c. To modify an account, click the title of the Account in the Account Name column; make desired changes and then click Save.
- a. To create a new account, click Add Account and complete the next window. See
Selecting Undeposited Payments Account
You may designate an account from your chart of accounts to hold undeposited payments and sales receipts. You may also choose the default placeholder account Undeposited Funds instead of choosing a specific account. This is selection is especially helpful for those exporting to Peachtree.
- Click Setup in the left-hand menu.
- Click Chart of Accounts in the "Billing" area.
- Select the appropriate Undeposited Payment Account.
- Peachtree users: Within Peachtree create a new chart of account item for undeposited funds. Go to Lists, Chart of Accounts, New. The Account ID field is what needs to match the ChamberMaster Chart of Account Account Name field. Once this has been created in both Peachtree and ChamberMaster, go into the Chart of Account list in ChamberMaster and set that account as the Undeposited Payment Account. Once this has been completed, Payments and deposits will flow through to Peachtree in the Journal Entry Export.
- A list of commonly asked questions that your accountant should answer.
- QuickBooks Troubleshooting
Overview Videos
- Description: An overview of the daily activity as it relates to billing: creating invoices, posting payments, issuing credits, running reports, etc. Includes information on what the difference is between a payment and a receipt as well as when to use credits, discounts and write-offs. (NOTE: this training is not intended for those using the legacy CQI integration) Length: ~15 minutes.
FAQs
- How to I create and send invoices for monthly membership dues?
- How do I create statements?
- How to I export my transactions to QuickBooks or Peachtree?
- How do I set up credit card processing?
- How do I set up voluntary fees?
- How do I run my QuickBooks reports on both a Cash and an Accrual Basis?
- What reports can I use to reconcile to my financial software?
- Which reports display cash vs. accrual based information?
- How do I track Trades?
- How do I make sure that the member name in CM/GZ matches what I have in Quickbooks?
Billing Help Topics
- This section provides staff with the details on setting up the selections required for using the Billing module.
- Provides a foundation for delivering statements and accessing the multitude of reports available.
- Explains the steps required to create the regular invoices for membership - annual, semi-annual, quarterly, and/or monthly invoices.
- Contains steps and tips for receiving payment, crating sales receipts, applying credits, and making deposits. Write-offs and Discounts are also covered.
- Explains options for printing pre-defined or self-defined letters to specific members based on your own set of criteria.
- Explains how to bill individuals within a Group.
- Contains steps for setting up Event fees and creating event invoices.
- Explains steps to implement credit card payment into event registrations, online membership applications, and member bill pay.
- Will explain the initial items to check, how to run a trial export, and give tips and instruction for exporting on a regular basis.
Pages in category "Billing"
The following 51 pages are in this category, out of 51 total.


