Billing
The Billing section is designed to assist in the setup and daily activities of staff/employees who use the Integrated Billing solution. Note: This this section is not intended for those using the legacy CQI integration.
Before getting started with Integrated Billing please review Things you will need to verify with your Accountant , a list of commonly asked questions that your accountant should answer.
Contents
Initial Billing Setup
Initial Billing Setup 
![]() View this video to learn how to setup your Chart of Accounts, Fee items, and Sales Tax. Setup custom customer messages, payment terms, payment methods, and set system-wide defaults. (NOTE: this training is not intended for those using the legacy CQI integration) Length: ~15 minutes.
View this video to learn how to setup your Chart of Accounts, Fee items, and Sales Tax. Setup custom customer messages, payment terms, payment methods, and set system-wide defaults. (NOTE: this training is not intended for those using the legacy CQI integration) Length: ~15 minutes.
Imported Data: If you are new to this application's Billing module, information may have been imported from your previous billing solution. If so, you may want to check your beginning balances, chart of accounts and other pertinent information for each member to ensure that your data is correct.
No Imported Data: If no billing information has been imported, each member will have a starting balance of $0 and will begin when you create your first transaction. Your first step should be to create the chart of accounts.
All Users: Setup Membership Fees, Payment Terms, Payment Methods, Customer Messages, and Sales Tax options.
Working with Invoice Templates
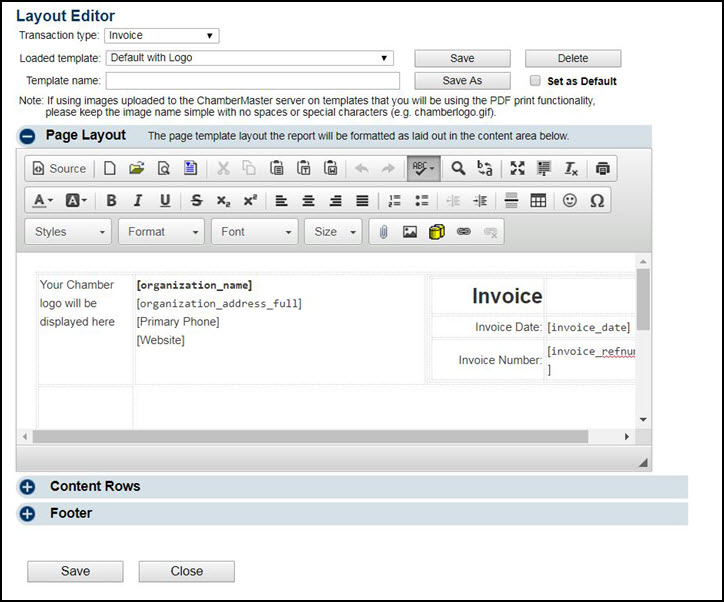
To edit an existing invoice template, the Template Manager must be available in your database. If the Template Manager has been enabled in your database, you will see the selection Template Manager under the Setup module. If the Template Manager is not enabled in your database, contact customer support to receive instruction about enabling this feature.
View/Edit Default Templates
- Select Setup in the Navigation Panel.
- Click Template Manager in the Billing section.
- Select the template you wish to view/edit, from the Loaded Template drop-down list.
- To edit the template:
- Type any desired static text in the desired location in the Page Layout area of your template. All the standard word processing functions are available, such as bold, italics, and so on.
- Insert database fields clicking Add Database Field. Open the Billing Template Fields, scroll to and click the desired field.
- Type a new name for this edited template in the Template Name field
- Click Save As (so not to modify the original in case you need to return to the old template).
| Note: The database field titled [invoice_compact_lineitems] generates a unique output when used and is not commonly included on templates except in rare occasions. This database field will take all individual line items billed to the customer and compact them into a single item on the invoice that is displayed to the customer. The line item total will include the total of all individual line items. The line item description for the first item on the invoice is the only item that will display to the customer. In your software, you will still see all individual line items but the customer is kept from getting bogged down with all the items that make up that single item that you’d like to bill them. |
Setting your default Invoice Template
- Click Setup in the left-hand menu.
- Click Billing Options and Settings.
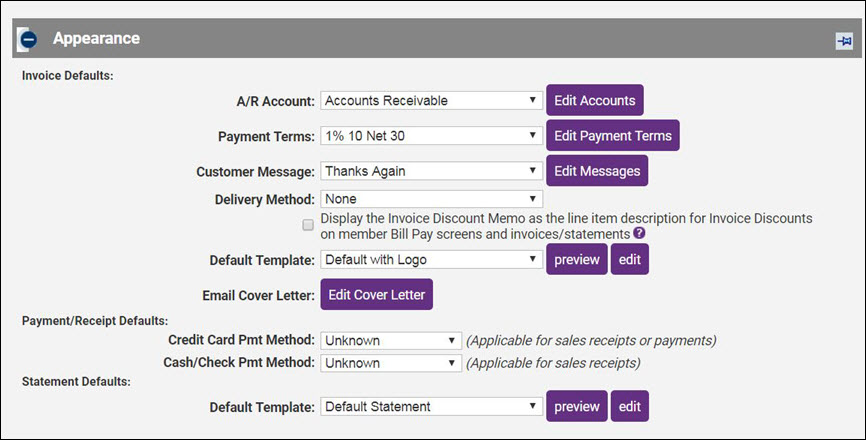
- Open the Appearance area.
- Select the desired template from the Invoice Default Template drop-down list.
Note: There is also a default Statement template that may be selected here.
Setup/Modify Chart of Accounts
If not imported from your data, the default Chart of Accounts will include only three selections: Accounts Receivable, Membership Dues (income), and Sales Tax (liability). Create or modify these accounts as desired.
![]() Here's a quick video tutorial for setting up and modifying the chart of accounts
Here's a quick video tutorial for setting up and modifying the chart of accounts
- Click Setup in the left-hand menu.
- Click Chart of Accounts in the "Billing" area.
- The current Chart of Accounts will display.
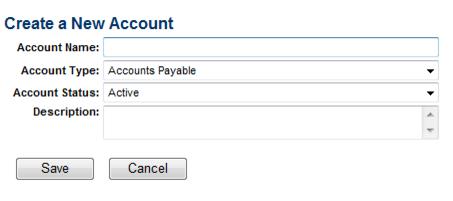
- a. To create a new account, click Add Account and complete the next window. See
- Note: Chart of Accounts names created by users who intend to export transactions to PeachTree should name their accounts here with the Peachtree Account ID (numeric value) instead of the Account name. For QuickBooks users that have the option enabled to use account numbers, EITHER the account number or the account name may be used. If using the account name, sub-accounts must be added with all heading accounts included (ex. Renewal Dues is set up as a sub-account of Membership Dues - account name would be entered as Membership Dues:Renewal Dues - a colon needs to separate the two account names)
- b. To remove an account, click the title of the Account in the Account Name column and then click Delete. NOTE: Best practice is to inactivate accounts as opposed to deleting.
- c. To modify an account, click the title of the Account in the Account Name column; make desired changes and then click Save.
- a. To create a new account, click Add Account and complete the next window. See
Selecting Undeposited Payments Account
You may designate an account from your chart of accounts to hold undeposited payments and sales receipts. You may also choose the default placeholder account Undeposited Funds instead of choosing a specific account. This is selection is especially helpful for those exporting to Peachtree.
- Click Setup in the left-hand menu.
- Click Chart of Accounts in the "Billing" area.
- Select the appropriate Undeposited Payment Account.
- Peachtree users: Within Peachtree create a new chart of account item for undeposited funds. Go to Lists, Chart of Accounts, New. The Account ID field is what needs to match the ChamberMaster Chart of Account Account Name field. Once this has been created in both Peachtree and ChamberMaster, go into the Chart of Account list in ChamberMaster and set that account as the Undeposited Payment Account. Once this has been completed, Payments and deposits will flow through to Peachtree in the Journal Entry Export.
Working with Fee Items
Adding a Regular Fee Item
- Click Setup in the left-hand menu.
- Click Fee Items List in the "Billing" area. The current list of Fee Items display under the List Options filter.
- Click Add Fee Item (This option is found either in the List Options area or at the bottom of the Fee Items List.).
- Select the Regular Fee radio button.
- Configure the following:
- Fee Item Name: Title for the fee item; will be used by default to identify the fee item on a member’s account
- Description: Further description of the fee item that displays on the invoice by default (may be modified on each member account)
- Account:' Select the desired account from your list of Chart of Accounts.
- Sales Tax: Select whether this item should be taxed or not; if proper tax amounts are not displayed, modify this item by selecting Sales Tax from the Setup module.
- Price: Type the desired fee item amount – the annual amount or one-time price.
- Member Fees and Dues
- Event Fees – available in the Events module (not available when creating a Bundled Fee)
- Group Fees – available in the Groups module for billing an entire group a single price all at once.
- eCommerce Fees - used with the eCommerce add-on module
- Pledges Fees - alternate fee item type to separate pledges. Works similar to non-dues fees
- Non-Dues Fees - used for tracking other fees that don't fit into a type above.
- Status: Select Active or Inactive (only Active items may be billed). Fee Items, when set to inactive, will present options to either remove the fee from the member or remain on the member account. Inactive fees on a member account will not be billed.
- Frequency: Select desired default frequency (available only if Member Fees and Dues item type is selected). Annual, Semi-annual, Quarterly, Monthly, One-Time. This selection may be changed on each members’ account as desired.
- Collection Basis: Select Cash or Accrual (Not available when creating a Bundled Fee.)
- Voluntary: If desired, click “Treat this fee as voluntary”. (Not available when creating a Bundled Fee.) Note: Unpaid voluntary fees do not count against a member's account balance and are not automatically included on billing statements.
Adding a Bundled Fee Item
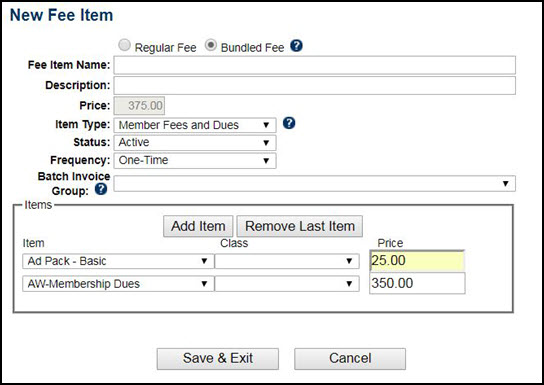
Bundled Fees are typically used for those offering a tiered dues membership. Bundled fees allow the ability to include a single line item on an invoice but report to multiple income accounts for internal bookkeeping. NOTE: Initially, you must create regular fee items to add to bundles.
Click Here to view a video on creating Bundled Fees
- Click Setup in the left-hand menu.
- Click Fee Items List in the "Billing" area. The current list of Fee Items display under the List Options filter.
- Click Add Fee Item (This option is found either in the List Options area or at the bottom of the Fee Items List.).
- Select the Bundled Fee radio button.
- Configure the following:
- Fee Item Name: Title for the fee item; will be used by default to identify the fee item on a member’s account
- Description: Further description of the fee item that displays on the invoice by default (may be modified on each member account)
- Item Type: The item type dictates where the fee item is used in the software.
- Member Fees and Dues
- Group Fees – available in the Groups module for billing an entire group a single price all at once.
- Pledges Fees - alternate fee item type to separate pledges. Works similar to non-dues fees
- Non-Dues Fees - used for tracking other fees that don't fit into a type above.
- Status: Select Active or Inactive (only Active items may be billed). Fee Items, when set to inactive, will present options to either remove the fee from the member or remain on the member account. Inactive fees on a member account will not be billed.
- Frequency: Select desired default frequency (available only if Member Fees and Dues item type is selected). Annual, Semi-annual, Quarterly, Monthly, One-Time. This selection may be changed on each members’ account as desired.
- Add Fee Items to your bundle (NOTE: The Account, Sales Tax assignment, and Collection Basis designation originally selected for each item is used when this Bundled Fee is invoiced.):
- Select an Item from the drop-down list.
- (Optional) Select Class from drop-down list.
- Edit Price if needed. NOTE As items are added, the Price of the bundle is totaled.
- Click the Add Item button to continue adding items to the bundle as needed.
- Click Save & Exit.
Billing - Day to Day Activities
Billing Day to Day Activities 
![]() View this video for an overview of the daily activity as it relates to billing: creating invoices, posting payments, issuing credits, running reports, etc. Includes information on what the difference is between a payment and a receipt as well as when to use credits, discounts and write-offs. (NOTE: this training is not intended for those using the legacy CQI integration) Length: ~15 minutes.
View this video for an overview of the daily activity as it relates to billing: creating invoices, posting payments, issuing credits, running reports, etc. Includes information on what the difference is between a payment and a receipt as well as when to use credits, discounts and write-offs. (NOTE: this training is not intended for those using the legacy CQI integration) Length: ~15 minutes.
Process Payments
When payment is received, you can enter a payment in one of three locations: the Billing Center tab or Payments tab in the Billing module, or the Account tab in the Members module.
Processing Sales Receipts
A receipt is created when accepting money on a Cash Basis. If you are receiving money to pay off an invoice, make sure to receive a payment instead of creating a receipt so the invoice can be marked as paid. The Sales Receipt Summary report will display sales receipts transactions.
Process Credits
A credit may be created for a member ahead of time or created when receiving the payment. Credits do not have to be associated with a particular invoice when created. In contrast, discounts must be associated with a particular invoice. The Credit Memo Summary report will display credit transactions.
- Create a credit
- Apply a credit before payment is received
- Apply a credit when payment is received
- Associated credit reports
Process Deposits
Deposits are only available when payments and receipts have been deposited into the Undeposited Funds account. See “Selecting Payment and Receipt “Deposit To” Account” for more information. The Deposit Summary report will display deposit transactions.
- Note: If planning to export your transactions to QuickBooks or other 3rd party billing software, making a deposit using Integrated Billing deposit options does not take away your option of being able to create a deposit in QuickBooks. The Integrated Billing deposit transaction can be excluded from your export, allowing you to also make the deposit in QuickBooks.
Process a Write-off
If a member does not pay, it is possible to write-off a balance. You may wish to have an account in your Chart of Accounts where these amounts will be recorded. Write-offs can also be done [[Mass Write-Offs|in mass when dropping members with the Mass Drop feature.
Process a Refund
Process Discounts
A discount may be applied to a particular invoice at the time of payment or prior to payment received. A discount is associated with a specific invoice and may only be removed by accessing the assigned invoice. In contrast, Credits do not have to be assigned to a particular invoice.
- Assign discount before payment is received
- Assign discount when payment is received
- Delete a discount
Statements and Reports
- Provides a foundation for delivering statements and accessing the multitude of reports available.
Print Collection Letters, Thank you’s, and Notifications
- Explains options for printing pre-defined or self-defined letters to specific members based on your own set of criteria.
Group Billing
- Explains how to bill individuals within a Group.
Event Billing
- Contains steps for setting up Event fees and creating event invoices.
Processing Recurring Member Invoices
Create a Batch of Recurring Invoices
Note: If you desire the fee items to appear in a particular order on the invoice when creating a batch, make sure the order is listed as desired on the Members->Account tab in the Membership Fees and Dues area. You can drag and drop the order of your fees. Don’t forget to save.
1. Click Billing in the left-hand menu.
2. Click the Invoices tab.
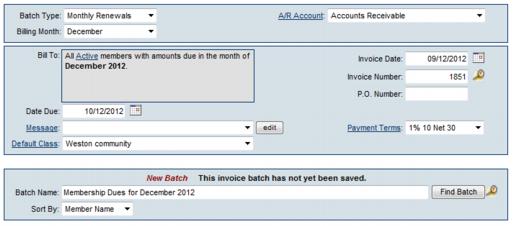
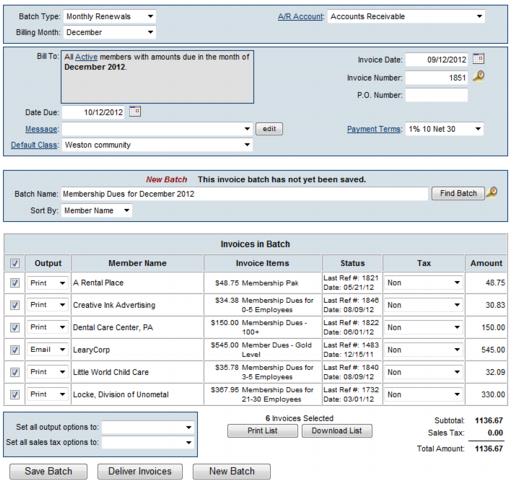
- Figure: Create Recurring Invoices
3. From the Batch Type drop down menu, select Monthly Renewals.
4. From the Billing Month drop down menu, select the desired month.
- If invoicing for the renewal month has been completed you will see a message that says: "Match Found"
- If invoices have not been created you will see a message that says: "New Batch"
5. If you have already created this batch and you see the message that says “Match Found”, then most likely you need to scroll down and click New Batch. If a match was found it means you’ve already invoiced this particular set of invoices. If there are some additional invoices that need “added to this batch”, you would want to create a new batch. Invoices that are added to the batch will update the entire batch with any new terms, dates, and payment options which changes those original invoices. Selecting New Batch is typically a better, safer idea.
6. Once you’ve determined you are on the correct batch, if desired, select a message that will be printed on each invoice. Note: click edit to modify the message or create a one-time custom message to display on all invoices.
7. Complete the rest of the fields including Invoice Date, Date Due, and Payment Terms.
- If Transaction Classes have been created, an Invoice Class drop-down selection will appear on the screen. Select the desired Invoice Class for this batch of invoices.
- Figure:Sample Recurring Invoice window
- Even if only viewing the invoices when clicking Deliver Invoices, the invoices will be created. If you clicked Deliver Invoices and do not want this batch created, close the Deliver window and click Delete Batch.
8. Uncheck any invoices that should be excluded from this Batch. Note: Excluded invoices may be added to this batch or placed in a new batch later.
9. Click Save Batch or Deliver Invoices. If clicking Save Batch, you can return to a batch of invoices at any time to deliver them (email or print them). If clicking Deliver Invoices, continue to the next step.
- Either choice, Save Batch or Deliver Invoices, will create the batch of invoices. Deliver Invoices will create the invoices and immediately open a window with options to print and/or email the invoices.
10. The Deliver Customer Invoices window will appear. The Delivery Method of Print Invoices is already selected. Those invoices with an Output selection (from the previous window) of Print or Both will be selected. Those invoices with an Output selection of Email or None will not be selected. Also, any invoice that does not have complete mailing address information will not be selected.
- Changes made to the Contact Name or address on the Deliver Customer Invoices window does not modify the Member’s Account information. Permanent Billing Rep or address changes must be made in the Members module.
- Figure: Delivery Method selections for Print Invoices
11. Complete the Delivery Method selections as desired.
Note: A default Invoice Template may be selected as desired by clicking '''Setup''' > '''Billing Options''' and '''Settings'''. Open the '''Appearance''' area and select a new '''Default Template'''. The templates may also be edited at this location. See “Invoice Templates” for more information.
12. When ready, click Preview Invoices or Print Invoices.
- Suggestion: Click Mark invoices as Delivered after printing when printing the labels. (if not printing labels, click Mark invoices as Delivered after printing when printing the invoices). This will make it easier to determine later if the invoices in that batch have been printed or not. Later, the selection Print/Email Invoices on the Reports tab will easily identify any outstanding invoices that have not been “delivered”, regardless of which batch they belong to. See “Print/Email All Undelivered Invoices”
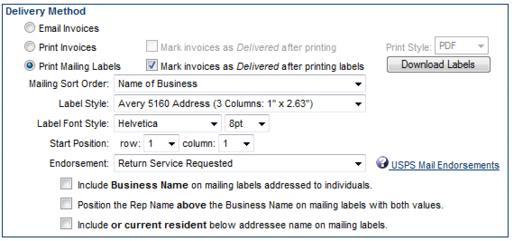
13. If mailing labels are desired, click Print Mailing Labels in the Delivery Method section.
Note: When viewing the Member's Account tab after billing: The Next Billed column in the Membership Fees and Dues area reflects the name of the monthly batch that this fee/due will be included in or already has been included in. This column will automatically display the next billing month when the current date passes that month. For instance, if the current date is February 2015 and a fee/due is set to be billed in Februrary 2015, the Next Billed column will display February 2015 until March 1, 2015; then it will automatically switch and display February 2016. To see if a particular fee/due has been billed, refer to the transactions displayed in the Transaction History area.
- Figure: Delivery Method selection for Print Mailing Labels
14. Make the desired selections.
15. Click Print Labels.
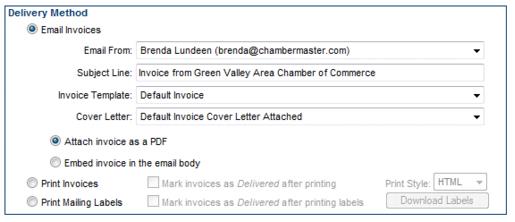
16. If any invoices need to be emailed, click Email Invoices in the Delivery Method section.
- Figure: Delivery Method selections for Email Invoices
17. Make the desired selections.
18. Click Send Emails.
Create Batch of Recurring Epayment Transactions
Credit Card Processing
- Explains steps to implement credit card payment into event registrations, online membership applications, and member bill pay.
Export to QuickBooks or Other Program
- Will explain the initial items to check, how to run a trial export, and give tips and instruction for exporting on a regular basis.
Billing FAQ's
- How to I create and send invoices for monthly membership dues?
- How do I create statements?
- How to I export my transactions to QuickBooks or Peachtree?
- How do I set up credit card processing?
- How do I set up voluntary fees?
- How do I run my QuickBooks reports on both a Cash and an Accrual Basis?
- What reports can I use to reconcile to my financial software?
- Which reports display cash vs. accrual based information?
- How do I track Trades?
- How do I make sure that the member name in CM/GZ matches what I have in Quickbooks?
Accounting Basics Tutorials
QuickBooks Troubleshooting
Pages in category "Billing"
The following 51 pages are in this category, out of 51 total.

