Events

From Support Wiki
Jump to navigation Jump to search

Contents

Getting Started

If you are just getting started with the Events module, watch this overview video and read Get the Big Picture.

Otherwise, just scroll down for FAQ, Common Tasks, and this module's Help Documentation.


Get the Big Picture

  • Events added to your calendar may be enhanced to include photos, sponsor logos and information, website links, and event description text that can be formatted as desired. Options also include online participant registration, special members only pricing, and an automatic email reminder to registered guests.
  • Event information may be kept for internal purposes only, displayed on the public website calendar, and/or a calendar available only to chamber members. The public events website displays a graphical monthly calendar, a list of current events, all events for the month, chamber-designated Featured Events, and the ability to search for desired event by category, keyword, or month. A printable listing is also available that contains all pertinent event details.
  • Invitations may be sent to potential participants and then automatically displayed on the participants list where their status may be changed from Invite Sent to Registered as RSVPs are received. From the participants list a roster sheet, name tags, or labels may be printed. Other output options include sending emails and downloading data to a comma separated value (.csv) file. Using a variety of filter options all output can be displayed by registration status, payment status, or according to self-selected filters.
Note: When creating a new event, work with the tabs in order as displayed. For example, after completing the General tab, setup the fees (if applicable) on the Fees tab. The Sponsor tab would be next, the Guest List, and finally the Account tab. You may complete them out-of-order if desired but there is a logical flow if working from left to right.
  • Event fees, designated for members or non-members, may be associated with each event. Individual invoices may be generated from the Events module for those requesting an invoice, and if credit card processing is set up then invoices/payments or sales receipts can be recorded automatically upon successful registration.

Maintaining the Events Calendar

Understanding the basics of how the Events module is organized will give a foundation for operation. Viewing existing events and learning to display only desired events will also be helpful. Then learn how to create, modify and manage events.

Event Module Organization

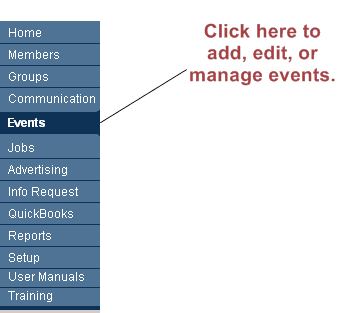
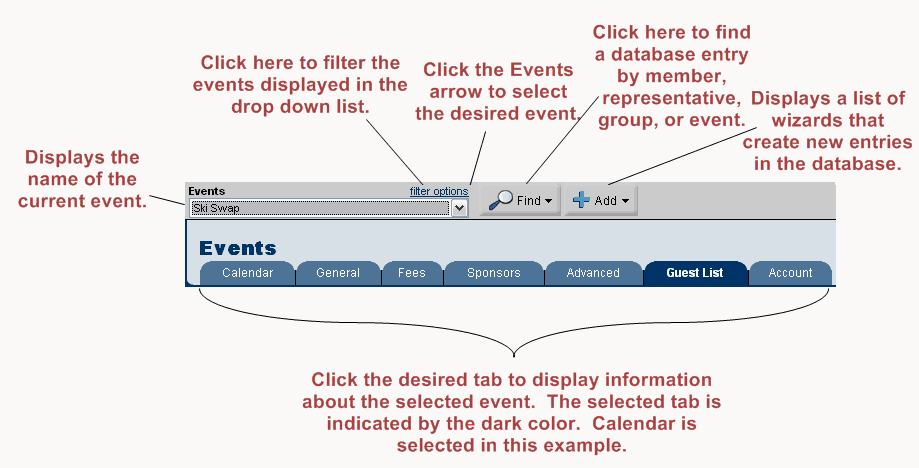
To add, edit, and manage the Events calendar, click Events in the left-hand menu where you can select the desired event and desired tab.
main menu
Figure 2-1 Main menu selection
events tabs
Figure 2-2 Events module

Event Tabs

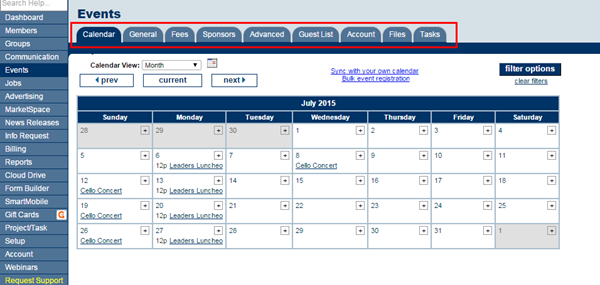
Within the Events Module there are nine tabs: General, Fees, Sponsors, Advanced, Guest List, Account, Files, and Tasks.


Events-tabs.png

Figure: Tabs in the Events Module


Calendar: Displays the internal events calendar in one of five views: list, day, month, week, or year view. Filter options may also be selected which would display only user-selected events. New events may be added from this tab by clicking the + sign on the desired date/time

General: Event information, placement options, and photos and images

Fees: Assign event fees, billing preferences, and discounts based on age, date, or volume

Sponsors: Designate event sponsors, logos, fees

Advanced: Specify Locations (if available) and Custom Fields

Guest List: Send invitations; add guests to the roster; print roster sheet, labels, and name tags; send emails; register invitees

Account: View income and payment activity, generate invoices and sales receipts (if applicable)

Files:

Tasks: 'Integration with the Project/Task Manager (Pro edition only) When creating a new event, work with the tabs in order as displayed. For example, after completing the General tab, setup the fees (if applicable) on the Fees tab. The Sponsor tab would be next, the Guest List, and finally the Account tab. You may complete them out-of-order if desired but there is a logical flow if working from left to right.


Working with the Calendar Tab

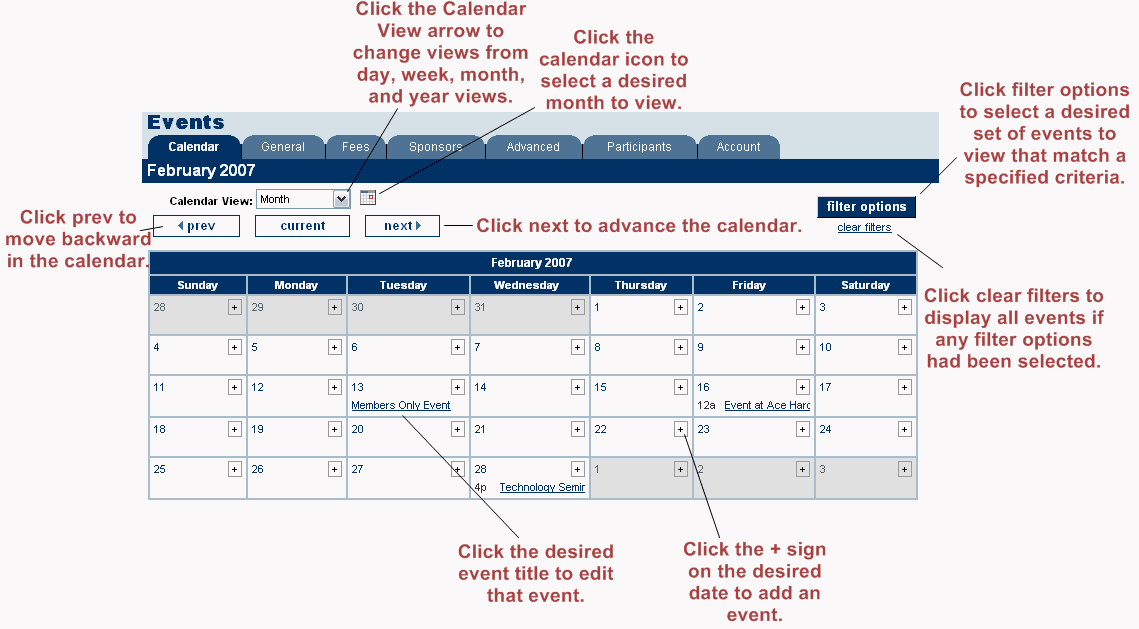
The Calendar tab displays an Events calendar that may be displayed in five different views: list, day, week, month, and year view. As the name suggests, List view displays all events in a list format. The day, week, and month view will display all events falling within the specified date range. The year view displays a graphical calendar allowing chamber employees to advance quickly to a particular date.

The calendar may also be filtered to display only certain events matching the desired criteria. Click clear filters to display all events again.

View the Internal Events Calendar

1.
Click Events in the left-hand menu.
2.
On the Calendar tab, click the Calendar View arrow to select the desired view.
3.
If necessary, click Prev and Next to decrease or advance the calendar. Alternatively, you may click the calendar icon and select the desired month to view.


calendar view
Figure: Events calendar

Filter the Internal Events Calendar (display only specified events)

Tip: After selecting the desired filter, you may want to select the List calendar view. List view will allow you to easily view all filtered events.
1.
On the Calendar tab, click filter options. filter options icon
2.
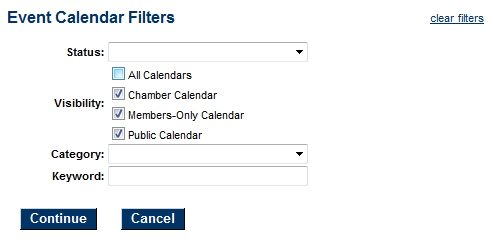
Select the desired filter options. See Figure 2-4 and Table 2-2 below.
3.
Click Continue.
4.
When finished viewing the filtered list of events, click clear filters to view all events.
Events-Filter the Internal Events calendar (display onl-image8.png
Figure 2-4 Filter options

Event Calendar Filters

Status
Approved: chamber employees have approved this event; displays on all designated calendars
Pending: an event submitted by a chamber member but waiting approval from a chamber employee
Disabled: an event that may or may not be current but will not be displayed on the public calendar; used to temporarily disable an event
Visibility: Select Internal Chamber Calendar, Chamber calendar, Public calendar, or Members calendar
Internal Chamber Event Calendar – When this option is checked the event can be filtered separately on the internal calendar system when you go to Events > Calendar tab and click on filter options.
Display on Public Events Calendar – When this option is checked the event will display on the website’s calendar as well as the upcoming events list. This option must be selected in order for the event to show on your public website.
Display on Members Only Calendar – When this option is checked the event will display on the Member Information Center (Members Portal) after they log in. This option must be checked for the event to show on the members’ calendar in the Member Center.
Display on Featured Events – This option allows for this event to be listed as a featured event on the featured events list.
Category: Select from all event categories
Location: Select from all locations (if applicable)
Keyword: Keyword must be a single word. Multiple single words may be specified which returns all events with either word. For example, keywords ski swap will display all events with ski OR swap in the title or description.

Selecting an Event

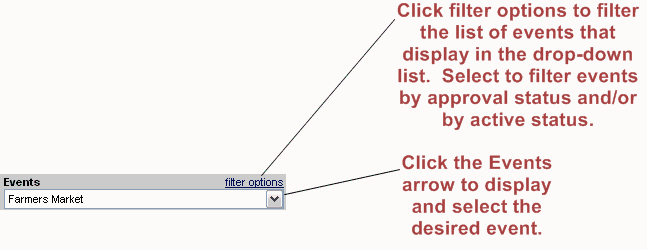
To edit event descriptions or dates, add photos, sponsors, participants or to modify any aspect associated with an event, the event must be selected and displayed in the Events drop-down list. See Figure 2-5 below.
events drop down
Figure 2-5 Farmers Market selected

Select an Event Using the Drop Down List

1.
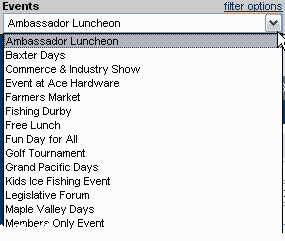
Within the Events module, click the drop-down arrow to the right of the Event name. See Figure 2-6.
2.
In the Events list, click the desired event name.
events drop down displayed
Figure 2-6 Events drop down list

Select an Event Using the Find Button

1.
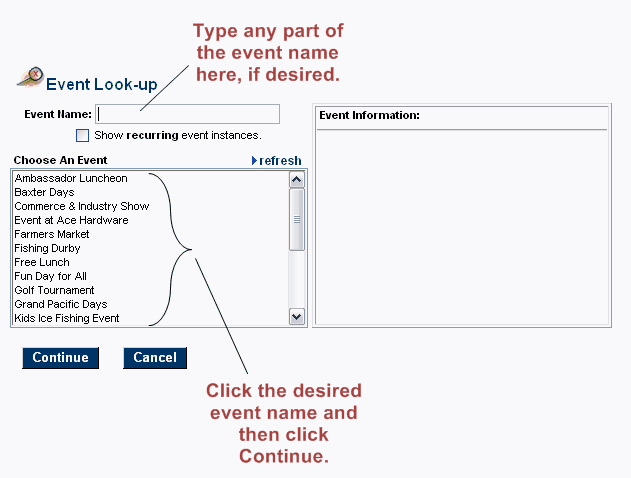
On the Find menu, click Event.
find menu
2.
If desired, in the Event Name box, type any part of the event name. (This will limit the list of displayed events to those matching your criteria.)
3.
In the Choose an Event list, click the desired event name.
find event menu
Figure 2-7 Event Look-up window
4.
Click Continue.

Select an Event Using the Calendar View

1.
In the Events module, click the Calendar tab.
2.
Advance the calendar to display the desired event.
3.
Click on the desired event title.

Adding an Event

When adding a new event, you simply fill in the requested information as the wizard walks you through three information screens. You will be asked to fill in the following information screens:

  • General Information
  • Descriptions/Appearance
  • Fees/Billing Information

When you click Finish, your event is automatically added to the designated event calendar(s).

You may add an event using one of two methods. Adding an event to the calendar may be done at any time using the Add menu and when by clicking the +sign when the Calendar tab is displayed, which uses the calendar to assist in date selection, or by nightly importing your iCal feed.

Add an Event

1.
On the Add menu, click Event.
Events-Add an event-image13.png
Optional: You may also click the + sign on the date of the event when on the Events->Calendar tab. First, advance the calendar to display the desired date. Then click the plus sign on that day. The date field will automatically display your desired date.
2.
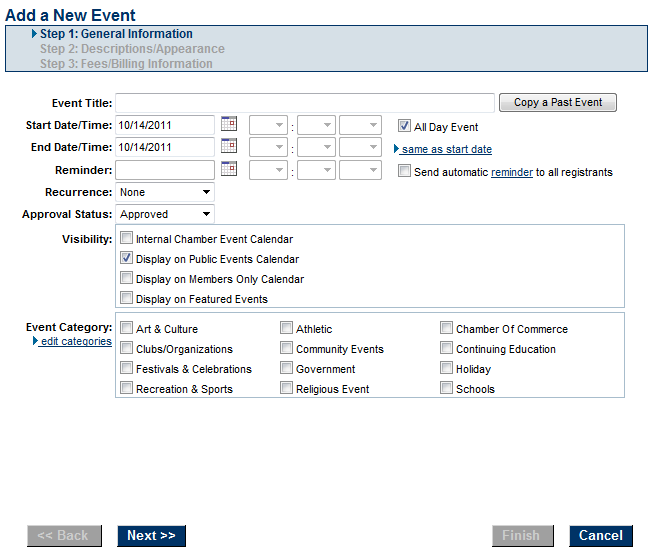
Complete the General Information fields and click Next.
Events-Add an event-image14.png
Figure 2-8 General Information screen
Event Title: This title will display in your Events drop-down list and also on the Event web page.
Start/End Date/Time: Ensure that these dates are correct. A different end date is only needed when a single event runs multiple days – like over the weekend.
All Day Event: Deselect this checkbox if you desire to display exact times. Time may also be specified in the Date/Time field on the next window.
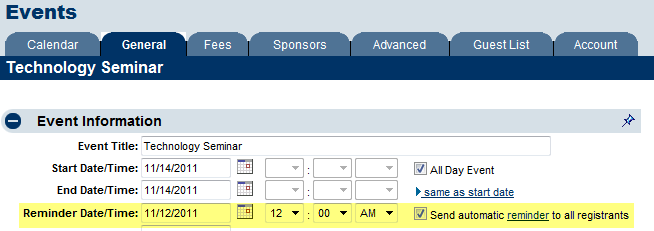
Reminder: An automatically generated reminder email will be sent using content from details on the General tab of your event. Preview the automatic reminder by clicking the reminder link. The email is sent to all registrants on your Guest List with a status of Registered. Only those with Plus or greater and SEO modules will have this new feature. The email “look and feel” may be modified with your own custom template if desired. Instructions for web designers are available at [[1]]
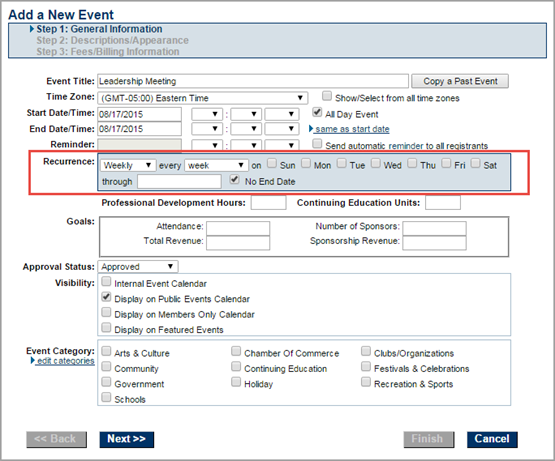
Recurrence: An event occurring multiple times on your calendar may be duplicated by setting a recurrence. See “Create a recurring event”.
Approval Status: Approved status will display this event on all calendar marked under “Visibility”. Status of Pending or Disabled will not display on the public calendar.
Visibility: Check the calendars that should display this event. Note: all events regardless of these checkboxes will display on the Events->Calendar tab.
Internal Chamber Event Calendar – When this option is checked the event can be filtered separately on the internal calendar system when you go to Events > Calendar tab and click on filter options.
Display on Public Events Calendar – When this option is checked the event will display on the website’s calendar as well as the upcoming events list. This option must be selected in order for the event to show on your public website.
Display on Members Only Calendar – When this option is checked the event will display on the Member Information Center (Members Portal) after they log in. This option must be checked for the event to show on the members’ calendar in the Member Center.
Display on Featured Events – This option allows for this event to be listed as a featured event on the featured events list.
 
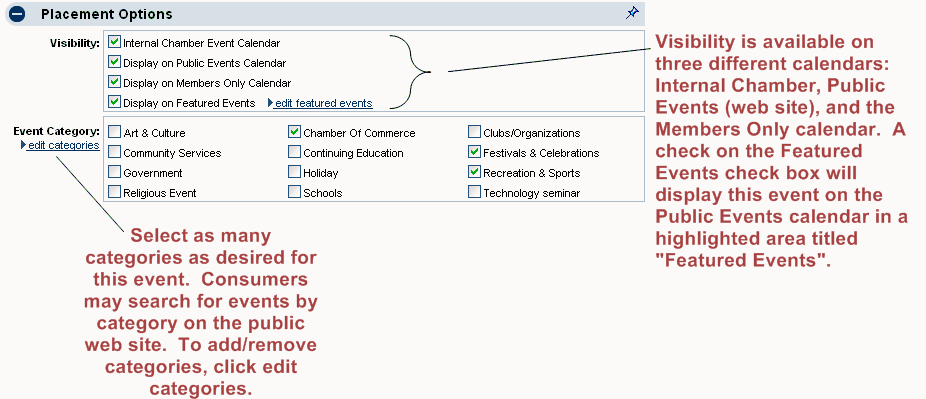
Event Category: Select as many categories as desired for this event. Website visitors may search for events by category on the public website. The Administrator may add/remove categories, by clicking edit categories.
3.
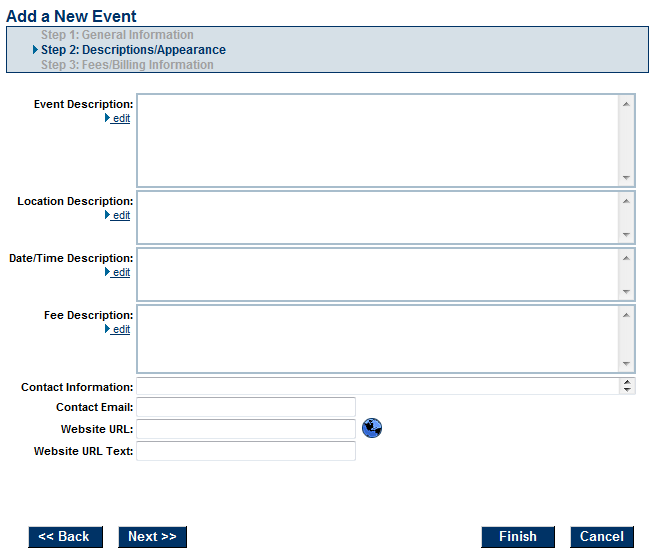
Complete the Descriptions/Appearance fields and click Next.
Events-Add an event-image15.png
Figure 2-9 Descriptions/Appearance window
Event, Location, Date/Time, and Fee Description: click edit next to each area to access the editor where the information should be typed. In the Event Description, use the editor to format the text as desired for display on the website. Add Attachments (downloaded documents), insert website links, and add graphics using the selections in the editor menu as desired.
Website URL Text: Type a word or phrase that will display as the link for the URL entered in the Website URL: field. For example: Type “Click here for more information” in the Website URL Text.
4.
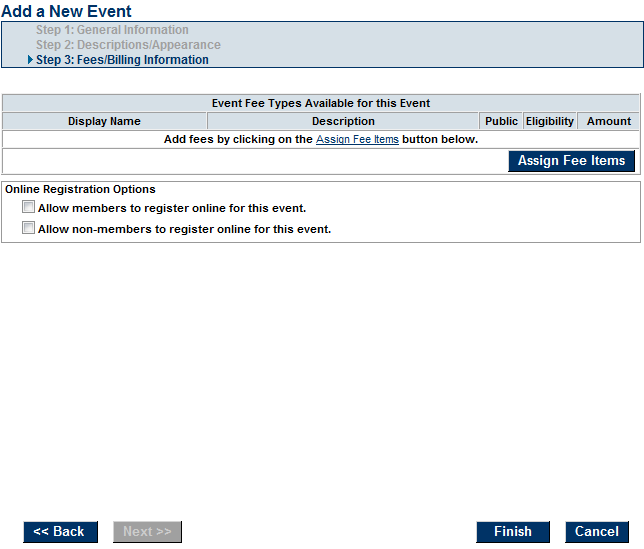
Complete the Fees/Billing Information fields and click Finish.
Events-Add an event-image16.png
Figure 2-10 Fees/Billing Information window
Assign Fee Items: If fees will be associated with this event, click Assign Fee Items. In order to be assigned, fees must first be created by someone with Finance or Administrator permissions. Fees can also be assigned later on the Fees tab of the event.
Online Registration Options: If desired, select to allow members and/or non-members to register online for this event. Selecting this checkbox will immediately display the Register button on the public event page. This selection can also be turned on later on the Fees tab of the event.
After creating a new event, work with the tabs in order as displayed. For example, after completing the General tab, setup the fees (if applicable) on the Fees tab. The Sponsor tab would be next, the Guest List, and finally the Account tab. You may complete them out-of-order if desired but there is a logical flow if working from left to right. The main concern would be to have the fees in place before registering guests and sponsors.

Importing Events from an iCal Feed

The iCal feed import provides an ability for customers to upload their iCal list (from the Cloud drive or other http url used with iPhones, iPads etc and other similar calendars) and import directly into the event calendar. A URL is specified to the location of this iCal and then each night the events are synched. To import iCal feeds into the event calendar

  1. Click Setup in the left-hand menu.
  2. Click Event Options and Settings
  3. Open the General Settings area.
  4. Click the +Add button in the iCal Import section.
    Events-Importing events from an iCal feed-image17.png
  5. Type the URL of the iCal feed.
  6. Click Save.
Note: Once an iCal has been added, the events on that calendar may take up to 24 hours to display on your event calendar.
Note: Recurring events are not supported with the iCal import feature.

Editing Event Information

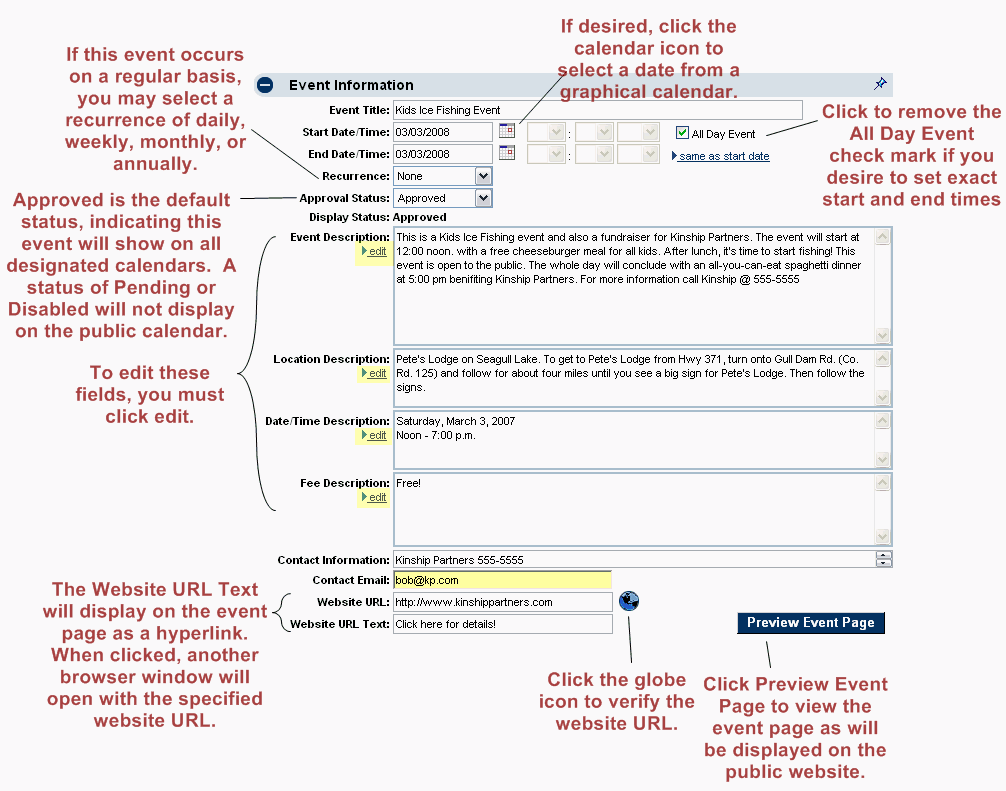
Facts displayed about an event are based on information from the event’s General tab. The Event Title, Start Date/Time, End Date/Time, Contact Information, Website URL, Recurrence, and Approval Status may be modified here.
In addition to this basic information, the Event Information area contains the Event Description, Location Description, Date/Time Description, and Fee Description, which is typed into the built-in editor allowing formatting of the text such as bold, underline, font size and style changes.

Edit Event Information

1.
In the Events module, select the desired event. See “Selecting an Event.”
2.
On the General tab, modify the desired Event Information fields.
3.
Click Save.
The Location, Date/Time and Fee Descriptions fields are highlighted (offset) on the public event page along the right-hand side of the screen.
event information
Figure 2-11 Editing Event Information

Photos and Images

Photos, images, a map and a video may be added to the event page.
One photo may be added as a Main Event photo that is automatically positioned within the event description area, and/or multiple photos may be included in the Photo Gallery which displays in thumbnail size at the bottom of the event page but will be enlarged when a consumer clicks the image. Images are automatically resized to accommodate the space allowed. Images must be .jpg or .gif.
A map to the event location may be included by uploading your own .jpg or .gif image or pointing to Google Maps.
One YouTube video may be displayed on the event description page as well.
Events-Photos and Images-image19.png
Figure 2-12 Photos & Images

Add a Main Event Photo or a New Gallery Photo

1.
On the General tab, click Add Image in the Action column of the Image Type that you wish to add in the Photos & Images area.
Events-Add a Main Event Photo or a New Gallery Photo-image20.png
Figure 2-12a Clicking to add a photo
2.
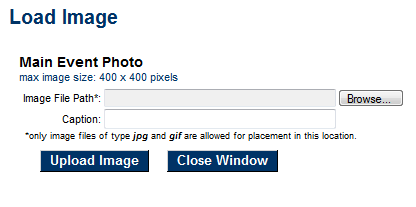
Type the path and filename of the desired graphic file or click Browse to locate and click Open when desired graphic is located.
3.
Click Upload Image.
4.
Optional: If adding a Main Event photo, you may also complete the Caption field and then click save caption.
Events-Add a Main Event Photo or a New Gallery Photo-image21.png
Figure 2-12b Selecting the desired image
5.
Click Close Window.
Only one Main Event photo may be added which is automatically positioned within the event description area. However, Gallery Photos may contain multiple images which display in thumbnail size at the bottom of the event page but will be enlarged when a consumer clicks the image. Photos may also be added to the Event Description. Click Add/Edit Image while editing the description text.

Remove a Main Event Photo or a Gallery Photo

1.
On the General tab, click Remove Image in the Action column of the Image Type that you wish to remove in the Photos & Images area.
Events-Remove a Main Event Photo or a Gallery Photo-image22.png
Figure 2-12c Removing an image

Change an existing Main Event Photo or Gallery Photo

1.
On the General tab, click Change Image in the Action column of the Image Type that you wish to change in the Photos & Images area.
2.
Type the path and filename of the desired graphic file or click Browse to locate and click Open when desired graphic is located.
3.
Click Upload Image.
4.
Click Close Window.

Add a Video

1.
On the General tab, click Add Video in the Action column in the Photos & Images area.
Events-Add a video-image23.png
2.
Type or paste the YouTube “share link” for the desired video into the Event Video field.
3.
Click Save.

Add a Map Image

1. On the Web tab, click the desired Map Image option button in the Image Type column in the Web Photos & Images area.


Events-Add a map image-image24.png


2. If selecting Uploaded Image, then click Add Image in the Action column. Type the path and filename of the desired graphic file or click Browse to locate and click Open when desired graphic is located. Click Upload Image. Click Close Window.

3. If selecting Google Maps or MapQuest, complete the address fields and then click Save.

Add Custom Fields

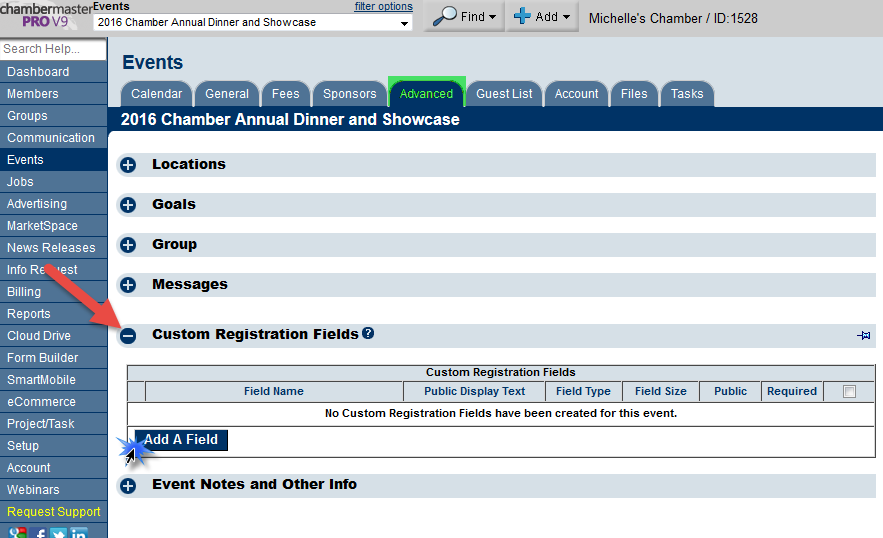
1. From the Advanced tab click to expand Custom Registration Fields, then click Add a Field


Cfr1.png
Figure 1: Creating Custom Registration Fields


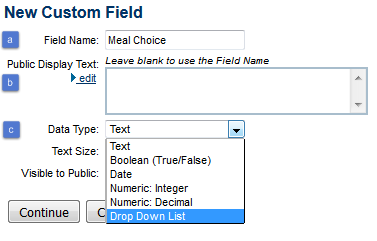
2. Create the custom registration field by completing the following:

a. Field Name
b. Public Display Text (optional)
c. Select Data Type


Cfr2.png
Figure 2: Custom Registration Instructions


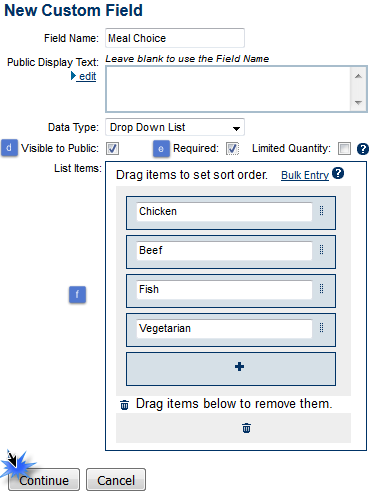
d. Designate whether or not custom field will be a publicly displayed field
e. Designate whether or not custom filed is required
f. (If data type is Drop Down List) Enter drop down selection items


Cfr3.png
Figure 3: Custom Registration Instructions 2

Create a recurring event

Video: Create a Recurring Event

If your association has an event which occurs on a regular basis, save time by setting it up as a recurring event. Most the details of the original event will be applied to the recurring instances. A notable exception is Fees, which must be set for each instance.[1]

Important: Once an event is listed as a recurring event, each event instance will be displayed on the calendar at the appropriate date/time where the instance may be modified on an individual basis or ALL instances may be changed at once by editing the original occurrence.
Note: After an instance has been edited individually, it will no longer accept the changes from the original occurrence.


Recurring.png
Figure: Recurrence options in the "Create a New Event" screen.


Set the recurrence of an event

1.
On the General tab, click the Recurrence arrow and click the desired recurrence.
recurrence
Figure 2-14 Recurrence
2.
Complete the Recurrence fields for the selected recurrence.
recurrence monthly
Figure 2-15 Monthly Recurrence fields
If you are already on the General tab of the original event, you may click edit specific instance and click to select the desired instance to edit.

Edit a specific instance

1.
On the Calendar tab, advance to the date of the desired instance.
2.
Click the title of the event.
3.
Modifications made will only affect this specific instance. (You may even delete a specific instance without affecting the others.)

To edit all event instances

To edit all instances of the event, you may also click the original event on the Calendar to go directly to the original event.
Note: After an instance has been edited individually, it will no longer accept the changes from the original occurrence.
1.
On the Calendar tab, click the title of any event instance of the desired event.
2.
In the Recurrence field, click the title of the original event.
recurrence original instance
Figure 2-16 Edit the original event instance

Placement Options

An event may be displayed on three different calendars: the Internal Chamber Events calendar, the Public Events calendar (web site), and/or the Members Only calendar. A check on the Featured Events check box will display this event on the public web site calendar page in a highlighted area title “Featured Events.”
Internal Chamber Events. All calendar events will automatically display for your Chamber staff on the Calendar tab no matter what selection is made for the Visibility check box but if selecting “Internal Chamber Event Calendar”, you will be able to filter by this selection on the Calendar tab.
placement options
Figure 2-17 Placement Options

Select placement options

1.
On the General tab, click the desired visibility check box(es).
2.
Click Save.
3.
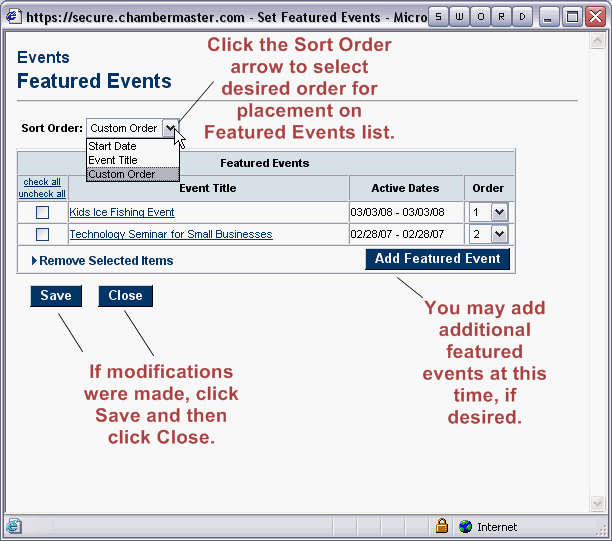
If selecting Display on Featured Events, complete the Featured Events window by selecting Sort Order and desired Order. Then click Save and Close.
featured events
Figure 2-18 Featured Events window

Select an event category

1.
On the General tab, click the desired Event Category(ies) check box(es).
2.
Click Save.

Edit event categories

1.
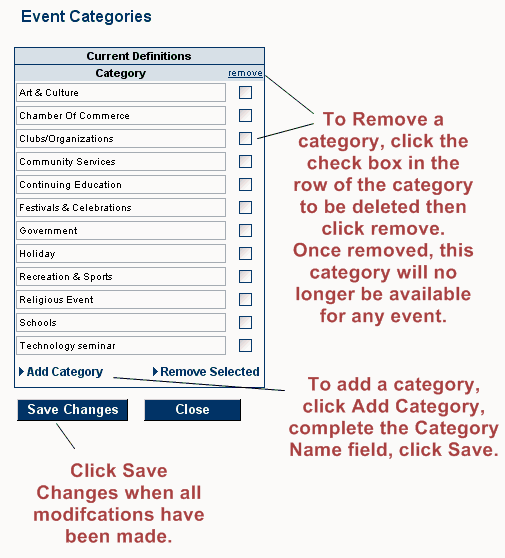
On the General tab, click edit categories in the Placement Options area.
event categories
Figure 2-19 Event Categories
2.
Make the desired modifications. See Figure 2-20.
Modifications made to categories affect all event listings. Do not remove a category if another event is using that category definition.
edit event categories
Figure 2-20 Edit event categories
3.
Click Save Changes.

Deleting an Event

If an event has been created by mistake, or you no longer wish to have the event appear, you may delete the event. All history of participants, sponsors, and fees will also be deleted and no longer available in reports.

Permanently delete an event

1.
On the General tab, click Delete Event. delete event
2.
Click OK.
Note: The Delete Event selection is only available to those with Administrator Level permissions.

Syncing with your calendar

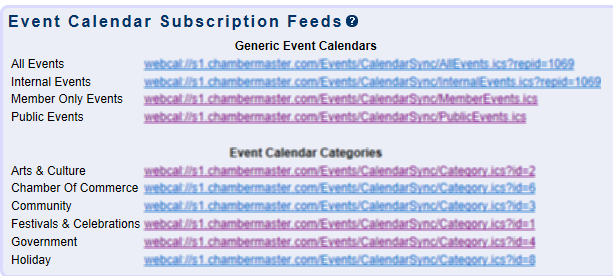
Event calendar feeds automatically synchronize your calendar with your events listed in your software. Many different applications support iCalendar, including Microsoft Outlook 2007 and later (Exchange), Lotus Notes 8.5 and later, Apple Calendar (iPhone and iPad), and Google Calendar (Android and Gmail).
Syncing with your calendar (basic instructions)
1.
Click Events in the left-hand menu.
Or find this same selection on the Dashboard Message Center next to the list of Upcoming Public Events.
2.
Click the Calendar tab.
3.
Click “Sync with your own calendar.”
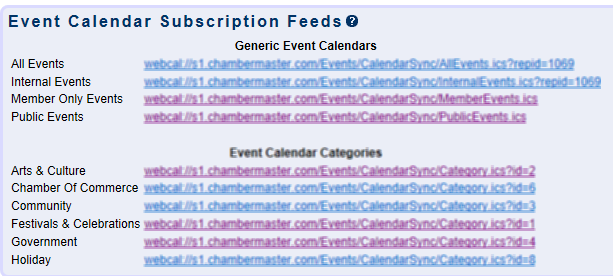
Events-Syncing with your calendar-image39.png
4.
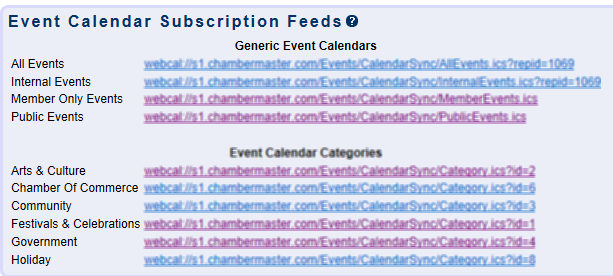
Click the desired link and follow the prompts to synchronize with the default calendar on your system (if available).
Events-Syncing with your calendar-image40.png
5.
To synchronize with a different calendar, copy and paste the desired URL into your calendar software in the location where feeds are accepted, often identified with “Subscribe”, “Add Calendar”, etc.
6.
Your 3rd party calendar will automatically update every hour with any changes made to your events.
 
Additional Information:
Populated date range: today - 365 days from now
Automatically updated: Every hour

Sync Events with Outlook

Outlook 2007 or greater will accept iCalendar feeds. Watch this video: How to Sync with Outlook Vid.png
To sync your events with Outlook
1.
Click Events in the left-hand menu.
2.
Click the Calendar tab and click “Synch with your own calendar.”
Events-Sync Events with Outlook-image41.png
3.
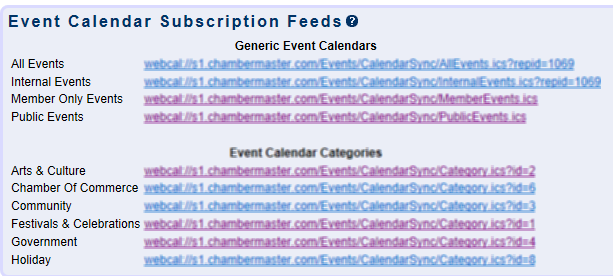
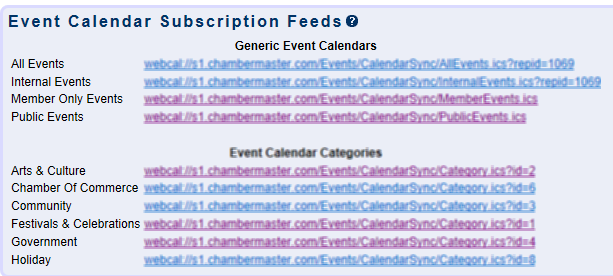
Locate the desired event feed.
Events-Sync Events with Outlook-image40.png
4.
Highlight the URL and copy it. (Right click on the highlighted URL and click Copy)
5.
Open your Outlook software.
6.
Click File, Date File Management.
7.
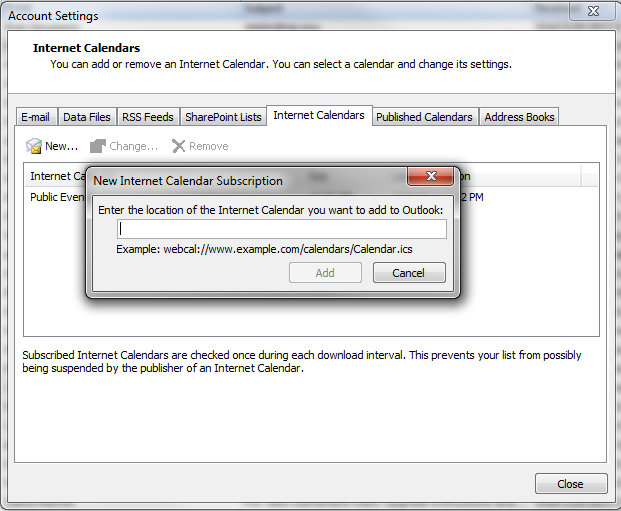
Click the Internet Calendars tab.
Events-Sync Events with Outlook-image42.png
8.
Click New...
9.
Paste the URL. (Right click and click Paste.)
10.
Click Add.
11.
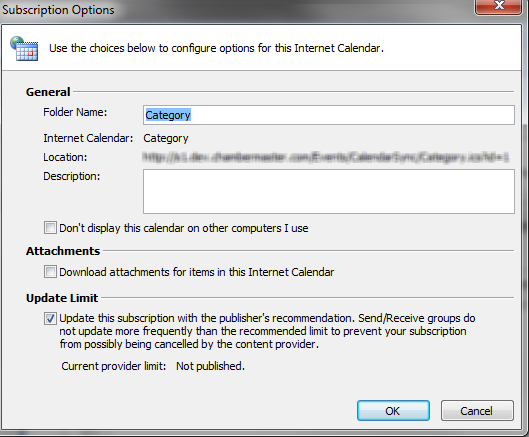
Click OK on the Subscription Options window.
Events-Sync Events with Outlook-image43.png

Synch your events with Google Calendar

Watch this video showing [to synch with Google Calendar] moviecamera
To sync your events with Google Calendar
1.
Click Events in the left-hand menu.
2.
Click the Calendar tab and click “Synch with your own calendar.”
Events-Synch your events with Google Calendar-image41.png
3.
Locate the desired event feed.
Events-Synch your events with Google Calendar-image40.png
4.
Highlight the URL and copy it. (Right click on the highlighted URL and click Copy)
5.
Open a browser window and login to your Google Calendar.
6.
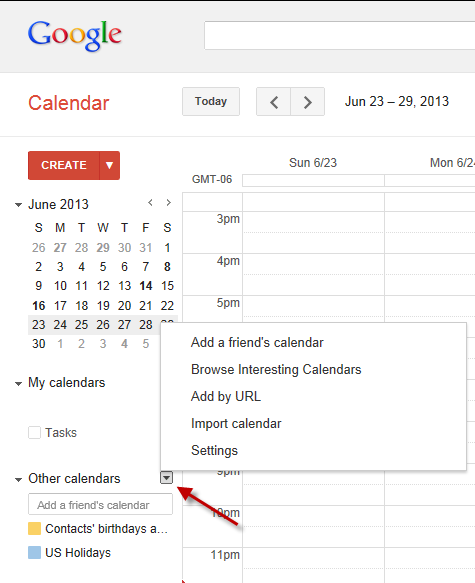
Click the arrow next to Other calendars.
Events-Synch your events with Google Calendar-image44.png
7.
Select Add by URL.
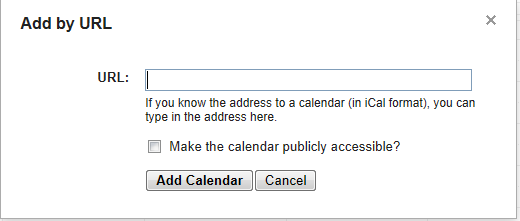
8.
Paste the URL into the URL field and click Add Calendar.
Events-Synch your events with Google Calendar-image45.png
To remove the calendar from Google
1.
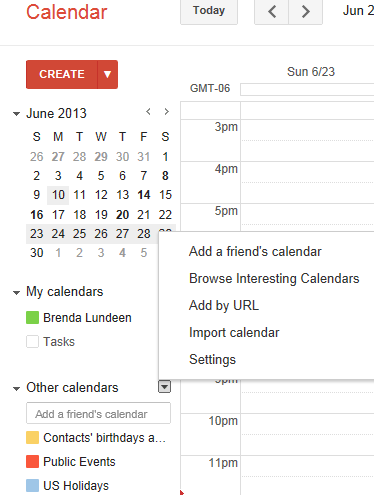
When logged into your Google Calendar, click the arrow next to Other calendars.
Events-Synch your events with Google Calendar-image46.png
2.
Select Settings.
3.
At the bottom of the screen in the Other Calendars area, click Unsubscribe to the right of the calendar that you wish to remove. (Public Events in the example below.)
Events-Synch your events with Google Calendar-image47.png
4.
Click Unsubscribe.

Synch your events with Apple iCalendar

To sync your events with Apple iCalendar
1.
Click Events in the left-hand menu.
2.
Click the Calendar tab and click “Synch with your own calendar.”
Events-Synch your events with Apple iCalendar-image41.png
3.
Locate the desired event feed.
Events-Synch your events with Apple iCalendar-image40.png
4.
Highlight the URL and copy it.
5.
Open your iCal software.
6.
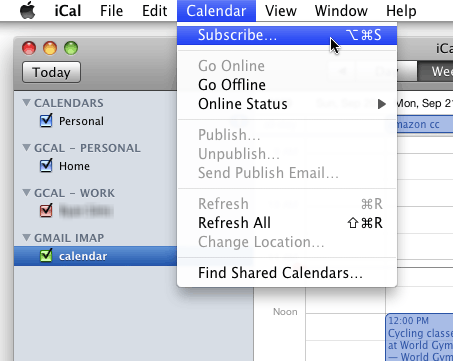
Select the Calendar menu and click Subscribe.
Events-Synch your events with Apple iCalendar-image48.png
7.
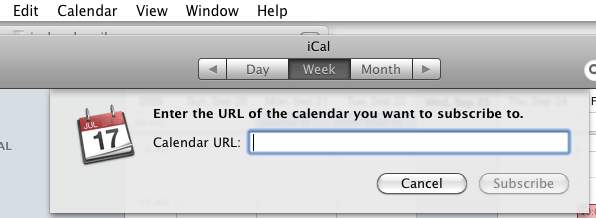
Paste the copied URL into the Calendar URL field.
Events-Synch your events with Apple iCalendar-image49.png
8.
Click Subscribe.
9.
After the feed is loaded, you have the option of changing some of the settings if you wish.
10.
Click OK.
 
To remove the calendar entirely
1.
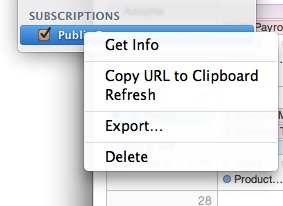
From the Calendars menu, right click (control) the calendar under the Subscriptions section.
2.
Click Delete.
To retain the calendar but stop it updating any further
3.
From the Calendars menu, right click (control) the calendar under the Subscriptions section.
4.
Click Get Info and set Auto-Refresh to None.
 
Events-Synch your events with Apple iCalendar-image50.png

Synch your events with your iPad or iPhone

 
To sync your events with your iPad or iPhone calendar
1.
Click Events in the left-hand menu.
2.
Click the Calendar tab and click “Synch with your own calendar.”
3.
Locate the desired event feed.
Events-Synch your events with your iPad or iPhone-image40.png
4.
Highlight the URL and copy it. (Right click on the highlighted URL and click Copy)
5.
Send yourself an email with URL pasted into it.
6.
On your iPad or iPhone open that email.
7.
Click the URL.
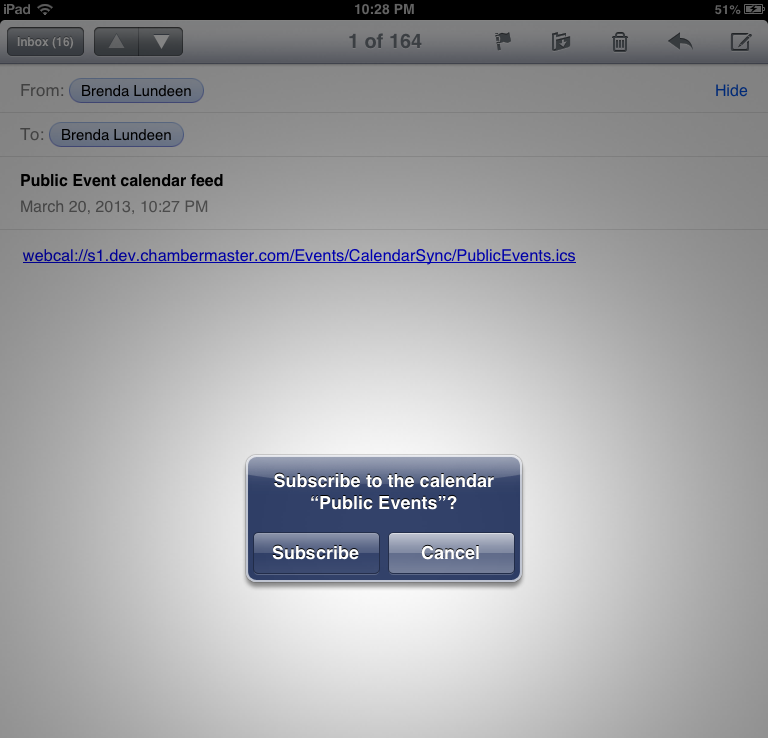
Note: you could copy and paste the URL and add it manually under Settings->Mail, Contacts, and Calendars->Add Account->Other->Add Subscribed Calendar. But clicking the link in an email streamlines the task.
Events-Synch your events with your iPad or iPhone-image51.png
8.
Click Subscribe.
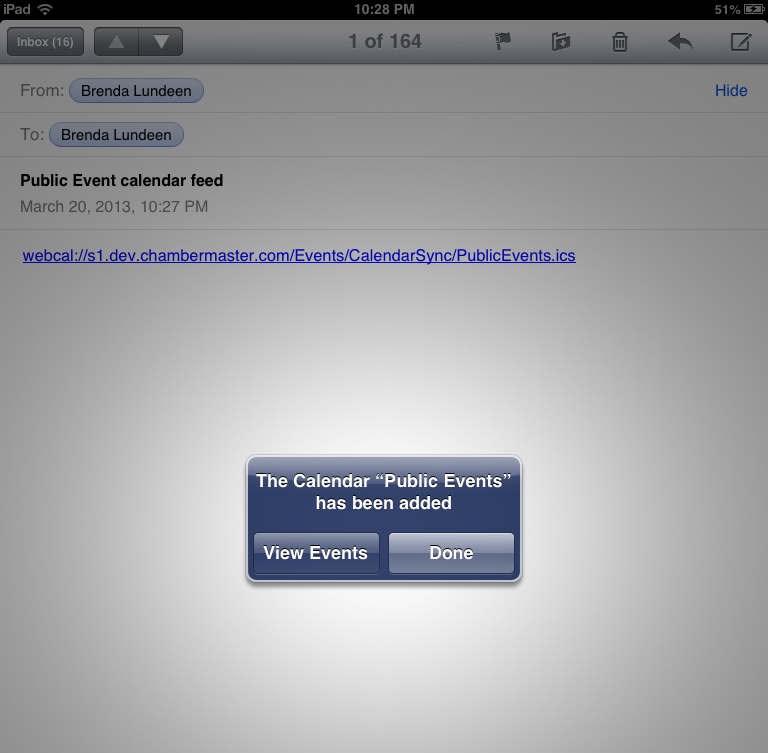
9.
The feed will load and provide a message.
Events-Synch your events with your iPad or iPhone-image52.png
10.
Click Done.
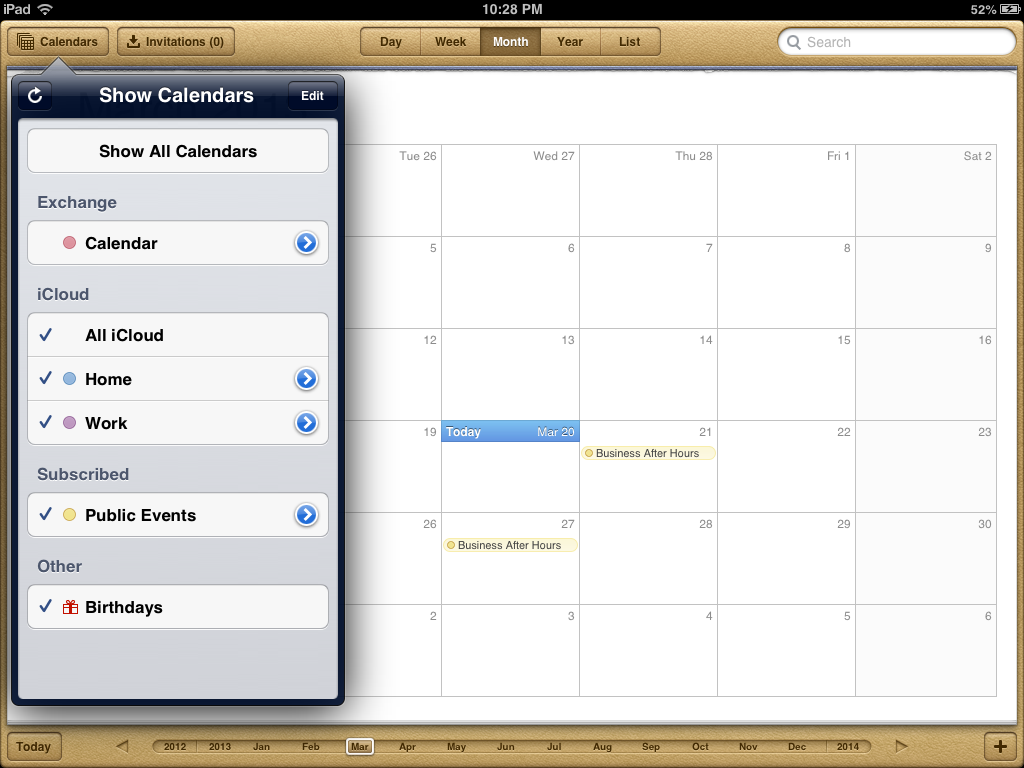
11.
The calendar will appear in your iPad calendar.
Events-Synch your events with your iPad or iPhone-image53.png
 
 
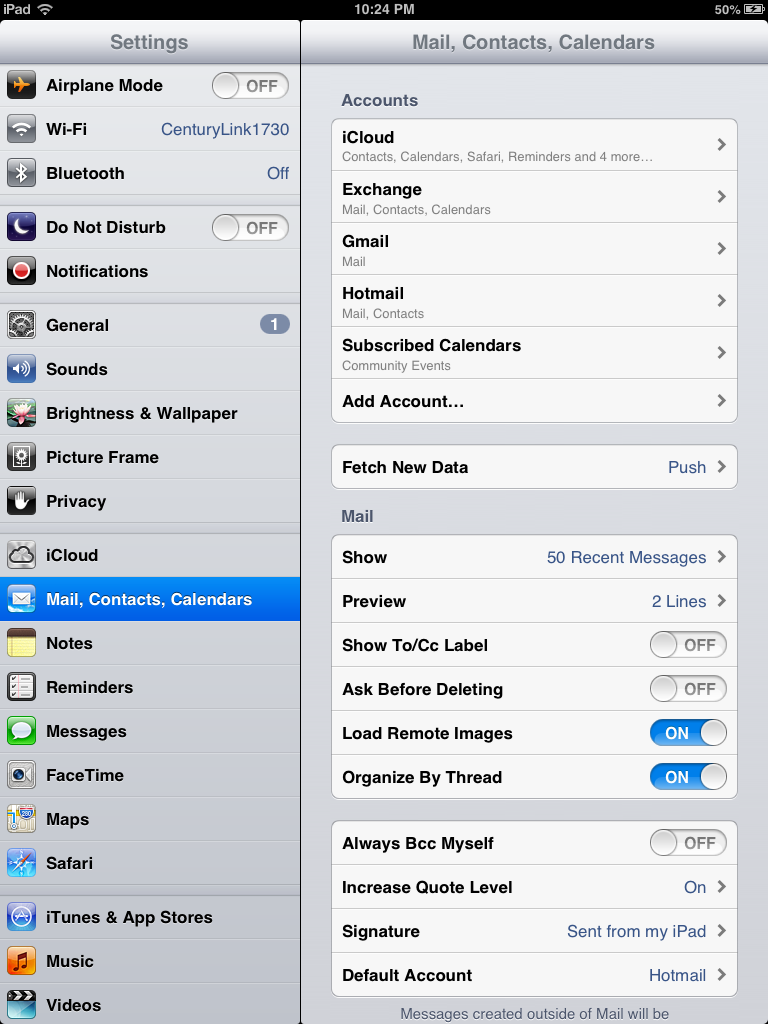
To remove the feed from your iPad or iPhone
1.
Select Settings.
2.
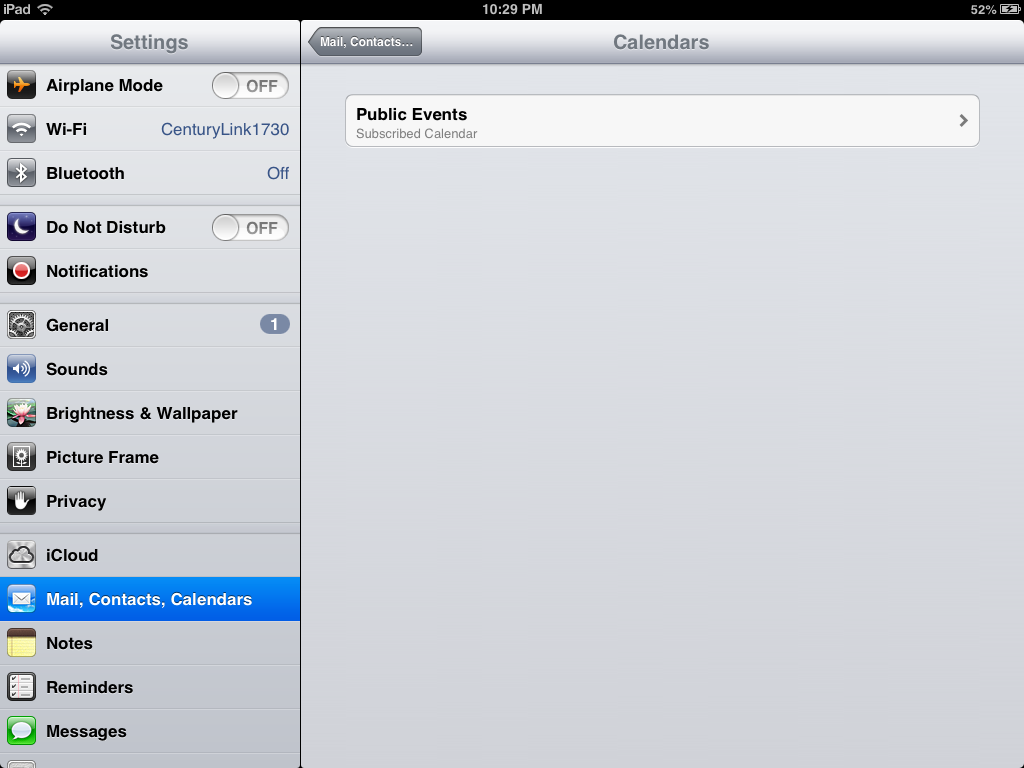
Select Mail, Contacts, Calendars.
Events-Synch your events with your iPad or iPhone-image54.png
3.
Select Subscribed Calendars.
4.
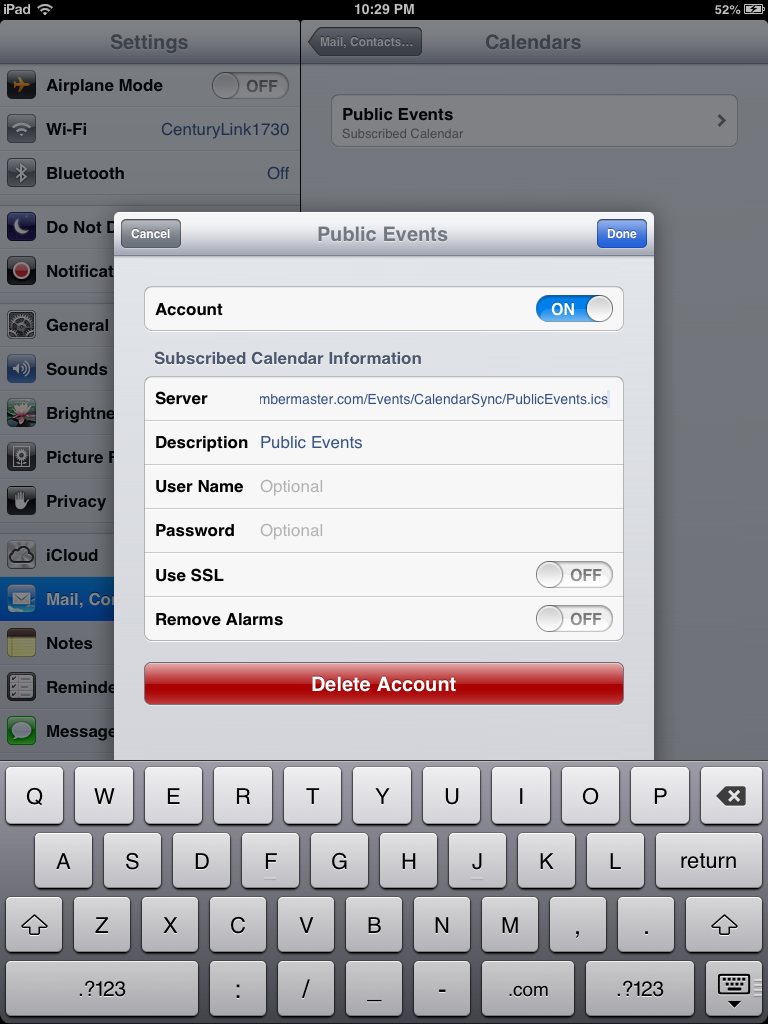
Select your subscribed calendar to be removed. (Public Events in example below.)
Events-Synch your events with your iPad or iPhone-image55.png
5.
Select Delete Account.
Events-Synch your events with your iPad or iPhone-image56.png
 

Event Fees and Billing

Events that require a fee to participate can be managed through the Events module. Event fees, designated for members or non-members, may be associated with each event. If allowing online registration, members-only pricing is available to those with a members-only login name and password.

Staff control what payment options appear for members and non-members, with a separate set of options available for each. If integrated with QuickBooks or using the integrated billing module, individual invoices may be generated from the Events module for those requesting payment by invoice.

Discounts based on age, date, or volume may be created for each event and applied when appropriate information is provided during registration.

The Account tab displays a running total of the event income activity in addition to a summary of guest list information.

Setting up and using event fees require the following steps:

  • Create Event Fees
  • Assign Event Fees
  • Select Billing Preferences
  • Create Discounts Options
  • View Account Information
  • Create Event Invoices

Create Event Fees with CQI (Legacy)

Note: CQI is a legacy product.

The procedure that you use to create the event fee depends on whether you have the event fee already created in QuickBooks.
For questions related to QuickBooks integration see the QuickBooks section of online help or call MicroNet support at 1-800-825-9171.
To create an event fee (does not yet exist in QuickBooks)
7.
Click QuickBooks in the left-hand navigation bar.
8.
Click the Event Fees tab.
9.
Click Add Fee Items.
10.
Click Define a New Fee Item.
11.
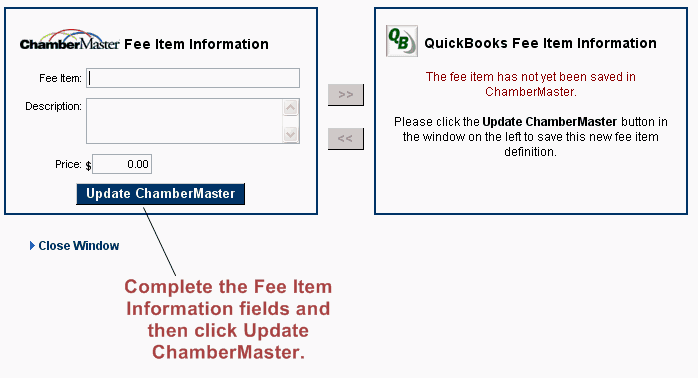
Complete the Fee Item Information screen.
Add fee item
Figure 3-1 Adding a new fee item
12.
Click Update ChamberMaster.
13.
If the fee does not exist in QuickBooks yet, click Add Fee Item to QuickBooks Now.
14.
Click Close Window.
To create an event fee (already exists in QuickBooks)
1.
Click QuickBooks in the left-hand navigation bar.
2.
Click the Event Fees tab.
3.
Click Add Fee Items.
The Event Fee Display Name is limited to 50 characters. The Event Fee Description is limited to 100 characters.
4.
From the list of QuickBooks items and services click the check box in front of the QuickBooks Fee Item that you desire to add to ChamberMaster / MemberZone.
5.
Click Save & Exit.
To match an existing ChamberMaster event fee with an existing QuickBooks item/service
Once matched, you may view a side-by-side comparison of these fees in order to verify or modify description and pricing by clicking the Fee Item Name.
1.
Click QuickBooks in the left-hand navigation bar.
2.
Click the Event Fees tab.
3.
Click Find a Match in the row of the desired fee to be matched.
4.
From the list of QuickBooks items and services click to select the desired item and service that matches your fee and due.
5.
Click Continue.
To remove an event fee with QuickBooks integration
Removing an event fee also removes any association with an event and makes it unavailable in event reports as well. Make sure that you no longer need access to this event fee before removing it.
1.
Click QuickBooks in the left-hand navigation bar.
2.
Click the Event Fees tab.
3.
Click to select the check box at the end of the desired item to be deleted.
4.
Click Remove Selected Fees.
5.
Click OK.

Create Events Fees (Integrated Billing)

If an event requires a fee in order to participate, the Event Fee must be created in before it can be assigned to the event.
To create an event fee
1.
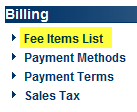
Click Fee Items List in the Billing module of the left-hand navigation bar.
Events-Create Events Fees (Integrated Billing)-image58.png
Figure 3-2 Fee Items List selection
2.
Click Add Fee Items.
Events-Create Events Fees (Integrated Billing)-image59.png
Figure 3-3 Add fee item
The Event Fee Display Name is limited to 50 characters. The Event Fee Description is limited to 100 characters.
3.
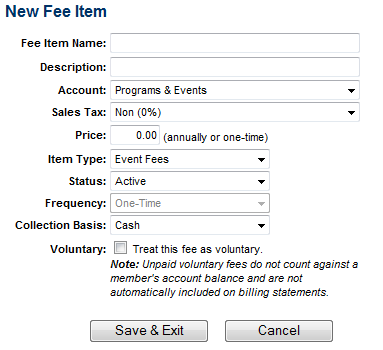
Complete the New Fee Item screen making sure Item Type is changed to the Event Fees selection.
4.
Click Save & Exit.
To remove an event fee with integrated Billing
Removing an event fee also removes any association with an event and makes it unavailable in event reports as well. Make sure that you no longer need access to this event fee before removing it.
1.
Click Setup in the left-hand navigation bar.
2.
Click Fee Items List.
3.
Click the x at the end of the row of the desired fee to be removed.
4.
Click OK.
To edit an event fee
1.
Click Setup in the left-hand navigation bar.
2.
Click Fee Items List.
3.
Click the title of the desired item to be modified.
4.
Make desired changes.
5.
Click Save & Exit.
Fee Item fields
Fee Item Name: Title for the fee item; will be used to identify the fee item on within the event module.
Description: Further description of the fee item; displays on the invoice
Account: Select the desired account from your list of Chart of Accounts.
Sales Tax: Select whether this item should be taxed or not; if proper tax amounts are not displayed, modify this item by selecting Sales Tax from the Setup module.
Price: Type the desired fee item amount
Item Type: Select
Events-rd bullet.jpg
Member Fees and Dues - available on Member->Account
Events-rd bullet.jpg
eCommerce Fees – available in the eCommerce module
Events-rd bullet.jpg
Event Fees – available in the Events module
Events-rd bullet.jpg
Group Fees – available in the Groups module
Events-rd bullet.jpg
Non-Dues Fees – available on Member->Account
Events-rd bullet.jpg
Pledge Fees - available on Member->Account
Status: Select Active or Inactive (only Active items may be billed)
Frequency: Only One-Time frequency is available for Event fees.
Collection Basis: Select Cash or Accrual
Voluntary: If desired, click “Treat this fee as voluntary”. Note: Unpaid voluntary fees do not count against a member's account balance and are not automatically included on billing statements.
Chart 3-1 Fee Item fields

Assign Event Fees

Once created, fees may be assigned to an event. If desired, multiple fees may be assigned to one event giving the ability to have separate pricing for members and non-members, pricing for sponsors, or any desired additional fee item.
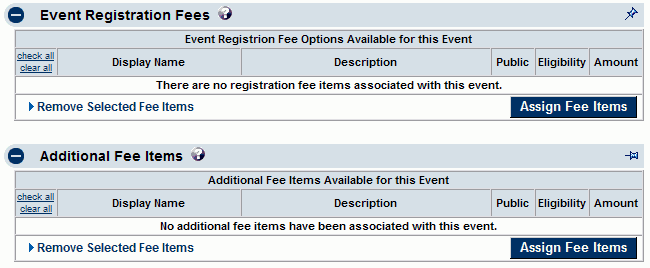
Assigning event registration fees may be done during creation of a new event by selecting Assign Fee Items on Step 3 of 3 or after creation on the Fees tab. When assigning fees after creation, event registration fees and additional fees items may both be assigned. Steps outlined below will specifically address assigning fees after creation but the same concepts can be applied to assigning fees during creation.
Assign fee items - add wizard
Figure 3-4 During creation
Only one event registration fee may be selected per registrant. One or more additional fee items may be selected per registrant.
Assign fee items - fees tab
Figure 3-5 After creation

Assign Event Registration Fees

Only one event registration fee may be selected per registrant.
1.
On the Fees tab, click Assign Fee Items in the Event Registration Fees area.
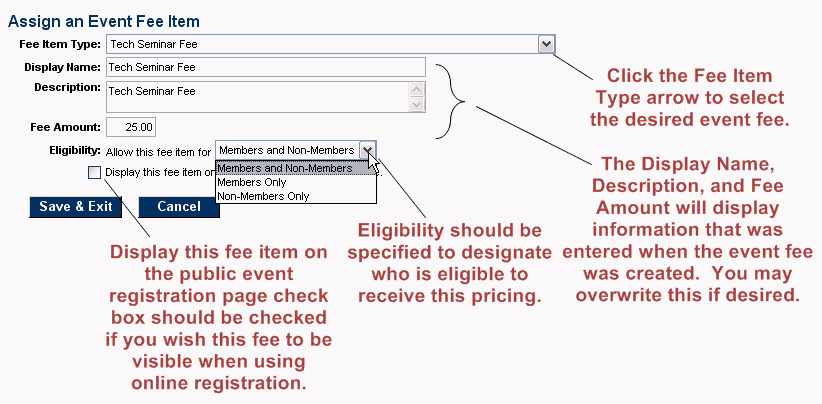
2.
Select the desired fee by clicking the Fee Item Type arrow.
3.
Complete other desired fields. See Figure 3-6.
The Event Fee Display Name is limited to 50 characters. The Event Fee Description is limited to 100 characters.
4.
Click Save & Exit.
Assign fee items
Figure 3-6 Assign fee items

Assign Additional Fee Item

One or more additional fee items may be selected per registrant.

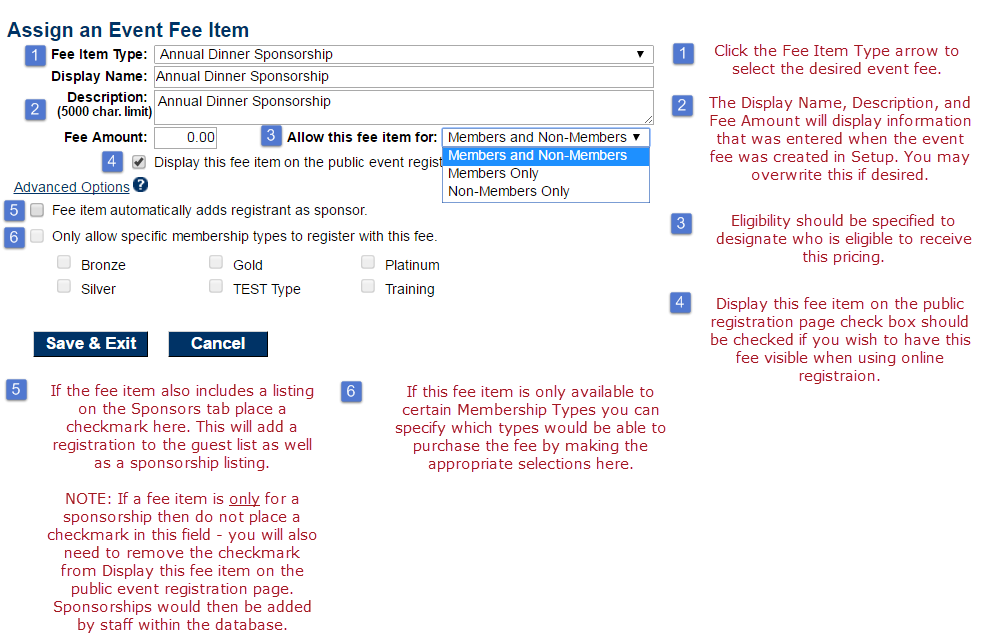
  1. On the Fees tab, click Assign Fee Items in the Additional Fee Items area.
  2. Select the desired fee by clicking the Fee Item Type arrow.
  3. Complete other desired fields. See Figure 1.
  4. Click Save & Exit.


Aafie.png
Figure 1: Assign Additional Fee Items

Edit an Event Fee Once Assigned

1.
On the Fees tab, click the title of the desired event fee in the Event Registration Fees area or the Additional Fee Items area.
2.
Make desired changes.
3.
Click Save & Exit.

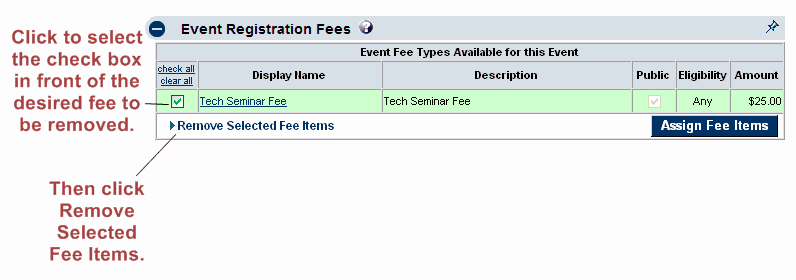
Remove an Event Fee Once Assigned

1.
On the Fees tab, click to select the check box in front of the desired item to be deleted.
2.
Click Remove Select Fee Items.
Removing an event fee also removes any association with an event and makes it unavailable in event reports as well. Make sure that you no longer need access to this event fee before removing it.
remove fee item
Figure 3-7 Removing an event fee

Select Billing Preferences

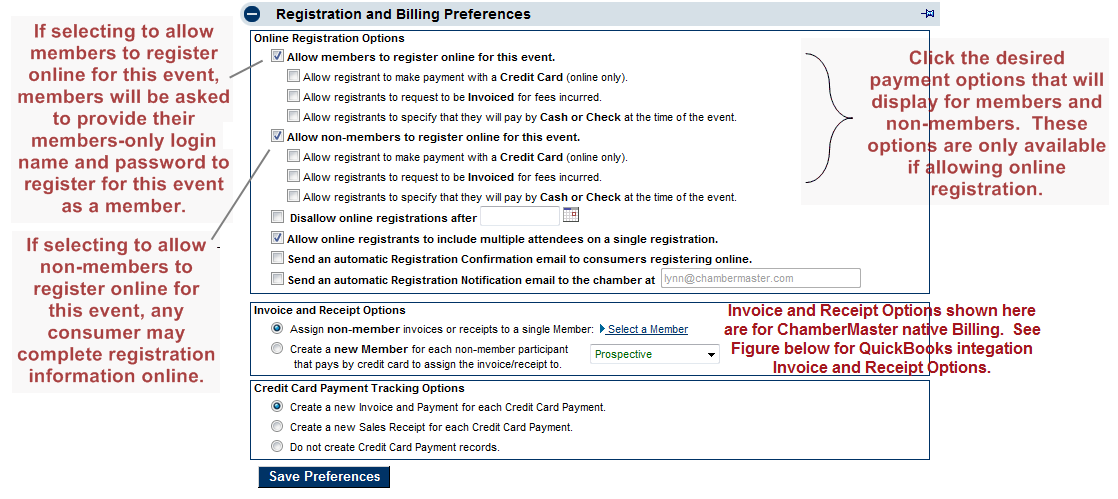
Desired billing preferences must be selected if fees have been assigned or to indicate online registration preferences. Many of these preferences are available during creation of an event on Step 3 of 3 or all selections may be made after creation of an event on the Fees tab.
If allowing online registration but you do not select any acceptable methods of payment, upon registration a message will be displayed to registrants that the chamber will be in contact with them regarding the registration fees for this event.
Preferences include selection of online registration options for members and non-members, available payment methods, general invoice options and non-members invoice options (if applicable). In addition email confirmation notices and email notification of registration may be specified if desired.
Note: Custom text may be included on the confirmation email. Put the desired custom text in the Chamber Message window in Setup->Event Options and Settings under the Registration and Billing Preferences area.
Steps outlined below will specifically address selecting billing preferences after creation but the same selections are available when selecting billing preferences during creation.

Save Billing Preferences

1.
On the Fees tab, select the desired options in the Billing Preferences area.
2.
Click Save Preferences.
Events-Save billing preferences-image64.png
Figure 3-8 Billing Preferences (integrated Billing example shown)
Events-Save billing preferences-image65.png
Figure 3-9 Invoice Options section (QuickBooks integration Only)

Create Discount Options

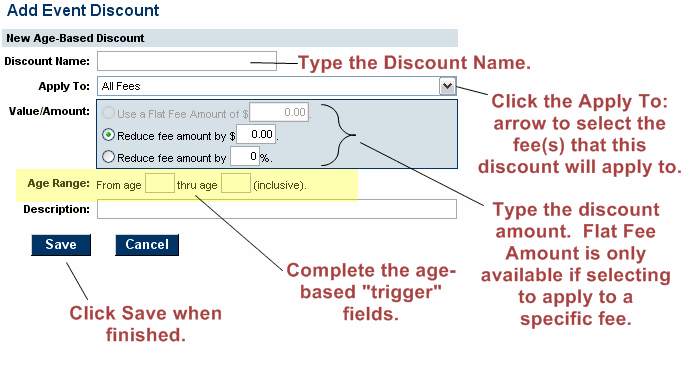
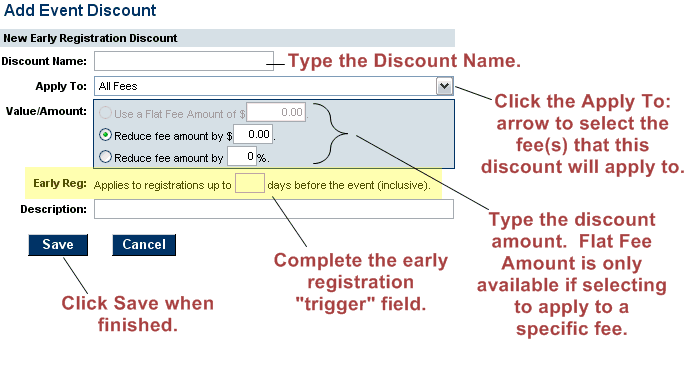
Any event may have special discounts available and applied to all or selected fees. Discounts based on age, date, or volume may be created for each event and applied when appropriate information is provided during registration or the discount criteria is met because of date or volume.

Create an Age-Based discount

  1. On the Fees tab, click Add Discount in the Discount Options area under the Age-Based Discounts section.
  2. Complete the Add Event Discount screen.
  3. Click Save.
    Age-based discounts

Create an Early Registration Discount

  1. On the Fees tab, click Add Discount in the Discount Options area under the Early Registration Discounts section.
  2. Complete the Add Event Discount screen.
  3. Click Save.
    Early Registration discounts

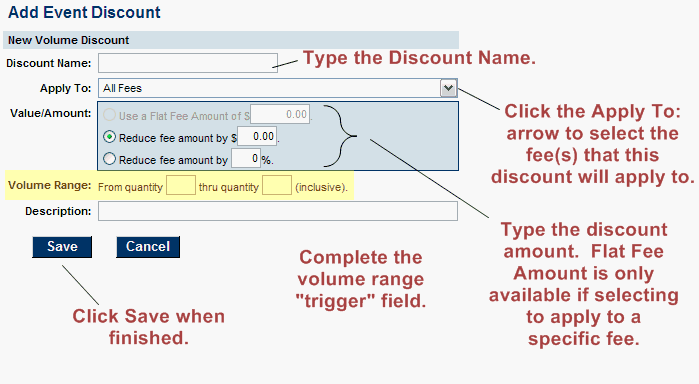
Create a Volume-Based Discount

  1. On the Fees tab, click Add Discount in the Discount Options area under the Volume Discounts section.
  2. Complete the Add Event Discount screen.
  3. Click Save.
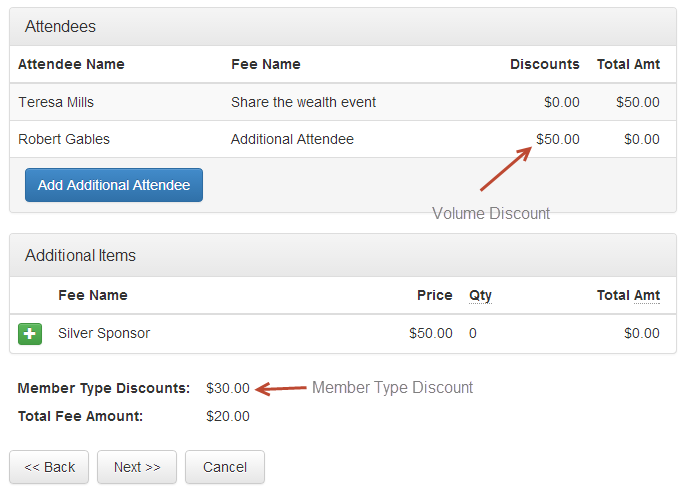
    Volume discounts
    When members or visitors register, upon checkout they will see the volume discount specified in a Discount column.
    Online Registration Volume Discount Example

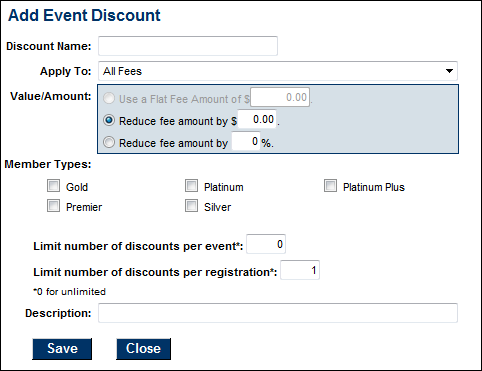
Create Membership Type Discount

See event discounts by membership type in action. Vid.png

  1. On the Fees tab, click Add Discount in the Discount Options area under the Membership Type Discounts section.
  2. Complete the Add Event Discount screen.
  3. Click Save.
    Membership Type Discount Screen

Notes:

  • Idea: Grant discounted, free, or included benefits to specific membership types.
  • Total discounts used per event may be specified and a separate limit per registration is also available.
  • For Plus edition or greater only.

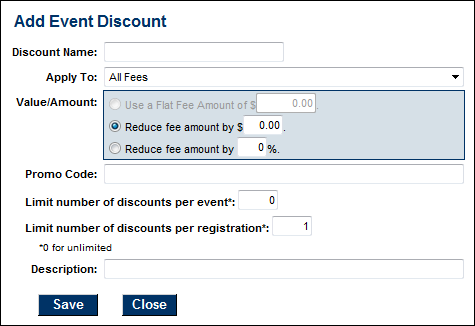
Create Promo Code Discount

See event promo codes in action Vid.png

  1. On the Fees tab, click Add Discount in the Discount Options area under the Promo Code section.
  2. Complete the Add Event Discount screen.
  3. Click Save.
    Event Promo code window

Notes:

  • Idea: create a Promo Code on your Event Fees tab and then post your promo code on specific advertising so you can track the effectiveness of the ad or provide this promo code to a select group of attendees.
  • Make sure to create different promo code for each discount.
  • Create multiple codes for each event if desired.
  • Limits on usage are available at the event level and registration level.
  • For Plus edition or greater only.
Related Topics Invoice Discounts

View Account Information

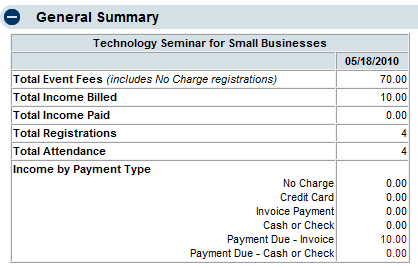
Running totals of income billed and paid, registrations, invitations, and a list of event sponsors for an event can be viewed on the Account tab. Totals are automatically updated as entries are made.

View the Event Account Information

1.
Select the desired event.
2.
Click the Account tab.
Events-View the event account information-image72.png
Figure 3-13 Account summary

Create Event Invoices and Sales Receipts

If integrated with QuickBooks or using the integrated billing module, individual invoices may be generated for members from the Events module for those requesting payment by invoice or for those registrants designated as such by chamber employees when completing registration.
If registration is accepted for individuals that are not chamber members, invoices may also be generated if desired. Two options for creation of non-member invoices are available: create a new member record (or QB Customer with QuickBooks integration) for each non-member participant or assign non-member invoices to a single member (or QB Customer with QuickBooks integration).
Creating invoices vary slightly dependent on which module you are using - - QuickBooks or Billing. Follow the instructions in the appropriate section below for creating your event fees.

Create Event Invoices/Sales Receipts when QuickBooks is Integrated

Defaults may be set for these options but may also be changed right before creating the invoices.
To change the event invoice defaults
1.
Select the desired event.
2.
Click the Fees tab.
3.
Make the desired selections in the Billing Preferences area.
To create event invoices/sales receipts
You may also create event invoices by clicking the Event Invoices tab after selecting the QuickBooks module in the left-hand navigation bar.
1.
Select the desired event.
2.
Click the Account tab.
3.
If registrations have specified a payment method of “invoice” and the invoice has not yet been created, a selection will appear indicating the number of invoices that need to be created. Or if credit card payment has been accepted and Credit Card Payment Tracking Options are set to create either an invoice/payment or sales receipt, a selection will appear indicating the number of entries that need to be created.
If the Create Entries Now button does not appear, there are no transactions to be created at this time.
Events-Create Event Invoices 2fSales Receipts when QuickB-image73.png
Figure 3-14 Create Entries Now (QuickBooks example shown)
4.
Click Create QuickBooks Entries Now.
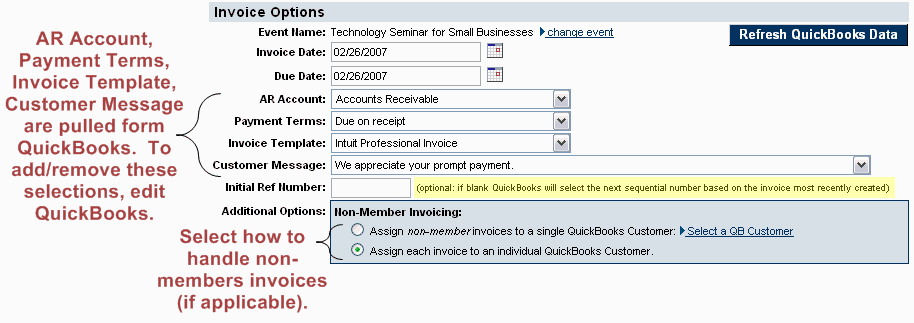
5.
Make desired changes in the Invoice Options area.
event invoices
Figure 3-15 Invoice options
6.
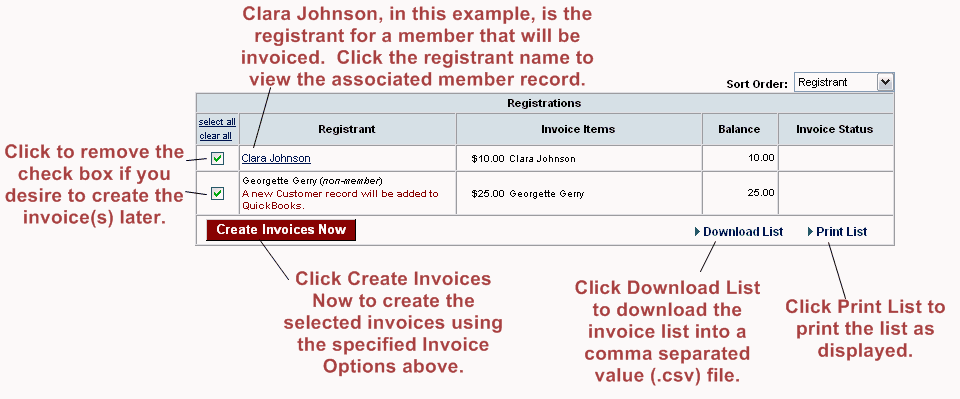
Click Create QuickBooks Entries Now. create invoices now icon
If the Create QuickBooks Entries Now button is not available (dimmed out), you may need to verify your QuickBooks connection. This may be done at the top of the Event Invoices tab or by selecting QuickBooks Connection Settings in the Setup module.
invoice creation
Figure 3-16 Create Invoices
7.
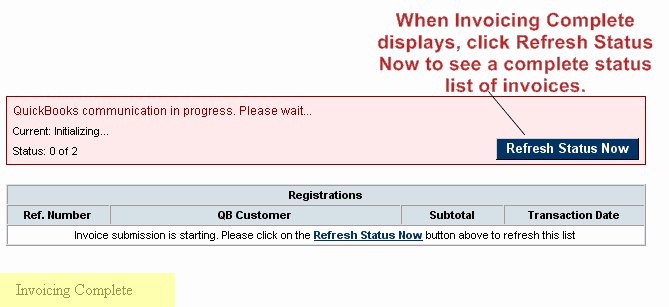
Invoice creation begins. Click Refresh Status Now to display the current status for completed invoices. When Invoicing Complete appears, click Refresh Status Now to view a complete status list of all invoices.
invoice status
Figure 3-17 Invoice status
8.
Click Finish.
In many versions of QuickBooks you may print the batch of invoices by clicking Invoices. Then click the Print drop-down arrow print batch. Click Print Batch
9.
These invoices now exist in QuickBooks and are marked to be printed. You may view and print them in QuickBooks according to standard QuickBooks procedures.

Create Event Invoices Using Integrated Billing Module

If a payment method of Invoice is selected, this invoice will be queued and then created at a time of your choosing. If a payment method of Credit Card is selected, one of three results will happen depending on your choice: an invoice and payment will be automatically created, a sales receipt will automatically be created, or no transaction will happen. Make these selections for each event on the Fees tab of the desired Event.
Event invoices may be created from within the Events module or from the Billing module. Either way of creating invoices accomplishes the same task.
Create event invoices
1.
Select the desired event.
2.
Click the Account tab.
If the Create Invoices Now button does not appear, there are no invoices to be created at this time.
3.
If registrations have specified a payment method that should result in a transaction, a selection will appear indicating the number of invoices that need to be created.
Events-Create Event Invoices using integrated Billing m-image79.png
Figure 3-18 Create Invoices Now
4.
Click Create Invoices Now.
5.
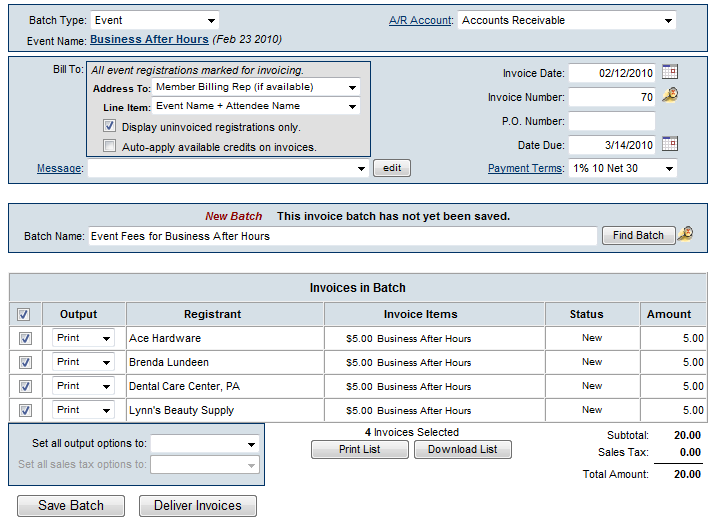
Make any desired selections in the Bill To: box for who the invoice should be addressed to and what items should appear on the invoice line.
The Bill To: selection of Line Item Description will display the content of the Description field of the Fee item.
6.
If you wish to apply any available credits a member may have available on their account, click to select the Auto-apply available credits on invoices checkbox.
7.
If desired, select a message that will be printed on each invoice. Note: click edit to modify the message or create a one-time custom message to display on all invoices.
8.
Complete the rest of the fields including Invoice Date, Date Due, and Payment Terms.
Events-Create Event Invoices using integrated Billing m-image80.png
Figure 3-19 Event Invoicing
9.
Uncheck any invoices that should be excluded from this Batch. Note: All excluded invoices may be added to this batch later.
Changes made to the Contact Name or address on the Deliver Customer Invoices window does not modify the Member’s Account information. Permanent Billing Rep or address changes must be made in the Members module.
10.
Click Save Batch or Deliver Invoices. If clicking Save Batch, you can return to a batch of invoices at any time to deliver them (email or print them). If clicking Deliver Invoices, you can also return to the batch at any time but this will proceed to the Deliver Customer Invoices screen now.
Either choice, Save Batch or Deliver Invoices, will create the batch of invoices. Deliver Invoices will create the invoices and immediately open a window with options to print and/or email the invoices.
11.
The Deliver Customer Invoices window will appear. Make appropriate Delivery Method selections and follow the instructions on the screen. Refer to “Recurring Member Invoices” in the Billing online help section for more detailed instructions on Delivery Method selections.
Create event invoices (starting within the Billing module)
1.
Click Billing in the left-hand menu.
2.
Click the Invoices tab.
3.
From the Batch Type drop down menu, select Event.
4.
Select the desired event by clicking the Event Name title.
- If invoicing for the renewal month has been completed you will see a message that says: Match Found
- If invoices have not been created you will see a message that says: New Batch
Events-Create Event Invoices using integrated Billing m-image81.png
Figure 3-20 Selecting Event Name
5.
Select Display uninvoiced registrations only if desired.
6.
Follow the same steps #5-11 in previous section “Create event invoices (starting from the Events module)”.
 

Sponsors

Event sponsors may be added to an event and is managed on the Sponsors tab where Sponsor Web Display Options, Contact Information, and Fee Information areas may be configured as desired.
When adding a sponsor, you simply fill in the requested information as the wizard walks you through three information screens. You will be asked to fill in the following information screens:
Events-rd bullet.jpg
Contact Information
Events-rd bullet.jpg
Fee Information
Events-rd bullet.jpg
Payment Options
When you click Finish, your sponsor is automatically added to the designated event in the Sponsor List and the Guest List (if desired).
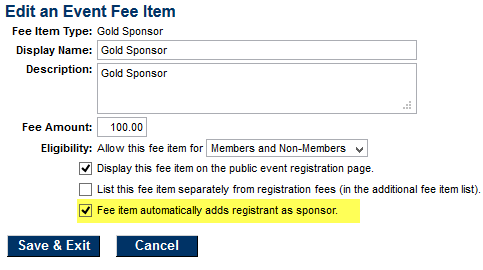
A sponsor may also be added to your Sponsors list automatically if the registrant selects a fee that you have marked to add them automatically to the sponsor list.
Sponsor logos may be uploaded and placement determined. In addition, a logo website link for the sponsor may be activated. Sponsorship levels may also be determined and assigned to a particular sponsor. Applicable event fees can be assigned to sponsors and additional fees applied as well.

Managing Sponsors

Managing sponsors include the ability to:
Events-rd bullet.jpg
Add a sponsor
Events-rd bullet.jpg
Remove a sponsor
Events-rd bullet.jpg
Add additional attendees with a sponsor
Events-rd bullet.jpg
Remove an additional attendee with a sponsor
Events-rd bullet.jpg
Add additional fee items for a sponsor
Events-rd bullet.jpg
Remove an additional fee item

Add a Sponsor

Sponsors may be added to your sponsor list in one of two ways:
Events-rd bullet.jpg
manually by you or
Events-rd bullet.jpg
automatically added to your list upon registration
Add a sponsor manually
1.
On the Sponsors tab, click Add a Sponsor in the List of Sponsors area.
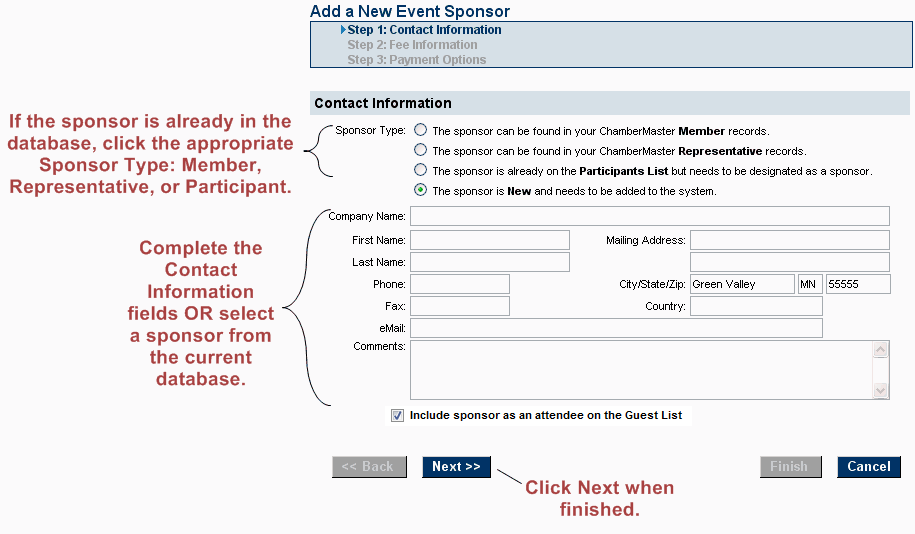
2.
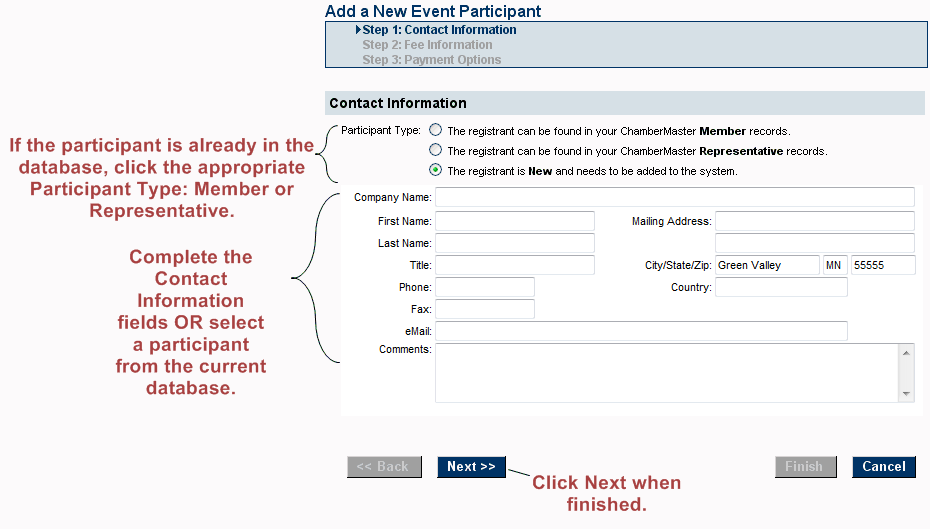
Complete the Contact Information screen or click to select a member, representative, or a participant from the current database.
Events-Add a sponsor-image82.png
Figure 4-1 Adding Sponsor – Step 1: Contact Information
3.
If choosing from a current member, representative, or participant, click the appropriate select button (select member for example), click to select the desired sponsor and then click Continue. Click Next to continue.
4.
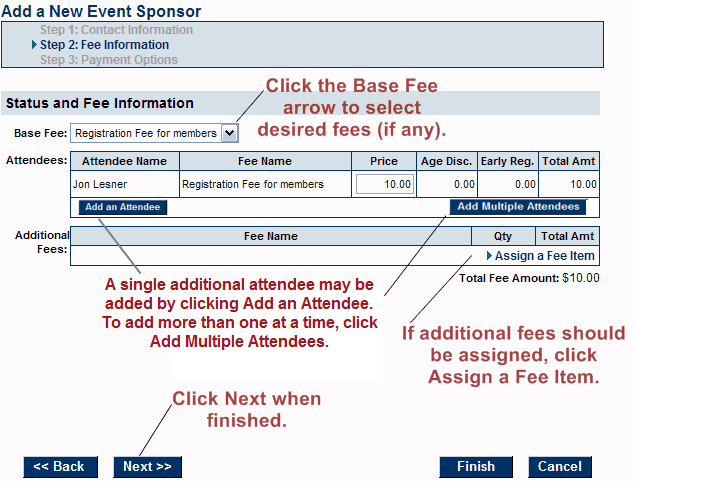
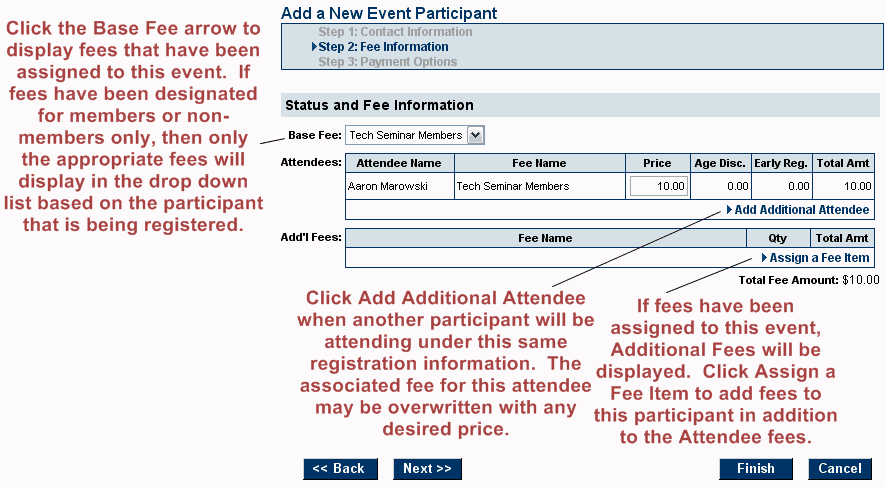
Complete the Fee Information screen and then click Next to continue.
If the Base Fee drop down list does not display and you wish to assess fees, you need to assign the fees to this event by selecting Assign Fee Items on the Fees tab. In addition, Assign a Fee Item will only display if fees have been assigned to this event.
Events-Add a sponsor-image84.png
Figure 4-2 Adding a Sponsor – Step 2: Fee Information
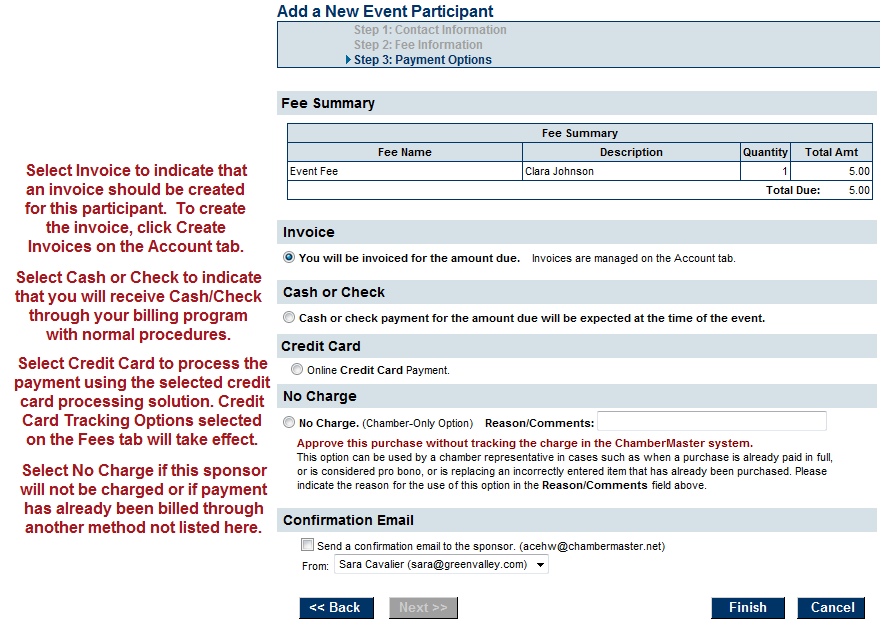
5.
Complete the Payment Options screen and then click Finish.
Note: A logo for this sponsor will automatically be added under Sponsor Web Display Options if a logo has been used with this member before on a prior event or if the member has a logo uploaded for their member logo. The default will load the logo with placement on the right-hand column of the event page. However, you can modify those settings as desired.
Events-Add a sponsor-image85.png
Figure 4-3 Adding a sponsor – Step 3: Payment Options
Add a sponsor automatically upon registration
1.
On the Fees tab, click Assign Fee Items in the Event Registration Fees area (or click the Display Name of an existing sponsor fee to edit)
Events-Add a sponsor-image86.png
2.
Select the check box “Fee item automatically adds registrant as sponsor.”
3.
Click Save & Exit.
4.
Going forward, anyone that registers and selects that fee will automatically be included on the Sponsors tab.
Note: Duplicate sponsors would be allowed if multiple duplicate registrants select this fee.
 

Remove a Sponsor

1.
On the Sponsors tab, click the check box in front of the desired sponsor’s name in the List of Sponsors area
2.
Click Remove Selected Sponsors.

Add Additional Attendees with a Sponsor

1.
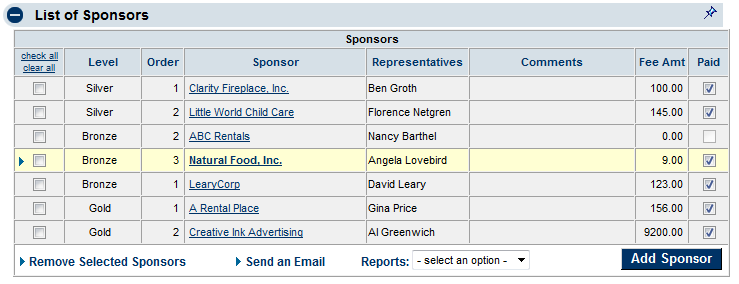
On the Sponsors tab, click the desired sponsor’s name in the List of Sponsors area. The selected row will show in yellow.
2.
Click Add Additional Attendee in the Fees area.
3.
Complete the Add Additional Attendee screen.
4.
Click Continue.
fees area
Figure 4-4 Fees area for sponsors

Remove an Additional Attendee with a Sponsor

1.
On the Sponsors tab, click the desired sponsor’s name in the List of Sponsors area. The selected row will show in yellow.
2.
Click the x at the end of the row of the desired attendee to be deleted in the Fees area.

Add Additional Fee Items to a Sponsor

1.
On the Sponsors tab, click the desired sponsor’s name in the List of Sponsors area. The selected row will show in yellow.
2.
Click Add Fee Item.
3.
Complete the Add Fee Item screen.
4.
Click Continue.

Remove an Additional Fee Item

1.
On the Sponsors tab, click the desired sponsor’s name in the List of Sponsors area. The selected row will show in yellow.
2.
Click the x at the end of the row of the desired additional fee item to be deleted in the Fees area.

Sponsor logos may be uploaded and placement determined. In addition, a logo website link for the sponsor may be activated.
A sponsor logo will automatically be displayed for the Sponsor Logo if a logo has been displayed for this sponsor-member before on any other event or if the member has a logo uploaded for their member logo in the Member Information Center.
Sponsorship levels may also be created and assigned appropriately to each sponsor. Sponsors may also be assigned a certain sort order.

A sponsor logo will automatically be displayed if a logo has been displayed for this sponsor-member before on any other event or if the member has a logo uploaded for their member logo in the Member Information Center.
The default settings will load the sponsor logo with placement on the right-hand column of the event page. However, you can modify those settings as desired.
To upload a sponsor logo
1.
On the Sponsors tab, click the desired sponsor’s name in the List of Sponsors area. The selected row will show in yellow.
2.
Click Add Image in the Sponsor Web Display Options area.
Events-Add a sponsor logo-image89.png
Figure 4-4 Add sponsor logo
3.
Type the path and filename of the desired graphic file or click Browse to locate and click Open when desired graphic is located.
4.
Click Upload Image.
5.
Click Close Window.
6.
Select logo placement by clicking the Logo Placement arrow. Select from Right Column, Page Bottom or Do Not Display.
Events-Add a sponsor logo-image90.png
Figure 4-5 Sponsor logo placement
7.
Click Save.

1.
On the Sponsors tab, click the desired sponsor’s name in the List of Sponsors area. The selected row will show in yellow.
2.
Click Remove Image in the Action column of the Image Type that you wish to remove in the Sponsor Web Display Options area.
Events-Remove a sponsor logo-image91.png
Figure 4-6 Change or remove sponsor logo

1.
On the Sponsors tab, click the desired sponsor’s name in the List of Sponsors area. The selected row will show in yellow.
2.
Click Change Image in the Action column of the Image Type that you wish to change in the Sponsor Web Display Options area.
3.
Type the path and filename of the desired graphic file or click Browse to locate and click Open when desired graphic is located.
4.
Click Upload Image.
5.
Click Close Window.

Create Sponsorship Levels

Sponsorship levels are part of what determine the order that sponsor logos or names display on the website. In addition, sponsors may be sorted within that level by assigning a Logo Sort Order. Sort order is determined as follows:
Events-rd bullet.jpg
Sponsorship level
Events-rd bullet.jpg
Logo sort order assignment
Events-rd bullet.jpg
Alphabetical by member name
If no sponsorship levels are assigned, logo sort order will be the priority sort. If no sort orders are assigned, then the order will be displayed alphabetically.
In this example, with Gold, Silver, and Bronze sponsorship levels created and ordered respectively, the sponsors’ name and logo will appear on the website as follows: A Rental Place, Creative Ink Advertising, Clarity Fireplace, Inc., Little World Child Care, LearyCorp, ABC Rentals, Natural Foods, Inc.
Events-Create Sponsorship Levels-image92.png
Sponsorship level titles may also display on the website if desired and is selected to “Display Heading” or “Do Not Display” on a level by level basis.
Default sponsorship levels may be created to use on events as desired (so that you only create the levels once and may use multiple times). Also, each event may have a unique set of sponsorship levels defined.
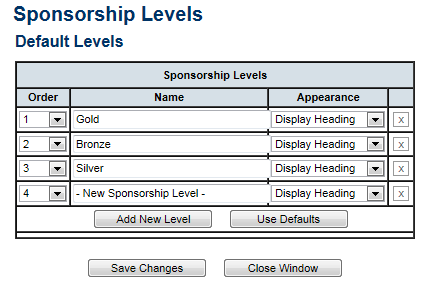
Create default sponsorship levels
Default sponsorship levels will be available to use on each event if desired. For each level, select whether the Sponsorship Level Name should display on the website as a heading for those listed under this sponsorship level.
1.
Login with administrator permissions.
2.
Click Setup in the left-hand menu.
3.
Click Event Options and Settings.
4.
Click Edit Default Levels in the Sponsors area.
5.
Click Add New Level.
Events-Create Sponsorship Levels-image93.png
Figure 4-6a Editing default sponsorship levels
6.
Type the name of the new sponsorship level in the Name field.
7.
Select the desired Appearance option of “Display Heading” or “Do Not Display”.
8.
Optional: Change the order for the sponsorship levels to appear on the website.
9.
Click Save Changes.
 
Create unique sponsorship levels for each event
1.
Click Events in the left-hand menu.
2.
Select the desired event.
3.
Click the Sponsors tab.
4.
Click Edit Sponsorship Levels in the Sponsor Web Display Options area.
5.
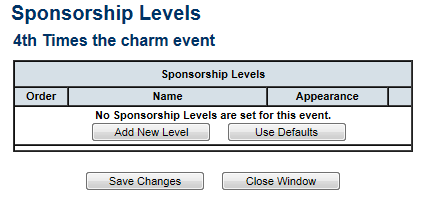
Click Add New Level to create a unique sponsorship level for this event or click Use Defaults to automatically display the default list of sponsorship levels that were created in the Setup module. (See “Create default sponsorship levels” above.)
Events-Create Sponsorship Levels-image94.png
Figure 4-6b Editing sponsorship levels for a particular event
6.
Continue adding, editing, and removing sponsorship levels until the list is as desired for this particular event. Note: any editing here does not affect the default sponsorship levels list created in the Setup module.
7.
Click Save Changes.

Create Output from the Sponsor List (print, download, name tags, labels etc.)

1.
On the Sponsors tab, click the Reports arrow.
2.
Select the desired output.
3.
Complete any screens that may follow. If printed output is desired, you may choose Print from the File menu.
sponsor output options
Figure 4-7 Sponsor output options

Guest List

When registration rosters and attendee lists must be tracked, a complete solution for managing participants is provided through the Guest List tab.
Participants may be added using member or representative names in the current database, added as new by a chamber employee, or automatically entered by the participant if online registration is enabled.
In addition, invitations may be sent to prospective attendees, resent to those who have not responded, and continually monitored, sorted, and reported on using the registration status column in the Guest List.
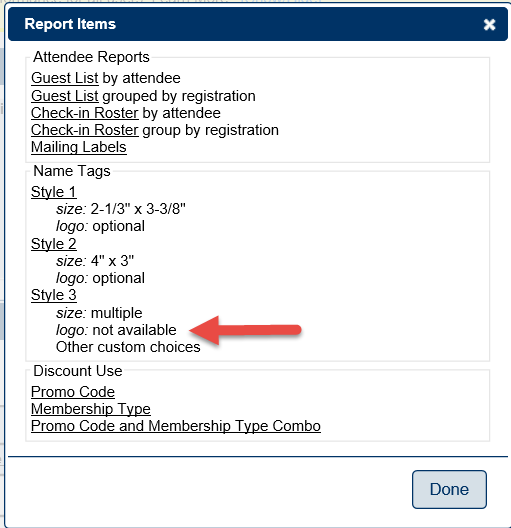
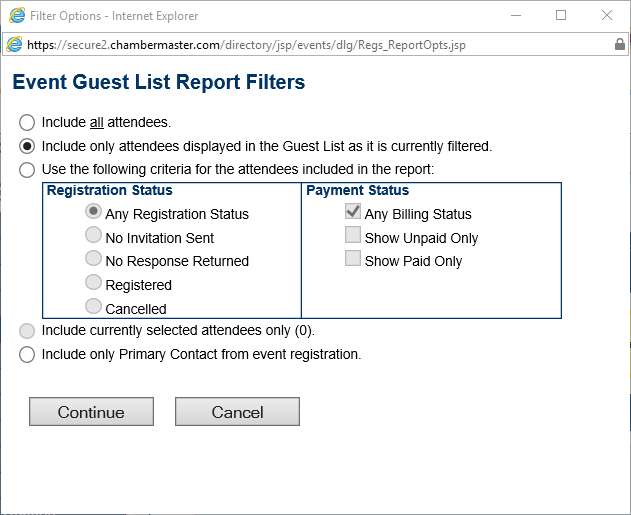
Output from the registration list consists of a roster sheet, mailing labels, name tags, and a printed list. Filter options may be applied to any output, filtered by registration status, payment status, or other self-selected filters. For example, emails may be sent, targeting only those registered or those still not registered, or many other combinations using the available filter options. Downloading this same information to a comma separated value (.csv) file is also available.
Sending invitations to attendees is not required in order to maintain a list of participants. However, if invitations will be sent, it is most helpful to send the invitations before creating the participant list. Instructions for working with these two areas follow:
Events-rd bullet.jpg
Invitations
Events-rd bullet.jpg
Guest List

Invitations

Invitations may be created and sent via email using the Guest List Summary area on the Guest List tab. After the invitations are emailed, the invitees are automatically added to the Guest List where their Status column will display “Invite Sent”. If no email address is available for the invitees, they are still added to the Guest List with a Status column displaying “No Invite Sent”. Mailing labels may be specifically generated for this group using the output options for mailing labels.
During the course of time, if invitees have still not responded to your invitations, you may decide to resend your invitation. The database will keep track of who has received an invitation but has not yet registered so that you may easily target those that might need a second or third reminder.

Send Invitations

1.
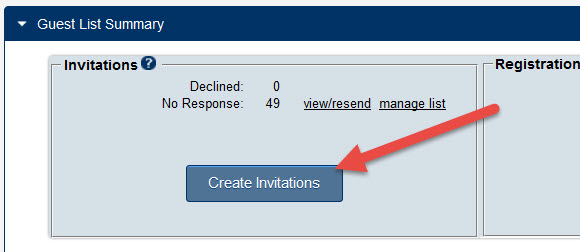
On the Guest List tab, click Create Invitations in the Guest List Summary area.
Send Invitations.jpg
Figure 5-1Add New Invitations
2.
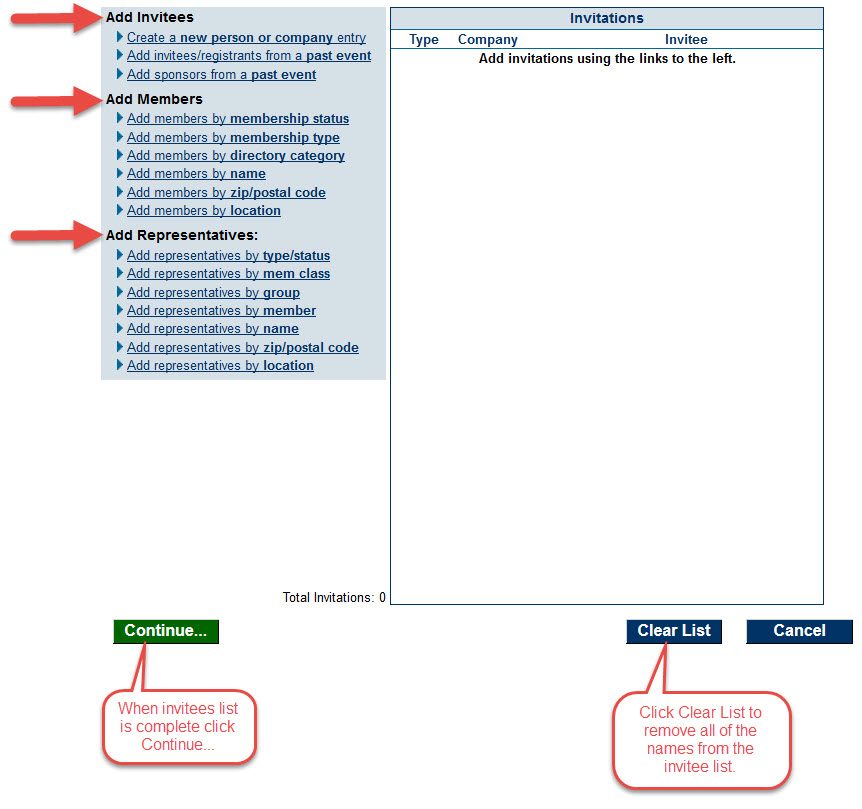
Select the attendees that should receive invitations using one or more selections available under Add Invitees, Add Members, or Add Representatives. Repeat until your invitee list is complete.
Invitee List.jpg
Figure 5-2 Add invitees to list
3.
Click Continue.
4.
Complete the Send an Email invitation screen.
Using the Add Database Field database field icon icon, you may wish to personalize the invitations by inserting their name.
Invitees that already appear on the Guest List will automatically be marked with an asterisk and may be removed by clicking Remove to avoid accidental duplication of these invitees on the participant list.remove
Saving the email invitation using the save save icon icon is recommended so that you can resend these invitations at a later date if desired.
5.
Click Send Email Now.
If this invitation will also be mailed to invitees, you may want to print the invitation at this time using the Print print icon icon.

Create Mailing Labels for those with “No Invite Sent” Status

1.
On the Guest List tab, click the Reports arrow in the Guest List area.
print mailing labels
Figure 5-3 Print mailing labels
2.
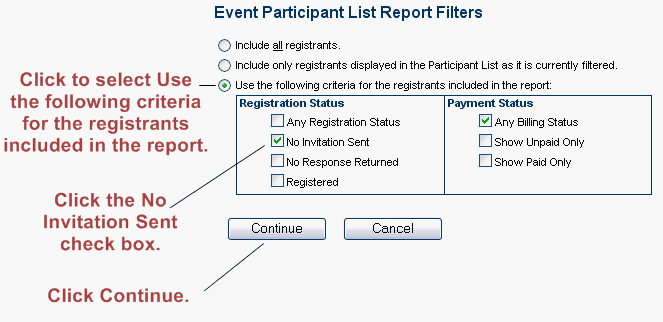
Click Use the following criteria for the registrants included in the report.
mailing label filters
Figure 5-4 Mailing label filters
3.
Click the No Invitation Sent check box.
4.
Click Continue.
5.
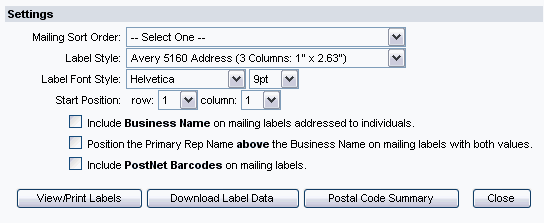
Complete the Mailing Labels screen.
label options
Figure 5-5 Mailing label options
6.
Click View/Print Labels.
7.
The desired output will display on the screen. On the File menu, click Print.
8.
Click to select the desired printer and click Print.
9.
Click the Close button. close button
10.
Click Close. close button

Register an Invitee

1.
On the Guest List tab, click the plus sign (plus sign) in the Status column in the row of the desired participant to register.
2.
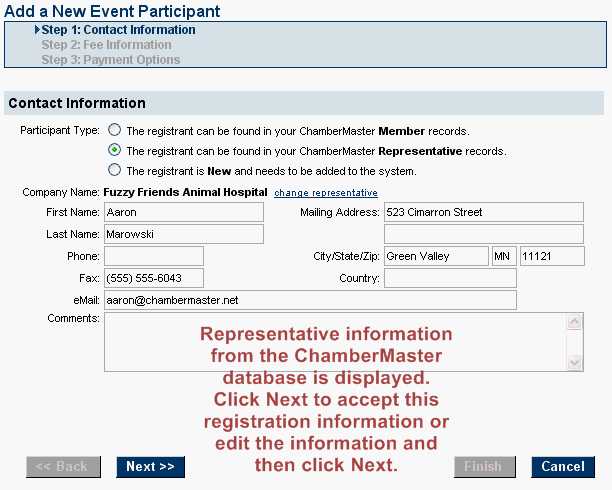
Complete the Contact Information screen and then click Next. See Figure 5-6.
3.
Complete the Fee Information screen and then click Next. See Figure 5-7.
4.
Complete the Billing Options screen and then click Finish. See Figure 5-8.
registering step 1
Figure 5-6 Register an invitee – Step 1:Contact Information
Events-Register an invitee-image109.png
Figure 5-7 Register an invitee – Step 2: Fee Information
If the Base Fee drop down list does not display and you wish to assess fees, you need to assign the fees to this event by selecting Assign Fee Items on the Fees tab. In addition, Assign a Fee Item will only display if fees have been assigned to this event.
 
add new participant step 3
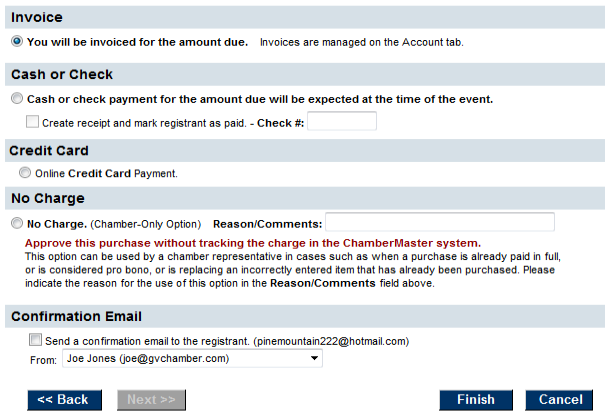
Figure 5-8 Register an invitee – Step 3: Payment Options
If no fees have been assigned to this event, only No Charge will be displayed as a payment method.

Resend Invitations to those not yet Registered

1.
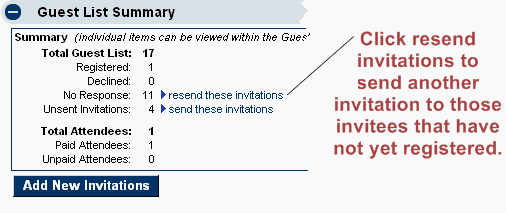
On the Guest List tab, click resend these invitations in the Guest List Summary area.
resend invitations
Figure 5-9 Resent invitations
2.
Click Send Invitations.
3.
Open your saved invitation (if applicable) or create a new invitation.
4.
Click Send Email.

Working with the Guest List

The Guest List area on the Guest List tab is used to track those that have been invited and/or will be attending an event. Guests may be added to this list in one of three ways: automatically added if included on the invitee list by selecting Add New Invitations, manually by clicking Add New Registration, or automatically through online registration (if allowed).

Creating a Guest List

The Guest List may be created manually by internally adding guests one at a time or through registration that happen online. The Guest List may also contain those that have been sent an invitation.
And even if not invited or registered yet, a guest may appear on the list with a status of “No Invite Sent”. Guests with this status have been added to the Guest List through the Send Invitations feature but was not actually sent an invitation. The purpose of having a guest on the list that is not registered would be so that you can begin to prep for their attendance (i.e. name tags, labels etc), even without their registration.
The Status column will display one of five options, dependent on actions taken: Invite Sent, No Invite Sent, Invite Declined or Registered.
Status Column Options
Invite Sent: Will display when an invitee has been added to the invitees list in the Guest List Summary area AND an email invitation has been sent. May also be selected manually by a chamber employee when editing the guest’s contact information.
No Invite Sent: Will display when an invitee has been added to the invitees list in the Guest List Summary area but the email has not been sent - - either intentionally not sent or because no email address is available. May also be selected manually by a chamber employee when editing the guest’s contact information.
Invite Declined: Will display when an invitee has responded to an email invitation by clicking on the Decline Invitation link within the email. May also be selected manually by a chamber employee when editing the guest’s contact information.
Registered: Will display when a guest has been added to the Guest List manually by clicking Add New Registration or automatically by a consumer or member that registers through online registration (if allowed). Will also display after an invitee, with either Invite Sent or No Invite Sent status, is fully registered by a chamber employee by completing the registration screens when clicking the + plus sign in their status column. May also be selected manually by a chamber employee when editing the guest’s contact information.
Registration Cancelled: Will display when a staff person changes their status to this manually by selecting the Registration Cancelled status. This will not refund payment or perform any financial transaction but will exclude them from the Guest List Summary list of Registered attendees.
Table 5-1 Status Column options
Add a new registration to the Guest List (if not already on the list)
1.
On the Guest List tab, click Add New Registration in the Guest List area.
2.
Complete the Contact Information screen or click to select a member, or representative from the current database.
 
Events-Creating a Guest List-image112.pngFigure 5-10 Add a Participant: - Step 1: Contact Information
3.
If choosing from a current member or representative, click the appropriate select button (select member for example), click to select the desired participant and then click Continue. Click Next to continue.
4.
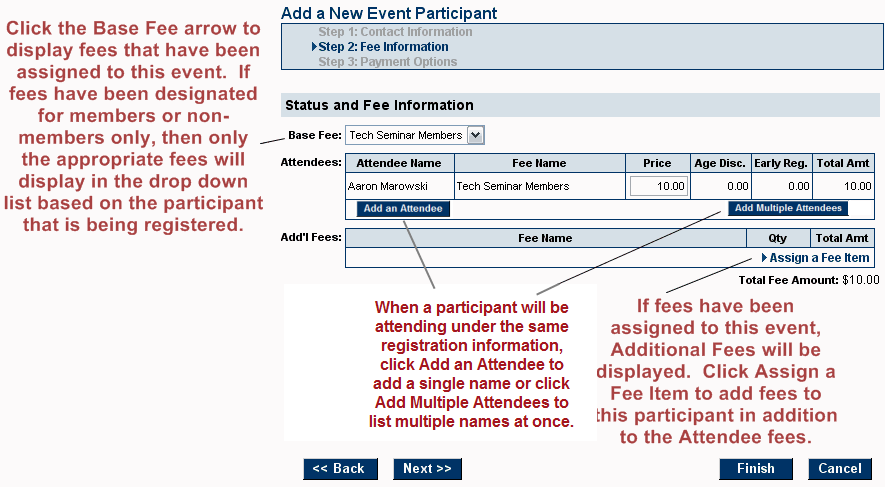
Complete the Fee Information screen. (If no fees are being assessed, continue to the next step.)
add new participant step 2 fees
Figure 5-11 Add a Participant – Step 2: Fee Information
If the Base Fee drop down list does not display and you wish to assess fees, you need to assign the fees to this event by selecting Assign Fee Items on the Fees tab. In addition, Assign a Fee Item will only display if fees have been assigned to this event.
5.
Click Next.
6.
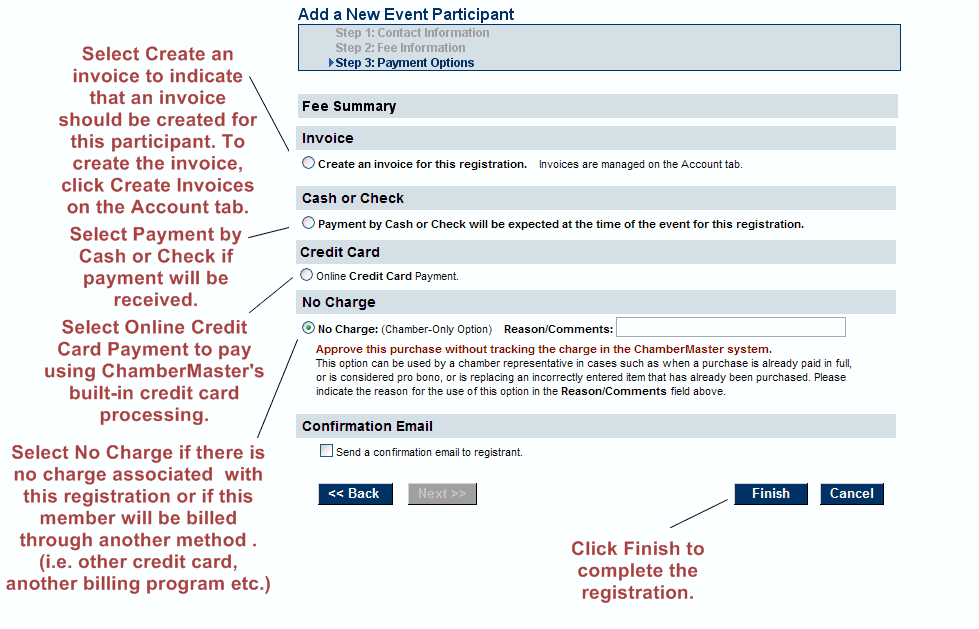
Complete the Payment Options screen.
Events-Creating a Guest List-image114.png
Figure 5-12 Add a Participant – Step 3: Payment Options
If no fees have been assigned to this event, only No Charge will be displayed as a payment method.
7.
Click Finish.
Add multiple names to the Guest List
This method also allows chamber employees the opportunity to populate the guest list with representatives and members by status, group or category. Invitees added using this method will be placed on the Guest List with a status of No Invite Sent and may easily be registered by clicking the + sign in the Status column.
1.
On the Guest List tab, click Add New Invitations in the Guest List Summary area.
invitations empty
Figure 5-13 Add New Invitations
2.
Select the attendees that should be added to the guest list using one or more selections available under Add Invitees, Add Members, or Add Representatives. Repeat until your invitee list is complete.
Invitees that already appear on the Guest List will automatically be marked with an asterisk and may be removed by clicking Remove to avoid accidental duplication of these invitees on the participant list.
Figure 5-14 Add invitees to list
If desiring to send invitations to this group of invitees, you may click Send Invitations instead of Save & Exit. See “Invitations” above for detailed instructions.
3.
Click Save & Exit. These invitees will be added to the Guest List with a status of “No Invite Sent”. They may easily be registered by clicking the + sign in the Status column. Additionally, invitations may still be sent at a later time by clicking send these invitations in the Guest List Summary area.
Add an additional attendee with a registered guest
Guests must have a registration status of Registered in order to add an additional attendee under their registration.
1.
On the Guest List tab, click the desired registered guest’s name in the Guest List area. The selected row will show in yellow and will display the Edit Guest Information screen.
2.
Click Attendees/Fees button.
You may access the Attendees/Fees screen directly by clicking the amount (or No Charge) in the Fee Amt column of the desired guest.
3.
Click Add Additional Attendee in the Fees area.
The Additional Attendee First and Last name field does not need to be completed at the time that they are added. These fields may be modified at a later time allowing members to get back with you on who is coming with them to an event.
Figure 5-15 Add additional attendee
4.
Complete the Add an Attendee screen.
5.
Click Continue.

Managing the Guest List

Guest List Output Options

Five output options are available when working with the Guest List. When selecting any of the five options, you will be able to select desired filter options first and then proceed to options specific to the output method selected.

Send Event Reminders

Note: Only those with Plus edition or greater and SEO modules will have this feature.

An automatically generated reminder email can be sent to all registrants on an event's Guest List with a status of "Registered".

1. Click Events in the left-hand menu.

2. Select the desired event.

3. Click the General tab.

4. Click to select the “Send automatic reminder to all registrants” checkbox.

5. Complete the Date and Time fields to indicate when the reminder should be sent.

6. Click Save.

Note: Preview the automatic reminder by clicking the reminder link. The email “look and feel” may be modified with your own custom template if desired.


Events-Send Event Reminders-image139.png

Reports and Labels

Within the Events module, reports, labels, and downloads are available at the bottom of a number of the lists which may give the desired options right there. These options were explained in the previous sections.
Additional reports are available in the Reports module of the software.
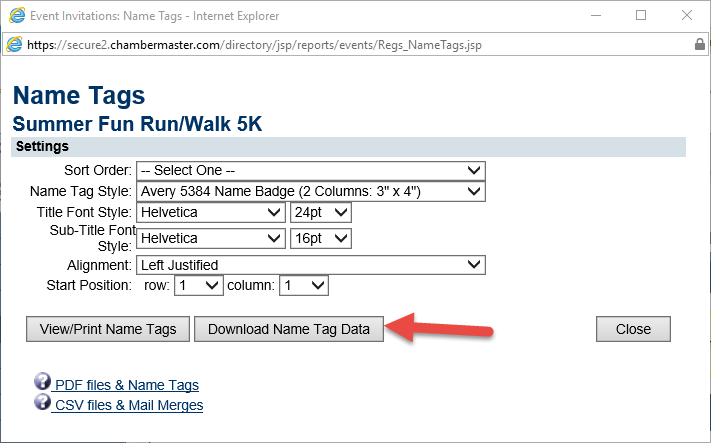
The flexibility of downloading data also provides opportunity to bring your Guest List into other programs where labels, nametags, or other desired output may be generated.

Reports

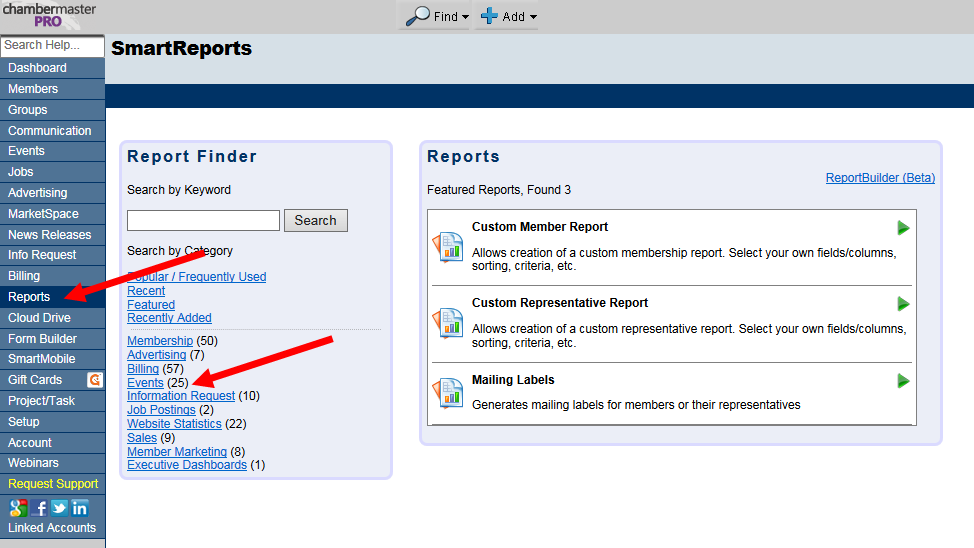
  1. Click Reports in the left-hand menu.
  2. Click Events from the list of links.
  3. Select the desired report from the list.
  4. Complete the selections as desired and click Print Report.


Event-report.png

Generate and Email a List of Events

A report is available that will list selected details of your desired event(s). After generating this report, you may choose to email that to desired recipients.

Generate List of Events

1.
Click Reports in the left-hand navigation bar
2.
Click Events in the Reports Categories area.
3.
Click Event Summary Listing.
4.
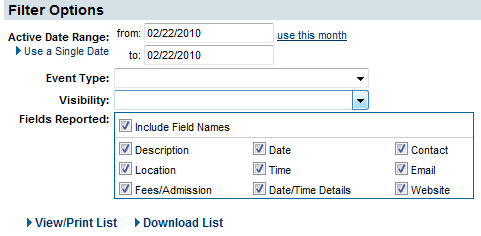
Complete the desired Filter Options and click View/Print List.
Events-Generate list of events-image143.png
Figure 6-3 Filter options for Event Information Summary report
5.
When the desired events display on the screen, press Ctrl-A (to select all) and then press Ctrl-C (to copy all).
You may also click Select All from the Edit menu in place of pressing Ctrl-A. Also, you may click Copy from the Edit menu instead of pressing Ctrl-C.
6.
Click Close close to close the event listing window.
7.
After completing the above steps, proceed immediately to the next section.

Email the Event Listing

1.
Click Communication in the left-hand navigation bar.
2.
Click New Email to Multiple Members.
3.
Select the desired addressees (by membership status for all active members) and distribution method (Email only).
4.
Click Continue.
5.
Complete the From: and Subject: fields.
6.
Click in the Body text area. Type any desired opening information.
7.
Click the Paste paste button.
8.
Click Allow Access (if necessary).
9.
The events listing from the steps performed above will display in the email.
10.
Complete the email and click Send Email.

Customize Event Name Tags

Name tags may be created that will list a participant's name and business name. If you desire additional participant information or to include a graphic on the name tab, you may wish to download the name tag data and import into Microsoft Word where you can customize the name tag as desired.

Download the Name Tag Data

1. Click Events in the left-hand navigation bar.
2. Select the desired event from the Events drop-down list.
3. Click the Guest List tab.
4. In the Guest List section click on the Report button


Cnt1.png


5. In the Report Items window select Style 3


Cnt2.png


6. Complete the Guest List Report Filters


Cnt3.png


7. On the Name Tags options screen click the Download Name Tag Data


Cnt4.png

Customize Online Event Calendar Display and Registration Options

Modify Event Options and Settings

Modify the list of Event Categories

Registration Options

FAQ

Common Tasks

Help Documentation

Browse Events Help
  1. Which event details DO NOT get copied from original event to recurring instances?
    • Reminder to attendees
    • Fees
    • Discounts
    • Attendees
    • Attendees List
    • Locations
    • Custom Fields
    • Event Notes