ECommerce
Other Topics > eCommerce
Contents
- 1 What is the eCommerce Store?
- 2 Getting Started
- 3 Add Products to Store
- 4 Managing your Store
- 5 Notes
What is the eCommerce Store?
With the eCommerce Store, you can sell items online to your members or the general public. This feature is available to users of Plus Edition and greater. Additionally, Pro Edition customers may offer consumers an unlimited number of items in the online store. Other editions display a maximum of three products at one time. The eCommerce Store works with most credit card processing services. To begin using the eCommerce Store, contact support@micronetonline.com.
|
|
NOTE: Customers with Bambora (formerly Beanstream) credit card processing will not be able to have a credit card option in their cart (there is not a Bambora compatible ecommerce plug-in available). Instead, they can have an Invoice choice in their cart if desired. To do this, after their ecommerce has been enabled, please enable the "Purchase Order" Payment method in their ecommerce cart. This selection can then be modified to say "Invoice / Purchase Order" (see MicroNet Knowledgebase article on how to do that). Also note that if the customer has items that are marked as Downloadable, then the download will not become available for the customer until either the order is marked as paid or the item is activated. See this video - http://screencast.com/t/3AresHh8 |
Getting Started
If you are just getting started with the eCommerce store, here is a short overview video ![]()
Name your Store
By default, the name of your store is the name of your association, as configured in General Association Information. You may change the name of your store if you wish:
- Click eCommerce in the left-hand navigation panel.
- Click the Configuration tab.
- Click Settings.
- Click General And Miscellaneous Settings.
- Enter the name of your store in the Store Name field. This will default to the name of your organization, as configured in General Association Information.
- The Store URL is automatically populated, and should not be changed.
- Click Save.


View/Customize On-line Store Messages
Default messages for your store pages have been provided to you. For example, the default home page message: "Online shopping made easy! Register under My Account or login with your current member credentials. Checkout at your convenience", will be automatically displayed on your home page. These on-line store messages may be customized to suit your needs:
- Click eCommerce in the left-hand navigation panel.
- Click the Content Managementtab.
- Click Topics (Pages). The current messages configured for your system will be displayed.
- Click Edit in the row of the message you wish to edit.
- Make changes as needed in the Body area of the Infotab. You may use the standard Rich Text Editor functions. NOTE: Use of the database field options are not applicable.
- Click Save.


Below is a list of the messages that may be modified, along with the messaging provided by default.
| Message | Default Text |
|---|---|
| AboutUs | Our organization exists to meet the needs of our members and provide meaningful services and products. |
| Checkout As Guest Or Register | Register and save time!
Register with us for future convenience:
Members do not need to register but may checkout using current member login credentials. |
| Conditions Of Use | Please refer to our organization for Conditions of Use. |
| Contact Us | Please contact us with questions. |
| Home Page Text | Online shopping made easy! Register under My Account or login with your current member credentials. Checkout at your convenience. |
| Login Registration Info | Current members of our organization should login with their member or representative credentials for member-only products and pricing. Visitors and guests will benefit by creating a new customer account which provides access to order status, previous orders, and faster checkout. |
| Privacy Info | If you require any more information or have any questions about our privacy policy, please feel free to contact us. |
| ShippingInfo | You can trust that your order will be quickly processed and safely delivered. Our goal is to ensure your complete satisfaction with your purchase. |
Setup Fee Items for eCommerce
Fee items will need to be setup for all items you will sell through your store, as well as a fee item for shipping. See Working with Fee Items for instructions. The Fee Item type should be set to eCommerce.

Set Up Taxes for eCommerce
If the products offered in your store are taxable, you will need to setup your tax providers. NOTE: Some states required taxes based on the location the product is shipped from (Fixed tax rate provider), and others require tax based on the location the product is shipped to (Tax By Country & State & Zip). Check with your own state tax revenue department for sales tax guidelines.
When it comes to charging sales tax, online sellers should start by looking at their home state and determining: whether you are based in an origin-based sales tax state or a destination-based sales tax state
Understanding sales tax rates can be tricky. But there’s one quick way to help you begin to understand what you should be charging your customers. The first thing you need to do is find out if you run your business out of an origin-based state or a destination-based state.
In origin-based states, sales tax should be collected based on where you, the seller, are located. In destination-based states, the correct sales tax rate is based on where the buyer is located (the destination of the sale).
Configure Fixed Tax Rate Provider Tax Setup (Origin Based)
If your taxes are required based on the location the product is shipped from (see above), configure the following:
- Click eCommerce in the left-hand navigation panel.
- Click the Configuration tab.
- Click Tax.
- Click Tax Providers.
- Click Configure, in the Fixed tax rate provider row.
- In the Tax row, click the Edit button. The Rate text box will be enabled.
- Enter your fixed tax rate.
- Click Update.


Configure Tax By Country & State & Zip (Destination Based)
Configure Tax by Country, State and Zip if your state requires charging tax based on the location the product is shipped to. Check with your own state tax revenue department for sales tax guidelines. To configure the taxes, you will need information on taxes charged in all zip codes for locations that you ship to.
- Click eCommerce in the left-hand navigation panel.
- Click the Configuration tab.
- Click Tax.
- Click Tax Providers.
- Click Configure, in the Tax By Country & State & Zip row.
- In the Adding a new tax rate section, configure the following:
- Country: Select the country to which you are shipping product.
- State: Select the state to which you are shipping product. NOTE: If an asterisk is selected, this tax rate will apply to all customer in the given country, regardless of State.
- Zip: Enter the zip code for which you are configuring tax.
- Tax: If this destination is taxable, select Tax from the drop-down list.
- Percentage: Enter the tax rate for this zip code.
- Click Add Tax Rate.

Repeat steps 6 & 7 to add the tax rates for all necessary countries, states and zip codes.
Setup Shipping
Assign Shipping Fee Item
A single fee item must be identified for shipping fees.
Create the fee item as described in Adding a Regular Fee Item. Select ECommerce as the fee item type. Once your fee item has been created:
- Click eCommerce in the left-hand navigation panel.
- Click Configuration.
- Click Shipping.
- Click Shipping Fee Item.
- Select the previously created fee item from the Fee item drop-down list.
- Click Save.

Shipping Settings
- Click the Configuration tab.
- Click Settings.
- Click Shipping Settings.
- Configure the following as needed:
- Free shipping over 'X': Enable this option if you wish to provide free shipping above a certain dollar value. When enabled, the Value of 'X' field will be displayed. Enter the value over which all orders with a total greater than this will qualify for free shipping.
- Calculate 'X' including tax: Enable this option if you wish to calculate X including tax. If it is not ticked, the value is calculated excluding tax.
- Estimate shipping enabled: If this option is enabled, customers will see a shipping estimate on the shopping cart page.
- Display shipment events: Enable this option to allow customers to view shipment events on their shipment details page. NOTE: to be enabled, this feature must be supported by a shipment computation method.
- Click Save.

Shipping Methods
Shipping Methods allow you to define how you will deliver the product to the customer. You may for example have an in-store pickup, standard shipping and rush are populated in your system by default.
View/Edit Shipping Methods
- Click Configuration.
- Click Shipping.
- Click Shipping Methods. A list of currently configured Shipping Methods is displayed.
- Click the Edit link to edit the desired method.
Add a Shipping Methods
- Click Configuration.
- Click Shipping.
- Click Shipping Methods. A list of currently configured Shipping Methods is displayed.
- Click the Add New button.

- Configure the following:
- Enter the Name of the shipping method. This is visible to the customer.
- Enter a *Description of the shipping method. This is visible to the customer.
- Enter the Display order of the shipping method. A value of 1 represents the top of the list.
- Click Save.
|
|
NOTE: You may place restrictions on your shipping methods as needed. See Shipping Method Restrictions. |
Shipping Method Restrictions
If needed, you can define restrictions for certain shipping methods in certain countries. For example, if in the US, you may not offer an over-night shipping method outside of the US. To configure restrictions:
- Click Configuration.
- Click Shipping.
- Click Shipping Method Restrictions.
- Mark the checkbox(es) for the country or countries in which you want the shipping method(s) not available.
- Click Save.
If shipping amounts are necessary, a Shipping Rate Computation Method must be selected and configured. Available Shipping Rate Computation methods:
- Fixed rate shipping: simple, flat-rate shipping with options to increase shipping on specific items as needed
- Shipping by weight: requires product weight to be entered for each product and broad formulas created to calculate price based on weight
- Various carriers provide their own – requires a shipper account and a website URL with appropriate login credentials with one of the major carriers (UPS, USPS, FedEx, Australia Post or Canada Post)
|
|
NOTE: The default shipping method is Fixed Rate Shipping with average prices set as the default rate. You may check and change these as needed. |
Configure Shipping Rates
Configure Rates for Fixed Rate Shipping
Flat rate shipping is a uniform shipping rate that is applicable for all types of shipping boxes and packages, irrespective of the weight, size and other dimensions. Your system is set to default to Fixed Rate Shipping, with the following options: In-store pickup, Standard shipping, and Rush. When fixed rate is used, customers will select the shipping method, and the fixed rate you have configured in the system will be applied.
If you are using fixed rate shipping, configuration of rates is needed:
- Click eCommerce in the left-hand menu.
- Click Configuration in the upper drop-down menu.
- Click Shipping.
- Click Shipping Rate Computation Methods. All shipping rate computation options will be displayed. Fixed Rate Shipping is enabled by default.
- Click Configure in theFixed Rate Shipping row.
- To change the Rate of a shipping method, click the Edit button.
- Enter the new Rate in the text box, and click Update.
- Repeat steps above to configure the other options.
- Click Save.


Configure Shipping by Weight
The shipping by weight and by total option allows setting different shipping fees based on a shipment weight and total. The ability to charge different fees depending on the weight and total of the shipment helps to keep the company's shipping costs down when heavy items are shipped, yet offer reasonable shipping costs to customers who purchase light products.
|
|
NOTE: In most cases, only one Shipping Rate Computation Method should be active at one time so that conflicting options are not presented to the purchaser. |
- Click eCommerce in the left-hand menu.
- Click Configuration in the upper drop-down menu.
- Click Shipping.
- Click Shipping Rate Computation Methods.
- Click the Edit button for Fixed Rate Shipping and clear the Is Active check-box.
- Click Update.
- Click the Edit button for the Shipping by weight option, and enable the Is Active check-box.
- Click Configure in the row that is titled Shipping by Weight.
- Click Add record to populate the values for the formula.
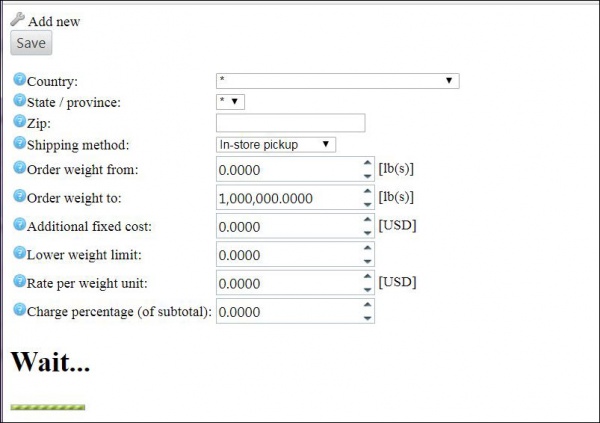
- The formula to calculate the rate is: [additional fixed cost] + ([order total weight] - [lower weight limit]) * [rate per weight unit] + [order subtotal] * [charge percentage].
- Select the Country and State/Province of the shipment destination. If an asterisk (*) is selected, then this shipping rate will apply to all customers regardless of the Country/State/Province.
- Enter a Zip or postal code. If this is left empty, this shipping rate will apply to all customers, regardless of their zip-code.
- Select the Shipping Method for the weights/rates you are configuring. You will configure a record for each shipping method you offer.
- Configure Order weight from and Order weight to. If the customer’s shipment weight falls into this range, the additional cost will be fixed and will be calculated according to this record.
- Configure the Additional fixed cost: This is the cost of shipment in case the weight is under a certain level Lower weight limit.
- Configure the Rate per weight unit: This is the cost of each weight unit above the lower weight limit.
- Configure the Charge percentage (of subtotal): These are parameters used for calculating the extra cost based on the order sub-total.
- Click Save.


Repeat the steps above for each shipping method, and each weight range.
|
|
NOTE: When using the Shipping by weight option, you will also need to configure the weight for each item you sell. |
Setup Email Messaging
Automated email messages will be sent both to your customers and your staff when transactions occur. For example: an automated message will be sent to the customer when product is marked as shipped.
View/Modify Your To/From Email Addresses
Three email addresses are defaulted in your system: General contact, Sales representative, and Customer support. Initially, these three addresses are defaulted to the email address listed in your General Association Information. These email addresses are you when automated messages are sent from you, or when email messages (such as when a buyer uses the contact us option) are sent to you.
To view/change email addresses:
- Click eCommerce in the left-hand menu.
- Click the Configuration tab.
- Click Email Accounts.
- Click Edit in the row of the email account you wish to change.
- Change the email address or the display name as desired.
- Click Save.
|
|
NOTE: Who is the “Store Owner? The default email account, noted by the blue checkmark in the “Is default email account” column, is the address and display name that will be used as the TO: address when automatic emails are sent to the “Store Owner”. This address is also used periodically within the body of some of the automatic emails as the address to contact with questions such as in the Customer.WelcomeMessage template. |
View/Modify Email Messages
Message templates define the layout, content, and formatting of automated messages sent from your store. They are called transactional emails because each one is associated with a specific type of transaction.
- Click eCommerce in the left-hand menu.
- Click the Content Management tab.
- Click Message Templates. A list of the current email templates will be displayed.
- Click Edit in the row of the message you wish to edit.
- Make changes in the Body area of the Info tab. You may use all of the Rich Text Editor functions. NOTE: Database fields are not applicable.
- Click Save.
Each Message template (automatic email) allows you to specify the address that email should come from by selecting one of three email accounts: General contact, Sales representative, or Customer support. Initially, these three addresses are defaulted to the email address listed in your General Association Information. You may change these addresses as needed.
The table below describes the email templates provided and the purpose of each.
| Email Message | Purpose |
|---|---|
| Customer.BackInStock | This email is sent to the customer when a product is back in stock. |
| Customer.EmailValidationMessage | This email is sent to the customer, after they have registered, to provide them with the needed information to activate their account. |
| Customer.NewOrderNote | Example |
| Customer.NewPM | Example |
| Customer.PasswordRecovery | This email is sent to the customer, when they click the |
| Customer.WelcomeMessage | This email is sent to a customer after they complete the register for account options. |
| GiftCard.Notification | Example |
| NewCustomer.Notification | This email is sent to your staff, when a new customer registered to your store. It will include customer details: Customer Full Name, and email address. |
| NewReturnRequest.StoreOwnerNotification | This email is sent to your staff when a customer requests to return product. |
| OrderCancelled.CustomerNotification | This email is sent to the customer when an order is cancelled. The email will include details of the order. |
| OrderCompleted.CustomerNotification | This email is sent to the customer when an order is completed. The email will include details of the order. |
| OrderPlaced.CustomerNotification | This email is sent to the customer when their order is received in the database. The email will include details of the order. |
| OrderPlaced.StoreOwnerNotification | This email is sent to staff when an order is place. It will include details of the order. |
| Product.ProductReview | This email is sent to staff when a new product review is added in the store. It will include the name of the product reviewed (but not the review). |
| QuantityBelow.StoreOwnerNotification | This email is sent to staff when inventory of a product is low (if inventory reaches the Minimum stock quantity defined for the product). |
| QuantityBelowCombination.StoreOwnerNotification | Example |
| RecurringPaymentCancelled.StoreOwnerNotification | Example |
| ReturnRequestStatusChanged.CustomerNotification | This email is sent to the customer when a change is made to a return request. |
| Service.EmailAFriend | Example |
| ShipmentDelivered.CustomerNotification | This email is sent to the customer when their order has been delivered. |
| ShipmentSent.CustomerNotification | This email is sent to the customer when their order has been shipped. |
| Wishlist.EmailAFriend | Example |
Setup Product Categories
Categories are used to organize your products for public view. Eight categories are already created for you but can be modified or deleted as desired. You may also remove the “Published” check-mark on any category which turns off the online display of that category. However, unless the item (product variant) itself also had the “Published” check-mark cleared, products in the category would continue to display when found through the Search command or the New Products list.
The following categories are created for you by default:
- Clothing
- Clothing Accessories
- Literature
- Maps
- Memorabilia & Trinkets
- Posters
- Seasonal Items
- Videos & DVDs
View/Edit Product Categories
- Click ECommerce in the left-hand navigation.
- Click the Catalog tab.
- Click Categories.
- Click Tree View or List View. A list of all of your categories will be displayed.
- Click the Edit button for the category you wish to edit.

|
|
NOTE: If you wish to remove categories from your store, you may deselect the “Published” check mark on any category which turns off the online display of that category. However, unless the item (product variant) itself also had the “Published” check-mark cleared, products in the category would continue to display when found through the Search command or the New Products list. |
Add a Product Category
- Click ECommerce in the left-hand navigation.
- Click the Catalog tab.
- Click Categories.
- Click Tree View or List View. A list of all of your categories will be displayed.
- Click the Add new button.
- Configure the category as desired:
- Name: Enter a name for the category. This name will be displayed on the store's home page.
- Description: Enter a description of the new category. Use the Rich Text Editor for layout and fonts.
- Category template: Select a category template. The default is Product in Grid or Lines.
- Picture: If you wish to include an image for this category, click the Upload a File button.
- Parent category: If this category will be a subcategory, select a parent category from the Parent Category drop-down list. The new category will be placed under this category in the public store.
- Price ranges: Setting price ranges will allow your customers to filter your products by price. Separate the ranges by a semicolon, for example, 0-999; 1000-1200; 1201 - (1201 means 1201 and over).
- Show on home page: Select this option if you wish to display this category on the home page of your store.
- Published: Enable this option to publish this category to your store.
- Display Order: This is the order number for displaying the category. This display number is used to sort categories in the public store (ascending). The category with the display order 1 will be placed at the top of the list.
- Click Save and Continue.

Setup Product Attributes
Product attributes are variations of a product (such as color, size, etc.). Prior to setting up your products, you will define the attributes. Your system is defaulted with the Color and Size attribute. You may add additional attributes as needed. These attributes are available to you for selection, and further configuration when you are creating products. For example, if you offer T-shirts in a variety of colors, you will select the Color attribute, and assign the desired colors at the product level.
- Click eCommerce in the left-hand navigation panel.
- Click the Catalog tab.
- Click Attributes.
- Click Product Attributes. A list of the attributes currently configured will be displayed. By default, your system will be populated with Color and Size.
- If needed, click the Add New button.
- Enter a Name for the attribute.
- Enter a Description of the attribute.
- Click Save.


Add Products to Store
The method for adding products will vary dependent on whether the product is a single product with no variations (for example, a key chain that comes with no additional options); a single product with a single variation (for example, a text book with choice of hard-cover or soft-cover) or a single product with multiple variations (for example, a t-shirt with choice of size and color). See a short video explaining the differences.
Add a Single Product with No Variations
Use the following steps to add a single product with no variations. For example: if you are selling key chains with no additional options to select.
- Click ECommerce in the left-hand navigation.
- Click the Catalog tab.
- Click Manage Products.
- Click the Add new button.
- Enter a Product name. This will be the name of the product displayed in the store.
- Enter a Short description. This description will be the shorter description displayed when multiple products are displayed in your store.
- Enter a Full description. This is the description of the item on the product's page. All of the Rich Text Editor options may be used.
- (Optional) Enter an Admin comment:. This is for internal use only.
- Select Single Product Variant from the Product template: drop-down list.
- Enable Show on home page: if you wish to feature this product on your home page. If disabled the product is only displayed within the category to which it is assigned.
- Tick Published: if wish to immediately include this product in your store. If this is disabled, the product is not displayed in the store.
- Enable Allow customer reviews: if you wish to allow visitors to your store to write reviews of the product.
- (Optional) Enter Product Tags. The product tag contains keywords or key phrases for each respective product. Enter tags separating them by comma. The more products are associated with a particular tag, the larger it will look in the Popular Tags area, displayed in the sidebar of the Catalog page.
- Click Save and Continue Edit.
- (Recommended) Click the SEO tab. To define the following:
- Meta keywords Enter a brief and concise list of the most important themes (keywords and key phrases) related to the product. These words will be added to the product page header.
- Meta description Enter a brief description of the product that will be added to the product page header.
- Meta title: a title for the Web page. Search engine friendly page name - a name of the page used by search engines. If you enter nothing then the product page URL is formed using the product name. If you enter custom-seo-page-name, then the following custom the URL will be used: http://www.yourStore.com/custom-seo-page-name.
- Click the Product Variants tab. The next steps allow you to add images of the product.
- Click the Edit for the new product.
- Enter the Name of the product.
- Enter the Description of the product.
- (Optional) Enter the SKU of the product.
- (Optional) Upload an image of the product.
- (Optional) Enter an Admin comment:. This is for internal use only.
- (Optional) Enter a Manufacturer part number: - a part number provided by a manufacturer for the product.
- (Optional) Enter a GTIN (global trade item number):. These identifiers include UPC (in North America), EAN (in Europe), JAN (in Japan), and ISBN (for Books).
- Select a Fee Item from the drop-down list. All fee items that you have configured of type ECommerce are included in the list. See Setup Fee Items for eCommerce.
- Enter the Price of the item.
- (Optional) If you are dropping the price of this item and you wish to display the old price, enter the old price. Pricing in the store will be shown as in the image below.
- (Optional) If you are tracking the actual cost of items sold, enter in the Product cost. This cost is not displayed to customers.
- (Optional) If you are offering the item at a special price, enter the Special price.
- (Optional) If you are offering the item at a special price, for a specific date range, enter the Special price start date and Special price end date.
- (Optional) Click the Disable Buy Button option if you wish to display the product in your store, but now allow purchasing of the product via the store. This might be an option for products that are available upon request.
- Enable the Disable Wishlist option, if you do not want consumers to have the ability to add this item to their wish list.
- Enable the Available for pre-order, if the product is not yet available, but you want the customers to be able to order it. The Pre-ordered button will be displayed to replace the standard Add to cart button. When this option is selected, the Pre-order availability start date field is displayed. Enter the availability start date of the product in UTC. The Pre-order button will be changed to Add to cart when this date is reached.
- Enable the Call for Price option to show Call for Pricing or Call for Quote instead of the price on your store page. This can help you to establish a contact with your customers and provide with additional information about the product they are interested in.
- Enable Customer enters price to indicate that a customer must enter the price. When selected, the following fields are displayed:
- In the Minimum amount field, enter the minimum amount for the price.
- In the Maximum amount field, enter the maximum amount for the price.
- Enter the Available start date. This is the date the product is available. May be used in conjunction with Available for Pre-order.


Add a Product with Variations (Options)
Use the following steps to add a product with variations. For example: if you are selling t-shirts with options for size and color.
- Click ECommerce in the left-hand navigation.
- Click the Catalog tab.
- Click Manage Products.
- Click the Add new button.
- Enter a Product name. This will be the name of the product displayed in the store.
- Enter a Short description. This description will be the shorter description displayed when multiple products are displayed in your store.
- Enter a Full description. This is the description of the item on the product's page. All of the Rich Text Editor options may be used.
- (Optional) Enter an Admin comment:. This is for internal use only.
- Select Variants in Grid from the Product template: drop-down list.
- Enable Show on home page: if you wish to feature this product on your home page. If disabled the product is only displayed within the category to which it is assigned.
- Tick Published: if wish to immediately include this product in your store. If this is disabled, the product is not displayed in the store.
- Enable Allow customer reviews: if you wish to allow visitors to your store to write reviews of the product.
- (Optional) Enter Product Tags. The product tag contains keywords or key phrases for each respective product. Enter tags separating them by comma. The more products are associated with a particular tag, the larger it will look in the Popular Tags area, displayed in the sidebar of the Catalog page.
- Click Save and Continue Edit.
- Click the Products Variants tab.
- (Recommended) Click the SEO tab. To define the following:
- Meta keywords Enter a brief and concise list of the most important themes (keywords and key phrases) related to the product. These words will be added to the product page header.
- Meta description Enter a brief description of the product that will be added to the product page header.
- Meta title: a title for the Web page. Search engine friendly page name - a name of the page used by search engines. If you enter nothing then the product page URL is formed using the product name. If you enter custom-seo-page-name, then the following custom the URL will be used: http://www.yourStore.com/custom-seo-page-name.
- Click the Product Variants tab. The next steps allow you to add images of the product.
- Click the Edit for the new product.
- Enter the Name of the product.
- Enter the Description of the product.
- (Optional) Enter the SKU of the product.
- (Optional) Upload an image of the product.
- (Optional) Enter an Admin comment:. This is for internal use only.
- (Optional) Enter a Manufacturer part number: - a part number provided by a manufacturer for the product.
- (Optional) Enter a GTIN (global trade item number):. These identifiers include UPC (in North America), EAN (in Europe), JAN (in Japan), and ISBN (for Books).
- Select a Fee Item from the drop-down list. All fee items that you have configured of type ECommerce are included in the list. See Setup Fee Items for eCommerce.
- Enter the Price of the item.
- (Optional) If you are dropping the price of this item and you wish to display the old price, enter the old price. Pricing in the store will be shown as in the image below.
- (Optional) If you are tracking the actual cost of items sold, enter in the Product cost. This cost is not displayed to customers.
- (Optional) If you are offering the item at a special price, enter the Special price.
- (Optional) If you are offering the item at a special price, for a specific date range, enter the Special price start date and Special price end date.
- (Optional) Click the Disable Buy Button option if you wish to display the product in your store, but now allow purchasing of the product via the store. This might be an option for products that are available upon request.
- Enable the Disable Wishlist option, if you do not want consumers to have the ability to add this item to their wish list.
- Enable the Available for pre-order, if the product is not yet available, but you want the customers to be able to order it. The Pre-ordered button will be displayed to replace the standard Add to cart button. When this option is selected, the Pre-order availability start date field is displayed. Enter the availability start date of the product in UTC. The Pre-order button will be changed to Add to cart when this date is reached.
- Enable the Call for Price option to show Call for Pricing or Call for Quote instead of the price on your store page. This can help you to establish a contact with your customers and provide with additional information about the product they are interested in.
- Enable Customer enters price to indicate that a customer must enter the price. When selected, the following fields are displayed:
- In the Minimum amount field, enter the minimum amount for the price.
- In the Maximum amount field, enter the maximum amount for the price.
- Enter the Available start date. This is the date the product is available. May be used in conjunction with Available for Pre-order.
- Click the Product variant attribute tab. This is where you will add the attributes to your product, such as size and/or color.
- Click Add new record.
- Select the desired Attribute from the drop-down list. Attributes should have been previously configured. See Setup Product Attributes.
- Enter the text prompt. This is the text that will be displayed on the store page.
- Tick the Is Required check-box, if this selection is required when the item is purchased.
- Define the Control type for this attribute (e.g. drop-down list, radio button list, etc.). NOTE: If using the Color attribute, select the Color squares option is recommended. This will then allow you to include a square of the color on the product page.
- Enter the Display Order for this attribute. This allows you to organize the attributes on the product page.
- Click Insert. The Values field now displays a number of predefined values for this attribute.
- Click view/edit in the Values column to add the desired choices. For example, to add your shirt sizes.
- Click Add new value.
- Enter the name of the value. For example, if your attribute is Size, you may enter XSmall.
- (Optional) Price adjustment: If you wish to adjust the standard price of the item, when this attribute is selected, enter the amount by which you will adjust the price in the Price adjustment text box.
- (Optional) Weight Adjustment: If the weight of the product must be adjusted based on selection of the attribute, enter the amount by which the weight should be adjusted.
- Is pre-selected: Select this option if this option should be pre-selected for the customer.
- Display order: Enter the display order for this option. 1 represents the first item on the list.
- Click Save.
- Repeat steps 22 - 23 to add additional options.
- Click (back to product variant details).
- Click Save.


View a short video on adding variants to your products.
Tiered Pricing
Tier pricing is a promotional tool that allows a store owner to offer special prices when customers buy bigger amounts of a particular product. You can can apply this as an incentive to buyers and drive more sales.
- Go to Catalog → Products → Manage Products.
- Select a product you want to add a tier price
- Click Edit.
- Click Tier Prices.
- From the Customer role drop-down list, select the customer role based on which the tier price will be defined, ex. all customers, registered, guests.
- In the Quantity and Price fields, define the price applicable to a certain quantity of the product.
- In fields start date and the end date enter the period of tier prices availability. Leave these fields empty if not applicable.
- Click Update. The Tier Prices tab is updated with the new data.
- Click Save on the Edit product details page.
Cross-sells and Related products
Cross-sells and Related Products
Cross-sells and related products are marketing tools that can be used to offer your customers additional products they may like based on their shopping behavior (viewing and adding to the cart certain products). It is also a good opportunity for you to up-sell some products. You can use both of these tools simultaneously.
Cross-sells
The Cross-sell products option provides an opportunity to sell additional products that are usually being bought with the selected product, however, you can add any product from your catalog even non-complementary to the product in the cart. Cross-sells are displayed at the bottom of the checkout page. For example, when your customer is buying a T-shirt, he/she might also want to purchase a mug.
- Go to Catalog → Products → Manage Products.
- Click Edit for the desired product.
- Click the Cross-sells tab.
- Click Add new cross-sell product.
- Check the products you wish to add as cross-sells.
- Click Save.
- Click the Save button.

Related Products
The Related Products option provides an opportunity to advertise and up-sell other products to your customers together with the chosen one. These products are displayed below the selected product on the product details page. You can add an unlimited number of related products to a product.
- Go to Catalog → Products → Manage Products.
- Click Edit for the desired product.
- Click the Related Products tab.
- Check the products you wish to add as related products.
- Click Save.
- Click the Save button.

Map Products to Categories
To make it easy for your customers to find what they are looking for in your store, you can map your products to categories. You can assign a product to as many categories as you wish. You can view and modify your categories as need. See Product Categories for instructions.
- Click ECommerce in the left-hand navigation.
- Click the Catalog tab.
- Click Manage Products. A list of all of your products will be displayed.
- Click Edit in the row for the product you wish to map to a category.
- Click the Category Mappings tab.
- Click Add New Record.
- Select a Category from the drop-down list.
- Enable Is featured product? if you wish this product featured within the category.
- Enter the Display order. This option allows you to specify the order in which this product will be displayed in the category.
- Click Insert.
- To add this product to additional categories, repeat steps 6 - 10 above.
- Click Save to save category mappings.


Your Products and SEO
To make your store appear higher in search engine results, adding meta data to products is recommended.
Add a Donation "Product"
You can use the store module to collect donations. By configuring the product for Customer enters price, your customers will be able to enter in the amount they wish to donate. to The first step in setting up donations for your eCommerce Store is to create a fee item in the back-office.
Create Your eCommerce Fee Item For Donation as previously discussed. Then, in the eCommerce module follow these steps to add in a product that allows the customer to enter in the amount they would like to donate.
- From the backoffice, click on eCommerce in the left-hand navigation
- Click on Catalog
- Click on Products
- Click on Manage Products
- In the Manage Products window click on Add New
- In the Add a New Product window enter in the following information:
- Product name
- Short Description – this will show on the home page of your store
- Enter the Full Description – This is where you will be able to explain the need or use of the donation
- Set the Product Template as Single Product Variant
- Check the box to Show on Home Page
- Check the box for Published
- Click Save and Continue Edit
- Click on the Product Variants tab.
- Click Edit.
- On the Edit Product Variant for Product screen fill in the following areas:
- Picture in you have one for your donation or you may add your association logo
- Assign your eCommerce Fee Item
- Select the option Customer enters price
- Remove the check mark for Shipping enabled
- Click Save
Your product is now available on the store! Members and guest will be able to make a donation for the amount they wish to share. If they are non-members the invoice/receipt will be recorded on the non-member record you created and if they are a member the invoice/receipt will be recorded on their account tab.
Add a Downloadable Product
You can use the store module to provide downloaded documents to your members and the public.
Create your product, as described in Add a Single Product with No Variations. On the Product Variant tab:
- Enable the Downloadable product check-box.
- For the Download file do one of the following:
- Click the Use download URL check-box and enter the URL to the document.
- OR
- Click the Upload a File button, to browse to and upload the desired file.
- Unlimited downloads: Enable this option, if this product can be downloaded an unlimited number of times. When this option is not selected, an additional field Max. downloads is displayed. Enter the maximum number of downloads, that are given to a customer, after purchasing the product.
- Number of days: Enter the number of Days during which customers can access the file for download. Leave this field empty if you want to enable continuous downloads. The customer must have created credentials to the store to return to the download option.
- Download activation type: Select one of the following options.
- When order is paid: Select this option to enable the download only when the order payment status is Paid.
- Manually: Select this option to give control to the store administrator. When this option is selected, the administrator must manually activate the download. This is performed on the Products tab of an Order Details page.
- Has user agreement: Select this option if a customer must accept an agreement, in order to be able to download the product. The User agreement text editor is then displayed enabling you to enter/edit the user agreement text.
- Has sample download file: Select this option if you wish to provide a small sample of the document for download on the product page. NOTE:: If a sample is uploaded, it will be shown on the product details page, and and be downloaded by any customer without charge, that if a store owner uploads a sample, it will be shown on the product details page and can be downloaded by any customer without any charge.
- If Has sample download file is selected, provide the file in one of the following ways:
- Click the Use download URL check-box and enter the URL to the document.
- OR
- Click the Upload a File button, to browse to and upload the desired file.
- Complete any additional product variant settings as desired.
- Click Save.

Managing your Store
The eCommerce Dashboard provides you an at a glance view of your store.

Processing ECommerce Orders
Watch a short video on how to Process an Order: ![]()
When an order is placed, an email notification is sent to the Store Owner address. This is initially defaulted to the address listed under Setup > Organization Information. The email template and associated settings can be found under Content Management > Message Templates. Edit the template called “OrderPlaced.StoreOwnerNotification”.
- Click eCommerce in the left-hand menu.
- Click the Sales tab.
- Click Orders.
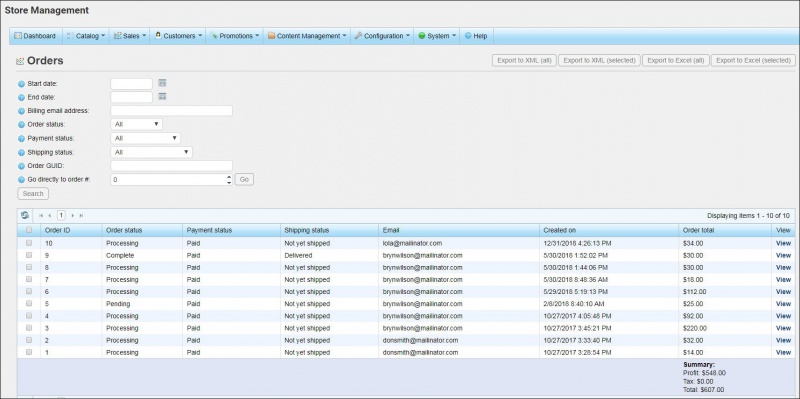
- Note the orders and their status columns – Order status, Payment status, and Shipping status. If your list of orders is quite long, use the filter at the top of the list to specify exactly what you’d like to see in your list. You can filter the list in the following manner:
- Start Date and End Date: use this filtering option to view orders placed with a specific date range.
- Billing email address: Use this filter option to search for a specific order based on the customer's email address.
- Order Status: Select one of the follows: All, Pending, Processing, Complete, Cancelled.
- Payment Status: Select a specific payment status to search by: All, Pending, Authorized, Paid, Refunded, Partially Refunded, Voided. NOTE: All orders would be paid by credit card.
- Shipping Status: Select a specific shipping status to search by: All, Shipping not required, Not yet shipped, Partially shipped, Shipped, Delivered.
- Go directly to order number: This option allows you to enter the order number and click Go to display the required order.
- If filtering options have been entered, click Search. When any search is performed, the results of the search are displayed in the lower half of the screen.
- Click View in the row of the item that you wish to process.
- Review the order information on the Info tab.
- Click the Shipping info tab.
- Click Add shipment at the bottom of the screen.
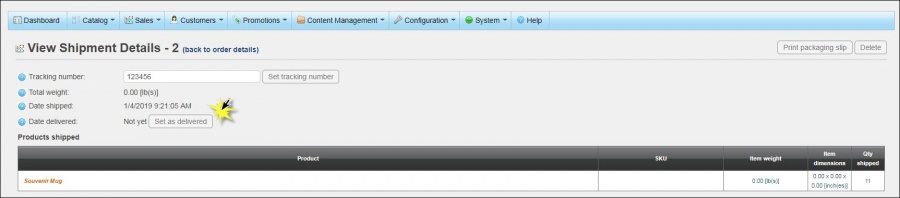
- In the Tracking number: text box, enter the tracking number associated with your shipment of this item. This will vary depending on your shipping carrier and what information you desire to record for shipping records. NOTE: This tracking number is also visible to customers that choose to check their order status by logging into the storefront.
- Make sure the quantity is correct for the items that will be included in this shipment. NOTE: If all of the items are not ready to be shipped, you may set their quantity at 0 on this screen. The order will then display as Partially Shipped when viewing the Shipping Status on the Sales->Orders list.
- Click Save and Continue.
- To add the date for the shipment, click the Shipment tab.
- Click ViewAdd a date to the shipment, click view for the product you wish to mark as shipped.
- Click View on the row of the desired shipment.
- Click the Set as shipped button. NOTE: An email notification, ShipmentSent.CustomerNotification under Content Management->Message Templates, is automatically sent to the purchaser when this date is set when the email is marked as active. This Shipped date is also visible to customers that choose to check their order status by logging into the storefront. Today’s current date and time will automatically be placed on this shipment. No other date or time may be specified and this date/time may not be undone.


Mark Orders as Delivered
When an order has been delivered, use the following procedure to "Set as delivered:
- Click eCommerce in the left-hand menu.
- Click the Sales tab.
- Click Shipments.
- Click the View link of for the shipment you wish to mark as delivered.
- Click the Set as delivered button.
- NOTE: Today’s current date and time will automatically be set as the delivered date/time. No other date or time may be specified and this date/time may not be undone.
- Click Save. An email notification, ShipmentDelivered.CustomerNotification under Content Management->Message Templates, is automatically sent to the purchaser when this date is set when the email is marked as active. This Delivered date is also visible to customers that choose to check their order status by logging into the storefront. Note: The order will continue to show as “Processing” until a delivered date is added.


Once the order has been marked as paid, shipped, and delivered it will list as "Complete" on the Order Info tab and on the Store Dashboard.

Cancel an eCommerce Order
- Click eCommerce in the left-hand menu.
- Click the Sales tab.
- Click Orders.
- Note the orders and their status columns – Order status, Payment status, and Shipping status. If your list of orders is quite long, use the filter at the top of the list to specify exactly what you’d like to see in your list. You can filter the list in the following manner:
- Start Date and End Date: use this filtering option to view orders placed with a specific date range.
- Billing email address: Use this filter option to search for a specific order based on the customer's email address.
- Order Status: Select one of the follows: All, Pending, Processing, Complete, Cancelled.
- Payment Status: Select a specific payment status to search by: All, Pending, Authorized, Paid, Refunded, Partially Refunded, Voided. NOTE: All orders would be paid by credit card.
- Shipping Status: Select a specific shipping status to search by: All, Shipping not required, Not yet shipped, Partially shipped, Shipped, Delivered.
- Go directly to order number: This option allows you to enter the order number and click Go to display the required order.
- If filtering options have been entered, click Search. When any search is performed, the results of the search are displayed in the lower half of the screen.
- Click View in the row of the item that you wish to process. By default, all orders are by credit card payment only so your order will be marked as Paid already.
- Click the Cancel Order button.
- Click OK in the confirmation dialog box.

eCommerce Topics
View more videos and tips by selecting one of the sections below:
- eCommerce Features
- Prep the Store
- Add Products
- Place an Order
- Process an Order
- Set up products customers receive when they make a donation
FAQs
- How do my members purchase an item from my eCommerce store that is available to members only or at a special price for members, and where will that transaction appear?
- In order for Members to receive special pricing, or have access to Member only products, they will need to login to your eCommerce store using their representative login credentials. Once a purchase is made using those credentials, a transaction will appear on the account tab of the member record.
- If something goes wrong with eCommerce is there any place that shows errors messages? For example: If a customer is checking out of e-commerce and the credit card is not accepted but no error is given on-screen, is there any place where you can check for these errors?
- In eCommerce in the back office select System >Log
- Find the message by the date/time issue occurred.
- Click View and see the message under Full Message. Copy the message, this will help the Dev team to know what went wrong.
- In eCommerce in the back office select System >Log