Difference between revisions of "ECommerce"
Cpetterson (talk | contribs) |
Cpetterson (talk | contribs) |
||
| Line 13: | Line 13: | ||
|} | |} | ||
| − | + | =='''<span style="color:#800080">Getting Started'''</span>== | |
---- | ---- | ||
If you are just getting started with the eCommerce store, here is a short overview video [[File:Vid.png|link=http://www.screencast.com/users/micronet_training/folders/eCommerce/media/f5d0f069-a6b8-40c1-b346-40a585f19794]] | If you are just getting started with the eCommerce store, here is a short overview video [[File:Vid.png|link=http://www.screencast.com/users/micronet_training/folders/eCommerce/media/f5d0f069-a6b8-40c1-b346-40a585f19794]] | ||
| − | + | ==='''<span style="color:#800080">Setup Fee Items for eCommerce'''</span>=== | |
---- | ---- | ||
Fee items will need to be setup for all items you will sell through your store, as well as a fee item for shipping. See '''Working with Fee Items''' for instructions. | Fee items will need to be setup for all items you will sell through your store, as well as a fee item for shipping. See '''Working with Fee Items''' for instructions. | ||
| Line 24: | Line 24: | ||
The Fee Item type should be set to '''eCommerce'''. | The Fee Item type should be set to '''eCommerce'''. | ||
| − | + | ==='''<span style="color:#800080">Setting Up Taxes for ECommerce'''</span>=== | |
---- | ---- | ||
| Line 41: | Line 41: | ||
#Click '''Update'''. | #Click '''Update'''. | ||
| − | + | ==='''<span style="color:#800080">Shipping Setup for eCommerce'''</span>=== | |
---- | ---- | ||
| Line 58: | Line 58: | ||
|} | |} | ||
| − | + | ===='''<span style="color:#800080">Configure Rates for Fixed Rate Shipping'''</span>==== | |
---- | ---- | ||
| Line 70: | Line 70: | ||
| − | + | ===='''<span style="color:#800080">Configure Shipping by Weight'''</span>==== | |
---- | ---- | ||
| Line 101: | Line 101: | ||
|} | |} | ||
| − | + | ==='''<span style="color:#800080">Setup Product Categories'''</span>=== | |
---- | ---- | ||
Categories are used to organize your products for public view. Eight categories are already created for you but can be modified or deleted as desired. You may also remove the “Published” check-mark on any category which turns off the online display of that category. However, unless the item (product variant) itself also had the “Published” check-mark cleared, products in the category would continue to display when found through the Search command or the New Products list. | Categories are used to organize your products for public view. Eight categories are already created for you but can be modified or deleted as desired. You may also remove the “Published” check-mark on any category which turns off the online display of that category. However, unless the item (product variant) itself also had the “Published” check-mark cleared, products in the category would continue to display when found through the Search command or the New Products list. | ||
| Line 115: | Line 115: | ||
*Videos & DVDs | *Videos & DVDs | ||
| − | + | ===='''<span style="color:#800080">View/Edit Product Categories'''</span>==== | |
---- | ---- | ||
#Click '''ECommerce''' in the left-hand navigation. | #Click '''ECommerce''' in the left-hand navigation. | ||
| Line 131: | Line 131: | ||
|} | |} | ||
| − | + | ===='''<span style="color:#800080">Add a Product Category'''</span>==== | |
---- | ---- | ||
| Line 142: | Line 142: | ||
#Click '''Save'''. | #Click '''Save'''. | ||
| − | + | ==='''<span style="color:#800080">Add Products to Store'''</span>=== | |
---- | ---- | ||
Revision as of 22:49, 31 December 2018
Other Topics > eCommerce
Contents
What is the eCommerce Store?
With the eCommerce Store, you can sell items online to your members or the general public. This feature is available to users of Plus Edition and greater. Additionally, Pro Edition customers may offer consumers an unlimited number of items in the online store. Other editions display a maximum of three products at one time. The eCommerce Store works with most credit card processing services. To begin using the eCommerce Store, contact support@micronetonline.com.
|
|
NOTE: Customers with Beanstream credit card processing will not be able to have a credit card option in their cart (there is not a Beanstream compatible ecommerce plug-in available). Instead, they can have an Invoice choice in their cart if desired. To do this, after their ecommerce has been enabled, please enable the "Purchase Order" Payment method in their ecommerce cart. This selection can then be modified to say "Invoice / Purchase Order" (see MicroNet Knowledgebase article on how to do that). Also note that if the customer has items that are marked as Downloadable, then the download will not become available for the customer until either the order is marked as paid or the item is activated. See this video - http://screencast.com/t/3AresHh8 |
Getting Started
If you are just getting started with the eCommerce store, here is a short overview video ![]()
Setup Fee Items for eCommerce
Fee items will need to be setup for all items you will sell through your store, as well as a fee item for shipping. See Working with Fee Items for instructions.
The Fee Item type should be set to eCommerce.
Setting Up Taxes for ECommerce
If the products offered in your store are taxable, you will need to setup your tax providers. NOTE: Some states required taxes based on the location the product is shipped from (Fixed tax rate provider), and others require tax based on the location the product is shipped to (Tax By Country & State & Zip). Check with your own state tax revenue department for sales tax guidelines.
Fixed Tax Rate Provider Tax Setup
If your taxes are required based on the location the product is shipped from (see above), configure the following:
- Click eCommerce in the left-hand navigation panel.
- Click the Configuration tab.
- Click Tax > Tax Providers.
- Click Configure.
- In the Tax row, click the Edit button.
- Enter the tax rate.
- Click Update.
Shipping Setup for eCommerce
If shipping amounts are necessary, a Shipping Rate Computation Method must be selected and configured. Available Shipping Rate Computation methods:
- Fixed rate shipping: simple, flat-rate shipping with options to increase shipping on specific items as needed
- Shipping by weight: requires product weight to be entered for each product and broad formulas created to calculate price based on weight
- Various carriers provide their own – requires a shipper account and a website URL with appropriate login credentials with one of the major carriers (UPS, USPS, FedEx, Australia Post or Canada Post)
|
|
NOTE: The default shipping method is Fixed Rate Shipping with average prices set as the default rate. You may check and change these as needed. |
Configure Rates for Fixed Rate Shipping
- Click eCommerce in the left-hand menu.
- Click Configuration in the upper drop-down menu.
- Click Shipping.
- Click Shipping Rate Computation Methods.
- Click Configure for the Fixed Rate Shipping option. Default shipping options: In-store pickup, Standard shipping, and Rush will be listed.
- To change the Rate of a shipping method, click the Edit button.
- Enter the new Rate in the text box, and click Update.
Configure Shipping by Weight
The default shipping method is Fixed Rate Shipping with average prices set as the default rate for your system. If you wish to setup shipping based on weight, use the following procedure.
|
|
NOTE: In most cases, only one Shipping Rate Computation Method should be active at one time so that conflicting options are not presented to the purchaser. |
- Click eCommerce in the left-hand menu.
- Click Configuration in the upper drop-down menu.
- Click Shipping.
- Click Shipping Rate Computation Methods.
- Click the Edit button for Fixed Rate Shipping and clear the Is Active check-box.
- Click Update.
- Click the Edit button for the Shipping by weight option, and enable the Is Active check-box.
- Click Configure in the row that is titled Shipping by Weight.
- Click Add record to populate the values for the formula. The formula to calculate the rate is: [additional fixed cost] + ([order total weight] - [lower weight limit]) * [rate per weight unit] + [order subtotal] * [charge percentage].
- Click Save.
Repeat the steps above for each shipping method, and each weight range.
|
|
NOTE: When using the Shipping by weight option, you will also need to configure the weight for each item you sell. |
Setup Product Categories
Categories are used to organize your products for public view. Eight categories are already created for you but can be modified or deleted as desired. You may also remove the “Published” check-mark on any category which turns off the online display of that category. However, unless the item (product variant) itself also had the “Published” check-mark cleared, products in the category would continue to display when found through the Search command or the New Products list.
The following categories are created for you by default:
- Clothing
- Clothing Accessories
- Literature
- Maps
- Memorabilia & Trinkets
- Posters
- Seasonal Items
- Videos & DVDs
View/Edit Product Categories
- Click ECommerce in the left-hand navigation.
- Click the Catalog tab.
- Click Categories.
- Click Tree View or List View. A list of all of your categories will be displayed.
- Click the Edit button for the category you wish to edit.
|
|
NOTE: If you wish to remove categories from your store, you may deselect the “Published” check mark on any category which turns off the online display of that category. However, unless the item (product variant) itself also had the “Published” check-mark cleared, products in the category would continue to display when found through the Search command or the New Products list. |
Add a Product Category
- Click ECommerce in the left-hand navigation.
- Click the Catalog tab.
- Click Categories.
- Click Tree View or List View. A list of all of your categories will be displayed.
- Click the Add new button.
- Configure the category as desired.
- Click Save.
Add Products to Store
- Click ECommerce in the left-hand navigation.
- Click the Catalog tab.
- Click Manage Products.
- Click the Add new button.
- Enter a Product name. This will be the name of the product displayed in the store.
- Enter a Short description. This description will be the shorter description displayed when multiple products are displayed in your store.
- Enter a Full description. This is the description of the item on the product's page.
Processing ECommerce Orders
Watch a short video on how to Process an Order: ![]()
When an order is placed, an email notification is sent to the Store Owner address. This is initially defaulted to the address listed under Setup > Organization Information. The email template and associated settings can be found under Content Management > Message Templates. Edit the template called “OrderPlaced.StoreOwnerNotification”.
The Store Statistics on the Store Dashboard will indicate the quantity and value of orders that are incomplete.

- Click eCommerce in the left-hand menu.
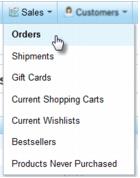
- Click Sales and select Orders from the drop-down menu.
- Note the orders and their status columns – Order status, Payment status, and Shipping status. If your list of orders is quite long, use the filter at the top of the list to specify exactly what you’d like to see in your list.
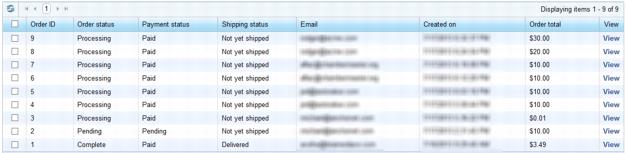
- Click View in the row of the item that you wish to process. By default, all orders are by credit card payment only so your order will be marked as Paid already.
- Click the Shipping info tab.
- Click Add shipment at the bottom of the screen.
- Enter the tracking number associated with your shipment of this item. This will vary depending on your shipping carrier and what information you desire to record for shipping records. This tracking number is also visible to customers that choose to check their order status by logging into the storefront.
- Make sure the quantity is correct for the items that will be included in this shipment. If all of the items are not ready to be shipped, you may set their quantity at 0 on this screen. The order will then display as Partially Shipped when viewing the Shipping Status on the Sales->Orders list.
- Click Save.

- The shipment will be added to this order but still not marked as “shipped” until you add a date to the shipment. The intent is that you can setup the shipment but separately indicate when the shipment actually goes out the door. At that time, place the date on this shipment. An email notification, ShipmentSent.CustomerNotification under Content Management->Message Templates, is automatically sent to the purchaser when this date is set.
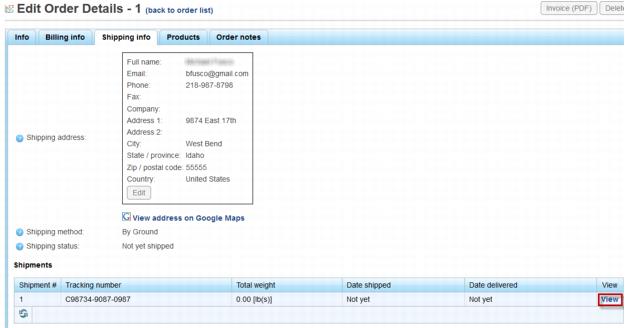
- To add a date to the shipment, click View on the row of the desired shipment. Or note that you can edit the shipment to add dates at any time by selecting Shipments from the Sales menu.
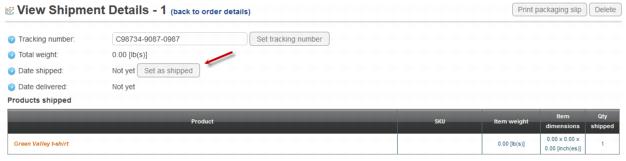
- Click the Set as shipped button. NOTE: An email notification, ShipmentSent.CustomerNotification under Content Management->Message Templates, is automatically sent to the purchaser when this date is set when the email is marked as active. This Shipped date is also visible to customers that choose to check their order status by logging into the storefront. Today’s current date and time will automatically be placed on this shipment. No other date or time may be specified and this date/time may not be undone.
- When the order has been delivered, click Set as delivered. You may return to this later at any time by selecting Shipments under the Sales menu. An email notification, ShipmentDelivered.CustomerNotification under Content Management->Message Templates, is automatically sent to the purchaser when this date is set when the email is marked as active. This Delivered date is also visible to customers that choose to check their order status by logging into the storefront. Note: The order will continue to show as “Processing” until a delivered date is added.
- Click Print Packaging slip if desired and follow on-screen instructions.


Once the order has been marked as paid, shipped, and delivered it will list as "Complete" on the Order Info tab and on the Store Dashboard.

eCommerce Topics
View more videos and tips by selecting one of the sections below:
- eCommerce Features
- Prep the Store
- Add Products
- Place an Order
- Process an Order
- Set up products customers receive when they make a donation
FAQs
- How do my members purchase an item from my eCommerce store that is available to members only or at a special price for members, and where will that transaction appear?
- In order for Members to receive special pricing, or have access to Member only products, they will need to login to your eCommerce store using their representative login credentials. Once a purchase is made using those credentials, a transaction will appear on the account tab of the member record.
- If something goes wrong with eCommerce is there any place that shows errors messages? For example: If a customer is checking out of e-commerce and the credit card is not accepted but no error is given on-screen, is there any place where you can check for these errors?
- In eCommerce in the back office select System >Log
- Find the message by the date/time issue occurred.
- Click View and see the message under Full Message. Copy the message, this will help the Dev team to know what went wrong.
- In eCommerce in the back office select System >Log